
User Manual
Page 27
...Contents Keeping yourself comfortable 49 Precautions 52 Setting up your computer 54 Setting up your software 54 Registering your computer with Toshiba ......... 55 Adding external devices 55 Connecting to a power source 56 Charging the main battery 58 Using the computer for...the power 60 Using the TouchPad 61 Control buttons 62 Disabling or enabling the TouchPad 62 Setting up a printer 63 Installing additional memory (optional 66 Removing a memory module 70 Connecting a mouse 71 Connecting a printer 71 Connecting a USB printer 71 Connecting a parallel printer 71 Using external ...
...Contents Keeping yourself comfortable 49 Precautions 52 Setting up your computer 54 Setting up your software 54 Registering your computer with Toshiba ......... 55 Adding external devices 55 Connecting to a power source 56 Charging the main battery 58 Using the computer for...the power 60 Using the TouchPad 61 Control buttons 62 Disabling or enabling the TouchPad 62 Setting up a printer 63 Installing additional memory (optional 66 Removing a memory module 70 Connecting a mouse 71 Connecting a printer 71 Connecting a USB printer 71 Connecting a parallel printer 71 Using external ...

User Manual
Page 32
... document ... 186 Viewing existing key assignments 188 Changing or removing existing key assignments 188 Hotkey utility 188 TOSHIBA Console 189 Customize Your Computer 190 Security 191 Power Management 191 Toshiba Hardware Setup 194 Chapter 8: If Something Goes Wrong 196 Problems that are easy to fix 196 Problems ...a hardware conflict 202 A plan of action 203 Resolving hardware conflicts on your own .... 203 Fixing a problem with Device Manager .......... 205 Memory module problems 207 Power and the batteries 208 Keyboard problems 209 Display problems 210 Disk drive problems 212
... document ... 186 Viewing existing key assignments 188 Changing or removing existing key assignments 188 Hotkey utility 188 TOSHIBA Console 189 Customize Your Computer 190 Security 191 Power Management 191 Toshiba Hardware Setup 194 Chapter 8: If Something Goes Wrong 196 Problems that are easy to fix 196 Problems ...a hardware conflict 202 A plan of action 203 Resolving hardware conflicts on your own .... 203 Fixing a problem with Device Manager .......... 205 Memory module problems 207 Power and the batteries 208 Keyboard problems 209 Display problems 210 Disk drive problems 212

User Manual
Page 46
... battery pack. When this light is on page 83. For more information, see "Using the cursor control overlay" on the top of the key. Underside Memory slot cover Battery release lock Battery release latch Battery pack The battery release lock keeps the battery release latch from the computer case. 46 Finding...
... battery pack. When this light is on page 83. For more information, see "Using the cursor control overlay" on the top of the key. Underside Memory slot cover Battery release lock Battery release latch Battery pack The battery release lock keeps the battery release latch from the computer case. 46 Finding...

User Manual
Page 47
See "Installing additional memory (optional)" on page 122. The memory slot cover protects the two expansion memory slots where you insert additional memory. Finding Your Way Around Underside 47 The battery pack contains the battery. For information about replacing the battery, see "Changing the main battery" on page 66 for detailed information.
See "Installing additional memory (optional)" on page 122. The memory slot cover protects the two expansion memory slots where you insert additional memory. Finding Your Way Around Underside 47 The battery pack contains the battery. For information about replacing the battery, see "Changing the main battery" on page 66 for detailed information.

User Manual
Page 54
... battery that needs to be charged before adding external or internal components to your software. 1 From the welcome screen, click Next to , a mouse, keyboard, printer, memory, and PC cards. 54 Getting Started Setting up your computer Setting up your computer TECHNICAL NOTE: You must attach the AC adapter. These components include...
... battery that needs to be charged before adding external or internal components to your software. 1 From the welcome screen, click Next to , a mouse, keyboard, printer, memory, and PC cards. 54 Getting Started Setting up your computer Setting up your computer TECHNICAL NOTE: You must attach the AC adapter. These components include...

User Manual
Page 56
..., or to operate. 56 Getting Started Connecting to a power source Before starting to use your computer, you may also want to: ❖ Add more memory (see "Installing additional memory (optional)" on page 66) ❖ Connect a mouse (see "Connecting a mouse" on page 71) ❖ Connect a local printer (see "Connecting a printer" on page 71...
..., or to operate. 56 Getting Started Connecting to a power source Before starting to use your computer, you may also want to: ❖ Add more memory (see "Installing additional memory (optional)" on page 66) ❖ Connect a mouse (see "Connecting a mouse" on page 71) ❖ Connect a local printer (see "Connecting a printer" on page 71...

User Manual
Page 66
... have both slots occupied. If you use the computer for more information). If the module is installed in various capacities (visit Toshiba's Web site at toshiba.com for a long time, the memory modules will be lost. If you replace them. Your system may want to room temperature before you use complex software or...
... have both slots occupied. If you use the computer for more information). If the module is installed in various capacities (visit Toshiba's Web site at toshiba.com for a long time, the memory modules will be lost. If you replace them. Your system may want to room temperature before you use complex software or...

User Manual
Page 67
...See "Turn Off or Shut down to locate the memory slot cover. Getting Started Installing additional memory (optional) 67 You need a standard Phillips no . 1 screwdriver, unscrew the screw that is in good condition. Memory slot cover Base of your Satellite computer 4 Using a standard Phillips no . 1 screwdriver... to the computer. 3 Close the display panel and turn the computer upside down command" on page 96. If you are adding memory after you have started to use...
...See "Turn Off or Shut down to locate the memory slot cover. Getting Started Installing additional memory (optional) 67 You need a standard Phillips no . 1 screwdriver, unscrew the screw that is in good condition. Memory slot cover Base of your Satellite computer 4 Using a standard Phillips no . 1 screwdriver... to the computer. 3 Close the display panel and turn the computer upside down command" on page 96. If you are adding memory after you have started to use...
User Manual
Page 68
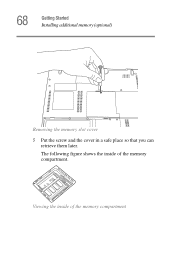
68 Getting Started Installing additional memory (optional) Removing the memory slot cover 5 Put the screw and the cover in a safe place so that you can retrieve them later. Viewing the inside of the memory compartment The following figure shows the inside of the memory compartment.
68 Getting Started Installing additional memory (optional) Removing the memory slot cover 5 Put the screw and the cover in a safe place so that you can retrieve them later. Viewing the inside of the memory compartment The following figure shows the inside of the memory compartment.
User Manual
Page 69
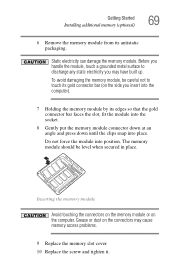
...connector bar faces the slot, fit the module into the socket. 8 Gently put the memory module connector down at an angle and press down until the clips snap into place. To avoid damaging the memory module, be level when secured in place. Grease or dust on the connectors may have... built up. Do not force the module into the computer). 7 Holding the memory module by its antistatic packaging. Static electricity can damage the memory module. Before you handle the module, touch a grounded metal surface to touch its gold connector bar (on the computer....
...connector bar faces the slot, fit the module into the socket. 8 Gently put the memory module connector down at an angle and press down until the clips snap into place. To avoid damaging the memory module, be level when secured in place. Grease or dust on the connectors may have... built up. Do not force the module into the computer). 7 Holding the memory module by its antistatic packaging. Static electricity can damage the memory module. Before you handle the module, touch a grounded metal surface to touch its gold connector bar (on the computer....
User Manual
Page 70
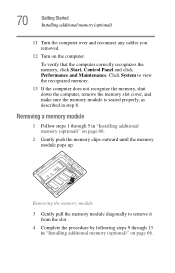
... pops up. Click System to remove it from the slot. 4 Complete the procedure by following steps 9 through 5 in "Installing additional memory (optional)" on the computer. 70 Getting Started Installing additional memory (optional) 11 Turn the computer over and reconnect any cables you removed. 12 Turn on page 66. To verify that the...
... pops up. Click System to remove it from the slot. 4 Complete the procedure by following steps 9 through 5 in "Installing additional memory (optional)" on the computer. 70 Getting Started Installing additional memory (optional) 11 Turn the computer over and reconnect any cables you removed. 12 Turn on page 66. To verify that the...
User Manual
Page 75
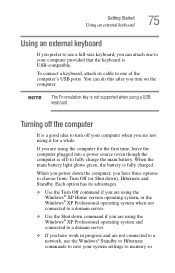
..., you have work in progress and are not connected to a network, use the Windows® Standby or Hibernate commands to save your system settings to memory so Each option has its cable to one to your computer provided that the keyboard is a good idea to fully charge the main battery. If...
..., you have work in progress and are not connected to a network, use the Windows® Standby or Hibernate commands to save your system settings to memory so Each option has its cable to one to your computer provided that the keyboard is a good idea to fully charge the main battery. If...
User Manual
Page 79
... Basics This chapter lists some computing tips and provides important information about basic features. You will lose all unsaved work temporarily stays in the computer's memory until you save feature which you are working. This feature saves your battery runs out of charge while you can be configured to the hard...
... Basics This chapter lists some computing tips and provides important information about basic features. You will lose all unsaved work temporarily stays in the computer's memory until you save feature which you are working. This feature saves your battery runs out of charge while you can be configured to the hard...

User Manual
Page 97
... but it first saves the current state of the computer to the hard disk. Restoring information from the hard disk takes longer than restarting from memory. Since Hibernation mode does not require power to system settings. Hibernation command The Hibernation command shuts the computer down completely, but automatically powers up the...
... but it first saves the current state of the computer to the hard disk. Restoring information from the hard disk takes longer than restarting from memory. Since Hibernation mode does not require power to system settings. Hibernation command The Hibernation command shuts the computer down completely, but automatically powers up the...
User Manual
Page 98
... which you left it , including all open programs and files you left off. Standby holds the current state of memory. ❖ When starting up again, the computer returns to the state in memory so that, when you restart the computer, you were using. If the battery discharges, your data will be lost...
... which you left it , including all open programs and files you left off. Standby holds the current state of memory. ❖ When starting up again, the computer returns to the state in memory so that, when you restart the computer, you were using. If the battery discharges, your data will be lost...
User Manual
Page 110
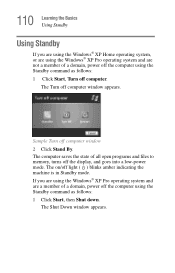
...® XP Home operating system, or are using the Windows® XP Pro operating system and are a member of all open programs and files to memory, turns off computer window 2 Click Stand By. The on/off computer window appears. The Shut Down window appears. The Turn off light ( ) blinks amber indicating...
...® XP Home operating system, or are using the Windows® XP Pro operating system and are a member of all open programs and files to memory, turns off computer window 2 Click Stand By. The on/off computer window appears. The Shut Down window appears. The Turn off light ( ) blinks amber indicating...
User Manual
Page 111
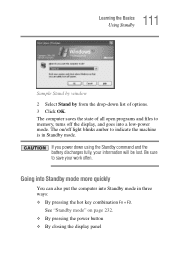
...-down using the Standby command and the battery discharges fully, your work often. If you power down list of all open programs and files to memory, turns off light blinks amber to save your information will be lost. Going into Standby mode more quickly You can also put the computer into...
...-down using the Standby command and the battery discharges fully, your work often. If you power down list of all open programs and files to memory, turns off light blinks amber to save your information will be lost. Going into Standby mode more quickly You can also put the computer into...

User Manual
Page 116
... docking station for an extended period, more than on battery power. For optimum DVD performance, Toshiba recommends that will provide the most stable operating environment and optimum system performance for all batteries. ...maximum capacity and will lose its maximum capacity, operate the computer on battery power at : toshiba.com. In addition, the computer has an internal real-time clock (RTC) battery. If .... The battery may vary depending on usage. To purchase a new battery pack, visit the Toshiba Web site at least once a month until the battery is fully discharged. To ensure that ...
... docking station for an extended period, more than on battery power. For optimum DVD performance, Toshiba recommends that will provide the most stable operating environment and optimum system performance for all batteries. ...maximum capacity and will lose its maximum capacity, operate the computer on battery power at : toshiba.com. In addition, the computer has an internal real-time clock (RTC) battery. If .... The battery may vary depending on usage. To purchase a new battery pack, visit the Toshiba Web site at least once a month until the battery is fully discharged. To ensure that ...

User Manual
Page 122
...two options-connect the computer to save your information will be lost . The Control Panel window appears. 2 Click Performance and Maintenance. 3 Click the Toshiba Power Saver icon. Do not scratch or break the casing and do not drop, hit or otherwise impact the battery. If your battery discharges fully... Panel. When handling a battery, be lost . To set the alarm, as desired. Changing the main battery When your battery power is in memory will be careful not to Turn Off or Shut down when the alarm goes off. Data in Standby mode. 122 Mobile Computing Changing the main...
...two options-connect the computer to save your information will be lost . The Control Panel window appears. 2 Click Performance and Maintenance. 3 Click the Toshiba Power Saver icon. Do not scratch or break the casing and do not drop, hit or otherwise impact the battery. If your battery discharges fully... Panel. When handling a battery, be lost . To set the alarm, as desired. Changing the main battery When your battery power is in memory will be careful not to Turn Off or Shut down when the alarm goes off. Data in Standby mode. 122 Mobile Computing Changing the main...
User Manual
Page 179
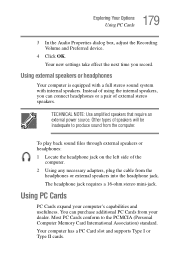
... or headphones Your computer is equipped with a full stereo sound system with internal speakers. Instead of speakers will be inadequate to the PCMCIA (Personal Computer Memory Card International Association) standard. TECHNICAL NOTE: Use amplified speakers that require an external power source. 179 Exploring Your Options Using PC Cards 3 In the Audio...
... or headphones Your computer is equipped with a full stereo sound system with internal speakers. Instead of speakers will be inadequate to the PCMCIA (Personal Computer Memory Card International Association) standard. TECHNICAL NOTE: Use amplified speakers that require an external power source. 179 Exploring Your Options Using PC Cards 3 In the Audio...


