User Manual
Page 5
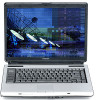
... to make changes in their equipment, operations or procedures. Connection to party line service is subject to the telephone network, the telephone company may be required. Contact the state public utility commission, public service commission or corporation commission for repair or limited warranty information, please contact Toshiba Corporation, Toshiba America Information Systems, Inc. If these changes might affect your service or the operation of...
... to make changes in their equipment, operations or procedures. Connection to party line service is subject to the telephone network, the telephone company may be required. Contact the state public utility commission, public service commission or corporation commission for repair or limited warranty information, please contact Toshiba Corporation, Toshiba America Information Systems, Inc. If these changes might affect your service or the operation of...
User Manual
Page 27
... 51 Opening the display panel 51 Your computer's features and specifications ....52 Turning on the power 52 Adding memory (optional 53 Installing a memory module 54 Removing a memory module 59 Using the TouchPad 61 Scrolling with the TouchPad 62 Control buttons 62 Disabling or enabling the TouchPad 62 Using the Dual Mode Pad 64 Scrolling with the Dual Mode Pad 65 Using the Control buttons 65 Using Tap Zones 65 Using the Virtual Buttons 66 Disabling or enabling the Dual Mode Pad .........67 Using external display devices 68 Directing the display output when you turn on...
... 51 Opening the display panel 51 Your computer's features and specifications ....52 Turning on the power 52 Adding memory (optional 53 Installing a memory module 54 Removing a memory module 59 Using the TouchPad 61 Scrolling with the TouchPad 62 Control buttons 62 Disabling or enabling the TouchPad 62 Using the Dual Mode Pad 64 Scrolling with the Dual Mode Pad 65 Using the Control buttons 65 Using Tap Zones 65 Using the Virtual Buttons 66 Disabling or enabling the Dual Mode Pad .........67 Using external display devices 68 Directing the display output when you turn on...

User Manual
Page 54
... or Hibernation mode, data will become hot. To avoid damaging the computer's screws, use the computer for this happens, let the module cool to room temperature before you install or remove a memory module, turn off the computer using the Start menu. Installing a memory module Additional memory modules can install one or two memory modules. The computer has two memory slots-Slot A and Slot B. 54 Getting Started Adding memory (optional) NOTE Before adding external devices or memory, Toshiba recommends setting up your software. If...
... or Hibernation mode, data will become hot. To avoid damaging the computer's screws, use the computer for this happens, let the module cool to room temperature before you install or remove a memory module, turn off the computer using the Start menu. Installing a memory module Additional memory modules can install one or two memory modules. The computer has two memory slots-Slot A and Slot B. 54 Getting Started Adding memory (optional) NOTE Before adding external devices or memory, Toshiba recommends setting up your software. If...
User Manual
Page 56
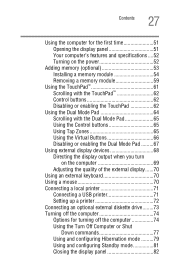
...unscrewing the memory module slot cover 7 Remove the memory slot cover. 8 Place the screw and the cover in a safe place so that you can damage the memory module. Grease or dust on the connectors may cause memory access problems. 10 Insert the memory module into the computer. 9 Remove the new memory module from its ... damaging the memory module, be careful not to discharge any static electricity you insert into the socket on the computer. Before you handle the module, touch a grounded metal surface to touch its antistatic packaging. 56 Getting Started Adding memory (optional) Front of...
...unscrewing the memory module slot cover 7 Remove the memory slot cover. 8 Place the screw and the cover in a safe place so that you can damage the memory module. Grease or dust on the connectors may cause memory access problems. 10 Insert the memory module into the computer. 9 Remove the new memory module from its ... damaging the memory module, be careful not to discharge any static electricity you insert into the socket on the computer. Before you handle the module, touch a grounded metal surface to touch its antistatic packaging. 56 Getting Started Adding memory (optional) Front of...
User Manual
Page 59
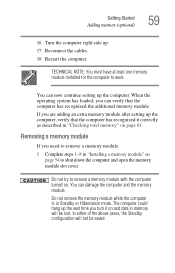
... the computer and open the memory module slot cover. TECHNICAL NOTE: You must have at least one memory module installed for the computer to remove a memory module: 1 Complete steps 1-8 in "Installing a memory module" on and data in Standby or Hibernation mode. You can verify that the computer has recognized it on page 54 to remove a memory module with the computer turned on page 61. When the operating system has loaded...
... the computer and open the memory module slot cover. TECHNICAL NOTE: You must have at least one memory module installed for the computer to remove a memory module: 1 Complete steps 1-8 in "Installing a memory module" on and data in Standby or Hibernation mode. You can verify that the computer has recognized it on page 54 to remove a memory module with the computer turned on page 61. When the operating system has loaded...
User Manual
Page 60
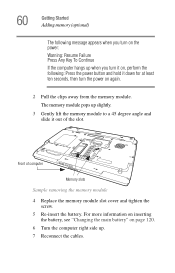
... turn on the power: Warning: Resume Failure Press Any Key To Continue If the computer hangs up slightly. 3 Gently lift the memory module to a 45 degree angle and slide it out of computer Memory slots Sample removing the memory module 4 Replace the memory module slot cover and tighten the screw. 5 Re-insert the battery. For more information on inserting the battery, see "Changing the main battery" on page 120. 6 Turn...
... turn on the power: Warning: Resume Failure Press Any Key To Continue If the computer hangs up slightly. 3 Gently lift the memory module to a 45 degree angle and slide it out of computer Memory slots Sample removing the memory module 4 Replace the memory module slot cover and tighten the screw. 5 Re-insert the battery. For more information on inserting the battery, see "Changing the main battery" on page 120. 6 Turn...
User Manual
Page 61
If the computer does not recognize the memory configuration, turn off the computer, remove the memory slot cover, and check that the computer has recognized the change. Using the TouchPad™ The TouchPad, the small, smooth square cutout located in the direction you to move the cursor with the socket clips. Getting Started Using the TouchPad™ 61 8 Restart the computer. Simply move it to the...
If the computer does not recognize the memory configuration, turn off the computer, remove the memory slot cover, and check that the computer has recognized the change. Using the TouchPad™ The TouchPad, the small, smooth square cutout located in the direction you to move the cursor with the socket clips. Getting Started Using the TouchPad™ 61 8 Restart the computer. Simply move it to the...
User Manual
Page 68
... type of the computer. 2 Connect the device's power cable to a live electrical outlet. 3 Turn on page 241). Using external display devices Your computer comes with a built-in LCD display, but you can easily attach an external monitor or projector to your operating system and devices. 68 Getting Started Using external display devices NOTE The Fn + F9 shortcut can be used to disable or enable the Dual Mode Pad (see "Disabling or enabling the TouchPad or Dual Mode Pad" on the external device. 4 Set the display mode...
... type of the computer. 2 Connect the device's power cable to a live electrical outlet. 3 Turn on page 241). Using external display devices Your computer comes with a built-in LCD display, but you can easily attach an external monitor or projector to your operating system and devices. 68 Getting Started Using external display devices NOTE The Fn + F9 shortcut can be used to disable or enable the Dual Mode Pad (see "Disabling or enabling the TouchPad or Dual Mode Pad" on the external device. 4 Set the display mode...
User Manual
Page 193
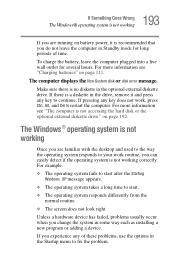
... is no diskette in the Startup menu to start after the Starting Windows XP message appears. ❖ The operating system takes a long time to fix the problem. Make sure there is a diskette in the drive, remove it is recommended that you do not leave the computer in some way such as installing a new program or adding a device. The computer displays the Non-System disk or disk error message.
... is no diskette in the Startup menu to start after the Starting Windows XP message appears. ❖ The operating system takes a long time to fix the problem. Make sure there is a diskette in the drive, remove it is recommended that you do not leave the computer in some way such as installing a new program or adding a device. The computer displays the Non-System disk or disk error message.

User Manual
Page 200
... using functions. A Help and Support window for these first: 1 Click Start, Turn off the computer automatically. 3 Remove the memory module, following the instructions in the dialog box vary from one device to be device-related. The operating system shuts down and turns off computer. 2 Click Turn Off. Memory problems Incorrectly connected or faulty memory modules may include: ❖ The General tab, which provides basic information about Device Manager, refer to the monitor, optional external DVD-ROM, optional external diskette drive...
... using functions. A Help and Support window for these first: 1 Click Start, Turn off the computer automatically. 3 Remove the memory module, following the instructions in the dialog box vary from one device to be device-related. The operating system shuts down and turns off computer. 2 Click Turn Off. Memory problems Incorrectly connected or faulty memory modules may include: ❖ The General tab, which provides basic information about Device Manager, refer to the monitor, optional external DVD-ROM, optional external diskette drive...
User Manual
Page 204
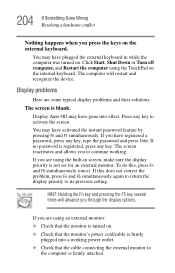
... activate the screen. If you are using an external monitor: ❖ Check that the monitor is registered, press any key to its previous setting. You may have registered a password, press any key, type the password and press Enter. Display Auto Off may have activated the instant password feature by pressing Fn and F1 simultaneously. Press any key. If no password is turned on the internal keyboard. If you are some typical display problems...
... activate the screen. If you are using an external monitor: ❖ Check that the monitor is registered, press any key to its previous setting. You may have registered a password, press any key, type the password and press Enter. Display Auto Off may have activated the instant password feature by pressing Fn and F1 simultaneously. Press any key. If no password is turned on the internal keyboard. If you are some typical display problems...
User Manual
Page 219
... Windows XP wireless management facility does not work. DVD operating problems If you experience a problem playing DVDs, you have tried several discs and all fail, consider sending your display settings: ❖ Click Start, Control Panel, Appearance and Themes, and double-click Display. ❖ Click on the Settings tab and check the Color Palette. If it cleaned. If the documentation that the Display properties are using an external Wi-Fi adapter (a PC Card, USB adapter...
... Windows XP wireless management facility does not work. DVD operating problems If you experience a problem playing DVDs, you have tried several discs and all fail, consider sending your display settings: ❖ Click Start, Control Panel, Appearance and Themes, and double-click Display. ❖ Click on the Settings tab and check the Color Palette. If it cleaned. If the documentation that the Display properties are using an external Wi-Fi adapter (a PC Card, USB adapter...
User Manual
Page 245
...; (Microsoft® Windows® XP or 2000) Click the Start button, and select All Programs, TOSHIBA, Networking, ConfigFree. ❖ Double-click the ConfigFree icon on page 259. ConfigFree also includes a screen saver that you switch between network configurations. For more information, see the Help File included in the application. Starting ConfigFree To start and setup ConfigFree. Click Options on setting up and using ConfigFree, see...
...; (Microsoft® Windows® XP or 2000) Click the Start button, and select All Programs, TOSHIBA, Networking, ConfigFree. ❖ Double-click the ConfigFree icon on page 259. ConfigFree also includes a screen saver that you switch between network configurations. For more information, see the Help File included in the application. Starting ConfigFree To start and setup ConfigFree. Click Options on setting up and using ConfigFree, see...
User Manual
Page 276
... many Toshiba notebook computers that saves to the earth, and is connected to the hard disk the current state of your work , including all components of programs and data. hot key - (1) A feature in which all open files and programs, when you turn on the keyboard. The physical components of keys that are used for voltages in a computer is referred to as the battery save mode. (2) A key...
... many Toshiba notebook computers that saves to the earth, and is connected to the hard disk the current state of your work , including all components of programs and data. hot key - (1) A feature in which all open files and programs, when you turn on the keyboard. The physical components of keys that are used for voltages in a computer is referred to as the battery save mode. (2) A key...
User Manual
Page 283
...-esse 161 audio .wav files 140 audio features 140 B backing up files 86 battery changing 120 charge indicator light 49, 113 charge not lasting 202 charging 47, 50 conserving power 117 disposal 126 low charge 116 monitoring power 49, 113 not charging 201 power usage hot key 119 power usage mode 237 real-time clock (RTC) 110 removing 121 BIOS setup see Toshiba Hardware Setup button power 52 start 130 C CD creating 104 playing an audio 103 CD/DVD button functionality 100 283
...-esse 161 audio .wav files 140 audio features 140 B backing up files 86 battery changing 120 charge indicator light 49, 113 charge not lasting 202 charging 47, 50 conserving power 117 disposal 126 low charge 116 monitoring power 49, 113 not charging 201 power usage hot key 119 power usage mode 237 real-time clock (RTC) 110 removing 121 BIOS setup see Toshiba Hardware Setup button power 52 start 130 C CD creating 104 playing an audio 103 CD/DVD button functionality 100 283

User Manual
Page 284
... files/trouble accessing a disk 206 running slow 207 diskette drive cannot insert a diskette 208 cannot read a diskette 208 connecting 73 external, connecting 73 display does not look normal/flickers 205 external monitor not working 206 screen is blank 204 display device external 68 display output settings 69 display, external adjusting 70 disposal information 25 disposing of used batteries 126 DMA (Direct Memory Access) 197 double-click 62, 65 DVD player general problems 219 DVD-ROM drive problems 209 troubleshooting 209 DVD-ROM/multi-function drive problems...
... files/trouble accessing a disk 206 running slow 207 diskette drive cannot insert a diskette 208 cannot read a diskette 208 connecting 73 external, connecting 73 display does not look normal/flickers 205 external monitor not working 206 screen is blank 204 display device external 68 display output settings 69 display, external adjusting 70 disposal information 25 disposing of used batteries 126 DMA (Direct Memory Access) 197 double-click 62, 65 DVD player general problems 219 DVD-ROM drive problems 209 troubleshooting 209 DVD-ROM/multi-function drive problems...

User Manual
Page 285
285 Index computer-friendly 40 error messages device driver conflict 196 general hardware problem 196 non-system disk or disk error 193, 208 problem with display settings/ current settings not working with hardware 205 program has performed an illegal operation 190 warning resume failure 192 Error-checking 207 Ethernet LAN port 135 expansion memory slot 56 exploring the desktop 128 external monitor not working 206 mouse 70 external diskette drive connecting 73 external display, adjusting 70 F FAT (File Allocation Table) 207...
285 Index computer-friendly 40 error messages device driver conflict 196 general hardware problem 196 non-system disk or disk error 193, 208 problem with display settings/ current settings not working with hardware 205 program has performed an illegal operation 190 warning resume failure 192 Error-checking 207 Ethernet LAN port 135 expansion memory slot 56 exploring the desktop 128 external monitor not working 206 mouse 70 external diskette drive connecting 73 external display, adjusting 70 F FAT (File Allocation Table) 207...
User Manual
Page 286
... or removing existing 163 keyboard character keys 87 function keys 88 hot keys 242 not working 192 overlay keys 89 troubleshooting 203 Windows special keys 89 keyboard, external 70 keyboard, full-size 87 keyboard, PS/2-compatible 70 M main battery removing 121 memory adding 53 problem solving 200 removing expansion slot cover 56 memory module inserting 57 installation 54 removing 60 microphone 141 modem determining COM port 132 problem solving 215 resetting port to default settings 132 upgrading 132 monitor 68 connecting 68 not working 204 mouse installing 70 serial 70 N network accessing 134
... or removing existing 163 keyboard character keys 87 function keys 88 hot keys 242 not working 192 overlay keys 89 troubleshooting 203 Windows special keys 89 keyboard, external 70 keyboard, full-size 87 keyboard, PS/2-compatible 70 M main battery removing 121 memory adding 53 problem solving 200 removing expansion slot cover 56 memory module inserting 57 installation 54 removing 60 microphone 141 modem determining COM port 132 problem solving 215 resetting port to default settings 132 upgrading 132 monitor 68 connecting 68 not working 204 mouse installing 70 serial 70 N network accessing 134
User Manual
Page 287
...-Up Networking Wizard 134 networking wireless 134 O opening the display panel 51 other documentation 38 overlay keys 89 P password deleting a supervisor 159 disabling a user 157 supervisor set up 157 types 155 passwords instant, using 156 PC Card checklist 211 CIS (Card Information Structure) 211 computer stops working 212 configuring 145 errors 213 hot swapping fails 213 inserting 143, 145 modem default 132 not recognized 213 problem solving 210, 212 removing 144, 146 setting up...
...-Up Networking Wizard 134 networking wireless 134 O opening the display panel 51 other documentation 38 overlay keys 89 P password deleting a supervisor 159 disabling a user 157 supervisor set up 157 types 155 passwords instant, using 156 PC Card checklist 211 CIS (Card Information Structure) 211 computer stops working 212 configuring 145 errors 213 hot swapping fails 213 inserting 143, 145 modem default 132 not recognized 213 problem solving 210, 212 removing 144, 146 setting up...
User Manual
Page 288
... Device Manager 198 disabling a device 199 disk drive is slow 207 display is blank 204 external display not working 206 external monitor 204 faulty memory 200 hardware conflict 196, 197 high-pitched noise 210 illegal operation 190 Internet bookmarked site not found 195 Internet connection is slow 195 keyboard not responding 192 missing files/trouble accessing a disk 206 modem not receiving or transmitting 215 no sound 210 non-system disk or disk error 193, 208 PC Card...
... Device Manager 198 disabling a device 199 disk drive is slow 207 display is blank 204 external display not working 206 external monitor 204 faulty memory 200 hardware conflict 196, 197 high-pitched noise 210 illegal operation 190 Internet bookmarked site not found 195 Internet connection is slow 195 keyboard not responding 192 missing files/trouble accessing a disk 206 modem not receiving or transmitting 215 no sound 210 non-system disk or disk error 193, 208 PC Card...


