

User Manual
Page 2
... Pentium are accurate for personal use or use of Eastman Kodak. Windows and Microsoft are subject to change without the prior written permission of SRS Labs, Inc. TOSHIBA Satellite A100/Satellite Pro A100 Portable Personal Computer User's Manual First edition December 2005 Copyright authority for damages incurred directly or indirectly from this manual cannot be reproduced only for the TOSHIBA Satellite A100/Satellite Pro A100 Portable Personal Computer at...
... Pentium are accurate for personal use or use of Eastman Kodak. Windows and Microsoft are subject to change without the prior written permission of SRS Labs, Inc. TOSHIBA Satellite A100/Satellite Pro A100 Portable Personal Computer User's Manual First edition December 2005 Copyright authority for damages incurred directly or indirectly from this manual cannot be reproduced only for the TOSHIBA Satellite A100/Satellite Pro A100 Portable Personal Computer at...

User Manual
Page 9
... network. When practical, they may temporarily discontinue service. If problems arise If any message via a telephone fax machine unless such message clearly contains in advance of TOSHIBA Corporation. If advance notice is not operating properly, you with the FCC. In order to file a complaint with the best service it , the telephone company will provide this disconnection. If these changes...
... network. When practical, they may temporarily discontinue service. If problems arise If any message via a telephone fax machine unless such message clearly contains in advance of TOSHIBA Corporation. If advance notice is not operating properly, you with the FCC. In order to file a complaint with the best service it , the telephone company will provide this disconnection. If these changes...
User Manual
Page 27
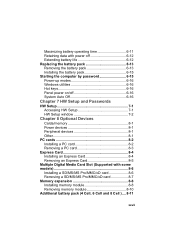
... Starting the computer by password 6-15 Power-up modes 6-16 Windows utilities 6-16 Hot keys 6-16 Panel power on/off 6-16 System Auto Off 6-16 Chapter 7 HW Setup and Passwords HW Setup 7-1 Accessing HW Setup 7-1 HW Setup window 7-2 Chapter 8 Optional Devices Cards/memory 8-1 Power devices 8-1 Peripheral devices 8-1 Other 8-1 PC cards 8-2 Installing a PC card 8-2 Removing a PC card 8-3 Express Card 8-4 Installing an Express Card 8-4 Removing an Express Card 8-5 Multiple Digital Media Card Slot (Supported with some models 8-6 Installing a SD/MS/MS Pro/MMC/xD card 8-6 Removing...
... Starting the computer by password 6-15 Power-up modes 6-16 Windows utilities 6-16 Hot keys 6-16 Panel power on/off 6-16 System Auto Off 6-16 Chapter 7 HW Setup and Passwords HW Setup 7-1 Accessing HW Setup 7-1 HW Setup window 7-2 Chapter 8 Optional Devices Cards/memory 8-1 Power devices 8-1 Peripheral devices 8-1 Other 8-1 PC cards 8-2 Installing a PC card 8-2 Removing a PC card 8-3 Express Card 8-4 Installing an Express Card 8-4 Removing an Express Card 8-5 Multiple Digital Media Card Slot (Supported with some models 8-6 Installing a SD/MS/MS Pro/MMC/xD card 8-6 Removing...
User Manual
Page 31
... tips on setting up your work area. Chapter 5, The Keyboard, describes special keyboard functions including the keypad overlay and hot keys. This powerful, lightweight notebook computer is an overview of computers or if you're new to begin using your computer, basic operations and care, using the Touch Pad, optical media drive, external diskette drive, Wireless LAN, LANs, Audio/Video controls and internal modem. If you are a new user of the computer's features, capabilities, and options. Manual contents This manual is...
... tips on setting up your work area. Chapter 5, The Keyboard, describes special keyboard functions including the keypad overlay and hot keys. This powerful, lightweight notebook computer is an overview of computers or if you're new to begin using your computer, basic operations and care, using the Touch Pad, optical media drive, external diskette drive, Wireless LAN, LANs, Audio/Video controls and internal modem. If you are a new user of the computer's features, capabilities, and options. Manual contents This manual is...
User Manual
Page 47
Software Operating System TOSHIBA Utilities Plug and Play Windows® XP Professional or Home Edition is available. When you connect an external device to the computer or when you install a component, Plug and Play capability enables the system to recognize the connection and make your computer more convenient to use. A number of this chapter. This switch turns the Wireless LAN and Blurtooth function on 256 bit encryption algorithm (Atheros module type). Refer...
Software Operating System TOSHIBA Utilities Plug and Play Windows® XP Professional or Home Edition is available. When you connect an external device to the computer or when you install a component, Plug and Play capability enables the system to recognize the connection and make your computer more convenient to use. A number of this chapter. This switch turns the Wireless LAN and Blurtooth function on 256 bit encryption algorithm (Atheros module type). Refer...

User Manual
Page 50
... the Control Panel and select the TOSHIBA Power Saver icon. RecordNow! To start the utility, click the Windows Start button and click Control Panel. This utility allows you work in several formats including audio CDs that provides easy access to DVD+RW, DVD-RW or CD-RW disc via a drive letter like a floppy disk or other removable disks. INTRODUCTION User's Manual Utilities This section describes preinstalled utilities and tells how to store the files and folderson your hard disk drive.
... the Control Panel and select the TOSHIBA Power Saver icon. RecordNow! To start the utility, click the Windows Start button and click Control Panel. This utility allows you work in several formats including audio CDs that provides easy access to DVD+RW, DVD-RW or CD-RW disc via a drive letter like a floppy disk or other removable disks. INTRODUCTION User's Manual Utilities This section describes preinstalled utilities and tells how to store the files and folderson your hard disk drive.
User Manual
Page 55
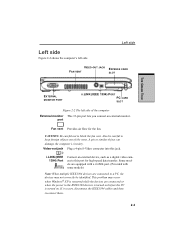
...'s left side of the vents. If it occurs, disconnect the IEEE1394 cables and then reconnect them.. 2-3 Some models are equipped with a i.LINK port. (Provided with some models) Note: When multiple IEEE1394 devices are connected or when the power to this jack. Left side VIDEO-OUT JACK FAN VENT EXPRESS CARD SLOT THE GRAND TOUR EXTERNAL MONITOR PORT II.LINK (IEEE 1394) PORT PC CARD SLOT Figure 2-2 The left side.
...'s left side of the vents. If it occurs, disconnect the IEEE1394 cables and then reconnect them.. 2-3 Some models are equipped with a i.LINK port. (Provided with some models) Note: When multiple IEEE1394 devices are connected or when the power to this jack. Left side VIDEO-OUT JACK FAN VENT EXPRESS CARD SLOT THE GRAND TOUR EXTERNAL MONITOR PORT II.LINK (IEEE 1394) PORT PC CARD SLOT Figure 2-2 The left side.
User Manual
Page 64
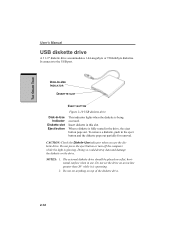
... pops out partially for removal. Insert diskette in use the diskette drive. CAUTION: Check the Disk-In-Use indicator when you use . To remove a diskette, push in the drive, the eject button pops out. When a diskette is operating. 2. DISK-IN-USE INDICATOR DISKETTE SLOT EJECT BUTTON Figure 2-10 USB diskette drive Disk-In-Use Indicator Diskette slot Eject button This indicator lights when the diskette is glowing. THE GRAND TOUR User's Manual USB diskette drive A 3 1/2" diskette drive accommodates 1.44-megabyte...
... pops out partially for removal. Insert diskette in use the diskette drive. CAUTION: Check the Disk-In-Use indicator when you use . To remove a diskette, push in the drive, the eject button pops out. When a diskette is operating. 2. DISK-IN-USE INDICATOR DISKETTE SLOT EJECT BUTTON Figure 2-10 USB diskette drive Disk-In-Use Indicator Diskette slot Eject button This indicator lights when the diskette is glowing. THE GRAND TOUR User's Manual USB diskette drive A 3 1/2" diskette drive accommodates 1.44-megabyte...

User Manual
Page 78
..., open Performance and Maintenance and open TOSHIBA Power Saver. 3-10 This feature must be lost. 4. See Chapter 5, Keyboard, for the duration set by shutting down the computer in hibernation mode or in the Control Panel. Close the display panel. Refer to the Setup Action tab in Power Saver Utility described in memory will be enabled. Press the power button. In Windows® XP, open Performance and Maintenance and open TOSHIBA Power Saver. 3. Do not install or remove a memory module...
..., open Performance and Maintenance and open TOSHIBA Power Saver. 3-10 This feature must be lost. 4. See Chapter 5, Keyboard, for the duration set by shutting down the computer in hibernation mode or in the Control Panel. Close the display panel. Refer to the Setup Action tab in Power Saver Utility described in memory will be enabled. Press the power button. In Windows® XP, open Performance and Maintenance and open TOSHIBA Power Saver. 3. Do not install or remove a memory module...
User Manual
Page 116
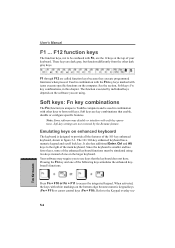
... keys: Fn key combinations, in combination with soft-key operations. Soft-key settings are called function keys because they execute programmed functions when pressed. Refer to use keys that enable, disable or configure specific features. Soft keys: Fn key combinations The Fn (function) is designed to form soft keys. Emulating keys on the larger keyboard. F12 function keys The function keys, not to Toshiba computers and is smaller and has fewer keys, some of your keyboard. Since the keyboard...
... keys: Fn key combinations, in combination with soft-key operations. Soft-key settings are called function keys because they execute programmed functions when pressed. Refer to use keys that enable, disable or configure specific features. Soft keys: Fn key combinations The Fn (function) is designed to form soft keys. Emulating keys on the larger keyboard. F12 function keys The function keys, not to Toshiba computers and is smaller and has fewer keys, some of your keyboard. Since the keyboard...
User Manual
Page 146
... than one of those above does not change the boot drive, follow the steps below. 1. If your operating system does not support USB, you want and press Enter. Use the up on Keyboard When this option to start the computer. 2. HW SETUP AND PASSWORDS User's Manual To change the boot priority settings in standby mode. Hold down cursor keys to select boot device you can turn on Keyboard. Keyboard Wake-up on the computer by...
... than one of those above does not change the boot drive, follow the steps below. 1. If your operating system does not support USB, you want and press Enter. Use the up on Keyboard When this option to start the computer. 2. HW SETUP AND PASSWORDS User's Manual To change the boot priority settings in standby mode. Hold down cursor keys to select boot device you can turn on Keyboard. Keyboard Wake-up on the computer by...
User Manual
Page 155
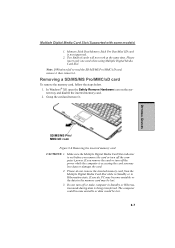
OPTIONAL DEVICES Multiple Digital Media Card Slot (Supported with some models) 1. In Windows® XP, open the Safely Remove Hardware icon on the system tray and disable the inserted memory card. 2. SD/MS/MS PRO/ MMC/XD CARD Figure 8-6 Removing the inserted memory card CAUTIONS: 1. If you may be lost . 3. Do not turn off the computer's power. Note: If Windows fail to read the SD/MS/MS Pro/MMC/xD card, remove it then reinsert it . Grasp...
OPTIONAL DEVICES Multiple Digital Media Card Slot (Supported with some models) 1. In Windows® XP, open the Safely Remove Hardware icon on the system tray and disable the inserted memory card. 2. SD/MS/MS PRO/ MMC/XD CARD Figure 8-6 Removing the inserted memory card CAUTIONS: 1. If you may be lost . 3. Do not turn off the computer's power. Note: If Windows fail to read the SD/MS/MS Pro/MMC/xD card, remove it then reinsert it . Grasp...
User Manual
Page 156
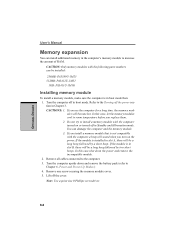
... Modes.) 4. OPTIONAL DEVICES User's Manual Memory expansion You can install additional memory in the computer's memory module to the computer. 3. In this case shut down and remove the battery pack (refer to room temperature before you use the computer for a long time, the memory modules will become hot. Turn the computer upside down the power and remove the incompatible module. 2. If the module is not compatible with the computer, a beep will sound...
... Modes.) 4. OPTIONAL DEVICES User's Manual Memory expansion You can install additional memory in the computer's memory module to the computer. 3. In this case shut down and remove the battery pack (refer to room temperature before you use the computer for a long time, the memory modules will become hot. Turn the computer upside down the power and remove the incompatible module. 2. If the module is not compatible with the computer, a beep will sound...
User Manual
Page 158
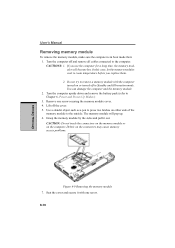
... and the memory module. 2. Grasp the memory module by the sides and pull it with the computer turned on either side of the memory module to the computer. Remove one screw. 8-10 In this case, let the memory modules cool to Chapter 6, Power and Power-Up Modes.) 3. If you replace them. 2. Do not try to remove a memory module with one screw securing the memory module cover. 4. OPTIONAL DEVICES User's Manual Removing memory module To remove the memory module, make sure the...
... and the memory module. 2. Grasp the memory module by the sides and pull it with the computer turned on either side of the memory module to the computer. Remove one screw. 8-10 In this case, let the memory modules cool to Chapter 6, Power and Power-Up Modes.) 3. If you replace them. 2. Do not try to remove a memory module with one screw securing the memory module cover. 4. OPTIONAL DEVICES User's Manual Removing memory module To remove the memory module, make sure the...

User Manual
Page 202
... format This command controls whether result codes (including call progress monitoring This command selects which result codes will be used by the modem. NECT X2 Enable Disable OK, RING, NO CARRIER, ERROR, NODI- ALTONE, CONNECT X3 Disable Enable X4 (default) Enable Enable OK, RING, NO CARRIER, ERROR, BUSY, CONNECT , BLACKLISTED OK, RING, NO CARRIER, ERROR, NODIALTONE, BUSY, CONNECT , DELAYED, BLACKLISTED, REORDER, WARBLE, CALL WAITING DETECTED C-6 V0 Displays result codes as text (default...
... format This command controls whether result codes (including call progress monitoring This command selects which result codes will be used by the modem. NECT X2 Enable Disable OK, RING, NO CARRIER, ERROR, NODI- ALTONE, CONNECT X3 Disable Enable X4 (default) Enable Enable OK, RING, NO CARRIER, ERROR, BUSY, CONNECT , BLACKLISTED OK, RING, NO CARRIER, ERROR, NODIALTONE, BUSY, CONNECT , DELAYED, BLACKLISTED, REORDER, WARBLE, CALL WAITING DETECTED C-6 V0 Displays result codes as text (default...
User Manual
Page 235
... works. The portion of bits (binary digits) used to indicate the transmission speed of a specific internal or peripheral device (e.g. cursor: A small, blinking rectangle or line that indicates the current position on a fluorescent screen-producing luminous spots. data bits: A data communications parameter controlling the number of the computer that interprets and executes instructions. delete: To remove data from the keyboard to initiate a particular function within a program. control keys: A key...
... works. The portion of bits (binary digits) used to indicate the transmission speed of a specific internal or peripheral device (e.g. cursor: A small, blinking rectangle or line that indicates the current position on a fluorescent screen-producing luminous spots. data bits: A data communications parameter controlling the number of the computer that interprets and executes instructions. delete: To remove data from the keyboard to initiate a particular function within a program. control keys: A key...
User Manual
Page 238
HW Setup: A TOSHIBA utility that lets you set system parameters, such as speaker volume. instruction: Statements or commands that the user can be used to communicate with the extended function key, Fn, can manipulate. often used specifically to connect one system or device to another. 2) To physically connect one system or device to another to change the hardware characteristics by the sending computer is turned on the screen or in combination...
HW Setup: A TOSHIBA utility that lets you set system parameters, such as speaker volume. instruction: Statements or commands that the user can be used to communicate with the extended function key, Fn, can manipulate. often used specifically to connect one system or device to another. 2) To physically connect one system or device to another to change the hardware characteristics by the sending computer is turned on the screen or in combination...

User Manual
Page 239
... uses the large scale integration. Also called a screen. See also hertz. modem keyboard: An input device containing switches that supports a monochrome 720x350 text mode. mode: A method of wave frequency that converts (modulates) digital data for example, the boot mode or the resume mode. modem: Derived from modulator/ demodulator, a device that equals 1 million cycles per second. L level 2 cache: See cache. See also kilobyte. MDA: Monochrome Display Adapter...
... uses the large scale integration. Also called a screen. See also hertz. modem keyboard: An input device containing switches that supports a monochrome 720x350 text mode. mode: A method of wave frequency that converts (modulates) digital data for example, the boot mode or the resume mode. modem: Derived from modulator/ demodulator, a device that equals 1 million cycles per second. L level 2 cache: See cache. See also kilobyte. MDA: Monochrome Display Adapter...

User Manual
Page 246
... 7-4 Password 7-2 USB 7-8 Index-2 I Indicators 2-10, 6-3 Infrared port, See also Ports problems 9-15 Instant security, See Hot keys Interfaces, See Ports K Keyboard 1-6, 5-1 emulating enhanced keyboard 5-2 F1 . . . F12 function keys 5-2 problems 9-7 Typewriter keys 5-1 Keypad overlay 1-10, 5-7 arrow mode 5-8 numeric mode 5-8 temporarily changing modes 5-9 temporarily using normal keyboard (overlay on 5-7 Windows special keys 5-7 L LAN, See also Wireless LAN 1-8 cable types 4-33 connecting 4-33 disconnecting 4-34 problems 9-24 using 4-33 LCD, See Display, Video modes, Monitor external Level...
... 7-4 Password 7-2 USB 7-8 Index-2 I Indicators 2-10, 6-3 Infrared port, See also Ports problems 9-15 Instant security, See Hot keys Interfaces, See Ports K Keyboard 1-6, 5-1 emulating enhanced keyboard 5-2 F1 . . . F12 function keys 5-2 problems 9-7 Typewriter keys 5-1 Keypad overlay 1-10, 5-7 arrow mode 5-8 numeric mode 5-8 temporarily changing modes 5-9 temporarily using normal keyboard (overlay on 5-7 Windows special keys 5-7 L LAN, See also Wireless LAN 1-8 cable types 4-33 connecting 4-33 disconnecting 4-34 problems 9-24 using 4-33 LCD, See Display, Video modes, Monitor external Level...

Detailed Specs for Satellite A100 PSAANC-VA305C English
Page 1
...-1 Bridge Media Adaptor (SD Card, xD picture card, Memory Stick, Memory Stick Pro, Multi Media Card), 4 USB 2.0, RJ11, RJ45, IEEE1394, external microphone port, headphone port, RGB, S-Video Out Keyboard CANADIAN BILINGUAL KEYBOARD Full sized 85 keys with TruBrite™ Screen Technology Native LCD Panel Resolution: 1280x800x16.7 million colours External Support and Max. Zero free slots. Shock: Operating: 7G; CD/DVD Control Function: Play/Pause, Stop, Previous track/Next track Pointing Device Touchpad Pointing device Optical Drive Built-in stereo speakers, Direct 3D Sound...
...-1 Bridge Media Adaptor (SD Card, xD picture card, Memory Stick, Memory Stick Pro, Multi Media Card), 4 USB 2.0, RJ11, RJ45, IEEE1394, external microphone port, headphone port, RGB, S-Video Out Keyboard CANADIAN BILINGUAL KEYBOARD Full sized 85 keys with TruBrite™ Screen Technology Native LCD Panel Resolution: 1280x800x16.7 million colours External Support and Max. Zero free slots. Shock: Operating: 7G; CD/DVD Control Function: Play/Pause, Stop, Previous track/Next track Pointing Device Touchpad Pointing device Optical Drive Built-in stereo speakers, Direct 3D Sound...


