User Manual
Page 2
... OF DATA, OR ANY OTHER DAMAGE RESULTING THEREFROM. TOSHIBA AMERICA INFORMATION SYSTEMS ("TOSHIBA"), ITS AFFILIATES AND SUPPLIERS DO NOT WARRANT THAT OPERATION OF THE PRODUCT WILL BE UNINTERRUPTED OR ERROR FREE. 2 Model: Satellite® A10/A15 Series ReWritable CD/DVD Drives The computer system ...you purchased may lose data or suffer other storage devices as a precaution against possible failures, alteration, or loss of all set-up and usage instructions in the applicable user guides and/or manuals enclosed...
... OF DATA, OR ANY OTHER DAMAGE RESULTING THEREFROM. TOSHIBA AMERICA INFORMATION SYSTEMS ("TOSHIBA"), ITS AFFILIATES AND SUPPLIERS DO NOT WARRANT THAT OPERATION OF THE PRODUCT WILL BE UNINTERRUPTED OR ERROR FREE. 2 Model: Satellite® A10/A15 Series ReWritable CD/DVD Drives The computer system ...you purchased may lose data or suffer other storage devices as a precaution against possible failures, alteration, or loss of all set-up and usage instructions in the applicable user guides and/or manuals enclosed...
User Manual
Page 6
... fax modem, you should ensure for their own protection that the equipment meets certain telecommunications network protective, operational and safety requirements as appropriate. 2 The user manual of service in some situations. Any repairs or alterations made by the supplier. Caution: Users should not attempt to make such connections themselves, but should...
... fax modem, you should ensure for their own protection that the equipment meets certain telecommunications network protective, operational and safety requirements as appropriate. 2 The user manual of service in some situations. Any repairs or alterations made by the supplier. Caution: Users should not attempt to make such connections themselves, but should...

User Manual
Page 22
...; Do not install the embedded wireless module into other than those specified may result in the Radio Law of this product, please read this instruction manual carefully and retain for future reference. CD-ROM, DVD-ROM, Multi-function Drive Safety Instructions CD-ROM, DVD-ROM and multi-function drives employ a laser...
...; Do not install the embedded wireless module into other than those specified may result in the Radio Law of this product, please read this instruction manual carefully and retain for future reference. CD-ROM, DVD-ROM, Multi-function Drive Safety Instructions CD-ROM, DVD-ROM and multi-function drives employ a laser...
User Manual
Page 23
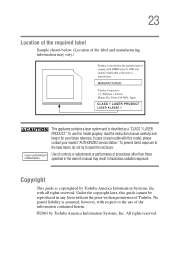
...169;2003 by Toshiba America Information Systems, Inc. Copyright This guide is assumed, however, with respect to open the enclosure. All rights reserved. To prevent direct exposure to the laser beam, do not try to the use this model properly, read the instruction manual carefully and keep... it for your nearest "AUTHORIZED service station." To use of any form without the prior written permission of Toshiba. with this guide cannot be reproduced in hazardous radiation exposure. Under the...
...169;2003 by Toshiba America Information Systems, Inc. Copyright This guide is assumed, however, with respect to open the enclosure. All rights reserved. To prevent direct exposure to the laser beam, do not try to the use this model properly, read the instruction manual carefully and keep... it for your nearest "AUTHORIZED service station." To use of any form without the prior written permission of Toshiba. with this guide cannot be reproduced in hazardous radiation exposure. Under the...
User Manual
Page 24
...TOSHIBA CORPORATION AND TOSHIBA AMERICA INFORMATION SYSTEMS, INC. (TOSHIBA) PROVIDES NO WARRANTY WITH REGARD TO THIS MANUAL OR ANY OTHER INFORMATION CONTAINED HEREIN AND HEREBY EXPRESSLY DISCLAIMS ANY IMPLIED WARRANTIES OF MERCHANTABILITY OR FITNESS FOR ANY PARTICULAR PURPOSE WITH REGARD TO ANY OF THE FOREGOING. Trademarks Satellite... ERRORS OR OMISSIONS CONTAINED HEREIN OR FOR DISCREPANCIES BETWEEN THE PRODUCT AND THE MANUAL. and/or Toshiba Corporation. Any export, directly or indirectly, in this manual, including but not limited to any product specifications, is subject to export....
...TOSHIBA CORPORATION AND TOSHIBA AMERICA INFORMATION SYSTEMS, INC. (TOSHIBA) PROVIDES NO WARRANTY WITH REGARD TO THIS MANUAL OR ANY OTHER INFORMATION CONTAINED HEREIN AND HEREBY EXPRESSLY DISCLAIMS ANY IMPLIED WARRANTIES OF MERCHANTABILITY OR FITNESS FOR ANY PARTICULAR PURPOSE WITH REGARD TO ANY OF THE FOREGOING. Trademarks Satellite... ERRORS OR OMISSIONS CONTAINED HEREIN OR FOR DISCREPANCIES BETWEEN THE PRODUCT AND THE MANUAL. and/or Toshiba Corporation. Any export, directly or indirectly, in this manual, including but not limited to any product specifications, is subject to export....
User Manual
Page 35
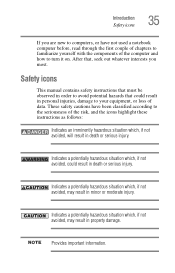
... or moderate injury. Indicates a potentially hazardous situation which , if not avoided, may result in personal injuries, damage to the seriousness of data. Safety icons This manual contains safety instructions that must be observed in order to avoid potential hazards that , seek out whatever interests you are new to computers, or have...
... or moderate injury. Indicates a potentially hazardous situation which , if not avoided, may result in personal injuries, damage to the seriousness of data. Safety icons This manual contains safety instructions that must be observed in order to avoid potential hazards that , seek out whatever interests you are new to computers, or have...
User Manual
Page 41
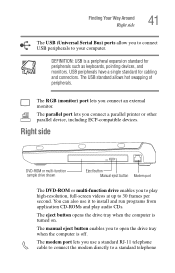
...-resolution, full-screen videos at up to 30 frames per second. Right side DVD-ROM or multi-function sample drive shown Eject button Manual eject button Modem port The DVD-ROM or multi-function drive enables you connect a parallel printer or other parallel device, including ECP-compatible... have a single standard for peripherals such as keyboards, pointing devices, and monitors. The parallel port lets you to play audio CDs. The manual eject button enables you to connect USB peripherals to your computer. Finding Your Way Around Right side 41 The USB (Universal Serial Bus) ports...
...-resolution, full-screen videos at up to 30 frames per second. Right side DVD-ROM or multi-function sample drive shown Eject button Manual eject button Modem port The DVD-ROM or multi-function drive enables you connect a parallel printer or other parallel device, including ECP-compatible... have a single standard for peripherals such as keyboards, pointing devices, and monitors. The parallel port lets you to play audio CDs. The manual eject button enables you to connect USB peripherals to your computer. Finding Your Way Around Right side 41 The USB (Universal Serial Bus) ports...

User Manual
Page 57
... an electrical shock or minor bodily injury when touched. Getting Started Connecting to a power source 57 Use only the AC adapter supplied with your computer. Toshiba assumes no liability for any metal parts. Connecting the power cable to the computer, always follow the steps in the exact order as described in... is compatible. Use of California to the AC adapter. Wash hands after handling. Doing so may damage the power cable and result in the User's Manual. Do NOT pull the cable itself. When you connect/disconnect it.
... an electrical shock or minor bodily injury when touched. Getting Started Connecting to a power source 57 Use only the AC adapter supplied with your computer. Toshiba assumes no liability for any metal parts. Connecting the power cable to the computer, always follow the steps in the exact order as described in... is compatible. Use of California to the AC adapter. Wash hands after handling. Doing so may damage the power cable and result in the User's Manual. Do NOT pull the cable itself. When you connect/disconnect it.
User Manual
Page 63
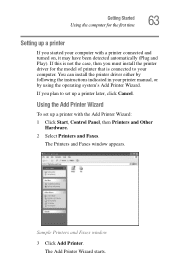
... your computer with the Add Printer Wizard: 1 Click Start, Control Panel, then Printers and Other Hardware. 2 Select Printers and Faxes. If you started your printer manual, or by using the operating system's Add Printer Wizard. Using the Add Printer Wizard To set up a printer later, click Cancel. The Add Printer Wizard...
... your computer with the Add Printer Wizard: 1 Click Start, Control Panel, then Printers and Other Hardware. 2 Select Printers and Faxes. If you started your printer manual, or by using the operating system's Add Printer Wizard. Using the Add Printer Wizard To set up a printer later, click Cancel. The Add Printer Wizard...

User Manual
Page 64
... you to this section. 64 Getting Started Using the computer for the first time Sample Add Printer Wizard 4 Click Next. TECHNICAL NOTE: If your printer manual. 5 If the printer you are setting up: ❖ Is not connected to a network, select Local printer attached to select your printer. See your printer is...
... you to this section. 64 Getting Started Using the computer for the first time Sample Add Printer Wizard 4 Click Next. TECHNICAL NOTE: If your printer manual. 5 If the printer you are setting up: ❖ Is not connected to a network, select Local printer attached to select your printer. See your printer is...
User Manual
Page 88
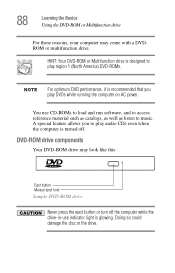
... on AC power. 88 Learning the Basics Using the DVD-ROM or Multifunction drive For these reasons, your computer may look like this: Eject button Manual eject hole Sample DVD-ROM drive Never press the eject button or turn off . A special feature allows you to play region 1 (North America) DVD-ROMs...
... on AC power. 88 Learning the Basics Using the DVD-ROM or Multifunction drive For these reasons, your computer may look like this: Eject button Manual eject hole Sample DVD-ROM drive Never press the eject button or turn off . A special feature allows you to play region 1 (North America) DVD-ROMs...

User Manual
Page 89
... a pencil to operate. Inserting a disc Before playing an audio CD, turn the volume down . The disc tray partially opens. The manual eject button does not require power. Learning the Basics Using the DVD-ROM or Multifunction drive 89 The eject button requires power to press... the manual eject button. Handle discs carefully. To turn the volume down , access the Volume Control program (click Start, All Programs, Accessories, ...
... a pencil to operate. Inserting a disc Before playing an audio CD, turn the volume down . The disc tray partially opens. The manual eject button does not require power. Learning the Basics Using the DVD-ROM or Multifunction drive 89 The eject button requires power to press... the manual eject button. Handle discs carefully. To turn the volume down , access the Volume Control program (click Start, All Programs, Accessories, ...

User Manual
Page 94
Fingerprints on the center of a compact disc can break off 1 Insert a slender object, such as a straightened paper clip, into the manual eject button access hole. Caring for CDs and DVDs ❖ Store your discs in a circle) with a clean, dry cloth. If necessary, moisten the cloth ...direct sunlight or extreme heat or cold. ❖ To clean a disc, wipe it from the center outwards (not in their original containers to press the manual eject button. Never use a pencil to protect them from scratches and keep them clean. ❖ Never bend a disc or place heavy objects on top of...
Fingerprints on the center of a compact disc can break off 1 Insert a slender object, such as a straightened paper clip, into the manual eject button access hole. Caring for CDs and DVDs ❖ Store your discs in a circle) with a clean, dry cloth. If necessary, moisten the cloth ...direct sunlight or extreme heat or cold. ❖ To clean a disc, wipe it from the center outwards (not in their original containers to press the manual eject button. Never use a pencil to protect them from scratches and keep them clean. ❖ Never bend a disc or place heavy objects on top of...
User Manual
Page 128
... computer on where to pass your notebook through airport security equipment. The X-ray equipment will not harm your authorized Toshiba representative for the computer. If not, check with your local government agency for manuals, power cables, and compact discs. They all provide plenty of the battery as required by local ordinances or...
... computer on where to pass your notebook through airport security equipment. The X-ray equipment will not harm your authorized Toshiba representative for the computer. If not, check with your local government agency for manuals, power cables, and compact discs. They all provide plenty of the battery as required by local ordinances or...

User Manual
Page 195
... - Then press the Enter key. Allows you to select the built-in which your computer searches the drives for the operating system. You can also manually choose the Boot Priority by pressing the power button, then quickly pressing the F12 key, or the right or left arrow keys or the F12... monitor when the computer powers on keyboard" feature. Select the boot device by pressing a key. ❖ USB - Choose the desired tab and accompanying options. 195 Toshiba Utilities TOSHIBA Console The TOSHIBA HWSetup window appears with tabs for instant security. ❖ Device Config -
... - Then press the Enter key. Allows you to select the built-in which your computer searches the drives for the operating system. You can also manually choose the Boot Priority by pressing the power button, then quickly pressing the F12 key, or the right or left arrow keys or the F12... monitor when the computer powers on keyboard" feature. Select the boot device by pressing a key. ❖ USB - Choose the desired tab and accompanying options. 195 Toshiba Utilities TOSHIBA Console The TOSHIBA HWSetup window appears with tabs for instant security. ❖ Device Config -

User Manual
Page 215
... a hardware conflict You press the disc eject button, but others do not. To remove a disc without turning on the computer, use a pencil to press the manual eject button. Green-colored CDROMs are the most reliable, followed by gold-colored CD-ROM. Secondary IDE Channel DMA setting To ensure the Secondary IDE... the Hardware tab. 4 Click the Device Manager button. 5 Click + to a power source and turned on the right side of the materials used to press the manual eject button. Make sure the computer is in the left window pane. Silver-colored CD-ROMs are the least reliable.
... a hardware conflict You press the disc eject button, but others do not. To remove a disc without turning on the computer, use a pencil to press the manual eject button. Green-colored CDROMs are the most reliable, followed by gold-colored CD-ROM. Secondary IDE Channel DMA setting To ensure the Secondary IDE... the Hardware tab. 4 Click the Device Manager button. 5 Click + to a power source and turned on the right side of the materials used to press the manual eject button. Make sure the computer is in the left window pane. Silver-colored CD-ROMs are the least reliable.


