

User Manual
Page 15
... Computing tips 69 Using the keyboard 70 Character keys 71 Ctrl, Fn, and Alt keys 71 Function keys 71 Windows® special keys 72 Overlay keys 72 Emulating a full-size keyboard 74 Starting a program 74 Saving your work 74 Printing your work 75 Using diskettes 76 Inserting and removing diskettes 76 Caring...
... Computing tips 69 Using the keyboard 70 Character keys 71 Ctrl, Fn, and Alt keys 71 Function keys 71 Windows® special keys 72 Overlay keys 72 Emulating a full-size keyboard 74 Starting a program 74 Saving your work 74 Printing your work 75 Using diskettes 76 Inserting and removing diskettes 76 Caring...

User Manual
Page 17
... about the Internet 123 Lesson 4: Creating a new document 124 Lesson 5: Creating a new folder 126 Lesson 6: Starting programs 127 Lesson 7: Resizing, repositioning, and hiding windows 129 Using the taskbar 130 Minimizing and maximizing windows 130 Resizing and moving windows 131 Lesson 8: Closing programs 132 Lesson 9: Creating shortcuts 133 Creating a shortcut to the Calculator 133 Creating...
... about the Internet 123 Lesson 4: Creating a new document 124 Lesson 5: Creating a new folder 126 Lesson 6: Starting programs 127 Lesson 7: Resizing, repositioning, and hiding windows 129 Using the taskbar 130 Minimizing and maximizing windows 130 Resizing and moving windows 131 Lesson 8: Closing programs 132 Lesson 9: Creating shortcuts 133 Creating a shortcut to the Calculator 133 Creating...

User Manual
Page 42
... in your knees, hips, and elbows form approximately 90-degree angles when you while typing, stop using the computer and rest. 42 Getting Started Selecting a place to work ❖ Adjust the back of your chair so that it supports the lower curve of your wrists. Lower-back...Avoid bending, arching, or twisting your spine. Keep them in a relaxed, neutral position while typing. ❖ Exercise your computer work area. Use tinted windows or shades to reduce glare. ❖ Avoid placing your computer in your hands, wrists, and arms to provide extra back support. If necessary, use ...
... in your knees, hips, and elbows form approximately 90-degree angles when you while typing, stop using the computer and rest. 42 Getting Started Selecting a place to work ❖ Adjust the back of your chair so that it supports the lower curve of your wrists. Lower-back...Avoid bending, arching, or twisting your spine. Keep them in a relaxed, neutral position while typing. ❖ Exercise your computer work area. Use tinted windows or shades to reduce glare. ❖ Avoid placing your computer in your hands, wrists, and arms to provide extra back support. If necessary, use ...
User Manual
Page 45
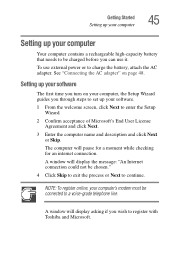
... or to continue. See "Connecting the AC adapter" on your software. 1 From the welcome screen, click Next to register with Toshiba and Microsoft. Getting Started Setting up your computer 45 Setting up your computer Your computer contains a rechargeable high-capacity battery that needs to be connected to a... acceptance of Microsoft's End User License Agreement and click Next. 3 Enter the computer name and description and click Next or Skip. A window will display asking if you through steps to set up your software The first time you turn on page 48. The computer will display the...
... or to continue. See "Connecting the AC adapter" on your software. 1 From the welcome screen, click Next to register with Toshiba and Microsoft. Getting Started Setting up your computer 45 Setting up your computer Your computer contains a rechargeable high-capacity battery that needs to be connected to a... acceptance of Microsoft's End User License Agreement and click Next. 3 Enter the computer name and description and click Next or Skip. A window will display asking if you through steps to set up your software The first time you turn on page 48. The computer will display the...
User Manual
Page 46
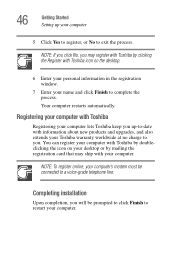
... doubleclicking the icon on your desktop or by clicking the Register with Toshiba icon on the desktop. 6 Enter your personal information in the registration window. 7 Enter your computer 5 Click Yes to register, or No to exit the process. Your computer restarts automatically. NOTE: To register ... mailing the registration card that may ship with your Toshiba warranty worldwide at no charge to you up your name and click Finish to complete the process. 46 Getting Started Setting up -to-date with information about new products and upgrades, and also extends your computer. ...
... doubleclicking the icon on your desktop or by clicking the Register with Toshiba icon on the desktop. 6 Enter your personal information in the registration window. 7 Enter your computer 5 Click Yes to register, or No to exit the process. Your computer restarts automatically. NOTE: To register ... mailing the registration card that may ship with your Toshiba warranty worldwide at no charge to you up your name and click Finish to complete the process. 46 Getting Started Setting up -to-date with information about new products and upgrades, and also extends your computer. ...

User Manual
Page 54
...Apply. 7 Click OK. The TouchPAD ON/OFF tab view window appears. 5 Select Disable or Enable, whichever is enabled by default. To change the enable/ disable TouchPad setting: 1 Click Start, Control Panel. The Control Panel window appears. 2 Click Printers and Other Hardware. 3 Click ...Mouse Properties. The Mouse Properties window closes. 8 Close the Printers and Other Hardware window. 9 Close the Control Panel window. It usually corresponds to find whether...
...Apply. 7 Click OK. The TouchPAD ON/OFF tab view window appears. 5 Select Disable or Enable, whichever is enabled by default. To change the enable/ disable TouchPad setting: 1 Click Start, Control Panel. The Control Panel window appears. 2 Click Printers and Other Hardware. 3 Click ...Mouse Properties. The Mouse Properties window closes. 8 Close the Printers and Other Hardware window. 9 Close the Control Panel window. It usually corresponds to find whether...

User Manual
Page 55
... with enough memory to add an additional memory module of either 128, 256, and 512 MB capacity. The operating system turns off computer window appears. 2 Click Turn Off. Getting Started Setting up other devices 55 Setting up other devices Installing additional memory (optional) Your computer comes with two memory slots, one of...
... with enough memory to add an additional memory module of either 128, 256, and 512 MB capacity. The operating system turns off computer window appears. 2 Click Turn Off. Getting Started Setting up other devices 55 Setting up other devices Installing additional memory (optional) Your computer comes with two memory slots, one of...
User Manual
Page 61
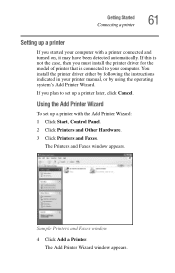
... been detected automatically. If you plan to your computer. The Add Printer Wizard window appears. Sample Printers and Faxes window 4 Click Add a Printer. Getting Started Connecting a printer 61 Setting up a printer If you started your computer with the Add Printer Wizard: 1 Click Start, Control Panel. 2 Click Printers and Other Hardware. 3 Click Printers and Faxes. You...
... been detected automatically. If you plan to your computer. The Add Printer Wizard window appears. Sample Printers and Faxes window 4 Click Add a Printer. Getting Started Connecting a printer 61 Setting up a printer If you started your computer with the Add Printer Wizard: 1 Click Start, Control Panel. 2 Click Printers and Other Hardware. 3 Click Printers and Faxes. You...
User Manual
Page 65
... to memory so that, when you turn off your computer when you are not using the computer for a longer period, use the Windows® Turn Off command. Getting Started Turning off the computer 65 Display limitations The quality of the display is limited to where you left off. ❖ Never turn off...
... to memory so that, when you turn off your computer when you are not using the computer for a longer period, use the Windows® Turn Off command. Getting Started Turning off the computer 65 Display limitations The quality of the display is limited to where you left off. ❖ Never turn off...

User Manual
Page 72
...; P 4 5 J K End 1 2 M Ins 0 6 - 72 Learning the Basics Using the keyboard Windows® special keys Application key Windows® logo key Windows® special keys The keyboard provides two keys that have special functions in the operating system: ❖ The Windows® logo key opens the Start menu. ❖ The Application key has the same function as...
...; P 4 5 J K End 1 2 M Ins 0 6 - 72 Learning the Basics Using the keyboard Windows® special keys Application key Windows® logo key Windows® special keys The keyboard provides two keys that have special functions in the operating system: ❖ The Windows® logo key opens the Start menu. ❖ The Application key has the same function as...
User Manual
Page 74
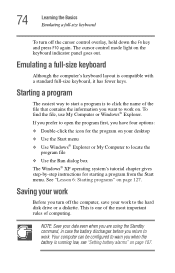
...have four options: ❖ Double-click the icon for starting a program from the Start menu. Starting a program The easiest way to start a program is running low, see "Setting battery alarms" on your desktop ❖ Use the Start menu ❖ Use Windows® Explorer or My Computer to warn you when the...the keyboard indicator panel goes out. Your computer can be configured to locate the program file ❖ Use the Run dialog box The Windows® XP operating system's tutorial chapter gives step-by-step instructions for the program on page 107. 74 Learning the Basics Emulating a...
...have four options: ❖ Double-click the icon for starting a program from the Start menu. Starting a program The easiest way to start a program is running low, see "Setting battery alarms" on your desktop ❖ Use the Start menu ❖ Use Windows® Explorer or My Computer to warn you when the...the keyboard indicator panel goes out. Your computer can be configured to locate the program file ❖ Use the Run dialog box The Windows® XP operating system's tutorial chapter gives step-by-step instructions for the program on page 107. 74 Learning the Basics Emulating a...

User Manual
Page 78
...select more than one file. 6 Click File, then click Send To. 7 Click the icon for the diskette drive (3 1/2 floppy [A:]). The My Computer window appears. 4 Double-click the drive that contains the file you want to copy. 5 Double-click the folder that contains the file, then click the ...file you want to copy. The Start menu appears. 3 Click My Computer. Copying to a diskette 1 Insert a diskette into the internal diskette drive. 2 Click Start. 78 Learning the Basics Backing up your files Backing up your hard disk to another device...
...select more than one file. 6 Click File, then click Send To. 7 Click the icon for the diskette drive (3 1/2 floppy [A:]). The My Computer window appears. 4 Double-click the drive that contains the file you want to copy. 5 Double-click the folder that contains the file, then click the ...file you want to copy. The Start menu appears. 3 Click My Computer. Copying to a diskette 1 Insert a diskette into the internal diskette drive. 2 Click Start. 78 Learning the Basics Backing up your files Backing up your hard disk to another device...
User Manual
Page 86
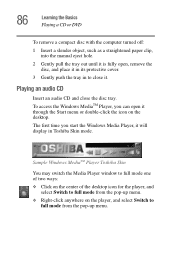
... you can open , remove the disc, and place it in its protective cover. 3 Gently push the tray in Toshiba Skin mode. To access the Windows MediaTM Player, you start the Windows Media Player, it will display in to full mode from the pop-up menu. ❖ Right-click anywhere on the... desktop. Sample Windows MediaTM Player Toshiba Skin You may switch the Media Player window to full mode one of two ways: ❖...
... you can open , remove the disc, and place it in its protective cover. 3 Gently push the tray in Toshiba Skin mode. To access the Windows MediaTM Player, you start the Windows Media Player, it will display in to full mode from the pop-up menu. ❖ Right-click anywhere on the... desktop. Sample Windows MediaTM Player Toshiba Skin You may switch the Media Player window to full mode one of two ways: ❖...

User Manual
Page 115
... the desktop The desktop is the launching pad for everything you will more detailed information on your operating system, refer to start programs, 115 As you explore the Windows® XP operating system further, you can do in the operating system. For more than offset the short amount of... these lessons. You use its features to the Microsoft® Windows ® XP operating system documentation that came with your computer. Chapter 5 Getting to Know the Windows® XP Operating System This chapter introduces the Windows® XP operating system by guiding you will gain from this...
... the desktop The desktop is the launching pad for everything you will more detailed information on your operating system, refer to start programs, 115 As you explore the Windows® XP operating system further, you can do in the operating system. For more than offset the short amount of... these lessons. You use its features to the Microsoft® Windows ® XP operating system documentation that came with your computer. Chapter 5 Getting to Know the Windows® XP Operating System This chapter introduces the Windows® XP operating system by guiding you will gain from this...

User Manual
Page 116
Finding your system. HINT: The illustrated examples in the functionality of your system. 116 Getting to Know the Windows® XP Operating System Lesson 1: Exploring the desktop find documents, set up system components, and perform most other computing tasks. However, the differences are not ... in this guide may appear slightly different from the screens displayed by your way around the desktop Your computer's desktop includes several standard features: icons, Start button, taskbar, system tray, and background pattern. Icons...
Finding your system. HINT: The illustrated examples in the functionality of your system. 116 Getting to Know the Windows® XP Operating System Lesson 1: Exploring the desktop find documents, set up system components, and perform most other computing tasks. However, the differences are not ... in this guide may appear slightly different from the screens displayed by your way around the desktop Your computer's desktop includes several standard features: icons, Start button, taskbar, system tray, and background pattern. Icons...

User Manual
Page 117
The icons initially displayed on each icon and how to use the Start button to: ❖ Start programs ❖ Access operating system update information ❖ Open recently accessed documents ❖ Adjust system settings See Windows® XP online Help for any folder, file, or program ...a popup description of the file contents appears. For more specific information on your configuration. Start button You use it does not go into the Recycle Bin. 117 Getting to Know the Windows® XP Operating System Lesson 1: Exploring the desktop Icons An icon represents a folder,...
The icons initially displayed on each icon and how to use the Start button to: ❖ Start programs ❖ Access operating system update information ❖ Open recently accessed documents ❖ Adjust system settings See Windows® XP online Help for any folder, file, or program ...a popup description of the file contents appears. For more specific information on your configuration. Start button You use it does not go into the Recycle Bin. 117 Getting to Know the Windows® XP Operating System Lesson 1: Exploring the desktop Icons An icon represents a folder,...

User Manual
Page 118
118 Getting to quickly switch between the programs or windows. Taskbar Each time you open a program, a button associated with that run continuously in files. To learn more information on starting programs, see "Lesson 6: Starting programs" on your computer are organized for a few moments and a short ...in the System tray are held in the background. Typical tasks in folders, and folders can use these buttons to Know the Windows® XP Operating System Lesson 1: Exploring the desktop ❖ Search for convenient organizing. System tray The System tray displays icons ...
118 Getting to quickly switch between the programs or windows. Taskbar Each time you open a program, a button associated with that run continuously in files. To learn more information on starting programs, see "Lesson 6: Starting programs" on your computer are organized for a few moments and a short ...in the System tray are held in the background. Typical tasks in folders, and folders can use these buttons to Know the Windows® XP Operating System Lesson 1: Exploring the desktop ❖ Search for convenient organizing. System tray The System tray displays icons ...

User Manual
Page 119
... more information, read the Microsoft® documentation that programs, documents and other data can use the My Computer feature accessible through the Start menu to access any file in the Windows® file system. You can be quickly and easily shared between computers. Computers can be connected together to form a network, so...
... more information, read the Microsoft® documentation that programs, documents and other data can use the My Computer feature accessible through the Start menu to access any file in the Windows® file system. You can be quickly and easily shared between computers. Computers can be connected together to form a network, so...

User Manual
Page 202
... is not working external diskette drive and press the left or right arrow key and choose your work , press Ctrl, Alt, and Del to start after the Starting Windows XP message appears. ❖ The operating system takes a long time to restart the computer. To charge the battery, leave the computer plugged into a live...
... is not working external diskette drive and press the left or right arrow key and choose your work , press Ctrl, Alt, and Del to start after the Starting Windows XP message appears. ❖ The operating system takes a long time to restart the computer. To charge the battery, leave the computer plugged into a live...
User Manual
Page 203
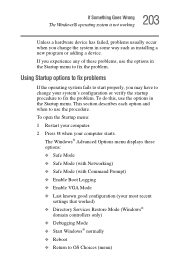
...: 1 Restart your computer. 2 Press F8 when your most recent settings that worked) ❖ Directory Services Restore Mode (Windows® domain controllers only) ❖ Debugging Mode ❖ Start Windows® normally ❖ Reboot ❖ Return to OS Choices (menu) 203 If Something Goes Wrong The... Windows® operating system is not working Unless a hardware device has failed, problems usually occur when you ...
...: 1 Restart your computer. 2 Press F8 when your most recent settings that worked) ❖ Directory Services Restore Mode (Windows® domain controllers only) ❖ Debugging Mode ❖ Start Windows® normally ❖ Reboot ❖ Return to OS Choices (menu) 203 If Something Goes Wrong The... Windows® operating system is not working Unless a hardware device has failed, problems usually occur when you ...


