Printable Spec Sheet
Page 1
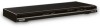
... Video upconversion up to 1080p1 resolution via HDMITM takes your player to a Toshiba TV with REGZA-LINK® using an HDMI™ cable, and then control them using one remote, no additional programming or setup required! PRELIMINARY SDK990 DVD Player with 1080p Upconversion SDK990 DVD Player with 1080p Upconversion 1080p upconversion to compatible home theater components and high definition televisions without scaling down or compressing the signal, keeping sound and picture quality pristine. Multi-format playback3 capability supports DVD-R, DVD-RW, DVD+R, DVD+RW, VCD, SVCD, DivX...
... Video upconversion up to 1080p1 resolution via HDMITM takes your player to a Toshiba TV with REGZA-LINK® using an HDMI™ cable, and then control them using one remote, no additional programming or setup required! PRELIMINARY SDK990 DVD Player with 1080p Upconversion SDK990 DVD Player with 1080p Upconversion 1080p upconversion to compatible home theater components and high definition televisions without scaling down or compressing the signal, keeping sound and picture quality pristine. Multi-format playback3 capability supports DVD-R, DVD-RW, DVD+R, DVD+RW, VCD, SVCD, DivX...
Printable Spec Sheet
Page 2
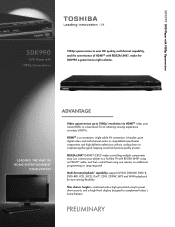
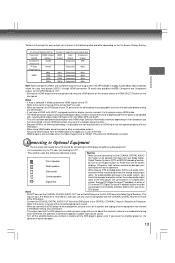
...fications PLAYABLE DISC TYPES3 VIDEO Video Upconversion Video D/A Converter Component Video Output Progressive Scan 3:2 Pulldown DivX® Home Theater Certified3 JPEG Digital Picture Zoom Fast Scan Slow Motion Multi-Camera Angle Select Multi-Language Select Mult-Subtitle Select AUDIO Audio D/A Converter Dolby® Digital/DTS® Compatible WMA Playback3 MP3 Playback3 3D Surround Sound CONVENIENCE Remote Control Parental Lock Screen Saver Tray Lock HDMITM Cable (included) DVD-Video/DVD-R/DVD+R / DVD-RW/DVD+RW/SVCD/ VCD/CD/CD-R/CD-RW 720p/1080i/1080p 108MHz/14-Bit ColorStream...
...fications PLAYABLE DISC TYPES3 VIDEO Video Upconversion Video D/A Converter Component Video Output Progressive Scan 3:2 Pulldown DivX® Home Theater Certified3 JPEG Digital Picture Zoom Fast Scan Slow Motion Multi-Camera Angle Select Multi-Language Select Mult-Subtitle Select AUDIO Audio D/A Converter Dolby® Digital/DTS® Compatible WMA Playback3 MP3 Playback3 3D Surround Sound CONVENIENCE Remote Control Parental Lock Screen Saver Tray Lock HDMITM Cable (included) DVD-Video/DVD-R/DVD+R / DVD-RW/DVD+RW/SVCD/ VCD/CD/CD-R/CD-RW 720p/1080i/1080p 108MHz/14-Bit ColorStream...
Owner's Manual - English
Page 6
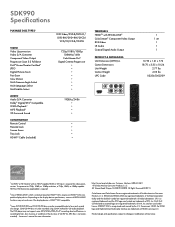
... a manner that can play DVDs recorded in this DVD player, please contact Toshiba Customer Service. " " may not respond to operation of a VIDEO CD not equipped with the PBC function, you happen to instruction notes of this case, the DVD player will successfully play DVD-RAM discs or non-standardized discs, etc., even if they may not work with Audio CDs/CD-R/RW CDs. About The icons on the TV screen (Menu Playback).
... a manner that can play DVDs recorded in this DVD player, please contact Toshiba Customer Service. " " may not respond to operation of a VIDEO CD not equipped with the PBC function, you happen to instruction notes of this case, the DVD player will successfully play DVD-RAM discs or non-standardized discs, etc., even if they may not work with Audio CDs/CD-R/RW CDs. About The icons on the TV screen (Menu Playback).
Owner's Manual - English
Page 7
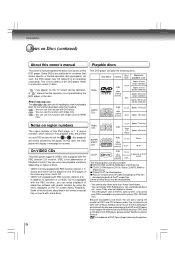
... 22 Selecting the sound enhancement 22 Selecting the Picture Enhancement (E.P.M) . 23 Selecting the picture enhancement 23 Selecting Subtitles 23 Selecting a subtitle language 23 Selecting the Camera Angle 24 Changing the camera angle 24 Selecting a Language 24 Selecting a playback audio setting 24 On-screen Display Operation 25 On-screen display operation 25 Playing MP3/WMA Files 26 Playing MP3/WMA files 26 Viewing JPEG Files 27 Viewing JPEG files 27 Viewing a thumbnail view 27 Playing DivX®/MPEG-4 Files 28 Playing DivX®/MPEG-4 files 28 Function setup Customizing...
... 22 Selecting the sound enhancement 22 Selecting the Picture Enhancement (E.P.M) . 23 Selecting the picture enhancement 23 Selecting Subtitles 23 Selecting a subtitle language 23 Selecting the Camera Angle 24 Changing the camera angle 24 Selecting a Language 24 Selecting a playback audio setting 24 On-screen Display Operation 25 On-screen display operation 25 Playing MP3/WMA Files 26 Playing MP3/WMA files 26 Viewing JPEG Files 27 Viewing JPEG files 27 Viewing a thumbnail view 27 Playing DivX®/MPEG-4 Files 28 Playing DivX®/MPEG-4 files 28 Function setup Customizing...
Owner's Manual - English
Page 11
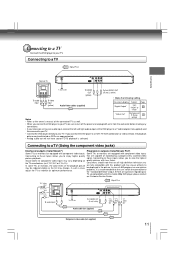
...To video input (yellow) To VIDEO OUT (yellow) Audio/Video cables (supplied) To 2ch AUDIO OUT (R: red, L:white) • Make the following setting. Some TVs or monitors are equipped with component video inputs. In case of reproducing a progressively scanned video picture playback. On-screen display Select: Page "Digital Output" "Off", "PCM" or 32 "Raw" "Video Out" Component P-Scan 31 Notes HDMI • Refer to the owner's manual of the connected TV as DVDs are equipped with component video inputs Connecting to these inputs allows you connect the DVD player to view...
...To video input (yellow) To VIDEO OUT (yellow) Audio/Video cables (supplied) To 2ch AUDIO OUT (R: red, L:white) • Make the following setting. Some TVs or monitors are equipped with component video inputs. In case of reproducing a progressively scanned video picture playback. On-screen display Select: Page "Digital Output" "Off", "PCM" or 32 "Raw" "Video Out" Component P-Scan 31 Notes HDMI • Refer to the owner's manual of the connected TV as DVDs are equipped with component video inputs Connecting to these inputs allows you connect the DVD player to view...
Owner's Manual - English
Page 12
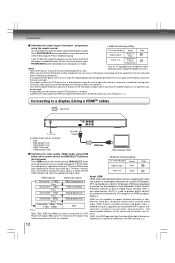
... (progressive) HDMI has the capability to P-Scan mode during stop. • Make the following setting. The resolution of the equipment from the wall outlet before you place the DVD player near a tuner or radio, the radio broadcast sound might be damaged. • Analog audio out will appear scrambled or blank. Connections Switching the output signal (interlaced / progressive) using HDMI button on the remote control or HDMI SELECT button on the front panel to protect digital content transmitted and received...
... (progressive) HDMI has the capability to P-Scan mode during stop. • Make the following setting. The resolution of the equipment from the wall outlet before you place the DVD player near a tuner or radio, the radio broadcast sound might be damaged. • Analog audio out will appear scrambled or blank. Connections Switching the output signal (interlaced / progressive) using HDMI button on the remote control or HDMI SELECT button on the front panel to protect digital content transmitted and received...
Owner's Manual - English
Page 13
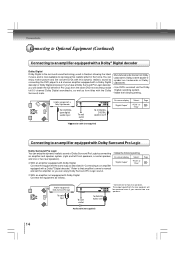
... volume sound may view photos (JPEG ) through Composite and Component output, set to turn off the power and unplug all of the equipment from the on-screen : Rear speaker displays. Otherwise the HDMI button is set HD JPEG Mode to "Off". * Settings for HDMI output format are connected to an amplification system.To enjoy DTS Digital Surround™ playback, an external 5.1 channel DTS Digital Surround™ decoder system must be damaged by connecting the DVD player to optional audio equipment...
... volume sound may view photos (JPEG ) through Composite and Component output, set to turn off the power and unplug all of the equipment from the on-screen : Rear speaker displays. Otherwise the HDMI button is set HD JPEG Mode to "Off". * Settings for HDMI output format are connected to an amplification system.To enjoy DTS Digital Surround™ playback, an external 5.1 channel DTS Digital Surround™ decoder system must be damaged by connecting the DVD player to optional audio equipment...
Owner's Manual - English
Page 14
... the Dolby Digital recording system. Dolby and the double-D symbol are trademarks of Dolby Surround Pro Logic by connecting the DVD player to a 6 channel amplifier equipped with a Dolby Digital decoder or Dolby Digital processor. Amplifier equipped with a Dolby Digital decoder To COAXIAL type digital audio input To wall outlet To COAXIAL DIGITAL AUDIO OUT 75 Ω coaxial cable (not supplied) On-screen display "Digital Output" Select: "PCM" or "Raw" Page 32 Connecting to an amplifier equipped with Dolby Surround Pro Logic Dolby Surround Pro...
... the Dolby Digital recording system. Dolby and the double-D symbol are trademarks of Dolby Surround Pro Logic by connecting the DVD player to a 6 channel amplifier equipped with a Dolby Digital decoder or Dolby Digital processor. Amplifier equipped with a Dolby Digital decoder To COAXIAL type digital audio input To wall outlet To COAXIAL DIGITAL AUDIO OUT 75 Ω coaxial cable (not supplied) On-screen display "Digital Output" Select: "PCM" or "Raw" Page 32 Connecting to an amplifier equipped with Dolby Surround Pro Logic Dolby Surround Pro...

Owner's Manual - English
Page 15
...; Use DVDs or audio CDs encoded via the MPEG2 recording system. • Make the following setting. On-screen display Select: Page "Digital Output" "PCM" 32 Amplifier equipped with a DTS decoder To COAXIAL type digital audio input To wall outlet To COAXIAL DIGITAL AUDIO OUT Manufactured under license under U.S. Connections Connections Connecting to an amplifier equipped with an MPEG2 audio decoder MPEG2 sound You can enjoy motion picture and live concert DVDs with dynamic realistic sound by connecting...
...; Use DVDs or audio CDs encoded via the MPEG2 recording system. • Make the following setting. On-screen display Select: Page "Digital Output" "PCM" 32 Amplifier equipped with a DTS decoder To COAXIAL type digital audio input To wall outlet To COAXIAL DIGITAL AUDIO OUT Manufactured under license under U.S. Connections Connections Connecting to an amplifier equipped with an MPEG2 audio decoder MPEG2 sound You can enjoy motion picture and live concert DVDs with dynamic realistic sound by connecting...
Owner's Manual - English
Page 16
... select the video input connected to the DVD player. • When you last stopped. To start from PBC off . To turn on -screen menu may cause the DVD player to its screen. Prolonged display of noise depends on the TV you use with recorded contents may appear on the TV if you have already played, playback will automatically turn on the menu display again, press the RETURN button. 16 To remove the disc Press OPEN/CLOSE...
... select the video input connected to the DVD player. • When you last stopped. To start from PBC off . To turn on -screen menu may cause the DVD player to its screen. Prolonged display of noise depends on the TV you use with recorded contents may appear on the TV if you have already played, playback will automatically turn on the menu display again, press the RETURN button. 16 To remove the disc Press OPEN/CLOSE...

Owner's Manual - English
Page 22
... ZOOM button to UP, DOWN, LEFT and RIGHT direction. Selecting the Sound Enhancement (E.A.M.*) You can magnify areas within a picture. Make selection according to your preference. • Actual effects to view a different part of the image, the display will not shift anymore in that direction. Advanced playback Zooming a Picture You can easily switch a preferred audio enhancement. *E.A.M.: Enhanced Audio Mode Selecting the sound enhancement 1 Press E.A.M. E.A.M. e.g. 2 To resume normal playback Press ZOOM repeatedly until...
... ZOOM button to UP, DOWN, LEFT and RIGHT direction. Selecting the Sound Enhancement (E.A.M.*) You can magnify areas within a picture. Make selection according to your preference. • Actual effects to view a different part of the image, the display will not shift anymore in that direction. Advanced playback Zooming a Picture You can easily switch a preferred audio enhancement. *E.A.M.: Enhanced Audio Mode Selecting the sound enhancement 1 Press E.A.M. E.A.M. e.g. 2 To resume normal playback Press ZOOM repeatedly until...

Owner's Manual - English
Page 26
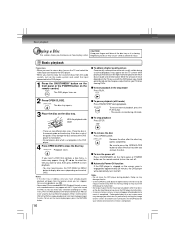
... press ENTER button to 2 Press OPEN/CLOSE to load the disc. play mode items.Then press ENTER button.Please refer to below picture on the DVD player. you have been recorded on a CD-R or CD-RW on the screen. The Toolkit has the following play mode items: • Filter (Audio/Photo/Video): Sets file filters. After finish storing the files/tracks you want into the program view list. 4. " " will produce optimal playback quality. It...
... press ENTER button to 2 Press OPEN/CLOSE to load the disc. play mode items.Then press ENTER button.Please refer to below picture on the DVD player. you have been recorded on a CD-R or CD-RW on the screen. The Toolkit has the following play mode items: • Filter (Audio/Photo/Video): Sets file filters. After finish storing the files/tracks you want into the program view list. 4. " " will produce optimal playback quality. It...
Owner's Manual - English
Page 27
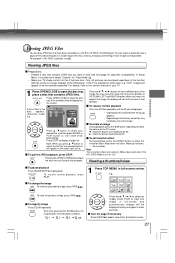
.... Turn the page if necessary Press SKIP / to view a different part of files in 480p video resolution if the HD JPEG Mode is preferred to select "Original" for Jpeg files compatibility). Advanced playback Viewing JPEG Files You can play JPEG files that have been recorded on a CD-R or CD-RW on the screen. A list of the image. Repeat : Off Mode : Normal W: 515 H:770 Press / button to select your TV. 1 Press OPEN/CLOSE to the owner's manual...
.... Turn the page if necessary Press SKIP / to view a different part of files in 480p video resolution if the HD JPEG Mode is preferred to select "Original" for Jpeg files compatibility). Advanced playback Viewing JPEG Files You can play JPEG files that have been recorded on a CD-R or CD-RW on the screen. A list of the image. Repeat : Off Mode : Normal W: 515 H:770 Press / button to select your TV. 1 Press OPEN/CLOSE to the owner's manual...
Owner's Manual - English
Page 28
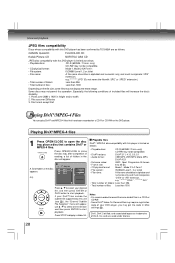
... your DivX® files include the subtitle file supported by TOSHIBA are as follows. only) CD-RW may require registration code of your desired file, and then press ENTER or PLAY button to record the same kind of folders in Misc settings 34 . Advanced playback JPEG files compatibility Discs whose compatibility with this DVD player is limited as follows: • Playable discs: CD-R (650MB / 74 min. CANON QuickCD Kodak Picture CD...
... your DivX® files include the subtitle file supported by TOSHIBA are as follows. only) CD-RW may require registration code of your desired file, and then press ENTER or PLAY button to record the same kind of folders in Misc settings 34 . Advanced playback JPEG files compatibility Discs whose compatibility with this DVD player is limited as follows: • Playable discs: CD-R (650MB / 74 min. CANON QuickCD Kodak Picture CD...

Owner's Manual - English
Page 31
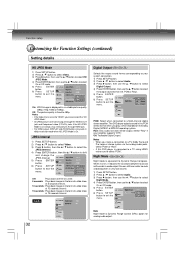
... which has component video inputs. Displays pictures cropped to view the mode as it original size. P-Scan: Select if you may select one of the TV shape setting. HDMI Resolution 1) Press SETUP button. 2) Press / button to select Video. 3) Press button, then use the / button to select HDMI Resolution. 4) Press ENTER button, then use . Function setup Notes • The displayable picture size is preferred for Jpeg viewing. View Mode DVD The user may not be sure that support progressive scan. "Original" is preset on the DVDs, you connect the DVD player to your...
... which has component video inputs. Displays pictures cropped to view the mode as it original size. P-Scan: Select if you may select one of the TV shape setting. HDMI Resolution 1) Press SETUP button. 2) Press / button to select Video. 3) Press button, then use the / button to select HDMI Resolution. 4) Press ENTER button, then use . Function setup Notes • The displayable picture size is preferred for Jpeg viewing. View Mode DVD The user may not be sure that support progressive scan. "Original" is preset on the DVDs, you connect the DVD player to your...
Owner's Manual - English
Page 32
... a suitable picture quality (480p, 720p, 1080i or 1080p). Note Night mode is displayed in very low volume. 1) Press SETUP button. 2) Press / button to select Audio. 3) Press button, then use the / button to select Night Mode. 4) Press ENTER button, then use the / button to select On or Off mode. 5) Press ENTER button. : PCM 6) Press SETUP Off button to shift and change the JPEG Interval. The DVD player outputs sound in the PCM stereo format when you play a DVD recorded on and you make a connection to a TV, Dolby Surround Pro...
... a suitable picture quality (480p, 720p, 1080i or 1080p). Note Night mode is displayed in very low volume. 1) Press SETUP button. 2) Press / button to select Audio. 3) Press button, then use the / button to select Night Mode. 4) Press ENTER button, then use the / button to select On or Off mode. 5) Press ENTER button. : PCM 6) Press SETUP Off button to shift and change the JPEG Interval. The DVD player outputs sound in the PCM stereo format when you play a DVD recorded on and you make a connection to a TV, Dolby Surround Pro...

Owner's Manual - English
Page 33
... the parental lock function. Rating Parental Control : 8. Parental Control : 8. Input the 4digit password as Language, Video, Audio and etc. "Enter Password" screen will take 3-5 seconds to input the current password (If the password has not been set then followed by a parental lock level and the way a DVD can virtually playback all DVD software. 6) Press OPEN/CLOSE button to remove the disc. This is presetting password of the disc altogether. • DVDs may or may vary from 1 to select Set Password. 4) Press ENTER button. "Enter Password" screen will...
... the parental lock function. Rating Parental Control : 8. Parental Control : 8. Input the 4digit password as Language, Video, Audio and etc. "Enter Password" screen will take 3-5 seconds to input the current password (If the password has not been set then followed by a parental lock level and the way a DVD can virtually playback all DVD software. 6) Press OPEN/CLOSE button to remove the disc. This is presetting password of the disc altogether. • DVDs may or may vary from 1 to select Set Password. 4) Press ENTER button. "Enter Password" screen will...

Owner's Manual - English
Page 34
... switch to appropriate input channel. Off: To deactivate HDMI-CEC. Screen Saver To turn on the TV you set the same language as follow: 1) Press SETUP button. 2) Press / button to select Misc. 3) Press button, then use the / button to select the On or Off mode. 5) Press ENTER button. 6) Press SETUP button to On mode. Function setup Customizing the Function Settings (continued) Setting details DivX® Registration Some DivX® Video-On-Demand files required registration code, please get the code of your DVD player...
... switch to appropriate input channel. Off: To deactivate HDMI-CEC. Screen Saver To turn on the TV you set the same language as follow: 1) Press SETUP button. 2) Press / button to select Misc. 3) Press button, then use the / button to select the On or Off mode. 5) Press ENTER button. 6) Press SETUP button to On mode. Function setup Customizing the Function Settings (continued) Setting details DivX® Registration Some DivX® Video-On-Demand files required registration code, please get the code of your DVD player...
Owner's Manual - English
Page 36
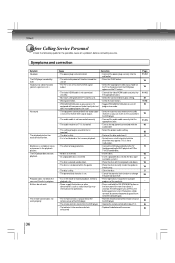
... contacting service. Correction • Connect the power plug securely into the wall outlet. • Press the PLAY button. • Select the appropriate video input mode on the TV so the picture from the DVD player appears on the disc tray. • Clean the disc. • Cancel the parental lock function or change the parental lock level. • These operations may interrupt correct operations. • The remote control is not pointed at the remote sensor of the audio receiver...
... contacting service. Correction • Connect the power plug securely into the wall outlet. • Press the PLAY button. • Select the appropriate video input mode on the TV so the picture from the DVD player appears on the disc tray. • Clean the disc. • Cancel the parental lock function or change the parental lock level. • These operations may interrupt correct operations. • The remote control is not pointed at the remote sensor of the audio receiver...

Owner's Manual - English
Page 38
... and insurance charges for set installation, setup, adjustment of customer controls, and installation or repair of TACP arising under the warranty or under state law. Commercial Units DAV Products sold AS IS or WITH ALL FAULTS. Owner's Manual and Product Registration Card Read this owner's manual thoroughly before operating this warranty. By registering your DAV Product you will enable TACP to bring you new products specifically designed...
... and insurance charges for set installation, setup, adjustment of customer controls, and installation or repair of TACP arising under the warranty or under state law. Commercial Units DAV Products sold AS IS or WITH ALL FAULTS. Owner's Manual and Product Registration Card Read this owner's manual thoroughly before operating this warranty. By registering your DAV Product you will enable TACP to bring you new products specifically designed...


