
Quick Start Guide
Page 2
... battery may affect the functionality of the camcorder. 8 Remove the battery if it in an ambient temperature between usages, as required by TOSHIBA as replacements. Doing so may damage the camcorder. 4 Use the camcorder with care. Avoid pressing hard on the included CD. About the battery pack ❖ Use only batteries recommended by local ordinances or regulations. ❖ Charge the battery pack only in direct sunlight. Safety instructions...
... battery may affect the functionality of the camcorder. 8 Remove the battery if it in an ambient temperature between usages, as required by TOSHIBA as replacements. Doing so may damage the camcorder. 4 Use the camcorder with care. Avoid pressing hard on the included CD. About the battery pack ❖ Use only batteries recommended by local ordinances or regulations. ❖ Charge the battery pack only in direct sunlight. Safety instructions...
Quick Start Guide
Page 3
... trademarks or trademarks of California to cause birth defects or other countries. GMAA00217011.book Page 3 Friday, March 26, 2010 10:53 AM Safety instructions 3 Handling the cord on this product conforms to the following Standards: FCC Conditions This equipment has been tested and found to the following two conditions: (1) This device may cause undesired operation.
... trademarks or trademarks of California to cause birth defects or other countries. GMAA00217011.book Page 3 Friday, March 26, 2010 10:53 AM Safety instructions 3 Handling the cord on this product conforms to the following Standards: FCC Conditions This equipment has been tested and found to the following two conditions: (1) This device may cause undesired operation.
Quick Start Guide
Page 4
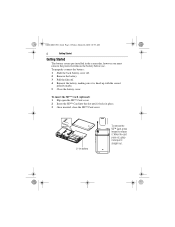
... the correct polarity marks. 5 Close the battery cover. To properly connect the battery: 1 Slide the back battery cover off. 2 Remove the battery. 3 Pull the film off. 4 Reinsert the battery, making sure it locks in the camcorder, however you must remove the protective film on the battery before use. Li-ion battery To remove the SD™ Card, press inward to release it straight out...
... the correct polarity marks. 5 Close the battery cover. To properly connect the battery: 1 Slide the back battery cover off. 2 Remove the battery. 3 Pull the film off. 4 Reinsert the battery, making sure it locks in the camcorder, however you must remove the protective film on the battery before use. Li-ion battery To remove the SD™ Card, press inward to release it straight out...
Quick Start Guide
Page 5
Turn off automatically after 5 minutes. A blinking light will indicate active charging and a solid light will turn off the camcorder. In AC charging mode, the light will indicate that charging is complete. GMAA00217011.book Page 5 Friday, March 26, 2010 10:53 AM Getting Started 5 Charge your battery You must use the supplied AC adaptor or the USB cable to charge your camcorder before use.
Turn off automatically after 5 minutes. A blinking light will indicate active charging and a solid light will turn off the camcorder. In AC charging mode, the light will indicate that charging is complete. GMAA00217011.book Page 5 Friday, March 26, 2010 10:53 AM Getting Started 5 Charge your battery You must use the supplied AC adaptor or the USB cable to charge your camcorder before use.
Quick Start Guide
Page 6
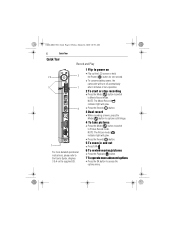
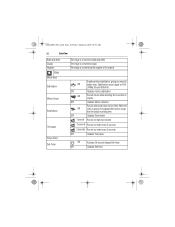
... menu. NOTE: The Picture mode (......) indicator light will glow. Press the Record (......) button. 5 To zoom in and out Press T/W 6 To review movies/pictures Press the Playback (....) button. 7 To operate more detailed operational instructions, please refer to the User's Guide, chapters 3 & 4 on the supplied CD. 1 Flip to Movie Record mode. To conserve battery power, the camcorder will turn off automatically after 3 minutes of non-operation. 2 To start or stop recording Press the Mode (......) button to switch to power on Flip out the LCD screen...
... menu. NOTE: The Picture mode (......) indicator light will glow. Press the Record (......) button. 5 To zoom in and out Press T/W 6 To review movies/pictures Press the Playback (....) button. 7 To operate more detailed operational instructions, please refer to the User's Guide, chapters 3 & 4 on the supplied CD. 1 Flip to Movie Record mode. To conserve battery power, the camcorder will turn off automatically after 3 minutes of non-operation. 2 To start or stop recording Press the Mode (......) button to switch to power on Flip out the LCD screen...
Quick Start Guide
Page 7
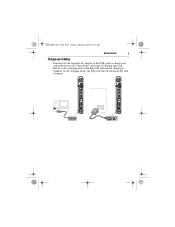
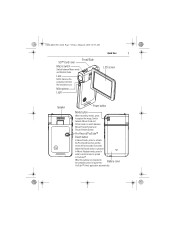
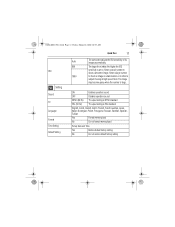
... LCD screen Speaker Power button Mode button When recording movies, press to activate the Pre-Record function and the movie will be recorded 3 seconds before use. GMAA00217011.book Page 7 Friday, March 26, 2010 10:53 AM Quick Tour 7 SD™ Card cover Macro switch Switch between Movie Preview Screen and Picture Preview Screen. Switch between Movie mode and Picture mode or switch between Macro mode and Normal mode. Pre-Record/YouTube™ Direct button In Record mode, press to capture the image. When the camera is pressed. Lens NOTE: Remove...
... LCD screen Speaker Power button Mode button When recording movies, press to activate the Pre-Record function and the movie will be recorded 3 seconds before use. GMAA00217011.book Page 7 Friday, March 26, 2010 10:53 AM Quick Tour 7 SD™ Card cover Macro switch Switch between Movie Preview Screen and Picture Preview Screen. Switch between Movie mode and Picture mode or switch between Macro mode and Normal mode. Pre-Record/YouTube™ Direct button In Record mode, press to capture the image. When the camera is pressed. Lens NOTE: Remove...
Quick Start Guide
Page 8
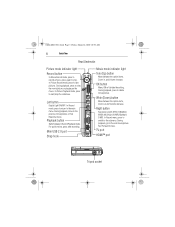
... button Menu ON or Validate the setting. In Record menu, press to switch to start/stop . In Picture Record mode, press to view the movie/picture or play/pause the movie. Left button Digital Light ON/OFF. Wide (Down) button Move between Record/Playback mode. TV port HDMI™ port Tripod socket During playback, press to take pictures. Mini USB 2.0 port Strap hook Movie mode indicator light Tele (Up) button Move between the option items, Zoom in, and Volume increase. For quick review, press after recording...
... button Menu ON or Validate the setting. In Record menu, press to switch to start/stop . In Picture Record mode, press to view the movie/picture or play/pause the movie. Left button Digital Light ON/OFF. Wide (Down) button Move between Record/Playback mode. TV port HDMI™ port Tripod socket During playback, press to take pictures. Mini USB 2.0 port Strap hook Movie mode indicator light Tele (Up) button Move between the option items, Zoom in, and Volume increase. For quick review, press after recording...
Quick Start Guide
Page 9
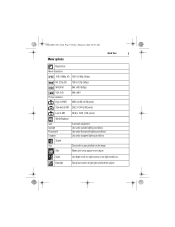
... AM Menu options Quick Tour 9 Resolution Movie Resolution FHD (1080p 30) 1920 x 1080p (30fps) HD (720p 30) WVGA 60 VGA (4:3) Picture resolution High (16 MP) 1280 x 720p (30fps) 848 x 480 (60fps) 640 x 480 4608 x 3456 (16 M pixels) Standard (5 MP) 2592 x 1944 (5 M pixels) Low (3 MP) 2048 x 1536 (3 M pixels) White Balance Auto Daylight Fluorescent Tungsten Automatic adjustment Use under outside lighting conditions Use...
... AM Menu options Quick Tour 9 Resolution Movie Resolution FHD (1080p 30) 1920 x 1080p (30fps) HD (720p 30) WVGA 60 VGA (4:3) Picture resolution High (16 MP) 1280 x 720p (30fps) 848 x 480 (60fps) 640 x 480 4608 x 3456 (16 M pixels) Standard (5 MP) 2592 x 1944 (5 M pixels) Low (3 MP) 2048 x 1536 (3 M pixels) White Balance Auto Daylight Fluorescent Tungsten Automatic adjustment Use under outside lighting conditions Use...
Quick Start Guide
Page 10
... smooth, ON stable video. GMAA00217011.book Page 10 Friday, March 26, 2010 10:53 AM 10 Quick Tour Black and white Classic Negative Effect Movie effect Stabilization Motion Detect Slow Motion Time lapse Picture Effect Self-Timer The image is converted to black and white The image is converted to sepia The image is played, the playback time will be longer than the actual recording time. OFF Disables Slow motion 1 second Record one frame per...
... smooth, ON stable video. GMAA00217011.book Page 10 Friday, March 26, 2010 10:53 AM 10 Quick Tour Black and white Classic Negative Effect Movie effect Stabilization Motion Detect Slow Motion Time lapse Picture Effect Self-Timer The image is converted to black and white The image is converted to sepia The image is played, the playback time will be longer than the actual recording time. OFF Disables Slow motion 1 second Record one frame per...
Quick Start Guide
Page 11
... Enables operation sound OFF Disables operation sound NTSC (60 Hz) TV output setting is NTSC standard PAL (50 Hz) TV output setting is large. GMAA00217011.book Page 11 Friday, March 26, 2010 10:53 AM ISO Setting Sound TV Language Format Time Setting Default Setting Quick Tour 11 Auto The camcorder adjusts the ISO sensitivity of its images automatically. 800 The larger the number, the higher the ISO sensitivity is set to shoot a subject moving at high speed...
... Enables operation sound OFF Disables operation sound NTSC (60 Hz) TV output setting is NTSC standard PAL (50 Hz) TV output setting is large. GMAA00217011.book Page 11 Friday, March 26, 2010 10:53 AM ISO Setting Sound TV Language Format Time Setting Default Setting Quick Tour 11 Auto The camcorder adjusts the ISO sensitivity of its images automatically. 800 The larger the number, the higher the ISO sensitivity is set to shoot a subject moving at high speed...
Quick Start Guide
Page 12
...-screen instructions to YouTube™: You can view, delete, move, or copy the desired recorded movies and pictures. To upload video files to complete the installation. ❖ ArcSoft MediaImpression®-a user-friendly application that can be found on the supplied CD. burns a video to DVD, and uploads videos to the User's Guide, chapter 9 on your media; To install the bundled Software: 1 Insert the supplied CD into one format that is compatible with the supplied mini USB 2.0 cable...
...-screen instructions to YouTube™: You can view, delete, move, or copy the desired recorded movies and pictures. To upload video files to complete the installation. ❖ ArcSoft MediaImpression®-a user-friendly application that can be found on the supplied CD. burns a video to DVD, and uploads videos to the User's Guide, chapter 9 on your media; To install the bundled Software: 1 Insert the supplied CD into one format that is compatible with the supplied mini USB 2.0 cable...
Quick Start Guide
Page 13
... Toshiba Computer Accessories can be found online at www.warranty.toshiba.com. Contacting Toshiba Toshiba's technical support Web site For technical support, or to stay current on the most recent software and hardware options for your CAMILEO product and for troubleshooting suggestions. GMAA00217011.book Page 13 Friday, March 26, 2010 10:53 AM Toshiba Support 13 Toshiba Support If you require help or are having problems operating...
... Toshiba Computer Accessories can be found online at www.warranty.toshiba.com. Contacting Toshiba Toshiba's technical support Web site For technical support, or to stay current on the most recent software and hardware options for your CAMILEO product and for troubleshooting suggestions. GMAA00217011.book Page 13 Friday, March 26, 2010 10:53 AM Toshiba Support 13 Toshiba Support If you require help or are having problems operating...


