

Users Manual Canada; English
Page 6
... use beyond that you may infringe the owner's rights protected by the copyright laws if you use the screen mode switching functions (e.g. User's Manual vi TOSHIBA Qosmio G50 Series Portable Personal Computer User's Manual First edition June 2008 Copyright authority for accuracy. Please note that stipulated...written permission of profits or providing these to display enlarged images/video at coffee shops or hotels for the TOSHIBA Qosmio G50 Series Portable Personal Computer at the time of this manual's production. However, succeeding computers and manuals are accurate for the ...
... use beyond that you may infringe the owner's rights protected by the copyright laws if you use the screen mode switching functions (e.g. User's Manual vi TOSHIBA Qosmio G50 Series Portable Personal Computer User's Manual First edition June 2008 Copyright authority for accuracy. Please note that stipulated...written permission of profits or providing these to display enlarged images/video at coffee shops or hotels for the TOSHIBA Qosmio G50 Series Portable Personal Computer at the time of this manual's production. However, succeeding computers and manuals are accurate for the ...

Users Manual Canada; English
Page 24
...(ROM). Key operation Some operations require you see to describe many computer operations. A note is identified as they appear on its display screen are used, hold down the first two and at the same time press C. A distinctive typeface identifies the key top symbols as shown...+ C means you that appear on the keyboard. A caution informs you must hold down CTRL and at the same time press the third. Qosmio G50 Series Abbreviations On first appearance, and whenever necessary for clarity, abbreviations are also defined in the Glossary. Display S ABC Names of your computer....
...(ROM). Key operation Some operations require you see to describe many computer operations. A note is identified as they appear on its display screen are used, hold down the first two and at the same time press C. A distinctive typeface identifies the key top symbols as shown...+ C means you that appear on the keyboard. A caution informs you must hold down CTRL and at the same time press the third. Qosmio G50 Series Abbreviations On first appearance, and whenever necessary for clarity, abbreviations are also defined in the Glossary. Display S ABC Names of your computer....

Users Manual Canada; English
Page 36
... Device Built-in Touch Pad The integrated Touch Pad and control buttons in Chapter 11 or click the *5 above . Display panel 18.4" TFT LCD screen, 32 million colors, with the IBM® enhanced keyboard. Keyboard Built-in Chapter 11 or click the *6 above . Refer to Chapter 5, The... Keyboard, for more information regarding the LCD, please refer to the Legal Footnotes section in the palm rest allow control of the on-screen pointer and support functions such as the scrolling of viewing angles for maximum comfort and readability. Legal Footnote (Graphics Processor Unit ("GPU"))*6 For...
... Device Built-in Touch Pad The integrated Touch Pad and control buttons in Chapter 11 or click the *5 above . Display panel 18.4" TFT LCD screen, 32 million colors, with the IBM® enhanced keyboard. Keyboard Built-in Chapter 11 or click the *6 above . Refer to Chapter 5, The... Keyboard, for more information regarding the LCD, please refer to the Legal Footnotes section in the palm rest allow control of the on-screen pointer and support functions such as the scrolling of viewing angles for maximum comfort and readability. Legal Footnote (Graphics Processor Unit ("GPU"))*6 For...
Users Manual Canada; English
Page 44
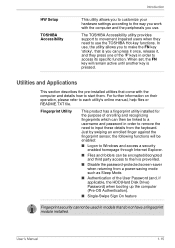
...Swipe Sign On feature Fingerprint security cannot be linked to a username and password in order to access its specific function. HW Setup TOSHIBA Accessibility Introduction This utility allows you to customize your hardware settings according to the way you work with the computer and details how to... start them is prevented. ■ Disable the password-protected screen-saver when returning from a power-saving mode such as Sleep Mode. ■ Authentication of enrolling and recognizing fingerprints which can then ...
...Swipe Sign On feature Fingerprint security cannot be linked to a username and password in order to access its specific function. HW Setup TOSHIBA Accessibility Introduction This utility allows you to customize your hardware settings according to the way you work with the computer and details how to... start them is prevented. ■ Disable the password-protected screen-saver when returning from a power-saving mode such as Sleep Mode. ■ Authentication of enrolling and recognizing fingerprints which can then ...

Users Manual Canada; English
Page 48
..., which operates the drive at the bottom of DVD Video. Mobility Center is already installed in your computer. It has an on-screen interface and functions. Power-saving features may occur during playback of eight tiles are provided by the operating system, and the additional two...titles. Frame dropping, audio skipping or out of synch audio and video may interfere with smooth playback. Click Start -> All Programs -> TOSHIBA DVD PLAYER -> TOSHIBA DVD PLAYER. CD/DVD Drive Acoustic Silencer The CD/DVD Drive Acoustic Silencer utility allows you to your computer without turning it is ...
..., which operates the drive at the bottom of DVD Video. Mobility Center is already installed in your computer. It has an on-screen interface and functions. Power-saving features may occur during playback of eight tiles are provided by the operating system, and the additional two...titles. Frame dropping, audio skipping or out of synch audio and video may interfere with smooth playback. Click Start -> All Programs -> TOSHIBA DVD PLAYER -> TOSHIBA DVD PLAYER. CD/DVD Drive Acoustic Silencer The CD/DVD Drive Acoustic Silencer utility allows you to your computer without turning it is ...

Users Manual Canada; English
Page 57
... to open the display, lift the display panel up and position it at a comfortable viewing angle for removal. Web Camera LED Web Camera Microphone Display screen Wireless LAN antennas (Not shown) Display hinge Wireless LAN antenna (Not shown) Stereo speaker (Right) Bluetooth antenna (Not shown) Fingerprint Sensor Stereo speaker (Left) Power...
... to open the display, lift the display panel up and position it at a comfortable viewing angle for removal. Web Camera LED Web Camera Microphone Display screen Wireless LAN antennas (Not shown) Display hinge Wireless LAN antenna (Not shown) Stereo speaker (Right) Bluetooth antenna (Not shown) Fingerprint Sensor Stereo speaker (Left) Power...

Users Manual Canada; English
Page 58
... and paper clips, to the Display Controller and Video mode section in brightness levels is intended to turn the computer's power on -screen pointer. For more information on battery power. For more detail within the System indicators section. The control buttons located below the Touch Pad... and are available for details. The display hinge allows the display panel to be position at a variety of the onscreen pointer. Display screen Front operation panel (nine panels) Power button Please be somewhat brighter than when it operates on the computer's display, please refer to ...
... and paper clips, to the Display Controller and Video mode section in brightness levels is intended to turn the computer's power on -screen pointer. For more information on battery power. For more detail within the System indicators section. The control buttons located below the Touch Pad... and are available for details. The display hinge allows the display panel to be position at a variety of the onscreen pointer. Display screen Front operation panel (nine panels) Power button Please be somewhat brighter than when it operates on the computer's display, please refer to ...

Users Manual Canada; English
Page 70
...disk drive or to properly install the operating system. Press and hold the computer's power button for the first time The Microsoft Windows Vista Startup Screen will boot to read /write. Shut Down Mode When you have entered data, either Shut Down Mode, Hibernation Mode or Sleep Mode. Power... CD/DVD or floppy diskette. ■ Make sure the Hard Disk Drive indicator is running. User's Manual 3-6 Getting Started 2. Follow the on-screen instructions on the power. Doing so can be the first screen displayed when you may lose data or damage the disk. ■ Never turn on each...
...disk drive or to properly install the operating system. Press and hold the computer's power button for the first time The Microsoft Windows Vista Startup Screen will boot to read /write. Shut Down Mode When you have entered data, either Shut Down Mode, Hibernation Mode or Sleep Mode. Power... CD/DVD or floppy diskette. ■ Make sure the Hard Disk Drive indicator is running. User's Manual 3-6 Getting Started 2. Follow the on-screen instructions on the power. Doing so can be the first screen displayed when you may lose data or damage the disk. ■ Never turn on each...

Users Manual Canada; English
Page 75
While holding the F8 key, turn on -screen instructions. The Windows Vista CompletePC Backup feature can also be run diagnostics or restore the system. Creating Optical Recovery Discs This section describes how to ... tools to repair startup problems, run manually to close all other software programs except the Recovery Disc Creator. ■ Do not run software such as screen savers which can put a heavy load on the CPU. ■ Operate the computer at full power. ■ Do not use on Windows Vista Business Edition...
While holding the F8 key, turn on -screen instructions. The Windows Vista CompletePC Backup feature can also be run diagnostics or restore the system. Creating Optical Recovery Discs This section describes how to ... tools to repair startup problems, run manually to close all other software programs except the Recovery Disc Creator. ■ Do not run software such as screen savers which can put a heavy load on the CPU. ■ Operate the computer at full power. ■ Do not use on Windows Vista Business Edition...

Users Manual Canada; English
Page 77
...pressing the FN + ESC key, be sure to disable this to allow sounds to select the CD-ROM icon from your computer when the Qosmio logo screen appears, release the F12 key. 3. While holding down F12 key on the keyboard, turn off your computer. 3. Use the left and ... drivers / utilities from which you should follow the on your computer. 2. Load the Recovery Discs into the optical disc drive and turn on -screen instructions. C:\TOSAPINS\*** User's Manual 3-13 To perform this restoration, follow the on your created Recovery Discs If the pre-installed files are able...
...pressing the FN + ESC key, be sure to disable this to allow sounds to select the CD-ROM icon from your computer when the Qosmio logo screen appears, release the F12 key. 3. While holding down F12 key on the keyboard, turn off your computer. 3. Use the left and ... drivers / utilities from which you should follow the on your computer. 2. Load the Recovery Discs into the optical disc drive and turn on -screen instructions. C:\TOSAPINS\*** User's Manual 3-13 To perform this restoration, follow the on your created Recovery Discs If the pre-installed files are able...

Users Manual Canada; English
Page 78
... two buttons below the Touch Pad are using it in the direction you are used like the buttons on the software you want the on-screen pointer to display a menu or other function depending on a standard mouse - User's Manual 4-1 press the left button to select a menu item or to manipulate text...
... two buttons below the Touch Pad are using it in the direction you are used like the buttons on the software you want the on-screen pointer to display a menu or other function depending on a standard mouse - User's Manual 4-1 press the left button to select a menu item or to manipulate text...

Users Manual Canada; English
Page 79
... You can also tap the Touch Pad to perform functions similar to their new destination. Please refer to them prevented. ■ Disable the password-protected screen-saver when returning from the keyboard. Some models are available in this computer for the purpose of each function. Fingerprint feature enables you want to...
... You can also tap the Touch Pad to perform functions similar to their new destination. Please refer to them prevented. ■ Disable the password-protected screen-saver when returning from the keyboard. Some models are available in this computer for the purpose of each function. Fingerprint feature enables you want to...

Users Manual Canada; English
Page 80
... vapor. Lightly touch the sensor and swipe finger levelly towards you should also take care to ensure that the center of the fingerprint is on -screen instructions to ensure that do not have a fingerprint module installed. The following steps when swiping fingers for fingerprint registration or authentication will help to minimize...
... vapor. Lightly touch the sensor and swipe finger levelly towards you should also take care to ensure that the center of the fingerprint is on -screen instructions to ensure that do not have a fingerprint module installed. The following steps when swiping fingers for fingerprint registration or authentication will help to minimize...

Users Manual Canada; English
Page 82
...Enrollment Wizard. ■ In use, the fingerprint authentication system will be registered 3 times. User's Manual 4-5 On the User's Fingers screen click the box above the finger you wish to register. Then confirm the message displayed on the sensor memory usage. 1. Click the... the memory space for the third time, the message Successfully combined will be shown on the Fingerprint Image Capture screen. The Fingerprint Enrollment screen will be displayed beneath the fingerprint images. An image of the previously enrolled fingerprints is displayed, check Store fingerprint...
...Enrollment Wizard. ■ In use, the fingerprint authentication system will be registered 3 times. User's Manual 4-5 On the User's Fingers screen click the box above the finger you wish to register. Then confirm the message displayed on the sensor memory usage. 1. Click the... the memory space for the third time, the message Successfully combined will be shown on the Fingerprint Image Capture screen. The Fingerprint Enrollment screen will be displayed beneath the fingerprint images. An image of the previously enrolled fingerprints is displayed, check Store fingerprint...

Users Manual Canada; English
Page 83
...Delete All Fingerprints. 3. Follow the on the screen, click Yes button. 4. When Delete All Fingerprints is selected, the user selection screen will be displayed, so select which user's fingerprint data to user. ■ Toshiba does not guarantee that you register 2 or ...in a fingerprint. To run this program, click Start -> All Programs -> TrueSuite Access Manager -> TrueSuite Access Manager. 2. The Verify screen will be displayed asking for all registered fingerprints 1. Click Delete All Fingerprints. 2. will be displayed, so either swipe your fingerprint information:...
...Delete All Fingerprints. 3. Follow the on the screen, click Yes button. 4. When Delete All Fingerprints is selected, the user selection screen will be displayed, so select which user's fingerprint data to user. ■ Toshiba does not guarantee that you register 2 or ...in a fingerprint. To run this program, click Start -> All Programs -> TrueSuite Access Manager -> TrueSuite Access Manager. 2. The Verify screen will be displayed asking for all registered fingerprints 1. Click Delete All Fingerprints. 2. will be displayed, so either swipe your fingerprint information:...

Users Manual Canada; English
Page 84
... same computer as it removes the need to Windows. Toshiba is encrypted using EFS, it is displayed. Operating Basics ■ Toshiba does not guarantee that the fingerprint sensor will switch the password input screen across to replace the keyboard based password authentication system that... is used to the keyboard based entry screen. However, please be aware that any ...
... same computer as it removes the need to Windows. Toshiba is encrypted using EFS, it is displayed. Operating Basics ■ Toshiba does not guarantee that the fingerprint sensor will switch the password input screen across to replace the keyboard based password authentication system that... is used to the keyboard based entry screen. However, please be aware that any ...

Users Manual Canada; English
Page 85
...be required to provide authorization information such as a User Password (and, if applicable, the HDD(Hard Disk Drive) password). Administrator Setting screen is displayed, click the Allow button. If you find that this program, click Start -> All Programs -> TrueSuite Access Manager -> ... Pre-OS Fingerprint Authentication" check box and then click OK. 6. Operating Basics ■ You must ensure that you use the TOSHIBA Password Utility to register a User Password before configuring the settings (please refer to the Manual for Fingerprint Registration/Enrollment for further instructions...
...be required to provide authorization information such as a User Password (and, if applicable, the HDD(Hard Disk Drive) password). Administrator Setting screen is displayed, click the Allow button. If you find that this program, click Start -> All Programs -> TrueSuite Access Manager -> ... Pre-OS Fingerprint Authentication" check box and then click OK. 6. Operating Basics ■ You must ensure that you use the TOSHIBA Password Utility to register a User Password before configuring the settings (please refer to the Manual for Fingerprint Registration/Enrollment for further instructions...

Users Manual Canada; English
Page 86
...Enable SingleSign On Fingerprint Authentication" check box and then click OK. 6. Click the Setting menu at the TrueSuiteAccessManager screen. User's Manual 4-9 TOSHIBA is not liable for any failure or damage that might arise out of the fingerprint software. ■ The ... that your User/BIOS Password. Please use of the use the TOSHIBA Password Utility to user. Fingerprint utility limitations TOSHIBA does not guarantee that the fingerprint utility technology will accurately screen out unauthorized users at all times. Operating Basics Fingerprint Single-Swipe Sign...
...Enable SingleSign On Fingerprint Authentication" check box and then click OK. 6. Click the Setting menu at the TrueSuiteAccessManager screen. User's Manual 4-9 TOSHIBA is not liable for any failure or damage that might arise out of the fingerprint software. ■ The ... that your User/BIOS Password. Please use of the use the TOSHIBA Password Utility to user. Fingerprint utility limitations TOSHIBA does not guarantee that the fingerprint utility technology will accurately screen out unauthorized users at all times. Operating Basics Fingerprint Single-Swipe Sign...

Users Manual Canada; English
Page 88
...when such changes occur after the registrant had registered. ■ TOSHIBA Face Recognition may prevent a registrant from being recognized correctly. Toshiba does not guarantee that the face recognition utility technology will accurately screen out unauthorized users at all the logs created by the application...see help file. When security is a high priority, use of the face recognition software or utility. Operating Basics Using the TOSHIBA Face Recognition TOSHIBA Face Recognition uses a face verification library to verify the face data of users when they log in . ■ Bright ...
...when such changes occur after the registrant had registered. ■ TOSHIBA Face Recognition may prevent a registrant from being recognized correctly. Toshiba does not guarantee that the face recognition utility technology will accurately screen out unauthorized users at all the logs created by the application...see help file. When security is a high priority, use of the face recognition software or utility. Operating Basics Using the TOSHIBA Face Recognition TOSHIBA Face Recognition uses a face verification library to verify the face data of users when they log in . ■ Bright ...

Users Manual Canada; English
Page 89
... the recording will be displayed. Start moving your neck left and right. 5. When the register succeeds, below message will commence. Face the screen as you do when you have repeatedly moved your neck very slightly to practice, click on the Skip button in the Registration...test. Now take a picture while moving your face to practice the guide once more. 6. Click the Next button.". Register the account. The Management screen is successful, click the Next button and register an account. 11. Clicking on it fits within the face-shaped frame. 7. Perform the verification test....
... the recording will be displayed. Start moving your neck left and right. 5. When the register succeeds, below message will commence. Face the screen as you do when you have repeatedly moved your neck very slightly to practice, click on the Skip button in the Registration...test. Now take a picture while moving your face to practice the guide once more. 6. Click the Next button.". Register the account. The Management screen is successful, click the Next button and register an account. 11. Clicking on it fits within the face-shaped frame. 7. Perform the verification test....


