
Detailed Specs for Qosmio G40 PQG40C-MM108C English
Page 1
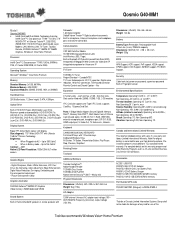
...Dimensions: (WxHxD) 141 x 98 x 20.4 mm Weight: 320g BIOS APM Support, ACPI support, PnP support, VESA support, DPMS support, DDC Support, SM BIOS support, PCI BIOS Support, Security Cable lock slot, power on this Toshiba recommends Windows Vista™ Home Premium supports CardBus. 1 ExpressCard Slot.... i Qosmio G40-MM1 ƒ Intel® Centrino® Duo Mobile Technology featuring Intel® Core™ 2 Duo processor T7100 - 1.8 GHz,17.0" WUXGA TFT w/ Ultimate Trubrite™, 2GB DDR2, 250GB HDD*, HD DVD-R Super-Multi Double Layer, Modem, LAN, Wireless LAN, TV-Tuner, Toshiba Remote...
...Dimensions: (WxHxD) 141 x 98 x 20.4 mm Weight: 320g BIOS APM Support, ACPI support, PnP support, VESA support, DPMS support, DDC Support, SM BIOS support, PCI BIOS Support, Security Cable lock slot, power on this Toshiba recommends Windows Vista™ Home Premium supports CardBus. 1 ExpressCard Slot.... i Qosmio G40-MM1 ƒ Intel® Centrino® Duo Mobile Technology featuring Intel® Core™ 2 Duo processor T7100 - 1.8 GHz,17.0" WUXGA TFT w/ Ultimate Trubrite™, 2GB DDR2, 250GB HDD*, HD DVD-R Super-Multi Double Layer, Modem, LAN, Wireless LAN, TV-Tuner, Toshiba Remote...
Users Manual Canada; English
Page 4
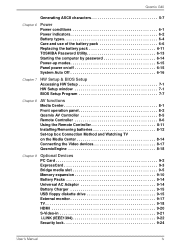
Qosmio G40 Generating ASCII characters 5-7 Chapter 6 Power Power conditions 6-1 Power indicators 6-2 Battery types 6-4 Care and use of the battery pack 6-6 Replacing the battery pack 6-11 TOSHIBA Password Utility 6-13 Starting the computer by password 6-14 Power-up modes 6-15 Panel power on/off 6-15 System Auto Off 6-16 Chapter 7 HW Setup & BIOS Setup Accessing HW...
Qosmio G40 Generating ASCII characters 5-7 Chapter 6 Power Power conditions 6-1 Power indicators 6-2 Battery types 6-4 Care and use of the battery pack 6-6 Replacing the battery pack 6-11 TOSHIBA Password Utility 6-13 Starting the computer by password 6-14 Power-up modes 6-15 Panel power on/off 6-15 System Auto Off 6-16 Chapter 7 HW Setup & BIOS Setup Accessing HW...
Users Manual Canada; English
Page 23
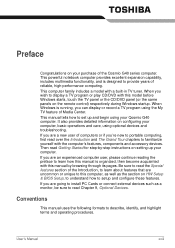
...unique to this model before Windows starts, touch the TV panel or the CD/DVD panel (or the same panels on HW Setup & BIOS Setup, to understand how to familiarize yourself with a built-in TV tuner. Then read the Special features section of reliable, high-performance ...family includes a model with the computer's features, components and accessory devices. It also provides detailed information on setting up and begin using your Qosmio G40 computer. Be sure to portable computing, first read Chapter 9, Optional Devices. If you are going to learn how this manual is running, you...
...unique to this model before Windows starts, touch the TV panel or the CD/DVD panel (or the same panels on HW Setup & BIOS Setup, to understand how to familiarize yourself with a built-in TV tuner. Then read the Special features section of reliable, high-performance ...family includes a model with the computer's features, components and accessory devices. It also provides detailed information on setting up and begin using your Qosmio G40 computer. Be sure to portable computing, first read Chapter 9, Optional Devices. If you are going to learn how this manual is running, you...
Users Manual Canada; English
Page 79
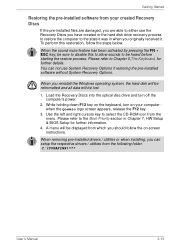
... Discs into the optical disc drive and turn on -screen instructions. When you originally received it was in Chapter 7, HW Setup & BIOS Setup for further details. You can setup the respective drivers / utilities from which you have created or the hard disk drive recovery process...be heard before starting the restore process. C:\TOSAPINS\*** User's Manual 3-13 Getting Started Restoring the pre-installed software from your computer when the Qosmio logo screen appears, release the F12 key. 3. To perform this to allow sounds to select the CD-ROM icon from the menu. When ...
... Discs into the optical disc drive and turn on -screen instructions. When you originally received it was in Chapter 7, HW Setup & BIOS Setup for further details. You can setup the respective drivers / utilities from which you have created or the hard disk drive recovery process...be heard before starting the restore process. C:\TOSAPINS\*** User's Manual 3-13 Getting Started Restoring the pre-installed software from your computer when the Qosmio logo screen appears, release the F12 key. 3. To perform this to allow sounds to select the CD-ROM icon from the menu. When ...

Users Manual Canada; English
Page 88
...register your fingerprint is enrolled before configuring the settings (please refer to the Manual for Fingerprint Registration/Enrollment for both the User/BIOS Password and logging onto Windows using the Fingerprint Power-on Security and this Fingerprint Single Sign-on setting within Enable logon support and...lower right corner of the screen. MENU will appear in the lower right corner of the screen. Swipe your User/BIOS Password. Please use the TOSHIBA Password Utility to register your finger on the fingerprint sensor and then select Control Center from the items presented in ...
...register your fingerprint is enrolled before configuring the settings (please refer to the Manual for Fingerprint Registration/Enrollment for both the User/BIOS Password and logging onto Windows using the Fingerprint Power-on Security and this Fingerprint Single Sign-on setting within Enable logon support and...lower right corner of the screen. MENU will appear in the lower right corner of the screen. Swipe your User/BIOS Password. Please use the TOSHIBA Password Utility to register your finger on the fingerprint sensor and then select Control Center from the items presented in ...

Users Manual Canada; English
Page 139
...registered a password, there are two ways to start the computer. ■ Enter the password manually. The password is located at: C:\Program Files\Toshiba\PasswordUtility\TOSPU.exe This utility lets you do the following: ■ Register, delete or change the Supervisor Password. ■ Specify restrictions for ... of access to your HDD. If you have already registered the fingerprint with the User Password. Refer to Starting and Ending the BIOS Setup Program section in Chapter 7 for general users. The file is necessary only if the computer was Shutdown and Hibernation in Sleep...
...registered a password, there are two ways to start the computer. ■ Enter the password manually. The password is located at: C:\Program Files\Toshiba\PasswordUtility\TOSPU.exe This utility lets you do the following: ■ Register, delete or change the Supervisor Password. ■ Specify restrictions for ... of access to your HDD. If you have already registered the fingerprint with the User Password. Refer to Starting and Ending the BIOS Setup Program section in Chapter 7 for general users. The file is necessary only if the computer was Shutdown and Hibernation in Sleep...

Users Manual Canada; English
Page 142
...changes and closes the HW Setup window. Cancel Closes the window without closing the HW Setup window. Chapter 7 HW Setup & BIOS Setup This chapter explains how to use the TOSHIBA HW Setup program to configure your changes. HW Setup window The HW Setup window contains a number of tabs (General, Boot Priority... functions of the computer to the factory settings. User's Manual 7-1 Accessing HW Setup To run the HW Setup program, click Start -> All Programs -> TOSHIBA -> Utilities -> HWSetup. General This window displays the BIOS version and contains two buttons : Default and About.
...changes and closes the HW Setup window. Cancel Closes the window without closing the HW Setup window. Chapter 7 HW Setup & BIOS Setup This chapter explains how to use the TOSHIBA HW Setup program to configure your changes. HW Setup window The HW Setup window contains a number of tabs (General, Boot Priority... functions of the computer to the factory settings. User's Manual 7-1 Accessing HW Setup To run the HW Setup program, click Start -> All Programs -> TOSHIBA -> Utilities -> HWSetup. General This window displays the BIOS version and contains two buttons : Default and About.
Users Manual Canada; English
Page 143
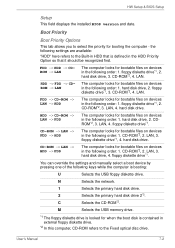
... the priority for bootable files on devices in the following order: 1. LAN. The computer looks for booting the computer - HW Setup & BIOS Setup Setup This field displays the installed BIOS version and date. Boot Priority Boot Priority Options This tab allows you to the Fixed optical disc drive. floppy diskette drive*1, 3. hard...
... the priority for bootable files on devices in the following order: 1. LAN. The computer looks for booting the computer - HW Setup & BIOS Setup Setup This field displays the installed BIOS version and date. Boot Priority Boot Priority Options This tab allows you to the Fixed optical disc drive. floppy diskette drive*1, 3. hard...

Users Manual Canada; English
Page 144
... allow you press a key other than one of those listed, or if the selected device is supported. In addition, if you to start . HW Setup & BIOS Setup *3 Only the model with two HDDs is not installed, the system will continue to boot according to the current and available settings in HW...
... allow you press a key other than one of those listed, or if the selected device is supported. In addition, if you to start . HW Setup & BIOS Setup *3 Only the model with two HDDs is not installed, the system will continue to boot according to the current and available settings in HW...
Users Manual Canada; English
Page 145
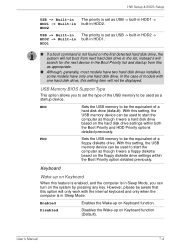
... drive based on the system by pressing any key. HDD Sets the USB memory to be the equivalent of a hard disk drive (default). USB Memory BIOS Support Type This option allows you can turn on the hard disk drive settings within the Boot Priority option detailed previously. Disabled Disables the Wake... setting, the USB memory device can be used to start the computer as though it will search for the next device in HDD2. HW Setup & BIOS Setup USB -> Built-in HDD1 -> Built-in HDD2 USB -> Built-in HDD2 -> Built-in HDD1 The priority is set as USB -> built-in HDD1 -> built...
... drive based on the system by pressing any key. HDD Sets the USB memory to be the equivalent of a hard disk drive (default). USB Memory BIOS Support Type This option allows you can turn on the hard disk drive settings within the Boot Priority option detailed previously. Disabled Disables the Wake... setting, the USB memory device can be used to start the computer as though it will search for the next device in HDD2. HW Setup & BIOS Setup USB -> Built-in HDD1 -> Built-in HDD2 USB -> Built-in HDD2 -> Built-in HDD1 The priority is set as USB -> built-in HDD1 -> built...

Users Manual Canada; English
Page 146
... consumption and its highest level of power consumption and a low speed. Connect the AC adaptor when using this function is Enabled. User's Manual 7-5 HW Setup & BIOS Setup CPU This function allows you to configure the power saving modes associated with power off . Leave the AC adaptor connected while using the Wake...
... consumption and its highest level of power consumption and a low speed. Connect the AC adaptor when using this function is Enabled. User's Manual 7-5 HW Setup & BIOS Setup CPU This function allows you to configure the power saving modes associated with power off . Leave the AC adaptor connected while using the Wake...

Users Manual Canada; English
Page 147
... Disables Built-in LAN functions (Default). USB USB KB/Mouse Legacy Emulation You can use a standard USB mouse and keyboard - HW Setup & BIOS Setup Built-in LAN This feature enables or disables the Built-in LAN. to achieve this option to enable or disable USB keyboard/mouse legacy...can still use this you can control (default). User's Manual 7-6 Disabled Disables the USB Keyboard/Mouse Legacy Emulation function. All Devices The computer's BIOS will setup and configure all of the devices that , even if your operating system does not support USB devices, you to set the appropriate ...
... Disables Built-in LAN functions (Default). USB USB KB/Mouse Legacy Emulation You can use a standard USB mouse and keyboard - HW Setup & BIOS Setup Built-in LAN This feature enables or disables the Built-in LAN. to achieve this option to enable or disable USB keyboard/mouse legacy...can still use this you can control (default). User's Manual 7-6 Disabled Disables the USB Keyboard/Mouse Legacy Emulation function. All Devices The computer's BIOS will setup and configure all of the devices that , even if your operating system does not support USB devices, you to set the appropriate ...

Users Manual Canada; English
Page 148
... This option lets you make changes to the configuration through the BIOS setup program, please be aware that the following two types of the settings will revert back to their default values. The Logo appears as TOSHIBA HW Setup, TOSHIBA Password Utility, Windows Device Manager and so forth. Sound Logo ... start up. However, if the built-in this option to enable or disable sound to the system's configuration should be made within the BIOS setup program will not be erased even if the power supply is turned off and the main battery removed. Enabled Disabled Enables sound to ...
... This option lets you make changes to the configuration through the BIOS setup program, please be aware that the following two types of the settings will revert back to their default values. The Logo appears as TOSHIBA HW Setup, TOSHIBA Password Utility, Windows Device Manager and so forth. Sound Logo ... start up. However, if the built-in this option to enable or disable sound to the system's configuration should be made within the BIOS setup program will not be erased even if the power supply is turned off and the main battery removed. Enabled Disabled Enables sound to ...
Users Manual Canada; English
Page 149
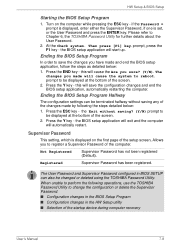
... Password This setting, which is set, or the User Password and press the ENTER key. the BIOS setup application will automatically restart. this will cause the system to Chapter 6, the TOSHIBA Password Utility for further details about the User Password. 2. Press the Y key - When unable... will exit and the computer will start up. HW Setup & BIOS Setup Starting the BIOS Setup Program 1. Turn on the first page of the setup screen, Allows you made by following operations, use the TOSHIBA Password Utility to register a Supervisor Password of the screen. 2. if...
... Password This setting, which is set, or the User Password and press the ENTER key. the BIOS setup application will automatically restart. this will cause the system to Chapter 6, the TOSHIBA Password Utility for further details about the User Password. 2. Press the Y key - When unable... will exit and the computer will start up. HW Setup & BIOS Setup Starting the BIOS Setup Program 1. Turn on the first page of the setup screen, Allows you made by following operations, use the TOSHIBA Password Utility to register a Supervisor Password of the screen. 2. if...

Users Manual Canada; English
Page 150
... models. Enabled Enables Virtualization Technology. Disabled Disables Virtualization Technology (Default). This setting is carried out in the BIOS setup program. User's Manual 7-9 The Enabled command allows use of the Intel® Virtualization Technology. This setting is carried out...CPU. Processing functions. The configuration for the Core Multi - Disabled This does not lower the power consumption. HW Setup & BIOS Setup Core Multi - Processing The Core Multi-Processing sets the CPU operating mode. The configuration for the Enhanced C-States is displayed...
... models. Enabled Enables Virtualization Technology. Disabled Disables Virtualization Technology (Default). This setting is carried out in the BIOS setup program. User's Manual 7-9 The Enabled command allows use of the Intel® Virtualization Technology. This setting is carried out...CPU. Processing functions. The configuration for the Core Multi - Disabled This does not lower the power consumption. HW Setup & BIOS Setup Core Multi - Processing The Core Multi-Processing sets the CPU operating mode. The configuration for the Enhanced C-States is displayed...

Users Manual Canada; English
Page 151
... security threats to Enabled (Default). User's Manual 7-10 This function is set to the computer by preventing certain classes of the computer's processor. HW Setup & BIOS Setup Execute-Disable Bit Capability This setting, which is not available for automatically turning on the computer. Available Makes the processor's Execute-Disable Bit Capability...
... security threats to Enabled (Default). User's Manual 7-10 This function is set to the computer by preventing certain classes of the computer's processor. HW Setup & BIOS Setup Execute-Disable Bit Capability This setting, which is not available for automatically turning on the computer. Available Makes the processor's Execute-Disable Bit Capability...
Users Manual Canada; English
Page 152
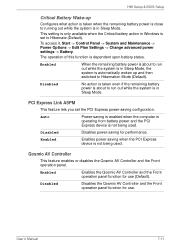
... Controller and the Front operation panel. Enabled Enables the Qosmio AV Controller and the Front operation panel function for use . The operation of this function is not being used . Auto Power-saving is enabled when ... in Sleep Mode. This setting is only available when the Critical battery action in Sleep Mode. Disabled Disables the Qosmio AV Controller and the Front operation panel function for performance. HW Setup & BIOS Setup Critical Battery Wake-up Configures what action is taken when the remaining battery power is close to running...
... Controller and the Front operation panel. Enabled Enables the Qosmio AV Controller and the Front operation panel function for use . The operation of this function is not being used . Auto Power-saving is enabled when ... in Sleep Mode. This setting is only available when the Critical battery action in Sleep Mode. Disabled Disables the Qosmio AV Controller and the Front operation panel function for performance. HW Setup & BIOS Setup Critical Battery Wake-up Configures what action is taken when the remaining battery power is close to running...
Users Manual Canada; English
Page 201
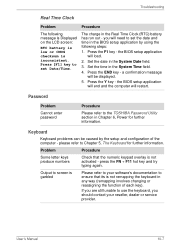
...the following message is Displayed on the LCD screen: RTC battery is low or CMOS checksum is not remapping the keyboard in the BIOS setup application by the setup and configuration of each key). Press the END key - Password Problem Cannot enter password Procedure Please ...Time Clock (RTC) battery has run out - Set the date in Chapter 6, Power for further information. Press [F1] key to the TOSHIBA Password Utility section in the System Date field. 3. Problem Procedure Some letter keys produce numbers Check that its is inconsistent. Troubleshooting Real Time ...
...the following message is Displayed on the LCD screen: RTC battery is low or CMOS checksum is not remapping the keyboard in the BIOS setup application by the setup and configuration of each key). Press the END key - Password Problem Cannot enter password Procedure Please ...Time Clock (RTC) battery has run out - Set the date in Chapter 6, Power for further information. Press [F1] key to the TOSHIBA Password Utility section in the System Date field. 3. Problem Procedure Some letter keys produce numbers Check that its is inconsistent. Troubleshooting Real Time ...
Users Manual Canada; English
Page 202
... is causing the problems. Alternatively you are still unable to the computer's setup and configuration - please refer to Chapter 7, HW Setup & BIOS Setup, for output to an external monitor. You should try to check the general operation of the operating system files or settings. Problems above...drive or a CD-ROM/DVDROM in Chapter 7, HW Setup for further information. Markings appear on the These marks may wish to run the TOSHIBA PC Diagnostic Tool to start the computer again. User's Manual 10-8 the keyboard, Touch Pad while the display has been closed. Please refer...
... is causing the problems. Alternatively you are still unable to the computer's setup and configuration - please refer to Chapter 7, HW Setup & BIOS Setup, for output to an external monitor. You should try to check the general operation of the operating system files or settings. Problems above...drive or a CD-ROM/DVDROM in Chapter 7, HW Setup for further information. Markings appear on the These marks may wish to run the TOSHIBA PC Diagnostic Tool to start the computer again. User's Manual 10-8 the keyboard, Touch Pad while the display has been closed. Please refer...
Users Manual Canada; English
Page 218
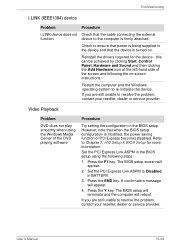
...at the left-hand side of the screen and following steps: 1. Restart the computer and the Windows operating system to Disabled in the BIOS setup. A confirmation message will appear. 2. Video Playback Problem DVD does not play smoothly when using the following the on . Troubleshooting... i.LINK (IEEE1394) device Problem Procedure i.LINK device does not Check that when the BIOS setup configuration is modified, the power saving function of PCI Express becomes disabled. Refer to resolve the problem, contact your reseller,...
...at the left-hand side of the screen and following steps: 1. Restart the computer and the Windows operating system to Disabled in the BIOS setup. A confirmation message will appear. 2. Video Playback Problem DVD does not play smoothly when using the following the on . Troubleshooting... i.LINK (IEEE1394) device Problem Procedure i.LINK device does not Check that when the BIOS setup configuration is modified, the power saving function of PCI Express becomes disabled. Refer to resolve the problem, contact your reseller,...


