User Guide
Page 5
...allow you will notify the customer as soon as possible. If Problems Arise If this change. Also, you to make changes in a margin at (949) 859-4273. or an authorized representative of Toshiba, or the Toshiba Support Centre within the United States at (800) 457-7777 or ...be necessary for any person to use a computer or other electronic device, including Fax machines, to the telephone network, the telephone company may request that temporary discontinuance of your service or the operation of service may occasionally be advised of 1991 makes it can. Fax Branding The ...
...allow you will notify the customer as soon as possible. If Problems Arise If this change. Also, you to make changes in a margin at (949) 859-4273. or an authorized representative of Toshiba, or the Toshiba Support Centre within the United States at (800) 457-7777 or ...be necessary for any person to use a computer or other electronic device, including Fax machines, to the telephone network, the telephone company may request that temporary discontinuance of your service or the operation of service may occasionally be advised of 1991 makes it can. Fax Branding The ...
User Guide
Page 27
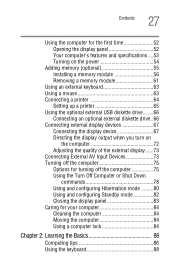
...time 52 Opening the display panel 52 Your computer's features and specifications ....53 Turning on the power 54 Adding memory (optional 55 Installing a memory module 56 Removing a memory module 61 Using an external keyboard 63 Using a mouse 63 Connecting a printer 64 Setting up a printer 65 Using the optional external USB diskette drive........66 Connecting an optional external diskette drive..66 Connecting external display devices 67 Connecting the display device 67 Directing the display output when you turn on the computer 72 Adjusting the quality of the external display......73...
...time 52 Opening the display panel 52 Your computer's features and specifications ....53 Turning on the power 54 Adding memory (optional 55 Installing a memory module 56 Removing a memory module 61 Using an external keyboard 63 Using a mouse 63 Connecting a printer 64 Setting up a printer 65 Using the optional external USB diskette drive........66 Connecting an optional external diskette drive..66 Connecting external display devices 67 Connecting the display device 67 Directing the display output when you turn on the computer 72 Adjusting the quality of the external display......73...

User Guide
Page 57
... Start, Turn off the computer. 3 Unplug and remove any cables connected to the computer, including the AC adapter. 4 Remove the battery. If you install or remove a memory module, turn the computer upside down to step 3. 1 If the computer is on page 119. 5 Close the display panel and turn off computer window appears. 2 Click Turn Off. The Turn off the computer using the Start menu. otherwise, skip to locate the memory module slot cover. Before you install or remove a memory module while...
... Start, Turn off the computer. 3 Unplug and remove any cables connected to the computer, including the AC adapter. 4 Remove the battery. If you install or remove a memory module, turn the computer upside down to step 3. 1 If the computer is on page 119. 5 Close the display panel and turn off computer window appears. 2 Click Turn Off. The Turn off the computer using the Start menu. otherwise, skip to locate the memory module slot cover. Before you install or remove a memory module while...

User Guide
Page 58
... up. Front of computer Sample removing the memory module slot cover 8 Place the memory module slot cover in a safe place so that secures the memory module slot cover. 7 Remove the memory slot cover. Avoid touching the connectors on the memory module or on the computer. Before you handle the module, touch a grounded metal surface to touch its antistatic packaging. 58 Getting Started Adding memory (optional) 6 Using a standard Phillips No. 1 screwdriver, loosen the captive screw that you may cause memory access problems.
... up. Front of computer Sample removing the memory module slot cover 8 Place the memory module slot cover in a safe place so that secures the memory module slot cover. 7 Remove the memory slot cover. Avoid touching the connectors on the memory module or on the computer. Before you handle the module, touch a grounded metal surface to touch its antistatic packaging. 58 Getting Started Adding memory (optional) 6 Using a standard Phillips No. 1 screwdriver, loosen the captive screw that you may cause memory access problems.

User Guide
Page 60
... the memory module connector until the clips snap into place when the memory module is properly inserted. 14 Replace the memory module slot cover and tighten the screw. 15 Re-insert the battery. For more information on inserting the battery, see "Changing the main battery" on page 119. 16 Turn the computer right side up. 17 Reconnect the cables. 18 Restart the computer. The memory module should...
... the memory module connector until the clips snap into place when the memory module is properly inserted. 14 Replace the memory module slot cover and tighten the screw. 15 Re-insert the battery. For more information on inserting the battery, see "Changing the main battery" on page 119. 16 Turn the computer right side up. 17 Reconnect the cables. 18 Restart the computer. The memory module should...
User Guide
Page 61
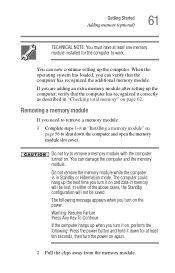
... the above cases, the Standby configuration will be saved. Getting Started Adding memory (optional) 61 TECHNICAL NOTE: You must have at least one memory module installed for at least ten seconds, then turn the power on . Do not try to work. The following : Press the power button and hold it down the computer and open the memory module slot cover. Removing a memory module If you turn it correctly as described in...
... the above cases, the Standby configuration will be saved. Getting Started Adding memory (optional) 61 TECHNICAL NOTE: You must have at least one memory module installed for at least ten seconds, then turn the power on . Do not try to work. The following : Press the power button and hold it down the computer and open the memory module slot cover. Removing a memory module If you turn it correctly as described in...
User Guide
Page 62
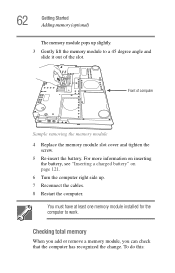
... memory (optional) The memory module pops up . 7 Reconnect the cables. 8 Restart the computer. Front of the slot. To do this: Checking total memory When you add or remove a memory module, you can check that the computer has recognized the change. For more information on inserting the battery, see "Inserting a charged battery" on page 121. 6 Turn the computer right side up slightly. 3 Gently lift the memory module to work...
... memory (optional) The memory module pops up . 7 Reconnect the cables. 8 Restart the computer. Front of the slot. To do this: Checking total memory When you add or remove a memory module, you can check that the computer has recognized the change. For more information on inserting the battery, see "Inserting a charged battery" on page 121. 6 Turn the computer right side up slightly. 3 Gently lift the memory module to work...
User Guide
Page 68
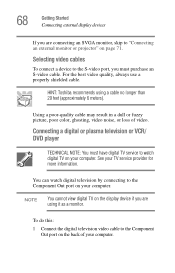
... plasma television or VCR/ DVD player TECHNICAL NOTE: You must purchase an S-video cable. 68 Getting Started Connecting external display devices If you are using a cable no longer than 20 feet (approximately 6 meters). For the best video quality, always use a properly shielded cable. Selecting video cables To connect a device to the S-video port, you must have digital TV service to watch digital television by connecting to "Connecting an external monitor or projector" on the...
... plasma television or VCR/ DVD player TECHNICAL NOTE: You must purchase an S-video cable. 68 Getting Started Connecting external display devices If you are using a cable no longer than 20 feet (approximately 6 meters). For the best video quality, always use a properly shielded cable. Selecting video cables To connect a device to the S-video port, you must have digital TV service to watch digital television by connecting to "Connecting an external monitor or projector" on the...
User Guide
Page 191
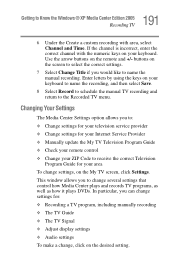
...; Adjust display settings ❖ Audio settings To make a change, click on the remote and +/- In particular, you to: ❖ Change settings for your television service provider ❖ Change settings for your Internet Service Provider ❖ Manually update the My TV Television Program Guide ❖ Check your remote control ❖ Change your keyboard. If the channel is incorrect, enter the correct channel with area, select Channel and Time. buttons on your ZIP Code to...
...; Adjust display settings ❖ Audio settings To make a change, click on the remote and +/- In particular, you to: ❖ Change settings for your television service provider ❖ Change settings for your Internet Service Provider ❖ Manually update the My TV Television Program Guide ❖ Check your remote control ❖ Change your keyboard. If the channel is incorrect, enter the correct channel with area, select Channel and Time. buttons on your ZIP Code to...
User Guide
Page 213
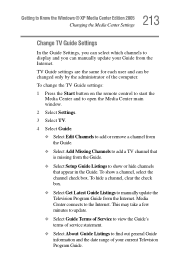
... service statement. ❖ Select About Guide Listings to manually update the Television Program Guide from the Internet. To hide a channel, clear the check box. ❖ Select Get Latest Guide Listings to find out general Guide information and the date range of the computer. Media Center connects to show a channel, select the channel check box. To change the TV Guide settings: 1 Press the Start button on the remote control to start...
... service statement. ❖ Select About Guide Listings to manually update the Television Program Guide from the Internet. To hide a channel, clear the check box. ❖ Select Get Latest Guide Listings to find out general Guide information and the date range of the computer. Media Center connects to show a channel, select the channel check box. To change the TV Guide settings: 1 Press the Start button on the remote control to start...
User Guide
Page 269
...'s hard disk which is read whenever the operating system is below specification values. The hard disk drive's performance improves when write cache is copied from being written onto the master boot record data area. This would result in the Windows Event Viewer when performance of a physical drive is started. Contact a Toshiba Authorized Service Provider or Toshiba Global Support Centre for assistance. Outside of the primary internal hard disk...
...'s hard disk which is read whenever the operating system is below specification values. The hard disk drive's performance improves when write cache is copied from being written onto the master boot record data area. This would result in the Windows Event Viewer when performance of a physical drive is started. Contact a Toshiba Authorized Service Provider or Toshiba Global Support Centre for assistance. Outside of the primary internal hard disk...
User Guide
Page 286
... a hardware device has failed, problems usually occur when you can easily detect if the operating system is not working correctly. The computer displays the Non-System disk or disk error message. If pressing any of time. For more information see "The computer is not accessing the hard disk or the optional external diskette drive." For more information see "Charging the main battery" on page 110. The Windows® operating...
... a hardware device has failed, problems usually occur when you can easily detect if the operating system is not working correctly. The computer displays the Non-System disk or disk error message. If pressing any of time. For more information see "The computer is not accessing the hard disk or the optional external diskette drive." For more information see "Charging the main battery" on page 110. The Windows® operating...
User Guide
Page 297
... return the display priority to continue working power outlet. ❖ Check that the cable connecting the external monitor to the computer is firmly attached. ❖ Try adjusting the contrast and brightness controls on the external monitor. ❖ Press Fn and F5 simultaneously to activate the screen. If this , press Fn and F5 simultaneously (once). Press any key to make sure the display priority is not set for the...
... return the display priority to continue working power outlet. ❖ Check that the cable connecting the external monitor to the computer is firmly attached. ❖ Try adjusting the contrast and brightness controls on the external monitor. ❖ Press Fn and F5 simultaneously to activate the screen. If this , press Fn and F5 simultaneously (once). Press any key to make sure the display priority is not set for the...
User Guide
Page 312
... Goes Wrong DVD operating problems The Windows XP wireless management facility does not work. If the documentation that accompanies the adapter does not provide enough information to 16-bit color and click OK. 4 Clean the disc and try the following steps: 1 Verify that the disc is in a format that the drive supports. 2 Ensure that the Display properties are using an external Wi-Fi adapter (a PC Card, USB adapter, or other...
... Goes Wrong DVD operating problems The Windows XP wireless management facility does not work. If the documentation that accompanies the adapter does not provide enough information to 16-bit color and click OK. 4 Clean the disc and try the following steps: 1 Verify that the disc is in a format that the drive supports. 2 Ensure that the Display properties are using an external Wi-Fi adapter (a PC Card, USB adapter, or other...
User Guide
Page 337
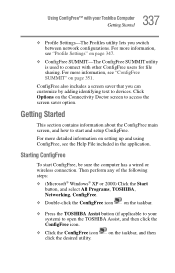
... or wireless connection. Starting ConfigFree To start and setup ConfigFree. on page 347. ❖ ConfigFree SUMMIT-The ConfigFree SUMMIT utility is used to connect with your system) to your Toshiba Computer Getting Started ❖ Profile Settings-The Profiles utility lets you can customize by adding identifying text to access the screen saver option. Click Options on the taskbar. ❖ Press the TOSHIBA Assist button (if applicable to open the TOSHIBA...
... or wireless connection. Starting ConfigFree To start and setup ConfigFree. on page 347. ❖ ConfigFree SUMMIT-The ConfigFree SUMMIT utility is used to connect with your system) to your Toshiba Computer Getting Started ❖ Profile Settings-The Profiles utility lets you can customize by adding identifying text to access the screen saver option. Click Options on the taskbar. ❖ Press the TOSHIBA Assist button (if applicable to open the TOSHIBA...

User Guide
Page 368
... and are removable. Compare software. hot key-(1) A feature in which certain keys in when the computer was turned off . H hard disk-A storage device composed of a rigid platter or platters that are used for voltages in which all open files and programs, when you turn on the keyboard. By default, the hard disk is referred to add or remove devices from a computer while the computer is connected to create a complete screen image...
... and are removable. Compare software. hot key-(1) A feature in which certain keys in when the computer was turned off . H hard disk-A storage device composed of a rigid platter or platters that are used for voltages in which all open files and programs, when you turn on the keyboard. By default, the hard disk is referred to add or remove devices from a computer while the computer is connected to create a complete screen image...
User Guide
Page 375
... B backing up files 87 battery changing 119 charge indicator light 50, 112 charge not lasting 295 charging 51 conserving power 116 disposal 124 low charge 114 monitoring power 50, 112 not charging 294 power usage hot key 118 power usage mode 329 real-time clock (RTC) 109 removing 119 BIOS Setup see TOSHIBA Hardware Setup Bridge Media slot 146 button power 54 start 128 C CD playing an audio 102 playing using Auto-Run 104 CD/DVD creating 104 CDs inserting 102 375
... B backing up files 87 battery changing 119 charge indicator light 50, 112 charge not lasting 295 charging 51 conserving power 116 disposal 124 low charge 114 monitoring power 50, 112 not charging 294 power usage hot key 118 power usage mode 329 real-time clock (RTC) 109 removing 119 BIOS Setup see TOSHIBA Hardware Setup Bridge Media slot 146 button power 54 start 128 C CD playing an audio 102 playing using Auto-Run 104 CD/DVD creating 104 CDs inserting 102 375
User Guide
Page 376
.../trouble accessing a disk 299 running slow 300 diskette drive cannot insert a diskette 301 cannot read a diskette 301 connecting 66 external, connecting 66 display does not look normal/flickers 298 external monitor not working 299 latch 52 screen is blank 297 display device connecting 67 display panel opening 52 disposal information 25 disposing of used batteries 124 DMA (Direct Memory Access) 290 DVD player general problems 312 DVD-ROM drive problems 302 troubleshooting 302 DVD-ROM or multi-function drive inserting discs 102 removing 105 DVD-ROM/multi-function drive
.../trouble accessing a disk 299 running slow 300 diskette drive cannot insert a diskette 301 cannot read a diskette 301 connecting 66 external, connecting 66 display does not look normal/flickers 298 external monitor not working 299 latch 52 screen is blank 297 display device connecting 67 display panel opening 52 disposal information 25 disposing of used batteries 124 DMA (Direct Memory Access) 290 DVD player general problems 312 DVD-ROM drive problems 302 troubleshooting 302 DVD-ROM or multi-function drive inserting discs 102 removing 105 DVD-ROM/multi-function drive
User Guide
Page 377
... change/remove key assignments 226 starting 222 Fn-esse program 222 assigning a key 222 using drag-and-drop 223 function keys 89 H hardware conflicts 289 resolving 291 headphones using 141 Help and Support Windows XP 288 Hibernation mode 76 configuring 80 starting again from 82 hot key display brightness 332 display modes 332 Hibernation mode 331 instant password security 327 keyboard 333 keyboard overlays 333, 334 password security 327 power usage mode 329 Standby mode 330 volume mute 326 hot key power usage mode...
... change/remove key assignments 226 starting 222 Fn-esse program 222 assigning a key 222 using drag-and-drop 223 function keys 89 H hardware conflicts 289 resolving 291 headphones using 141 Help and Support Windows XP 288 Hibernation mode 76 configuring 80 starting again from 82 hot key display brightness 332 display modes 332 Hibernation mode 331 instant password security 327 keyboard 333 keyboard overlays 333, 334 password security 327 power usage mode 329 Standby mode 330 volume mute 326 hot key power usage mode...
User Guide
Page 378
... 225 key assignments changing or removing existing 226 keyboard character keys 88 function keys 89 hot keys 333, 334 not working 285 overlay keys 90 troubleshooting 296 Windows special keys 90 keyboard, external 63 keyboard, full-size 88 keyboard, PS/2-compatible 63 M main battery removing 119 memory adding 55 expansion slots 57 problem solving 293 removing expansion slot cover 58 memory module inserting 59 installation 56 removing 62 microphone 140 modem determining COM port 130 problem solving 308 resetting port to default settings 130 upgrading 130 module memory 58 monitor connecting 67...
... 225 key assignments changing or removing existing 226 keyboard character keys 88 function keys 89 hot keys 333, 334 not working 285 overlay keys 90 troubleshooting 296 Windows special keys 90 keyboard, external 63 keyboard, full-size 88 keyboard, PS/2-compatible 63 M main battery removing 119 memory adding 55 expansion slots 57 problem solving 293 removing expansion slot cover 58 memory module inserting 59 installation 56 removing 62 microphone 140 modem determining COM port 130 problem solving 308 resetting port to default settings 130 upgrading 130 module memory 58 monitor connecting 67...


