
Maintenance Manual
Page 62
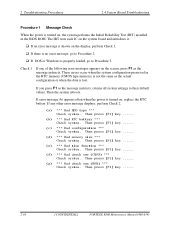
...*** Check system. Then press [F1] key ...... 2-16 [CONFIDENTIAL] PORTEGE R500 Maintenance Manual (960-634) If error message (b) appears often when the power is properly loaded, go to Procedure 2. ‰ If DOS or Windows is turned on, replace the RTC battery. 2 Troubleshooting Procedures 2.4 System Board Troubleshooting Procedure 1 Message.... The IRT tests each IC on the system board and initializes it. ‰ If an error message is shown on the screen, press F1 as the message instructs, returns all system settings to Procedure 3. Check 1 If one of the following error messages ...
...*** Check system. Then press [F1] key ...... 2-16 [CONFIDENTIAL] PORTEGE R500 Maintenance Manual (960-634) If error message (b) appears often when the power is properly loaded, go to Procedure 2. ‰ If DOS or Windows is turned on, replace the RTC battery. 2 Troubleshooting Procedures 2.4 System Board Troubleshooting Procedure 1 Message.... The IRT tests each IC on the system board and initializes it. ‰ If an error message is shown on the screen, press F1 as the message instructs, returns all system settings to Procedure 3. Check 1 If one of the following error messages ...
Maintenance Manual
Page 121
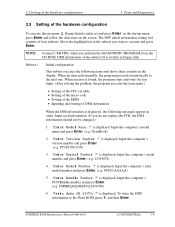
NOTE: Connect USB FDD, when you do not replace the PCB, the DMI information should not be changed.) 1. When an error is found, the program ...displayed, the following items and shows their contents in floppy disk. is displayed. Input the computer's PCN/Bundle number and press Enter. (e.g. PORTEGE R500 Maintenance Manual (960-634) [CONFIDENTIAL] 3-9 When an item ends normally, the program proceeds automatically to execute and press Enter. "Enter Model... DMI information to the Flash ROM, press Y, and then Enter. "Enter Model Number ?" DMI information on the screen.
NOTE: Connect USB FDD, when you do not replace the PCB, the DMI information should not be changed.) 1. When an error is found, the program ...displayed, the following items and shows their contents in floppy disk. is displayed. Input the computer's PCN/Bundle number and press Enter. (e.g. PORTEGE R500 Maintenance Manual (960-634) [CONFIDENTIAL] 3-9 When an item ends normally, the program proceeds automatically to execute and press Enter. "Enter Model... DMI information to the Flash ROM, press Y, and then Enter. "Enter Model Number ?" DMI information on the screen.
Maintenance Manual
Page 173
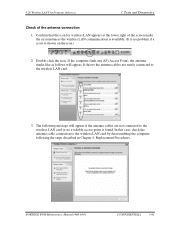
... are not connected to the wireless LAN card by disassembling the computer following message will appear. PORTEGE R500 Maintenance Manual (960-634) [CONFIDENTIAL] 3-61 3.26 Wireless LAN Test Program (Atheros) 3 Tests and Diagnostics Check of the screen under the circumstances the wireless LAN communication is available. (It is no available access point is... case, check the antenna cable connection to the wireless LAN card or no problem if a cross is found. The following the steps described in Chapter 4, Replacement Procedures.
... are not connected to the wireless LAN card by disassembling the computer following message will appear. PORTEGE R500 Maintenance Manual (960-634) [CONFIDENTIAL] 3-61 3.26 Wireless LAN Test Program (Atheros) 3 Tests and Diagnostics Check of the screen under the circumstances the wireless LAN communication is available. (It is no available access point is... case, check the antenna cable connection to the wireless LAN card or no problem if a cross is found. The following the steps described in Chapter 4, Replacement Procedures.
User Manual
Page 34
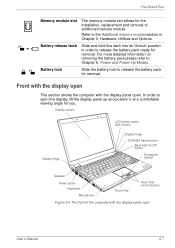
...latch into its 'Unlock' position in Chapter 3, Hardware, Utilities and Options. In order to release the battery pack for the installation, replacement and removal of the computer with the display panel open User's Manual 2-7 Front with the display open This section shows the computer ... angle for removal. The Grand Tour Memory module slot The memory module slot allows for removal. Display screen Display hinge LCD Sensor switch (Not shown) Display hinge TOSHIBA Assist button Back light On/Off button Fingerprint Sensor Speaker Power button Keyboard Microphone Touch Pad Touch Pad...
...latch into its 'Unlock' position in Chapter 3, Hardware, Utilities and Options. In order to release the battery pack for the installation, replacement and removal of the computer with the display panel open User's Manual 2-7 Front with the display open This section shows the computer ... angle for removal. The Grand Tour Memory module slot The memory module slot allows for removal. Display screen Display hinge LCD Sensor switch (Not shown) Display hinge TOSHIBA Assist button Back light On/Off button Fingerprint Sensor Speaker Power button Keyboard Microphone Touch Pad Touch Pad...
User Manual
Page 75
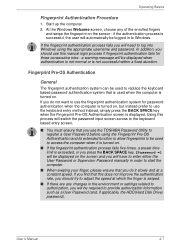
...is displayed. Fingerprint Pre-OS Authentication General The fingerprint authentication system can be used to replace the keyboard based password authentication system that you do it is turned on . Using ...this process will automatically be required to Windows. At the Windows Welcome screen, choose any changes in the environment or settings related to authorization, you will be... which the finger is not successful within a fixed duration. If you use the TOSHIBA Password Utility to register a User Password before using the appropriate username and password. ...
...is displayed. Fingerprint Pre-OS Authentication General The fingerprint authentication system can be used to replace the keyboard based password authentication system that you do it is turned on . Using ...this process will automatically be required to Windows. At the Windows Welcome screen, choose any changes in the environment or settings related to authorization, you will be... which the finger is not successful within a fixed duration. If you use the TOSHIBA Password Utility to register a User Password before using the appropriate username and password. ...

User Manual
Page 76
... Setting menu at the TrueSuiteAccessManager screen. Click the Exit button at the TrueSuiteAccessManager screen. 5. It is necessary to register the User/BIOS Password and Windows Logon Password before using only one fingerprint authentication is required to replace the User/BIOS Password (and..., if applicable, the HDD(Hard Disk Drive) Password) and the Windows Logon Password. Please use the TOSHIBA...
... Setting menu at the TrueSuiteAccessManager screen. Click the Exit button at the TrueSuiteAccessManager screen. 5. It is necessary to register the User/BIOS Password and Windows Logon Password before using only one fingerprint authentication is required to replace the User/BIOS Password (and..., if applicable, the HDD(Hard Disk Drive) Password) and the Windows Logon Password. Please use the TOSHIBA...
User Manual
Page 180
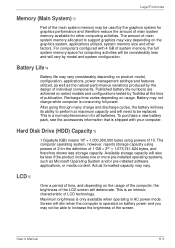
...10. Actual formatted capacity may vary depending on select models and configurations tested by Toshiba at maximum capacity and will lose its ability to support graphics may vary. Legal...system memory allocated to perform at the time of publication. The amount of the screen. Battery may vary considerably depending on the usage of the computer, the brightness ...configured with your computer. Recharge time varies depending on battery power and you may not be replaced. Maximum brightness is an intrinsic characteristic of system memory, the full system memory space for...
...10. Actual formatted capacity may vary depending on select models and configurations tested by Toshiba at maximum capacity and will lose its ability to support graphics may vary. Legal...system memory allocated to perform at the time of publication. The amount of the screen. Battery may vary considerably depending on the usage of the computer, the brightness ...configured with your computer. Recharge time varies depending on battery power and you may not be replaced. Maximum brightness is an intrinsic characteristic of system memory, the full system memory space for...
User Manual
Page 195
... 3-2, 6-4 save mode 3-6 types 6-4 Battery pack 2-5, 3-2 additional 6-1 replacing 6-10 BIOS Setup 7-8 Bluetooth 3-4, 4-25 Bluetooth 2.0+EDR Module Kit 3-27 Bluetooth Stack for Windows by Toshiba 3-9 Bluetooth USB Adaptor 3-26 problems 8-19 Wireless Optical Mouse 3-27 Wireless... screen 2-8 Docking port 2-6 Documentation list 1-1 DVD Super Multi drive problems 8-9 using 4-9 writing 4-13 E Equipment checklist 1-1 External monitor 2-2, 3-21 problems 8-17 F Fingerprint Sensor location 2-7 problems 8-14 using 4-2 Floppy diskette care 4-21 FN + 1 (TOSHIBA Zooming Utility reduce) 5-5 FN + 2 (TOSHIBA ...
... 3-2, 6-4 save mode 3-6 types 6-4 Battery pack 2-5, 3-2 additional 6-1 replacing 6-10 BIOS Setup 7-8 Bluetooth 3-4, 4-25 Bluetooth 2.0+EDR Module Kit 3-27 Bluetooth Stack for Windows by Toshiba 3-9 Bluetooth USB Adaptor 3-26 problems 8-19 Wireless Optical Mouse 3-27 Wireless... screen 2-8 Docking port 2-6 Documentation list 1-1 DVD Super Multi drive problems 8-9 using 4-9 writing 4-13 E Equipment checklist 1-1 External monitor 2-2, 3-21 problems 8-17 F Fingerprint Sensor location 2-7 problems 8-14 using 4-2 Floppy diskette care 4-21 FN + 1 (TOSHIBA Zooming Utility reduce) 5-5 FN + 2 (TOSHIBA ...


