
User Guide
Page 30
30 Contents Closing the display panel 93 Using your computer in tablet mode 93 Customizing your computer's settings 94 Caring for your computer 94 Cleaning the computer 95 Moving the computer 95 Using a computer lock 95 Chapter 2: ...
30 Contents Closing the display panel 93 Using your computer in tablet mode 93 Customizing your computer's settings 94 Caring for your computer 94 Cleaning the computer 95 Moving the computer 95 Using a computer lock 95 Chapter 2: ...
User Guide
Page 32
32 Contents Exploring audio features 138 Recording sounds 138 Using external speakers or headphones..........139 Using tablet mode 139 Preparing to use the tablet 139 Using tablet mode 141 Using the Toshiba tablet pen 142 Returning the computer to its original configuration 143 Using the Web Camera 143 Using ...LINK® port 150 Using the eSATA/USB combo port 150 Using the expansion port 150 Chapter 5: Utilities 152 TOSHIBA Assist 153 Connect 154 Secure 155 Protect & Fix 156 Optimize 157 TOSHIBA Application Installer 158 Setting passwords 159 Using an instant password 159
32 Contents Exploring audio features 138 Recording sounds 138 Using external speakers or headphones..........139 Using tablet mode 139 Preparing to use the tablet 139 Using tablet mode 141 Using the Toshiba tablet pen 142 Returning the computer to its original configuration 143 Using the Web Camera 143 Using ...LINK® port 150 Using the eSATA/USB combo port 150 Using the expansion port 150 Chapter 5: Utilities 152 TOSHIBA Assist 153 Connect 154 Secure 155 Protect & Fix 156 Optimize 157 TOSHIBA Application Installer 158 Setting passwords 159 Using an instant password 159
User Guide
Page 33
... Sleep and Charge 169 Enabling USB Sleep and Charge 171 Power supply mode settings 171 TOSHIBA Zooming Utility 173 TOSHIBA Button Support 174 TOSHIBA Rotation Utility 175 Windows® Mobility Center 176 Tablet PC Settings 177 TOSHIBA Tablet Access Code Utility 179 TOSHIBA Accessibility 180 Trusted Platform Module (TPM 181 Fingerprint Authentication Utility 182 Fingerprint utility limitations...
... Sleep and Charge 169 Enabling USB Sleep and Charge 171 Power supply mode settings 171 TOSHIBA Zooming Utility 173 TOSHIBA Button Support 174 TOSHIBA Rotation Utility 175 Windows® Mobility Center 176 Tablet PC Settings 177 TOSHIBA Tablet Access Code Utility 179 TOSHIBA Accessibility 180 Trusted Platform Module (TPM 181 Fingerprint Authentication Utility 182 Fingerprint utility limitations...

User Guide
Page 49
... to ensure that all drives and slots are empty. 3 Make sure the power button lock is in the unlocked position. 4 Press the power button in tablet mode" on page 93. When you turn on the computer for the first time deteriorate. This is operated on battery power, the screen will load.../OFF light on the system indicator panel glows green-about one second. To learn how to rotate the display panel or use your computer in tablet mode, see "Using your computer in until the operating system has loaded completely. Getting Started 49 Using the computer for the first time, do not...
... to ensure that all drives and slots are empty. 3 Make sure the power button lock is in the unlocked position. 4 Press the power button in tablet mode" on page 93. When you turn on the computer for the first time deteriorate. This is operated on battery power, the screen will load.../OFF light on the system indicator panel glows green-about one second. To learn how to rotate the display panel or use your computer in tablet mode, see "Using your computer in until the operating system has loaded completely. Getting Started 49 Using the computer for the first time, do not...

User Guide
Page 53
... cover Front of computer (Sample Illustration) Removing the memory module slot cover 7 Remove the memory module slot cover. 8 Place the screw and the cover in tablet mode. Front of computer (Sample Illustration) Locating the memory module slot cover 6 Using a small Phillips screwdriver, loosen the captive screw that you turn the computer...
... cover Front of computer (Sample Illustration) Removing the memory module slot cover 7 Remove the memory module slot cover. 8 Place the screw and the cover in tablet mode. Front of computer (Sample Illustration) Locating the memory module slot cover 6 Using a small Phillips screwdriver, loosen the captive screw that you turn the computer...

User Guide
Page 93
...have turned off the computer, close the display panel to use the screen much as you would a writing tablet. (Sample Illustration) Rotating the screen By orienting the screen so it again by closing the display panel, you...keep dust and dirt out of your computer, be sure to the screen(s) you place the computer in tablet mode Starting again from Sleep mode To start up the computer from Sleep mode, press the power button until... of the computer. The computer returns to slowly turn the screen in tablet mode One of your computer's features is a convertible display that allows you to use in...
...have turned off the computer, close the display panel to use the screen much as you would a writing tablet. (Sample Illustration) Rotating the screen By orienting the screen so it again by closing the display panel, you...keep dust and dirt out of your computer, be sure to the screen(s) you place the computer in tablet mode Starting again from Sleep mode To start up the computer from Sleep mode, press the power button until... of the computer. The computer returns to slowly turn the screen in tablet mode One of your computer's features is a convertible display that allows you to use in...

User Guide
Page 94
... moving your computer. See "Utilities" on page 128. For more information on those applications, see the documentation provided with the tablet feature of your computer's battery, see "Taking care of the system. There are several ways in which you can customize your...surface. 94 Getting Started Customizing your computer's settings Pen holder (Sample Illustration) Using the computer in tablet mode To remove the tablet pen, press it in tablet mode, see "Using tablet mode" on page 139. Customizing your particular requirements. For more information on using the computer in...
... moving your computer. See "Utilities" on page 128. For more information on those applications, see the documentation provided with the tablet feature of your computer's battery, see "Taking care of the system. There are several ways in which you can customize your...surface. 94 Getting Started Customizing your computer's settings Pen holder (Sample Illustration) Using the computer in tablet mode To remove the tablet pen, press it in tablet mode, see "Using tablet mode" on page 139. Customizing your particular requirements. For more information on using the computer in...

User Guide
Page 126
... the AC adaptor. 4 Close the display panel and turn the computer over, make sure that the computer display is properly closed and is not in tablet mode.
... the AC adaptor. 4 Close the display panel and turn the computer over, make sure that the computer display is properly closed and is not in tablet mode.

User Guide
Page 139
... high when using the internal speakers, you to loud sound can connect headphones or a pair of your model-about one second. Using tablet mode One of external stereo speakers. Preparing to listen, turn the volume down. TECHNICAL NOTE: When using amplified speakers, use the computer...'s volume control. Exploring Your Computer's Features Using tablet mode 139 6 To save the file, type a file name, and then click Save. Before putting on each speaker. ❖ For headphones,...
... high when using the internal speakers, you to loud sound can connect headphones or a pair of your model-about one second. Using tablet mode One of external stereo speakers. Preparing to listen, turn the volume down. TECHNICAL NOTE: When using amplified speakers, use the computer...'s volume control. Exploring Your Computer's Features Using tablet mode 139 6 To save the file, type a file name, and then click Save. Before putting on each speaker. ❖ For headphones,...

User Guide
Page 140
When you complete this task, the screen faces away from the keyboard. 140 Exploring Your Computer's Features Using tablet mode NOTE The display panel should be sure to slowly turn the screen in the proper direction, and not apply excessive force or speed. (Sample ...
When you complete this task, the screen faces away from the keyboard. 140 Exploring Your Computer's Features Using tablet mode NOTE The display panel should be sure to slowly turn the screen in the proper direction, and not apply excessive force or speed. (Sample ...

User Guide
Page 141
... landscape mode. Pull the pen from the holder. (Sample Illustration) Removing the Toshiba tablet pen from tablet mode to locate the optional reserve pen slot. For more information on changing tablet screen settings, see "TOSHIBA Rotation Utility" on the pen and then releasing it. To access the optional ...reserve pen, turn the computer upside down. Using tablet mode 1 Remove the Toshiba tablet pen which is unavailable. Any other orientation will automatically rotate to an external monitor, use the Cross Menu button (the...
... landscape mode. Pull the pen from the holder. (Sample Illustration) Removing the Toshiba tablet pen from tablet mode to locate the optional reserve pen slot. For more information on changing tablet screen settings, see "TOSHIBA Rotation Utility" on the pen and then releasing it. To access the optional ...reserve pen, turn the computer upside down. Using tablet mode 1 Remove the Toshiba tablet pen which is unavailable. Any other orientation will automatically rotate to an external monitor, use the Cross Menu button (the...
User Guide
Page 142
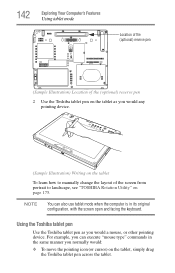
...you would any pointing device. (Sample Illustration) Writing on the tablet To learn how to landscape, see "TOSHIBA Rotation Utility" on the tablet, simply drag the Toshiba tablet pen across the tablet. For example, you can also use tablet mode when the computer is in the same manner you normally ... (Sample Illustration) Location of the screen from portrait to manually change the layout of the (optional) reserve pen 2 Use the Toshiba tablet pen on the tablet as you would a mouse, or other pointing device. NOTE You can execute "mouse type" commands in its original configuration, with...
...you would any pointing device. (Sample Illustration) Writing on the tablet To learn how to landscape, see "TOSHIBA Rotation Utility" on the tablet, simply drag the Toshiba tablet pen across the tablet. For example, you can also use tablet mode when the computer is in the same manner you normally ... (Sample Illustration) Location of the screen from portrait to manually change the layout of the (optional) reserve pen 2 Use the Toshiba tablet pen on the tablet as you would a mouse, or other pointing device. NOTE You can execute "mouse type" commands in its original configuration, with...

User Guide
Page 143
...Title Bar, and then hold it while you drag it twice-two clicks). ❖ To drag a window to another location on the tablet, press the Toshiba tablet pen on the side of the computer. 2 Lift the display panel to its upright position, perpendicular or 90o to its original configuration When ... Your Computer's Features Using the Web Camera 143 ❖ To click a button, gently press the Toshiba tablet pen on it (one click). ❖ To launch an application from the desktop, press the Toshiba tablet pen on the icon (some applications may require you to press it to the keyboard. 3 Rotate ...
...Title Bar, and then hold it while you drag it twice-two clicks). ❖ To drag a window to another location on the tablet, press the Toshiba tablet pen on the side of the computer. 2 Lift the display panel to its upright position, perpendicular or 90o to its original configuration When ... Your Computer's Features Using the Web Camera 143 ❖ To click a button, gently press the Toshiba tablet pen on it (one click). ❖ To launch an application from the desktop, press the Toshiba tablet pen on the icon (some applications may require you to press it to the keyboard. 3 Rotate ...

User Guide
Page 148
... accessories information packaged with you when you can be removed now, the system displays Safe to carry unnecessary components with your system or visit accessories.toshiba.com. If the system is safe to remove it is unable to prepare the module for the task at hand without having to Remove Hardware... display may result in damage to components, such as cables, attached to your computer. Failure to do so may cause damage to be used in tablet mode. If the module can be removed.
... accessories information packaged with you when you can be removed now, the system displays Safe to carry unnecessary components with your system or visit accessories.toshiba.com. If the system is safe to remove it is unable to prepare the module for the task at hand without having to Remove Hardware... display may result in damage to components, such as cables, attached to your computer. Failure to do so may cause damage to be used in tablet mode. If the module can be removed.
User Guide
Page 153
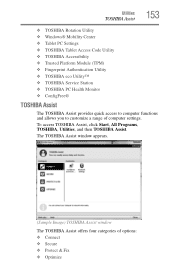
... Utility ❖ Windows® Mobility Center ❖ Tablet PC Settings ❖ TOSHIBA Tablet Access Code Utility ❖ TOSHIBA Accessibility ❖ Trusted Platform Module (TPM) ❖ Fingerprint Authentication Utility ❖ TOSHIBA eco Utility™ ❖ TOSHIBA Service Station ❖ TOSHIBA PC Health Monitor ❖ ConfigFree® TOSHIBA Assist The TOSHIBA Assist provides quick access to computer functions and allows you...
... Utility ❖ Windows® Mobility Center ❖ Tablet PC Settings ❖ TOSHIBA Tablet Access Code Utility ❖ TOSHIBA Accessibility ❖ Trusted Platform Module (TPM) ❖ Fingerprint Authentication Utility ❖ TOSHIBA eco Utility™ ❖ TOSHIBA Service Station ❖ TOSHIBA PC Health Monitor ❖ ConfigFree® TOSHIBA Assist The TOSHIBA Assist provides quick access to computer functions and allows you...

User Guide
Page 175
...) to change screen rotation options and settings for either PC mode or Tablet PC mode. 3 Click OK. The TOSHIBA Rotation Utility screen appears. (Sample Image) TOSHIBA Rotation Utility screen 2 Select a new display format for the tablet feature, rather than the Tablet PC Settings. NOTE TOSHIBA recommends that you to three other display formats: ❖ Primary landscape...
...) to change screen rotation options and settings for either PC mode or Tablet PC mode. 3 Click OK. The TOSHIBA Rotation Utility screen appears. (Sample Image) TOSHIBA Rotation Utility screen 2 Select a new display format for the tablet feature, rather than the Tablet PC Settings. NOTE TOSHIBA recommends that you to three other display formats: ❖ Primary landscape...

User Guide
Page 176
176 Utilities Windows® Mobility Center Windows® Mobility Center The Windows® Mobility Center allows you to select or activate an option. To start the Windows® Mobility Center: 1 Press and hold the Cross-Functional button for two seconds until the following screen displays. (Sample Image) Windows® Mobility Center screen 2 Move the Cross-Functional button up or down, or right to left to select an option. 3 Press the Cross-Functional button to configure hardwarerelated settings, or launch applications while in Tablet mode using the Cross-Functional button.
176 Utilities Windows® Mobility Center Windows® Mobility Center The Windows® Mobility Center allows you to select or activate an option. To start the Windows® Mobility Center: 1 Press and hold the Cross-Functional button for two seconds until the following screen displays. (Sample Image) Windows® Mobility Center screen 2 Move the Cross-Functional button up or down, or right to left to select an option. 3 Press the Cross-Functional button to configure hardwarerelated settings, or launch applications while in Tablet mode using the Cross-Functional button.

User Guide
Page 177
... Settings screen appears. (Sample Image) Tablet PC Settings window ❖ The Buttons tab allows you to specify an action when a display system button is recommended that you to change the screen's ... click OK. ❖ While the Display tab can be used to set various options for using the tablet and pen. Utilities Tablet PC Settings 177 Tablet PC Settings The Tablet PC Settings utility allows you use the "TOSHIBA Rotation Utility" on page 175 to change the screen's orientation and adjust screen brightness, it is pressed...
... Settings screen appears. (Sample Image) Tablet PC Settings window ❖ The Buttons tab allows you to specify an action when a display system button is recommended that you to change the screen's ... click OK. ❖ While the Display tab can be used to set various options for using the tablet and pen. Utilities Tablet PC Settings 177 Tablet PC Settings The Tablet PC Settings utility allows you use the "TOSHIBA Rotation Utility" on page 175 to change the screen's orientation and adjust screen brightness, it is pressed...

User Guide
Page 178
178 Utilities Tablet PC Settings ❖ The Other tab allows you to specify whether you are left handed or right handed, and configure your pen and touch displays. (Sample Image) Tablet PC Settings Tablet Buttons tab 2 Select the desired settings. 3 Click OK.
178 Utilities Tablet PC Settings ❖ The Other tab allows you to specify whether you are left handed or right handed, and configure your pen and touch displays. (Sample Image) Tablet PC Settings Tablet Buttons tab 2 Select the desired settings. 3 Click OK.
User Guide
Page 179
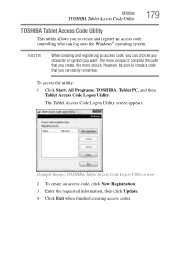
...to create a code that you to create and register an access code controlling who can easily remember. The Tablet Access Code Logon Utility screen appears. (Sample Image) TOSHIBA Tablet Access Code Logon Utility screen 2 To create an access code, click New Registration. 3 Enter the requested information..., then click Update. 4 Click Exit when finished creating access codes. The more secure. Utilities TOSHIBA Tablet Access Code Utility 179 TOSHIBA Tablet Access Code Utility This utility allows you create, the more unique or complex the code that you want.
...to create a code that you to create and register an access code controlling who can easily remember. The Tablet Access Code Logon Utility screen appears. (Sample Image) TOSHIBA Tablet Access Code Logon Utility screen 2 To create an access code, click New Registration. 3 Enter the requested information..., then click Update. 4 Click Exit when finished creating access codes. The more secure. Utilities TOSHIBA Tablet Access Code Utility 179 TOSHIBA Tablet Access Code Utility This utility allows you create, the more unique or complex the code that you want.
