
User Guide
Page 29
... Shut Down commands 74 Using and configuring Hibernation mode .........76 Using and configuring Standby mode 78 Closing the display panel 79 Using your computer in tablet mode 79 Customizing your computer's settings 80
... Shut Down commands 74 Using and configuring Hibernation mode .........76 Using and configuring Standby mode 78 Closing the display panel 79 Using your computer in tablet mode 79 Customizing your computer's settings 80

User Guide
Page 32
... Internet 128 Exploring audio features 129 Recording sounds 129 Using external speakers or headphones..........130 Using tablet mode 130 Preparing to use the tablet 130 Using tablet mode 132 Using the Toshiba tablet pen 134 Returning the computer to its original configuration 134 Web Cam 134 Using PC Cards ... module into the Ultra SlimBay.......141 Using the i.LINK® port 141 Using an expansion device 141 Using an Optional Toshiba Express Port Replicator with your computer 141 Chapter 5: Utilities 142 TOSHIBA Assist 143 Connect 144 Secure 145 Protect & Fix 146 Optimize 147...
... Internet 128 Exploring audio features 129 Recording sounds 129 Using external speakers or headphones..........130 Using tablet mode 130 Preparing to use the tablet 130 Using tablet mode 132 Using the Toshiba tablet pen 134 Returning the computer to its original configuration 134 Web Cam 134 Using PC Cards ... module into the Ultra SlimBay.......141 Using the i.LINK® port 141 Using an expansion device 141 Using an Optional Toshiba Express Port Replicator with your computer 141 Chapter 5: Utilities 142 TOSHIBA Assist 143 Connect 144 Secure 145 Protect & Fix 146 Optimize 147...
User Guide
Page 33
...a user password 151 Deleting a user password 152 TOSHIBA PC Diagnostic Tool Utility 153 TOSHIBA HDD Protection Utility 154 Fn-esse 155 Starting Fn-esse 155 TOSHIBA SD™ Memory Card Format Utility .........156 TOSHIBA SD™ Memory Boot Utility 157 Booting from a... TOSHIBA Hardware Setup 162 TOSHIBA Zooming Utility 164 TOSHIBA Mobile Extension 165 TOSHIBA Button Support 166 CD/DVD Drive Acoustic Silencer 167 TOSHIBA Rotation Utility 168 Tablet and Pen Settings 169 Cross Menu Utility 171 Creating a New Menu 172 Toshiba Tablet Access Code Utility 173 TOSHIBA Accessibility...
...a user password 151 Deleting a user password 152 TOSHIBA PC Diagnostic Tool Utility 153 TOSHIBA HDD Protection Utility 154 Fn-esse 155 Starting Fn-esse 155 TOSHIBA SD™ Memory Card Format Utility .........156 TOSHIBA SD™ Memory Boot Utility 157 Booting from a... TOSHIBA Hardware Setup 162 TOSHIBA Zooming Utility 164 TOSHIBA Mobile Extension 165 TOSHIBA Button Support 166 CD/DVD Drive Acoustic Silencer 167 TOSHIBA Rotation Utility 168 Tablet and Pen Settings 169 Cross Menu Utility 171 Creating a New Menu 172 Toshiba Tablet Access Code Utility 173 TOSHIBA Accessibility...

User Guide
Page 49
... you turn on the computer: 1 Make sure any external devices (such as the AC adaptor, if you plan to use your computer in tablet mode, see "Using your display are an intrinsic characteristic of the TFT manufacturing technology. Your computer's features and specifications Certain notebook chassis are empty... sure the power button lock is manufactured using highprecision technology. This information applies to all of thin-film transistors (TFT) and is in tablet mode" on page 79. To learn how to rotate the display panel or use AC power rather than battery power) are properly connected ...
... you turn on the computer: 1 Make sure any external devices (such as the AC adaptor, if you plan to use your computer in tablet mode, see "Using your display are an intrinsic characteristic of the TFT manufacturing technology. Your computer's features and specifications Certain notebook chassis are empty... sure the power button lock is manufactured using highprecision technology. This information applies to all of thin-film transistors (TFT) and is in tablet mode" on page 79. To learn how to rotate the display panel or use AC power rather than battery power) are properly connected ...

User Guide
Page 52
...) Locating the memory module slot cover 6 Using a small Phillips screwdriver, loosen the captive screw that the computer display is properly closed and is not in tablet mode.
...) Locating the memory module slot cover 6 Using a small Phillips screwdriver, loosen the captive screw that the computer display is properly closed and is not in tablet mode.

User Guide
Page 79
...computer is a convertible display that allows you to keep dust and dirt out of your computer in tablet mode 5 Click Apply. 6 Click OK. Closing the display panel After you would a writing tablet. (Sample Illustration) Rotating the screen The computer returns to the screen(s) you place the computer in..., depending on page 159. If you were using. Getting Started 79 Using your computer in tablet mode One of the computer. NOTE For more information about the Power Saver utility, see "TOSHIBA Power Saver" on the Standby options set. Starting again from Standby mode, press the power ...
...computer is a convertible display that allows you to keep dust and dirt out of your computer in tablet mode 5 Click Apply. 6 Click OK. Closing the display panel After you would a writing tablet. (Sample Illustration) Rotating the screen The computer returns to the screen(s) you place the computer in..., depending on page 159. If you were using. Getting Started 79 Using your computer in tablet mode One of the computer. NOTE For more information about the Power Saver utility, see "TOSHIBA Power Saver" on the Standby options set. Starting again from Standby mode, press the power ...

User Guide
Page 80
... and folding the screen over the keyboard, your system is ready to use in tablet mode, with the included Toshiba tablet pen. For more information, see "TOSHIBA Power Saver" on using the computer in tablet mode, see the documentation provided with the tablet feature of the system. For more information on page 159. You may also...
... and folding the screen over the keyboard, your system is ready to use in tablet mode, with the included Toshiba tablet pen. For more information, see "TOSHIBA Power Saver" on using the computer in tablet mode, see the documentation provided with the tablet feature of the system. For more information on page 159. You may also...

User Guide
Page 113
... not in "Using and configuring Hibernation mode" on the display may cause damage to the screen. 5 Slide the battery release lock to the instructions in tablet mode. Removing the battery from the computer To remove the battery: 1 Save your work. 2 Turn off the computer or place it into Hibernation mode before...
... not in "Using and configuring Hibernation mode" on the display may cause damage to the screen. 5 Slide the battery release lock to the instructions in tablet mode. Removing the battery from the computer To remove the battery: 1 Save your work. 2 Turn off the computer or place it into Hibernation mode before...

User Guide
Page 130
...is equipped with a full stereo sound system with internal speakers. Before putting on those applications, see the documentation provided with the tablet feature of external stereo speakers. Your computer came with applications already installed specifically designed to listen, turn the volume down. NOTE ...Display panel should be inadequate to rotate the display. 130 Exploring Your Computer's Features Using tablet mode Using external speakers or headphones Your computer is a convertible display that require an external power source. Do not set the...
...is equipped with a full stereo sound system with internal speakers. Before putting on those applications, see the documentation provided with the tablet feature of external stereo speakers. Your computer came with applications already installed specifically designed to listen, turn the volume down. NOTE ...Display panel should be inadequate to rotate the display. 130 Exploring Your Computer's Features Using tablet mode Using external speakers or headphones Your computer is a convertible display that require an external power source. Do not set the...

User Guide
Page 131
... down flat By default, the computer desktop will automatically rotate to primary portrait view. For more information on changing tablet screen settings, see "TOSHIBA Rotation Utility" on page 168. Exploring Your Computer's Features Using tablet mode 131 3 Rotate the display panel clockwise 180o (degrees). When you complete this task, the screen faces away...
... down flat By default, the computer desktop will automatically rotate to primary portrait view. For more information on changing tablet screen settings, see "TOSHIBA Rotation Utility" on page 168. Exploring Your Computer's Features Using tablet mode 131 3 Rotate the display panel clockwise 180o (degrees). When you complete this task, the screen faces away...

User Guide
Page 132
... the external video resolution incorrectly. Using tablet mode 1 Remove the Toshiba tablet pen which is unavailable. Pull the pen from the holder. (Sample Illustration) Removing the Toshiba tablet pen from the slot on the pen and then releasing it. 132 Exploring Your Computer's Features Using tablet mode 5 To send the video to... on an external monitor in case the primary pen is located on the side of the computer by momentarily pressing in on the tablet computer NOTE Your computer may have come equipped with an optional reserve pen to be used in primary landscape mode. To access the...
... the external video resolution incorrectly. Using tablet mode 1 Remove the Toshiba tablet pen which is unavailable. Pull the pen from the holder. (Sample Illustration) Removing the Toshiba tablet pen from the slot on the pen and then releasing it. 132 Exploring Your Computer's Features Using tablet mode 5 To send the video to... on an external monitor in case the primary pen is located on the side of the computer by momentarily pressing in on the tablet computer NOTE Your computer may have come equipped with an optional reserve pen to be used in primary landscape mode. To access the...
User Guide
Page 133
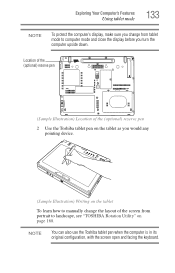
...) Location of the (optional) reserve pen 2 Use the Toshiba tablet pen on the tablet as you would any pointing device. (Sample Illustration) Writing on the tablet To learn how to manually change the layout of the screen from tablet mode to computer mode and close the display before you change... from portrait to landscape, see "TOSHIBA Rotation Utility" on page 168. Exploring Your Computer's Features Using tablet mode 133 NOTE To protect the computer's display, make sure you turn the computer upside down. NOTE You can also use the Toshiba tablet pen when the computer is in ...
...) Location of the (optional) reserve pen 2 Use the Toshiba tablet pen on the tablet as you would any pointing device. (Sample Illustration) Writing on the tablet To learn how to manually change the layout of the screen from tablet mode to computer mode and close the display before you change... from portrait to landscape, see "TOSHIBA Rotation Utility" on page 168. Exploring Your Computer's Features Using tablet mode 133 NOTE To protect the computer's display, make sure you turn the computer upside down. NOTE You can also use the Toshiba tablet pen when the computer is in ...

User Guide
Page 134
..., and then hold it while you drag it twice-two clicks). ❖ To drag a window to another location on the tablet, press the Toshiba tablet pen on the side of the computer. 2 Lift the display panel to its normal position facing the keyboard. Returning the computer to...Exploring Your Computer's Features Web Cam Using the Toshiba tablet pen Use the Toshiba tablet pen as you would : ❖ To move the pointing icon (or cursor) on the tablet, simply drag the Toshiba tablet pen across the tablet. ❖ To click a button, gently press the Toshiba tablet pen on it (one click). ❖ ...
..., and then hold it while you drag it twice-two clicks). ❖ To drag a window to another location on the tablet, press the Toshiba tablet pen on the side of the computer. 2 Lift the display panel to its normal position facing the keyboard. Returning the computer to...Exploring Your Computer's Features Web Cam Using the Toshiba tablet pen Use the Toshiba tablet pen as you would : ❖ To move the pointing icon (or cursor) on the tablet, simply drag the Toshiba tablet pen across the tablet. ❖ To click a button, gently press the Toshiba tablet pen on it (one click). ❖ ...

User Guide
Page 139
...not in progress and your computer. Before you turn the computer over, make sure that did not come with your system or visit accessories.toshiba.com. Using the Ultra SlimBay The Ultra SlimBay gives you travel. If the module can be purchased separately. Setting the computer down on the...drive ❖ Secondary hard disk drive (HDD) HINT: Items from the Ultra SlimBay NOTE Use caution when lifting or turning your data could be in tablet mode. Even when the Windows® message "copying..." If the system is being written or read. For example, any one of the following: &#...
...not in progress and your computer. Before you turn the computer over, make sure that did not come with your system or visit accessories.toshiba.com. Using the Ultra SlimBay The Ultra SlimBay gives you travel. If the module can be purchased separately. Setting the computer down on the...drive ❖ Secondary hard disk drive (HDD) HINT: Items from the Ultra SlimBay NOTE Use caution when lifting or turning your data could be in tablet mode. Even when the Windows® message "copying..." If the system is being written or read. For example, any one of the following: &#...

User Guide
Page 143
... Support ❖ CD/DVD Drive Acoustic Silencer ❖ TOSHIBA Rotation Utility ❖ Tablet and Pen Settings ❖ Cross Menu Utility ❖ Toshiba Tablet Access Code Utility ❖ TOSHIBA Accessibility ❖ Trusted Platform Module (TPM) ❖ Fingerprint Authentication Utility ❖ Important information for Wireless Key Logon TOSHIBA Assist The TOSHIBA Assist provides quick access to computer functions and...
... Support ❖ CD/DVD Drive Acoustic Silencer ❖ TOSHIBA Rotation Utility ❖ Tablet and Pen Settings ❖ Cross Menu Utility ❖ Toshiba Tablet Access Code Utility ❖ TOSHIBA Accessibility ❖ Trusted Platform Module (TPM) ❖ Fingerprint Authentication Utility ❖ Important information for Wireless Key Logon TOSHIBA Assist The TOSHIBA Assist provides quick access to computer functions and...
User Guide
Page 147
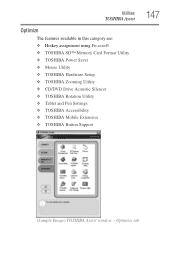
Utilities TOSHIBA Assist Optimize The features available in this category are: ❖ Hotkey assignment using Fn-esse® ❖ TOSHIBA SD™ Memory Card Format Utility ❖ TOSHIBA Power Saver ❖ Mouse Utility ❖ TOSHIBA Hardware Setup ❖ TOSHIBA Zooming Utility ❖ CD/DVD Drive Acoustic Silencer ❖ TOSHIBA Rotation Utility ❖ Tablet and Pen Settings ❖ TOSHIBA Accessibility ❖ TOSHIBA Mobile Extension ❖ TOSHIBA Button Support 147 (Sample Image) TOSHIBA Assist window - Optimize tab
Utilities TOSHIBA Assist Optimize The features available in this category are: ❖ Hotkey assignment using Fn-esse® ❖ TOSHIBA SD™ Memory Card Format Utility ❖ TOSHIBA Power Saver ❖ Mouse Utility ❖ TOSHIBA Hardware Setup ❖ TOSHIBA Zooming Utility ❖ CD/DVD Drive Acoustic Silencer ❖ TOSHIBA Rotation Utility ❖ Tablet and Pen Settings ❖ TOSHIBA Accessibility ❖ TOSHIBA Mobile Extension ❖ TOSHIBA Button Support 147 (Sample Image) TOSHIBA Assist window - Optimize tab

User Guide
Page 168
... Optimize tab of TOSHIBA Assist. 168 Utilities TOSHIBA Rotation Utility TOSHIBA Rotation Utility The TOSHIBA Rotation utility allows you use the TOSHIBA Rotation Utility to change the default setting of the display format (primary portrait) to change screen rotation options and settings for either PC mode or Tablet PC mode. 3 Click OK. The TOSHIBA Rotation Utility screen...
... Optimize tab of TOSHIBA Assist. 168 Utilities TOSHIBA Rotation Utility TOSHIBA Rotation Utility The TOSHIBA Rotation utility allows you use the TOSHIBA Rotation Utility to change the default setting of the display format (primary portrait) to change screen rotation options and settings for either PC mode or Tablet PC mode. 3 Click OK. The TOSHIBA Rotation Utility screen...

User Guide
Page 169
... 159. To access this utility: 1 Click the Tablet and Pen Settings icon in the Optimize tab of TOSHIBA Assist. Utilities Tablet and Pen Settings 169 Tablet and Pen Settings The Tablet and Pen Settings utility allows you use the TOSHIBA Rotation Utility to change the screen's orientation, see "TOSHIBA Rotation Utility" on page 168, and to set...
... 159. To access this utility: 1 Click the Tablet and Pen Settings icon in the Optimize tab of TOSHIBA Assist. Utilities Tablet and Pen Settings 169 Tablet and Pen Settings The Tablet and Pen Settings utility allows you use the TOSHIBA Rotation Utility to change the screen's orientation, see "TOSHIBA Rotation Utility" on page 168, and to set...

User Guide
Page 170
After making your selections, click Change, choose an Action, and then click OK. (Sample Image) Tablet and Pen Settings Tablet Buttons tab ❖ The Pen Options tab allows you to set various pen options. 2 Select the desired settings. 3 Click OK. 170 Utilities Tablet and Pen Settings ❖ The Tablet Buttons tab allows you to specify an action when a display system button is pressed.
After making your selections, click Change, choose an Action, and then click OK. (Sample Image) Tablet and Pen Settings Tablet Buttons tab ❖ The Pen Options tab allows you to set various pen options. 2 Select the desired settings. 3 Click OK. 170 Utilities Tablet and Pen Settings ❖ The Tablet Buttons tab allows you to specify an action when a display system button is pressed.

User Guide
Page 172
To create a new menu: 1 Click Start, All Programs, Toshiba, Tablet PC, and then Cross Menu. The Cross Menu Setting window appears. (Sample Image) Cross Menu Setting window 2 Click New. 3 Click Add File. 4 Browse for the application(s) you want to add to the menu and click Open. 5 When you have finished adding applications to five menus. 172 Utilities Cross Menu Utility Creating a New Menu NOTE You can add up to the menu, click OK.
To create a new menu: 1 Click Start, All Programs, Toshiba, Tablet PC, and then Cross Menu. The Cross Menu Setting window appears. (Sample Image) Cross Menu Setting window 2 Click New. 3 Click Add File. 4 Browse for the application(s) you want to add to the menu and click Open. 5 When you have finished adding applications to five menus. 172 Utilities Cross Menu Utility Creating a New Menu NOTE You can add up to the menu, click OK.

