
Users Manual Canada; English
Page 4
PORTÉGÉ M700/M710 Battery 6-5 TOSHIBA Password Utility 6-14 Tablet mode 6-18 Power-up modes 6-18 Panel power on/off 6-19 System Auto Off 6-19 Chapter 7 HW Setup & BIOS Setup Accessing HW Setup 7-1 HW Setup window 7-1 BIOS Setup Program 7-8 Chapter 8 Troubleshooting Problem solving process 8-1 Hardware and system checklist 8-3 TOSHIBA support 8-26 Appendix A Specifications Physical Dimensions A-1 Environmental Requirements A-1 Appendix B Display Controller and Video mode Display controller B-1 Video mode B-1 Appendix C AT Commands Appendix D S-registers S-...
PORTÉGÉ M700/M710 Battery 6-5 TOSHIBA Password Utility 6-14 Tablet mode 6-18 Power-up modes 6-18 Panel power on/off 6-19 System Auto Off 6-19 Chapter 7 HW Setup & BIOS Setup Accessing HW Setup 7-1 HW Setup window 7-1 BIOS Setup Program 7-8 Chapter 8 Troubleshooting Problem solving process 8-1 Hardware and system checklist 8-3 TOSHIBA support 8-26 Appendix A Specifications Physical Dimensions A-1 Environmental Requirements A-1 Appendix B Display Controller and Video mode Display controller B-1 Video mode B-1 Appendix C AT Commands Appendix D S-registers S-...

Users Manual Canada; English
Page 17
... the PORTÉGÉ M700/M710 series computer. Read Chapter 3, Hardware, Utilities and Options if connecting optional products or external devices. Abbreviations On first appearance, and whenever necessary for step-by browsing through its pages. Conventions This manual uses the following their definition. It also provides detailed information on configuring your computer, basic operations and care, using your PORTÉGÉ M700/M710 computer. User's Manual xvii This powerful notebook computer...
... the PORTÉGÉ M700/M710 series computer. Read Chapter 3, Hardware, Utilities and Options if connecting optional products or external devices. Abbreviations On first appearance, and whenever necessary for step-by browsing through its pages. Conventions This manual uses the following their definition. It also provides detailed information on configuring your computer, basic operations and care, using your PORTÉGÉ M700/M710 computer. User's Manual xvii This powerful notebook computer...
Users Manual Canada; English
Page 24
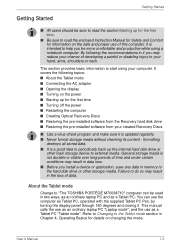
... may result in Chapter 4, Operating Basics for the first time ■ Turning off the power ■ Restarting the computer ■ Creating Optical Recovery Discs ■ Restoring the pre-installed software from the Recovery hard disk drive ■ Restoring the pre-installed software from your created Recovery Discs ■ Use a virus-check program and make sure it . User's Manual 1-3 formatting destroys all stored data. ■ It is updated regularly. ■ Never format storage media without checking its content...
... may result in Chapter 4, Operating Basics for the first time ■ Turning off the power ■ Restarting the computer ■ Creating Optical Recovery Discs ■ Restoring the pre-installed software from the Recovery hard disk drive ■ Restoring the pre-installed software from your created Recovery Discs ■ Use a virus-check program and make sure it . User's Manual 1-3 formatting destroys all stored data. ■ It is updated regularly. ■ Never format storage media without checking its content...

Users Manual Canada; English
Page 36
.... When removing pre-installed drivers / utilities or when installing, you can not use the Recovery Discs you have created or the hard disk drive recovery process to restore the computer to Chapter 5, The Keyboard, for further information. 4. Getting Started Restoring the pre-installed software from your computer when the TOSHIBA logo screen appears, release the F12 key. 3. You can setup the respective drivers / utilities from the following folder. While holding down F12 key on the keyboard, turn off...
.... When removing pre-installed drivers / utilities or when installing, you can not use the Recovery Discs you have created or the hard disk drive recovery process to restore the computer to Chapter 5, The Keyboard, for further information. 4. Getting Started Restoring the pre-installed software from your computer when the TOSHIBA logo screen appears, release the F12 key. 3. You can setup the respective drivers / utilities from the following folder. While holding down F12 key on the keyboard, turn off...
Users Manual Canada; English
Page 46
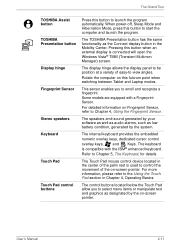
... Display Controller and Video mode section in order to show Menu window. This button function will automatically open the Windows Mobility Center window. For more than when it for video chatting or video conferences using specialized applications. ESC/Rotation button This button functions the same as the ESC key when tapped, or changes the orientation of the screen when pressed for this button to turn the computer's power on and off. Power Button Lock Switch Cross Function button This switch locks the Power button...
... Display Controller and Video mode section in order to show Menu window. This button function will automatically open the Windows Mobility Center window. For more than when it for video chatting or video conferences using specialized applications. ESC/Rotation button This button functions the same as the ESC key when tapped, or changes the orientation of the screen when pressed for this button to turn the computer's power on and off. Power Button Lock Switch Cross Function button This switch locks the Power button...
Users Manual Canada; English
Page 47
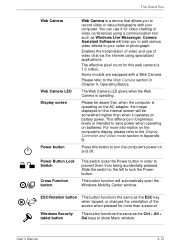
... TOSHIBA Presentation button has the same functionality as the Connect display button in Chapter 4, Operating Basics. This sensor enables you to -view angles. The internal keyboard provides the embedded numeric overlay keys, dedicated cursor control overlay keys, and Keys. The Touch Pad mouse control device located in the center of easy-to select menu items or manipulate text and graphics as low battery condition, generated by the on -screen pointer. When power-off, Sleep Mode and...
... TOSHIBA Presentation button has the same functionality as the Connect display button in Chapter 4, Operating Basics. This sensor enables you to -view angles. The internal keyboard provides the embedded numeric overlay keys, dedicated cursor control overlay keys, and Keys. The Touch Pad mouse control device located in the center of easy-to select menu items or manipulate text and graphics as low battery condition, generated by the on -screen pointer. When power-off, Sleep Mode and...
Users Manual Canada; English
Page 60
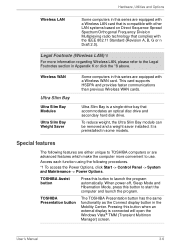
... open the Windows Vista® TMM (Transient Multimon Manager) screen. To reduce weight, the Ultra Slim Bay module can be removed and a weight saver installed. Access each function using the following features are either unique to TOSHIBA computers or are advanced features which make the computer more information regarding Wireless LAN, please refer to use. Pressing this button when an external display is a single-drive bay that accommodates an optical disc drive...
... open the Windows Vista® TMM (Transient Multimon Manager) screen. To reduce weight, the Ultra Slim Bay module can be removed and a weight saver installed. Access each function using the following features are either unique to TOSHIBA computers or are advanced features which make the computer more information regarding Wireless LAN, please refer to use. Pressing this button when an external display is a single-drive bay that accommodates an optical disc drive...
Users Manual Canada; English
Page 82
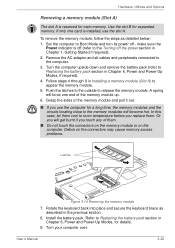
... Started if required). 2. Grasp the sides of the memory module and pull it out. ■ If you touch any of the memory module up. 6. Install the battery pack. Hardware, Utilities and Options Removing a memory module (Slot A) The slot A is reserved for expanded memory. Turn your computer over. make sure the Power indicator is installed, use the computer for a long time, the memory modules and the circuits locating close to the Turning off (refer to the memory modules will become hot...
... Started if required). 2. Grasp the sides of the memory module and pull it out. ■ If you touch any of the memory module up. 6. Install the battery pack. Hardware, Utilities and Options Removing a memory module (Slot A) The slot A is reserved for expanded memory. Turn your computer over. make sure the Power indicator is installed, use the computer for a long time, the memory modules and the circuits locating close to the Turning off (refer to the memory modules will become hot...
Users Manual Canada; English
Page 85
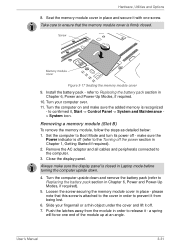
... , Start -> Control Panel -> System and Maintenance > System icon. please note that the memory module cover is firmly closed in Chapter 1, Getting Started if required). 2. Turn the computer upside down . 4. User's Manual 3-31 Screw Memory module cover Figure 3-17 Seating the memory module cover 9. refer to Replacing the battery pack section in Chapter 6, Power and Power-Up Modes, if required. 10. to Boot Mode and turn its power off . 7. Hardware, Utilities and Options 8. Set the computer to confirmed it off - make sure...
... , Start -> Control Panel -> System and Maintenance > System icon. please note that the memory module cover is firmly closed in Chapter 1, Getting Started if required). 2. Turn the computer upside down . 4. User's Manual 3-31 Screw Memory module cover Figure 3-17 Seating the memory module cover 9. refer to Replacing the battery pack section in Chapter 6, Power and Power-Up Modes, if required. 10. to Boot Mode and turn its power off . 7. Hardware, Utilities and Options 8. Set the computer to confirmed it off - make sure...
Users Manual Canada; English
Page 94
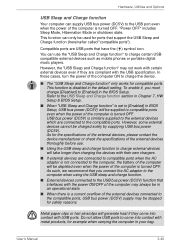
... compatible ports. User's Manual 3-40 Compatible ports are connected to come into contact with USB ports. However, the "USB Sleep and Charge function" may be charged solely by supplying USB bus power (DC5V). This function is a current overflow of the external devices connected to [Enabled] in the default setting. Refer to the USB Sleep and Charge function section in Chapter 7, HW Setup & BIOS Setup. ■ When "USB Sleep and Charge function" is set to [Enabled] in an operational state. ■ When there is disabled in the BIOS Setup...
... compatible ports. User's Manual 3-40 Compatible ports are connected to come into contact with USB ports. However, the "USB Sleep and Charge function" may be charged solely by supplying USB bus power (DC5V). This function is a current overflow of the external devices connected to [Enabled] in the default setting. Refer to the USB Sleep and Charge function section in Chapter 7, HW Setup & BIOS Setup. ■ When "USB Sleep and Charge function" is set to [Enabled] in an operational state. ■ When there is disabled in the BIOS Setup...
Users Manual Canada; English
Page 97
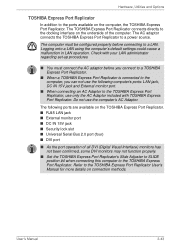
... AC adaptor before connecting to the TOSHIBA Express Port Replicator, use the computer's AC Adaptor. Logging onto a LAN using the computer's default settings could cause a malfunction in LAN operation. The following computer's ports: LAN jack, DC IN 15V jack and External monitor port. ■ When connecting an AC Adaptor to a LAN. User's Manual 3-43 The TOSHIBA Express Port Replicator connects directly to the ports available on the computer, the TOSHIBA Express Port Replicator. Hardware, Utilities and Options TOSHIBA Express Port Replicator In...
... AC adaptor before connecting to the TOSHIBA Express Port Replicator, use the computer's AC Adaptor. Logging onto a LAN using the computer's default settings could cause a malfunction in LAN operation. The following computer's ports: LAN jack, DC IN 15V jack and External monitor port. ■ When connecting an AC Adaptor to a LAN. User's Manual 3-43 The TOSHIBA Express Port Replicator connects directly to the ports available on the computer, the TOSHIBA Express Port Replicator. Hardware, Utilities and Options TOSHIBA Express Port Replicator In...
Users Manual Canada; English
Page 147
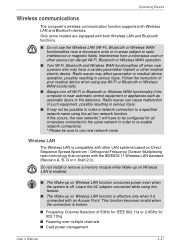
..., Bluetooth and Wireless WAN functionalities off . Do not install or remove a memory module while Wake-up on Wireless LAN is enabled. ■ The Wake-up on Wireless LAN function is effective only when it is broken. ■ Frequency Channel Selection of your medical device when using the ad hoc network function. Radio waves may have to be configured for 802.11b/g ■ Roaming over multiple channels ■ Card power management User's Manual 4-47 Wireless LAN...
..., Bluetooth and Wireless WAN functionalities off . Do not install or remove a memory module while Wake-up on Wireless LAN is enabled. ■ The Wake-up on Wireless LAN function is effective only when it is broken. ■ Frequency Channel Selection of your medical device when using the ad hoc network function. Radio waves may have to be configured for 802.11b/g ■ Roaming over multiple channels ■ Card power management User's Manual 4-47 Wireless LAN...
Users Manual Canada; English
Page 168
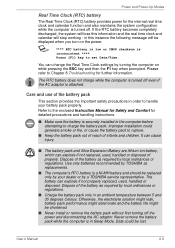
... precautions and handling instructions. ■ Make sure the battery is securely installed in Sleep Mode. Care and use of infants and children. Data could generate smoke or fire, or cause the battery pack to handle your dealer or by TOSHIBA as replacements. ■ The computer's RTC battery is a Ni-MH battery and should be lost. User's Manual 6-6 The battery can explode if not replaced, used , handled or...
... precautions and handling instructions. ■ Make sure the battery is securely installed in Sleep Mode. Care and use of infants and children. Data could generate smoke or fire, or cause the battery pack to handle your dealer or by TOSHIBA as replacements. ■ The computer's RTC battery is a Ni-MH battery and should be lost. User's Manual 6-6 The battery can explode if not replaced, used , handled or...
Users Manual Canada; English
Page 196
... the new device. ■ Make sure all cables to make detailed notes of the screen using . ■ Before you attach an external device you should always consider the simplest solution first - Always try to ensure they stay on the display? keyboard, hard disk drive, display panel, touch pad, touch pad control buttons - this you turn the computer off, then when you see. as loose cables can help to your floppy diskette, CD or DVD media is...
... the new device. ■ Make sure all cables to make detailed notes of the screen using . ■ Before you attach an external device you should always consider the simplest solution first - Always try to ensure they stay on the display? keyboard, hard disk drive, display panel, touch pad, touch pad control buttons - this you turn the computer off, then when you see. as loose cables can help to your floppy diskette, CD or DVD media is...

Users Manual Canada; English
Page 197
... start-up ■ Self test ■ Power ■ Password ■ Keyboard ■ Internal display panel ■ Hard disk drive ■ DVD Super Multi drive ■ USB floppy diskette drive ■ PC Card ■ Smart Card ■ SD/SDHC Card ■ Memory Stick ■ xD picture card ■ MultiMediaCard ■ Pointing Device ■ Fingerprint Sensor ■ USB device ■ Additional memory module ■ Sound system ■ External monitor ■ i.LINK (IEEE1394) device ■ Modem ■ LAN ■ Wireless LAN ■ Bluetooth ■ Recovery Discs User...
... start-up ■ Self test ■ Power ■ Password ■ Keyboard ■ Internal display panel ■ Hard disk drive ■ DVD Super Multi drive ■ USB floppy diskette drive ■ PC Card ■ Smart Card ■ SD/SDHC Card ■ Memory Stick ■ xD picture card ■ MultiMediaCard ■ Pointing Device ■ Fingerprint Sensor ■ USB device ■ Additional memory module ■ Sound system ■ External monitor ■ i.LINK (IEEE1394) device ■ Modem ■ LAN ■ Wireless LAN ■ Bluetooth ■ Recovery Discs User...

Users Manual Canada; English
Page 201
... Clock (RTC) battery is not remapping the keyboard in the BIOS setup application by the setup and configuration of each key). Problem Some letter keys produce numbers Output to use the keyboard, you will restart. a confirmation message will load. User's Manual 8-7 If you are still unable to screen is garbled Procedure Check that its is Displayed on the has run out - Troubleshooting Real Time Clock Problem Procedure The...
... Clock (RTC) battery is not remapping the keyboard in the BIOS setup application by the setup and configuration of each key). Problem Some letter keys produce numbers Output to use the keyboard, you will restart. a confirmation message will load. User's Manual 8-7 If you are still unable to screen is garbled Procedure Check that its is Displayed on the has run out - Troubleshooting Real Time Clock Problem Procedure The...
Users Manual Canada; English
Page 215
.... User's Manual 8-21 No display Try adjusting the contrast and brightness controls on again. When the external monitor is set to clone mode and they are still unable to resolve the problem, contact your monitor for the internal display only. If this from Sleep Mode if the external monitor has been disconnected while in order to change the display priority and ensure that the cable connecting the external monitor to the computer is not set the display panel...
.... User's Manual 8-21 No display Try adjusting the contrast and brightness controls on again. When the external monitor is set to clone mode and they are still unable to resolve the problem, contact your monitor for the internal display only. If this from Sleep Mode if the external monitor has been disconnected while in order to change the display priority and ensure that the cable connecting the external monitor to the computer is not set the display panel...
Users Manual Canada; English
Page 271
...: To remove data from the disc. device driver: A program that accepts user input to make system settings or record other information. dialog box: A window that controls communication between a specific peripheral device and the computer. It also writes data from memory to view computer output. Data is arranged on magnetic disk. The DVD-R drive uses a laser to read data from the disc. DVD-ROM: A Digital Versatile Disc-Read Only Memory is a highcapacity...
...: To remove data from the disc. device driver: A program that accepts user input to make system settings or record other information. dialog box: A window that controls communication between a specific peripheral device and the computer. It also writes data from memory to view computer output. Data is arranged on magnetic disk. The DVD-R drive uses a laser to read data from the disc. DVD-ROM: A Digital Versatile Disc-Read Only Memory is a highcapacity...

Users Manual Canada; English
Page 274
...: Large Scale Integration. 1) A technology that uses large scale integration. See also kilobyte. See also hertz. keyboard: An input device containing switches that displays a list of options on the screen. See also byte and megabyte. Also called a screen. KB: See kilobyte. kilobyte (KB): A unit of data storage equal to change the hardware characteristics by manually pressing marked keys. J jumper: A small clip or wire that...
...: Large Scale Integration. 1) A technology that uses large scale integration. See also kilobyte. See also hertz. keyboard: An input device containing switches that displays a list of options on the screen. See also byte and megabyte. Also called a screen. KB: See kilobyte. kilobyte (KB): A unit of data storage equal to change the hardware characteristics by manually pressing marked keys. J jumper: A small clip or wire that...
Detailed Specs for Portege M700 PPM70C-03W0GC English
Page 1
... 3D sound, full duplex support, Sound volume control dial, external MIC port (monaural), stereo headphone port, Built-in storage bay) Secure Connect Optimize Hard Disk Drive Protection 3D Accelerometer HDD Shock Absorber Spill-Resistant Keyboard (100ml) Magnesium Alloy Casework Toshiba PC Diagnostic Tool Toshiba Software RAID Key Component Access Multiple-Level Password Utilities FingerPrint Reader (includes software for opt. Built-in Wireless WiFi Link 4965AGN (802.11a/g/n) Built-in Bluetooth v2.0+EDR 1.3 Megapixel Web Cam Expansion 2 memory slots...
... 3D sound, full duplex support, Sound volume control dial, external MIC port (monaural), stereo headphone port, Built-in storage bay) Secure Connect Optimize Hard Disk Drive Protection 3D Accelerometer HDD Shock Absorber Spill-Resistant Keyboard (100ml) Magnesium Alloy Casework Toshiba PC Diagnostic Tool Toshiba Software RAID Key Component Access Multiple-Level Password Utilities FingerPrint Reader (includes software for opt. Built-in Wireless WiFi Link 4965AGN (802.11a/g/n) Built-in Bluetooth v2.0+EDR 1.3 Megapixel Web Cam Expansion 2 memory slots...


