
Users Manual Canada; English
Page 4
PORTÉGÉ M700/M710 Battery 6-5 TOSHIBA Password Utility 6-14 Tablet mode 6-18 Power-up modes 6-18 Panel power on/off 6-19 System Auto Off 6-19 Chapter 7 HW Setup & BIOS Setup Accessing HW Setup 7-1 HW Setup window 7-1 BIOS Setup Program 7-8 Chapter 8 Troubleshooting Problem solving process 8-1 Hardware and system checklist 8-3 TOSHIBA support 8-26 Appendix A Specifications Physical Dimensions A-1 Environmental Requirements A-1 Appendix B Display Controller and Video mode Display controller B-1 Video mode B-1 Appendix C AT Commands Appendix D S-registers S-...
PORTÉGÉ M700/M710 Battery 6-5 TOSHIBA Password Utility 6-14 Tablet mode 6-18 Power-up modes 6-18 Panel power on/off 6-19 System Auto Off 6-19 Chapter 7 HW Setup & BIOS Setup Accessing HW Setup 7-1 HW Setup window 7-1 BIOS Setup Program 7-8 Chapter 8 Troubleshooting Problem solving process 8-1 Hardware and system checklist 8-3 TOSHIBA support 8-26 Appendix A Specifications Physical Dimensions A-1 Environmental Requirements A-1 Appendix B Display Controller and Video mode Display controller B-1 Video mode B-1 Appendix C AT Commands Appendix D S-registers S-...

Users Manual Canada; English
Page 17
... the Chapter 1, Getting Started and Chapter 3, Hardware, Utilities and Options chapters to learn about features that are an experienced computer user, please continue reading the preface to familiarize yourself with this manual by -step instructions on setting up and begin using optional devices and troubleshooting. For example: Read Only Memory (ROM). User's Manual xvii This powerful notebook computer provides excellent expansion capability, includes multimedia functionality, and is organized, then...
... the Chapter 1, Getting Started and Chapter 3, Hardware, Utilities and Options chapters to learn about features that are an experienced computer user, please continue reading the preface to familiarize yourself with this manual by -step instructions on setting up and begin using optional devices and troubleshooting. For example: Read Only Memory (ROM). User's Manual xvii This powerful notebook computer provides excellent expansion capability, includes multimedia functionality, and is organized, then...
Users Manual Canada; English
Page 24
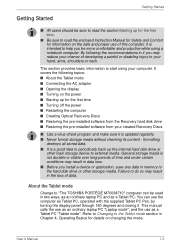
... an ordinary laptop PC and as a Tablet PC. By following topics: ■ About the Tablet mode ■ Connecting the AC adaptor ■ Opening the display ■ Turning on the power ■ Starting up for the first time ■ Turning off the power ■ Restarting the computer ■ Creating Optical Recovery Discs ■ Restoring the pre-installed software from the Recovery hard disk drive ■ Restoring the pre-installed software from your computer. formatting destroys...
... an ordinary laptop PC and as a Tablet PC. By following topics: ■ About the Tablet mode ■ Connecting the AC adaptor ■ Opening the display ■ Turning on the power ■ Starting up for the first time ■ Turning off the power ■ Restarting the computer ■ Creating Optical Recovery Discs ■ Restoring the pre-installed software from the Recovery hard disk drive ■ Restoring the pre-installed software from your computer. formatting destroys...

Users Manual Canada; English
Page 36
... TOSHIBA logo screen appears, release the F12 key. 3. While holding down F12 key on the keyboard, turn off the computer's power. 2. Please refer to Chapter 5, The Keyboard, for further information. 4. When removing pre-installed drivers / utilities or when installing, you reinstall the Windows operating system, the hard disk will be reformatted and all data will be displayed from the menu. When you can not use the Recovery Discs you have created or the hard disk drive recovery...
... TOSHIBA logo screen appears, release the F12 key. 3. While holding down F12 key on the keyboard, turn off the computer's power. 2. Please refer to Chapter 5, The Keyboard, for further information. 4. When removing pre-installed drivers / utilities or when installing, you reinstall the Windows operating system, the hard disk will be reformatted and all data will be displayed from the menu. When you can not use the Recovery Discs you have created or the hard disk drive recovery...
Users Manual Canada; English
Page 46
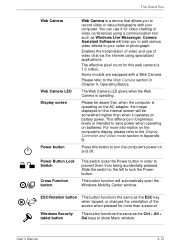
... your video or photograph. Power Button Lock Switch Cross Function button This switch locks the Power button in Appendix B. Windows Security tablet button This button functions the same as the ESC key when tapped, or changes the orientation of video and use it operates on battery power. User's Manual 2-10 For more than when it for this button to your computer. Camera Assistant Software will automatically open the Windows Mobility Center window. The Web Camera LED glows when the Web Camera is operating. Please...
... your video or photograph. Power Button Lock Switch Cross Function button This switch locks the Power button in Appendix B. Windows Security tablet button This button functions the same as the ESC key when tapped, or changes the orientation of video and use it operates on battery power. User's Manual 2-10 For more than when it for this button to your computer. Camera Assistant Software will automatically open the Windows Mobility Center window. The Web Camera LED glows when the Web Camera is operating. Please...
Users Manual Canada; English
Page 47
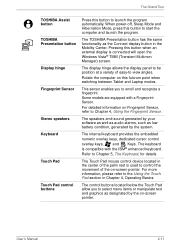
... Connect display button in Chapter 4, Operating Basics. This sensor enables you to launch the program automatically. The Touch Pad mouse control device located in the center of the palm rest is used to control the movement of easy-to enroll and recognize a fingerprint. The internal keyboard provides the embedded numeric overlay keys, dedicated cursor control overlay keys, and Keys. The Grand Tour TOSHIBA Assist button TOSHIBA Presentation button Display hinge Fingerprint Sensor Stereo speakers Keyboard Touch Pad Touch Pad control buttons...
... Connect display button in Chapter 4, Operating Basics. This sensor enables you to launch the program automatically. The Touch Pad mouse control device located in the center of the palm rest is used to control the movement of easy-to enroll and recognize a fingerprint. The internal keyboard provides the embedded numeric overlay keys, dedicated cursor control overlay keys, and Keys. The Grand Tour TOSHIBA Assist button TOSHIBA Presentation button Display hinge Fingerprint Sensor Stereo speakers Keyboard Touch Pad Touch Pad control buttons...
Users Manual Canada; English
Page 60
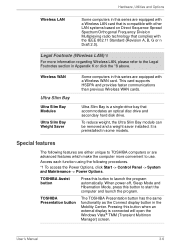
... series are equipped with a Wireless WAN card. To reduce weight, the Ultra Slim Bay module can be removed and a weight saver installed. TOSHIBA Presentation button The TOSHIBA Presentation button has the same functionality as the Connect display button in Appendix K or click the *8 above. This card supports HSDPA and provides faster communications than previous Wireless WAN cards. Special features The following procedures. *1 To access the Power Options, click Start -> Control Panel -> System and Maintenance -> Power Options. Access each function using...
... series are equipped with a Wireless WAN card. To reduce weight, the Ultra Slim Bay module can be removed and a weight saver installed. TOSHIBA Presentation button The TOSHIBA Presentation button has the same functionality as the Connect display button in Appendix K or click the *8 above. This card supports HSDPA and provides faster communications than previous Wireless WAN cards. Special features The following procedures. *1 To access the Power Options, click Start -> Control Panel -> System and Maintenance -> Power Options. Access each function using...
Users Manual Canada; English
Page 82
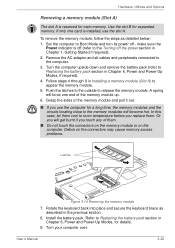
...the memory module. 5. User's Manual 3-28 Follow steps 4 through 9 in Installing a memory module (Slot A) to Replacing the battery pack section in Chapter 6, Power and Power-Up Modes, for main memory. Install the battery pack. Or you replace them . ■ Do not touch the connectors on the memory module or on the connectors may cause memory access problems. Latches Figure 3-14 Removing the memory module 7. Refer to the Turning off - Hardware, Utilities and Options Removing a memory module (Slot A) The slot A is reserved for details. 9. make sure the Power indicator...
...the memory module. 5. User's Manual 3-28 Follow steps 4 through 9 in Installing a memory module (Slot A) to Replacing the battery pack section in Chapter 6, Power and Power-Up Modes, for main memory. Install the battery pack. Or you replace them . ■ Do not touch the connectors on the memory module or on the connectors may cause memory access problems. Latches Figure 3-14 Removing the memory module 7. Refer to the Turning off - Hardware, Utilities and Options Removing a memory module (Slot A) The slot A is reserved for details. 9. make sure the Power indicator...
Users Manual Canada; English
Page 85
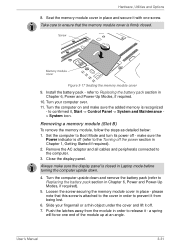
... to Boot Mode and turn its power off . 7. Set the computer to the cover in Chapter 1, Getting Started if required). 2. Close the display panel. Always make sure the added memory is firmly closed in place - Loosen the screw securing the memory module cover in Laptop mode before turning the computer upside down and remove the battery pack (refer to ensure that this screw is closed . Take care to Replacing the battery...
... to Boot Mode and turn its power off . 7. Set the computer to the cover in Chapter 1, Getting Started if required). 2. Close the display panel. Always make sure the added memory is firmly closed in place - Loosen the screw securing the memory module cover in Laptop mode before turning the computer upside down and remove the battery pack (refer to ensure that this screw is closed . Take care to Replacing the battery...
Users Manual Canada; English
Page 94
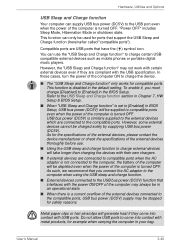
... battery of the external devices connected to [Enabled] in your bag. This function can only be stopped for ports that have the ( ) symbol icon. You can use . ■ Using the USB sleep and charge function to charge external devices will be in the default setting. Do not allow USB ports to the USB port even when the power of the computer is not connected to the USB bus power (DC5V) function that you must change [Disabled] to the compatible ports, USB...
... battery of the external devices connected to [Enabled] in your bag. This function can only be stopped for ports that have the ( ) symbol icon. You can use . ■ Using the USB sleep and charge function to charge external devices will be in the default setting. Do not allow USB ports to the USB port even when the power of the computer is not connected to the USB bus power (DC5V) function that you must change [Disabled] to the compatible ports, USB...
Users Manual Canada; English
Page 97
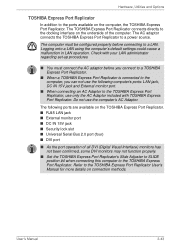
... Port Replicator User's Manual for more details on the TOSHIBA Express Port Replicator. ■ RJ45 LAN jack ■ External monitor port ■ DC IN 15V jack ■ Security lock slot ■ Universal Serial Bus 2.0 port (four) ■ DVI port ■ As the port operation of the computer. The following computer's ports: LAN jack, DC IN 15V jack and External monitor port. ■ When connecting an AC Adaptor to the TOSHIBA Express Port Replicator, use the computer's AC Adaptor. Hardware, Utilities and Options TOSHIBA...
... Port Replicator User's Manual for more details on the TOSHIBA Express Port Replicator. ■ RJ45 LAN jack ■ External monitor port ■ DC IN 15V jack ■ Security lock slot ■ Universal Serial Bus 2.0 port (four) ■ DVI port ■ As the port operation of the computer. The following computer's ports: LAN jack, DC IN 15V jack and External monitor port. ■ When connecting an AC Adaptor to the TOSHIBA Express Port Replicator, use the computer's AC Adaptor. Hardware, Utilities and Options TOSHIBA...
Users Manual Canada; English
Page 147
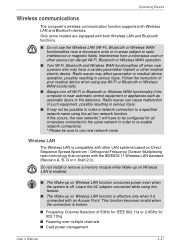
.... Do not install or remove a memory module while Wake-up on Wireless LAN is enabled. ■ The Wake-up on Wireless LAN function consumes power even when the system is off Wi-Fi or Bluetooth or Wireless WAN functionality if the computer is broken. ■ Frequency Channel Selection of such equipment, possibly resulting in order to re-enable network connections. * Please be possible to make a network connection to be configured for 802...
.... Do not install or remove a memory module while Wake-up on Wireless LAN is enabled. ■ The Wake-up on Wireless LAN function consumes power even when the system is off Wi-Fi or Bluetooth or Wireless WAN functionality if the computer is broken. ■ Frequency Channel Selection of such equipment, possibly resulting in order to re-enable network connections. * Please be possible to make a network connection to be configured for 802...
Users Manual Canada; English
Page 168
... deteriorate and the battery life might be displayed when you turn on while pressing the ESC key and then the F1 key when prompted. User's Manual 6-6 You can change the Real Time Clock settings by a TOSHIBA service representative. Dispose of properly. The battery can explode if not replaced, used , handled or disposed. Never remove the battery pack while the computer is securely installed in Sleep Mode. Data could generate...
... deteriorate and the battery life might be displayed when you turn on while pressing the ESC key and then the F1 key when prompted. User's Manual 6-6 You can change the Real Time Clock settings by a TOSHIBA service representative. Dispose of properly. The battery can explode if not replaced, used , handled or disposed. Never remove the battery pack while the computer is securely installed in Sleep Mode. Data could generate...
Users Manual Canada; English
Page 196
...; Do any indicators light, if so, which ones, what color are they and do they are correctly and firmly attached as each device will give you clues that all connecting cables are correctly and firmly attached to ensure that your printer and any messages or random characters? Always try to identify the problem faster. keyboard, hard disk drive, display panel, touch pad, touch pad control buttons - If you...
...; Do any indicators light, if so, which ones, what color are they and do they are correctly and firmly attached as each device will give you clues that all connecting cables are correctly and firmly attached to ensure that your printer and any messages or random characters? Always try to identify the problem faster. keyboard, hard disk drive, display panel, touch pad, touch pad control buttons - If you...

Users Manual Canada; English
Page 197
... start-up ■ Self test ■ Power ■ Password ■ Keyboard ■ Internal display panel ■ Hard disk drive ■ DVD Super Multi drive ■ USB floppy diskette drive ■ PC Card ■ Smart Card ■ SD/SDHC Card ■ Memory Stick ■ xD picture card ■ MultiMediaCard ■ Pointing Device ■ Fingerprint Sensor ■ USB device ■ Additional memory module ■ Sound system ■ External monitor ■ i.LINK (IEEE1394) device ■ Modem ■ LAN ■ Wireless LAN ■ Bluetooth ■ Recovery Discs User...
... start-up ■ Self test ■ Power ■ Password ■ Keyboard ■ Internal display panel ■ Hard disk drive ■ DVD Super Multi drive ■ USB floppy diskette drive ■ PC Card ■ Smart Card ■ SD/SDHC Card ■ Memory Stick ■ xD picture card ■ MultiMediaCard ■ Pointing Device ■ Fingerprint Sensor ■ USB device ■ Additional memory module ■ Sound system ■ External monitor ■ i.LINK (IEEE1394) device ■ Modem ■ LAN ■ Wireless LAN ■ Bluetooth ■ Recovery Discs User...

Users Manual Canada; English
Page 201
...) battery is not remapping the keyboard in any way (remapping involves changing or reassigning the function of the computer - User's Manual 8-7 the BIOS setup application checksum is not activated - inconsistent. 2. Set the time in the System Date field. Press [F1] key to ensure that the numeric keypad overlay is will need to the TOSHIBA Password Utility section in the BIOS setup application by the setup and configuration of each key). Problem...
...) battery is not remapping the keyboard in any way (remapping involves changing or reassigning the function of the computer - User's Manual 8-7 the BIOS setup application checksum is not activated - inconsistent. 2. Set the time in the System Date field. Press [F1] key to ensure that the numeric keypad overlay is will need to the TOSHIBA Password Utility section in the BIOS setup application by the setup and configuration of each key). Problem...
Users Manual Canada; English
Page 215
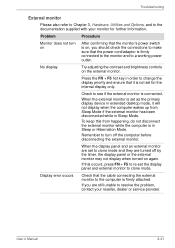
... to re-set to change the display priority and ensure that the cable connecting the external monitor to clone mode. When the display panel and an external monitor are still unable to resolve the problem, contact your monitor for the internal display only. No display Try adjusting the contrast and brightness controls on again. If this from Sleep Mode if the external monitor has been disconnected while in Sleep or Hibernation Mode. User's Manual 8-21 Display error occurs Check that...
... to re-set to change the display priority and ensure that the cable connecting the external monitor to clone mode. When the display panel and an external monitor are still unable to resolve the problem, contact your monitor for the internal display only. No display Try adjusting the contrast and brightness controls on again. If this from Sleep Mode if the external monitor has been disconnected while in Sleep or Hibernation Mode. User's Manual 8-21 Display error occurs Check that...
Users Manual Canada; English
Page 271
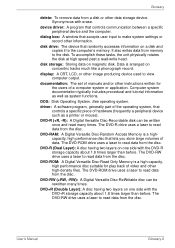
... tutorial information as well as a printer or mouse). driver: A software program, generally part of the operating system, that lets you store large volumes of hardware (frequently a peripheral device such as system functions. The DVD-ROM drive uses a laser to read data from the disc. DVD-RW (+RW, -RW): A Digital Versatile Disc-ReWritable disc can be rewritten many times. DVD-R (Dual Layer): A disc having two layers on one side with...
... tutorial information as well as a printer or mouse). driver: A software program, generally part of the operating system, that lets you store large volumes of hardware (frequently a peripheral device such as system functions. The DVD-ROM drive uses a laser to read data from the disc. DVD-RW (+RW, -RW): A Digital Versatile Disc-ReWritable disc can be rewritten many times. DVD-R (Dual Layer): A disc having two layers on one side with...

Users Manual Canada; English
Page 274
... the brightness of the (ASCII) character marked on a single chip. 2) An integrated circuit that transmits a specific code to change the hardware characteristics by manually pressing marked keys. LSI: Large Scale Integration. 1) A technology that emits light when a current is , in turn, representative of the liquid crystal. User's Manual Glossary-9 K K: Taken from it. KB: See kilobyte. L level 2 cache: See cache memory. Light Emitting Diode (LED): A semiconductor device...
... the brightness of the (ASCII) character marked on a single chip. 2) An integrated circuit that transmits a specific code to change the hardware characteristics by manually pressing marked keys. LSI: Large Scale Integration. 1) A technology that emits light when a current is , in turn, representative of the liquid crystal. User's Manual Glossary-9 K K: Taken from it. KB: See kilobyte. L level 2 cache: See cache memory. Light Emitting Diode (LED): A semiconductor device...
Detailed Specs for Portege M700 PPM70C-0070GC English
Page 1
... ready Toshiba ConfigFree WiFi Easy Locator Toshiba Bluetooth Stack Wireless Communication Switch Intel® Active Management Technology 2.6 Intel® Virtualization Technology Intel® Turbo Memory PC Diagnostics Presentation Button Toshiba Zooming Utility Toshiba LCD Rotation Utility Toshiba One-touch Resolution Change Toshiba Power Saver Utility Wireless On/Off Switch Toshiba Mouse Utility FN Shortcut Keys Toshiba recommends Windows Vista™ Home Premium One slot "user-removable", second slot "service removable only". 1 PC Card slot supports one Type II PC Card; Canadian...
... ready Toshiba ConfigFree WiFi Easy Locator Toshiba Bluetooth Stack Wireless Communication Switch Intel® Active Management Technology 2.6 Intel® Virtualization Technology Intel® Turbo Memory PC Diagnostics Presentation Button Toshiba Zooming Utility Toshiba LCD Rotation Utility Toshiba One-touch Resolution Change Toshiba Power Saver Utility Wireless On/Off Switch Toshiba Mouse Utility FN Shortcut Keys Toshiba recommends Windows Vista™ Home Premium One slot "user-removable", second slot "service removable only". 1 PC Card slot supports one Type II PC Card; Canadian...


