User Guide 1
Page 2
... of all the data stored on this product may include Recordable and/or ReWritable optical media drive(s) and associated software, among the most advanced data storage technologies available. YOU AGREE THAT TOSHIBA, ITS AFFILIATES AND SUPPLIERS SHALL HAVE NO RESPONSIBILITY FOR DAMAGE TO OR LOSS OF ANY BUSINESS... after handling. IF YOUR DATA IS ALTERED OR LOST DUE TO ANY TROUBLE, FAILURE OR MALFUNCTION OF THE HARD DISK DRIVE OR OTHER STORAGE DEVICES AND THE DATA CANNOT BE RECOVERED, TOSHIBA SHALL NOT BE LIABLE FOR ANY DAMAGE OR LOSS OF DATA, OR ANY OTHER DAMAGE RESULTING THEREFROM.
... of all the data stored on this product may include Recordable and/or ReWritable optical media drive(s) and associated software, among the most advanced data storage technologies available. YOU AGREE THAT TOSHIBA, ITS AFFILIATES AND SUPPLIERS SHALL HAVE NO RESPONSIBILITY FOR DAMAGE TO OR LOSS OF ANY BUSINESS... after handling. IF YOUR DATA IS ALTERED OR LOST DUE TO ANY TROUBLE, FAILURE OR MALFUNCTION OF THE HARD DISK DRIVE OR OTHER STORAGE DEVICES AND THE DATA CANNOT BE RECOVERED, TOSHIBA SHALL NOT BE LIABLE FOR ANY DAMAGE OR LOSS OF DATA, OR ANY OTHER DAMAGE RESULTING THEREFROM.
User Guide 1
Page 19
... up your software 38 Registering your computer with Toshiba 39 Adding optional external devices 39 Adding memory (optional 40 Installing a memory module 40 Removing a memory module 45 Checking total memory 46 Hard Drive Recovery 47 Hard Disk Drive Recovery options 47 Creating a Recovery DVD 54 Restoring...62 Options for turning off the computer 62 Using the Turn Off Computer command ...........64 Using and configuring Hibernation mode .........66 Using and configuring Standby mode 68 Closing the display panel 69 Customizing your computer's settings 69 Caring for your computer 69...
... up your software 38 Registering your computer with Toshiba 39 Adding optional external devices 39 Adding memory (optional 40 Installing a memory module 40 Removing a memory module 45 Checking total memory 46 Hard Drive Recovery 47 Hard Disk Drive Recovery options 47 Creating a Recovery DVD 54 Restoring...62 Options for turning off the computer 62 Using the Turn Off Computer command ...........64 Using and configuring Hibernation mode .........66 Using and configuring Standby mode 68 Closing the display panel 69 Customizing your computer's settings 69 Caring for your computer 69...
User Guide 1
Page 47
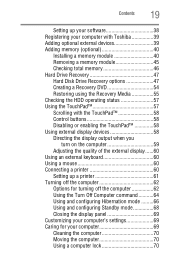
.... ❖ It is strongly recommended that your hard disk drive. Hard Drive Recovery Getting Started Hard Drive Recovery 47 NOTE To purchase an optional external optical drive, visit the Toshiba Web site at accessories.toshiba.com. Hard Disk Drive Recovery options NOTE To purchase an optional external optical drive, visit the Toshiba Web site at accessories.toshiba.com. NOTE ❖ During the HDD Recovery...
.... ❖ It is strongly recommended that your hard disk drive. Hard Drive Recovery Getting Started Hard Drive Recovery 47 NOTE To purchase an optional external optical drive, visit the Toshiba Web site at accessories.toshiba.com. Hard Disk Drive Recovery options NOTE To purchase an optional external optical drive, visit the Toshiba Web site at accessories.toshiba.com. NOTE ❖ During the HDD Recovery...
User Guide 1
Page 48
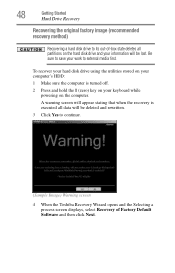
... to continue. (Sample Image) Warning screen 4 When the Toshiba Recovery Wizard opens and the Selecting a process screen displays, select Recovery of -box state deletes all data will be lost. 48 Getting Started Hard Drive Recovery Recovering the original factory image (recommended recovery method) Recovering a hard disk drive to its out-of Factory Default Software and...
... to continue. (Sample Image) Warning screen 4 When the Toshiba Recovery Wizard opens and the Selecting a process screen displays, select Recovery of -box state deletes all data will be lost. 48 Getting Started Hard Drive Recovery Recovering the original factory image (recommended recovery method) Recovering a hard disk drive to its out-of Factory Default Software and...

User Guide 1
Page 49
A confirmation message displays reminding you that the HDD has been recovered. 7 Press any key on the keyboard to restart the computer. Select Recover to begin the recovery. Be sure to save your work to external media before proceeding. (Sample Image) Recovery of Factory Default Software screen 6 Click Next to out-of Factory Default Software screen appears. Once complete, a message displays that all data will be lost during the recovery process. Getting Started Hard Drive Recovery 49 (Sample Image) Selecting a process screen 5 The Recovery of -box state, and then click Next.
A confirmation message displays reminding you that the HDD has been recovered. 7 Press any key on the keyboard to restart the computer. Select Recover to begin the recovery. Be sure to save your work to external media before proceeding. (Sample Image) Recovery of Factory Default Software screen 6 Click Next to out-of Factory Default Software screen appears. Once complete, a message displays that all data will be lost during the recovery process. Getting Started Hard Drive Recovery 49 (Sample Image) Selecting a process screen 5 The Recovery of -box state, and then click Next.
User Guide 1
Page 50
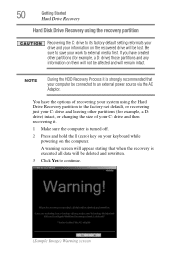
50 Getting Started Hard Drive Recovery Hard Disk Drive Recovery using the Hard Drive Recovery partition to the factory-set default, or recovering just your C: drive and leaving other partitions (for example, a D: drive) intact, or changing the size of recovering your system using the recovery partition Recovering the C: drive to its factory default setting reformats your drive and your information on...
50 Getting Started Hard Drive Recovery Hard Disk Drive Recovery using the Hard Drive Recovery partition to the factory-set default, or recovering just your C: drive and leaving other partitions (for example, a D: drive) intact, or changing the size of recovering your system using the recovery partition Recovering the C: drive to its factory default setting reformats your drive and your information on...
User Guide 1
Page 51
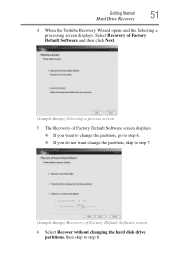
Getting Started Hard Drive Recovery 51 4 When the Toshiba Recovery Wizard opens and the Selecting a processing screen displays. Select Recovery of Factory Default Software and then click Next. (Sample Image) Selecting a process screen 5 The Recovery of Factory Default Software screen displays. ❖ If you want to change the partition, go to step 6. ❖ If you do not want change the partition, skip to step 7. (Sample Image) Recovery of Factory Default Software screen 6 Select Recover without changing the hard disk drive partitions, then skip to step 8.
Getting Started Hard Drive Recovery 51 4 When the Toshiba Recovery Wizard opens and the Selecting a processing screen displays. Select Recovery of Factory Default Software and then click Next. (Sample Image) Selecting a process screen 5 The Recovery of Factory Default Software screen displays. ❖ If you want to change the partition, go to step 6. ❖ If you do not want change the partition, skip to step 7. (Sample Image) Recovery of Factory Default Software screen 6 Select Recover without changing the hard disk drive partitions, then skip to step 8.
User Guide 1
Page 52
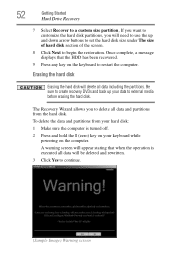
... Click Next to external media before erasing the hard disk. The Recovery Wizard allows you will need to use the up your keyboard while powering on the keyboard to delete all data including the partitions. 52 Getting Started Hard Drive Recovery 7 Select Recover to a custom size ...partition, If you want to customize the hard disk partitions, you to restart the computer. A warning screen will be deleted and rewritten....
... Click Next to external media before erasing the hard disk. The Recovery Wizard allows you will need to use the up your keyboard while powering on the keyboard to delete all data including the partitions. 52 Getting Started Hard Drive Recovery 7 Select Recover to a custom size ...partition, If you want to customize the hard disk partitions, you to restart the computer. A warning screen will be deleted and rewritten....
User Guide 1
Page 53
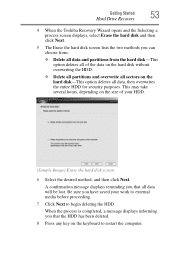
... any key on the hard disk-This option deletes all data will be lost. When the process is completed, a message displays informing you that all data, then overwrites the entire HDD for security purposes. Getting Started Hard Drive Recovery 53 4 When the Toshiba Recovery Wizard opens and the... Selecting a process screen displays, select Erase the hard disk and then click Next. 5 The Erase the hard disk screen lists the two methods you can choose from:...
... any key on the hard disk-This option deletes all data will be lost. When the process is completed, a message displays informing you that all data, then overwrites the entire HDD for security purposes. Getting Started Hard Drive Recovery 53 4 When the Toshiba Recovery Wizard opens and the... Selecting a process screen displays, select Erase the hard disk and then click Next. 5 The Erase the hard disk screen lists the two methods you can choose from:...
User Guide 1
Page 54
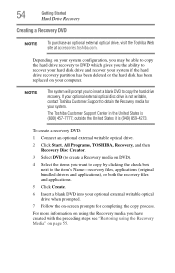
... the United States it is (800) 457-7777; 54 Getting Started Hard Drive Recovery Creating a Recovery DVD NOTE To purchase an optional external optical drive, visit the Toshiba Web site at accessories.toshiba.com. NOTE The system will prompt you the ability to copy the hard drive recovery. Depending on -screen prompts for your system configuration, you...
... the United States it is (800) 457-7777; 54 Getting Started Hard Drive Recovery Creating a Recovery DVD NOTE To purchase an optional external optical drive, visit the Toshiba Web site at accessories.toshiba.com. NOTE The system will prompt you the ability to copy the hard drive recovery. Depending on -screen prompts for your system configuration, you...
User Guide 1
Page 55
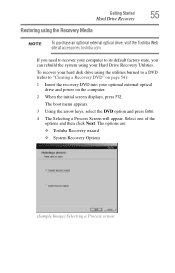
Select one of the options and then click Next. The options are: ❖ Toshiba Recovery wizard ❖ System Recovery Options (Sample Image) Selecting a Process screen The boot menu appears. 3 Using the arrow keys, select the ...DVD into your Hard Drive Recovery Utilities. To recover your hard disk drive using your optional external optical drive and power on the computer. 2 When the initial screen displays, press F12. Getting Started Hard Drive Recovery 55 Restoring using the Recovery Media NOTE To purchase an optional external optical drive, visit the Toshiba Web site at...
Select one of the options and then click Next. The options are: ❖ Toshiba Recovery wizard ❖ System Recovery Options (Sample Image) Selecting a Process screen The boot menu appears. 3 Using the arrow keys, select the ...DVD into your Hard Drive Recovery Utilities. To recover your hard disk drive using your optional external optical drive and power on the computer. 2 When the initial screen displays, press F12. Getting Started Hard Drive Recovery 55 Restoring using the Recovery Media NOTE To purchase an optional external optical drive, visit the Toshiba Web site at...
User Guide 1
Page 56
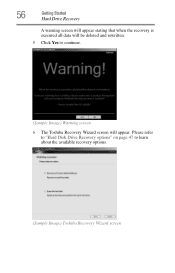
Please refer to "Hard Disk Drive Recovery options" on page 47 to continue. (Sample Image) Warning screen 6 The Toshiba Recovery Wizard screen will appear. 56 Getting Started Hard Drive Recovery A warning screen will appear stating that when the recovery is executed all data will be deleted and rewritten. 5 Click Yes to learn about the available recovery options. (Sample Image) Toshiba Recovery Wizard screen
Please refer to "Hard Disk Drive Recovery options" on page 47 to continue. (Sample Image) Warning screen 6 The Toshiba Recovery Wizard screen will appear. 56 Getting Started Hard Drive Recovery A warning screen will appear stating that when the recovery is executed all data will be deleted and rewritten. 5 Click Yes to learn about the available recovery options. (Sample Image) Toshiba Recovery Wizard screen
User Guide 1
Page 57
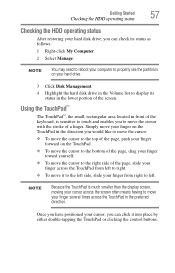
NOTE You may need to reboot your computer to properly see the partitions on your hard drive. 3 Click Disk Management. 4 Highlight the hard disk drive in the Volume list to display its status as follows: 1 Right-click My Computer. 2 Select Manage. Using the TouchPad™ The TouchPad™,... the TouchPad or clicking the control buttons. Getting Started Checking the HDD operating status 57 Checking the HDD operating status After restoring your hard disk drive, you can check its status in front of the keyboard, is much smaller than the display screen, moving your cursor across the ...
NOTE You may need to reboot your computer to properly see the partitions on your hard drive. 3 Click Disk Management. 4 Highlight the hard disk drive in the Volume list to display its status as follows: 1 Right-click My Computer. 2 Select Manage. Using the TouchPad™ The TouchPad™,... the TouchPad or clicking the control buttons. Getting Started Checking the HDD operating status 57 Checking the HDD operating status After restoring your hard disk drive, you can check its status in front of the keyboard, is much smaller than the display screen, moving your cursor across the ...
User Guide 1
Page 82
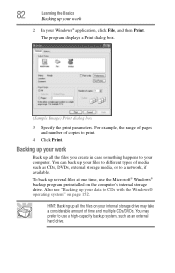
...) Print dialog box 3 Specify the print parameters. You can back up all the files on your internal storage drive may prefer to use the Microsoft® Windows® backup program preinstalled on page 152. HINT: Backing up ...to different types of copies to CDs with the Windows® operating system" on the computer's internal storage drive. To back up your data to print. 4 Click Print. 82 Learning the Basics Backing up all the..., the range of pages and number of media such as an external hard drive. You may take a considerable amount of time and multiple CDs/DVDs.
...) Print dialog box 3 Specify the print parameters. You can back up all the files on your internal storage drive may prefer to use the Microsoft® Windows® backup program preinstalled on page 152. HINT: Backing up ...to different types of copies to CDs with the Windows® operating system" on the computer's internal storage drive. To back up your data to print. 4 Click Print. 82 Learning the Basics Backing up all the..., the range of pages and number of media such as an external hard drive. You may take a considerable amount of time and multiple CDs/DVDs.
User Guide 1
Page 117
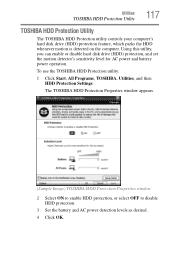
... Protection utility: 1 Click Start, All Programs, TOSHIBA, Utilities, and then HDD Protection Settings. Utilities TOSHIBA HDD Protection Utility 117 TOSHIBA HDD Protection Utility The TOSHIBA HDD Protection utility controls your computer's hard disk drive (HDD) protection feature, which parks the HDD whenever motion is detected on the computer. The TOSHIBA HDD Protection Properties window appears. (Sample Image...
... Protection utility: 1 Click Start, All Programs, TOSHIBA, Utilities, and then HDD Protection Settings. Utilities TOSHIBA HDD Protection Utility 117 TOSHIBA HDD Protection Utility The TOSHIBA HDD Protection utility controls your computer's hard disk drive (HDD) protection feature, which parks the HDD whenever motion is detected on the computer. The TOSHIBA HDD Protection Properties window appears. (Sample Image...
User Guide 1
Page 144
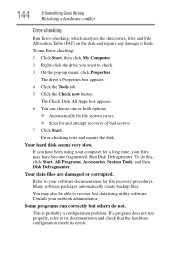
...: ❖ Automatically fix file system errors ❖ Scan for a long time, your computer for and attempt recovery of bad sectors 7 Click Start. Your hard disk seems very slow. The drive's Properties box appears. 4 Click the Tools tab. 5 Click the Check now button. Refer to check. 3 On the pop-up menu, click Properties... properly, refer to recover lost data using utility software. If a program does not run Error-checking: 1 Click Start, then click My Computer. 2 Right-click the drive you have become fragmented.
...: ❖ Automatically fix file system errors ❖ Scan for a long time, your computer for and attempt recovery of bad sectors 7 Click Start. Your hard disk seems very slow. The drive's Properties box appears. 4 Click the Tools tab. 5 Click the Check now button. Refer to check. 3 On the pop-up menu, click Properties... properly, refer to recover lost data using utility software. If a program does not run Error-checking: 1 Click Start, then click My Computer. 2 Right-click the drive you have become fragmented.
User Guide 1
Page 152
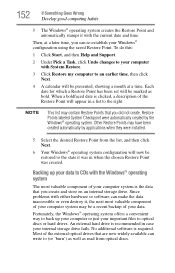
...Points labeled System Checkpoint were automatically created by applications when they were installed. 5 Select the desired Restore Point from optical discs. An external hard drive is clicked, a description of the Restore Point will be marked as read from the list, and then click Next. 6 Your Windows&#...it , the next most valuable component of the external optical drives that you can write to optical discs or hard drives. No additional software is the data that you create and store on an internal storage drive. NOTE This list may have been created automatically by the Windows...
...Points labeled System Checkpoint were automatically created by applications when they were installed. 5 Select the desired Restore Point from optical discs. An external hard drive is clicked, a description of the Restore Point will be marked as read from the list, and then click Next. 6 Your Windows&#...it , the next most valuable component of the external optical drives that you can write to optical discs or hard drives. No additional software is the data that you create and store on an internal storage drive. NOTE This list may have been created automatically by the Windows...
User Guide 1
Page 155
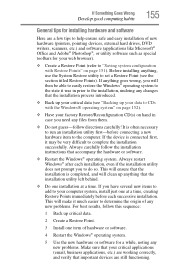
... be very difficult to set a Restore Point (see "Backing up critical data. 2 Create a Restore Point. 3 Install one item of new hardware (printers, pointing devices, external hard drives, DVD writers, scanners, etc.) and software (applications like Microsoft® Office and Adobe® Photoshop®, or utility software such as special toolbars for a while...
... be very difficult to set a Restore Point (see "Backing up critical data. 2 Create a Restore Point. 3 Install one item of new hardware (printers, pointing devices, external hard drives, DVD writers, scanners, etc.) and software (applications like Microsoft® Office and Adobe® Photoshop®, or utility software such as special toolbars for a while...
User Guide 1
Page 189
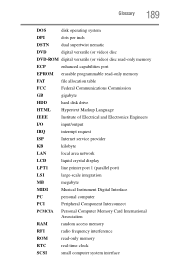
...) disc read-only memory ECP enhanced capabilities port EPROM erasable programmable read-only memory FAT file allocation table FCC Federal Communications Commission GB gigabyte HDD hard disk drive HTML Hypertext Markup Language IEEE Institute of Electrical and Electronics Engineers I/O input/output IRQ interrupt request ISP Internet service provider KB kilobyte LAN local...
...) disc read-only memory ECP enhanced capabilities port EPROM erasable programmable read-only memory FAT file allocation table FCC Federal Communications Commission GB gigabyte HDD hard disk drive HTML Hypertext Markup Language IEEE Institute of Electrical and Electronics Engineers I/O input/output IRQ interrupt request ISP Internet service provider KB kilobyte LAN local...

User Guide 1
Page 193
... to disk, given a name by batteries. dialog box - direct current (DC) - See also enable. Compare disk. See also diskette, hard disk. diskette - Your computer uses 3.5-inch diskettes. See also double-density diskette, high-density diskette. A dedicated channel, bypassing the CPU, that... to the computer. Compare alternating current (AC). See folder. To turn a computer option off. disc - disk - Compare disc. disk drive - A thin, flexible disk in one or more read from the user. Diskettes can be external (outside the computer's case) or internal...
... to disk, given a name by batteries. dialog box - direct current (DC) - See also enable. Compare disk. See also diskette, hard disk. diskette - Your computer uses 3.5-inch diskettes. See also double-density diskette, high-density diskette. A dedicated channel, bypassing the CPU, that... to the computer. Compare alternating current (AC). See folder. To turn a computer option off. disc - disk - Compare disc. disk drive - A thin, flexible disk in one or more read from the user. Diskettes can be external (outside the computer's case) or internal...


