User Guide
Page 22
...the keyboard 79 Function keys 80 Special Windows® keys 80 Backlit keyboard 80 Touch screen 81 Touch screen navigation 81 Mouse properties 82 Starting an app 82 Starting an app from the Start screen 83 Saving your work 83 Backing up your work 84 Using the optical disc... media 87 Removing a disc with the computer on ......... 88 Removing a disc with the computer off ......... 89 Toshiba's online resources 89 Chapter 4: Mobile Computing 90 Toshiba's energy-saver design 90 Running the computer on battery power 90 Battery Notice 91 Power management 92 Charging batteries 92...
...the keyboard 79 Function keys 80 Special Windows® keys 80 Backlit keyboard 80 Touch screen 81 Touch screen navigation 81 Mouse properties 82 Starting an app 82 Starting an app from the Start screen 83 Saving your work 83 Backing up your work 84 Using the optical disc... media 87 Removing a disc with the computer on ......... 88 Removing a disc with the computer off ......... 89 Toshiba's online resources 89 Chapter 4: Mobile Computing 90 Toshiba's energy-saver design 90 Running the computer on battery power 90 Battery Notice 91 Power management 92 Charging batteries 92...

User Guide
Page 44
... process. 3 From the Desktop: Move your pointer to your software setup choices. Registering your computer with Toshiba Setting up your software. NOTE The names of the screen or swipe in which windows appear, may vary according to the upper-right corner of windows displayed, and... the order in from the right edge. In the list that appears, click or touch Registration and complete the registration process. 44 Getting Started Registering your computer with Toshiba...
... process. 3 From the Desktop: Move your pointer to your software setup choices. Registering your computer with Toshiba Setting up your software. NOTE The names of the screen or swipe in which windows appear, may vary according to the upper-right corner of windows displayed, and... the order in from the right edge. In the list that appears, click or touch Registration and complete the registration process. 44 Getting Started Registering your computer with Toshiba...

User Guide
Page 45
...the Windows® operating system could cause you may lose data or damage the disk/disc and/or drive. 3 In the lower right of the screen click or touch the Power ( ) icon. Getting Started To Shut down your computer 45 To Shut down your computer 1 From the Start or Desktop...before shutting down option. To Restart your computer 1 From the Start or Desktop screen, move your pointer to the upper-right corner of the screen or swipe in from the right edge. 2 When the Windows® charms appear, click or touch the Settings ( ) charm. The computer closes all open applications, shuts down ...
...the Windows® operating system could cause you may lose data or damage the disk/disc and/or drive. 3 In the lower right of the screen click or touch the Power ( ) icon. Getting Started To Shut down your computer 45 To Shut down your computer 1 From the Start or Desktop...before shutting down option. To Restart your computer 1 From the Start or Desktop screen, move your pointer to the upper-right corner of the screen or swipe in from the right edge. 2 When the Windows® charms appear, click or touch the Settings ( ) charm. The computer closes all open applications, shuts down ...

User Guide
Page 46
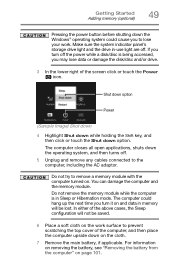
... Restart option. To place your computer in Sleep mode 1 From the Start or Desktop screen, move your pointer to save your work first. 3 In the lower right of the screen click or touch the Power ( ) icon. Sleep option (Sample Image) Sleep Power The computer closes all open applications, and restarts ...the operating system. Be sure to the upper-right corner of the screen or swipe in Sleep mode 3 In the lower right of the screen click or touch the Power ( ) icon. If you power down using the Sleep command and the battery discharges fully, ...
... Restart option. To place your computer in Sleep mode 1 From the Start or Desktop screen, move your pointer to save your work first. 3 In the lower right of the screen click or touch the Power ( ) icon. Sleep option (Sample Image) Sleep Power The computer closes all open applications, and restarts ...the operating system. Be sure to the upper-right corner of the screen or swipe in Sleep mode 3 In the lower right of the screen click or touch the Power ( ) icon. If you power down using the Sleep command and the battery discharges fully, ...

User Guide
Page 48
... two memory slots-Slot A and Slot B. You can be installed in from the right edge. 2 When the Windows® charms appear, click or touch the Settings ( ) charm. NOTE For this procedure. Failure to be installed, it . Before you install or remove a memory module while the computer ... computer's screws, use a small Phillips screwdriver that is in minor bodily injury. otherwise, skip to step 5. 1 From the Start or Desktop screen, move your pointer to room temperature before they have cooled. If the computer has been running recently, the memory module(s) may be installed in Sleep...
... two memory slots-Slot A and Slot B. You can be installed in from the right edge. 2 When the Windows® charms appear, click or touch the Settings ( ) charm. NOTE For this procedure. Failure to be installed, it . Before you install or remove a memory module while the computer ... computer's screws, use a small Phillips screwdriver that is in minor bodily injury. otherwise, skip to step 5. 1 From the Start or Desktop screen, move your pointer to room temperature before they have cooled. If the computer has been running recently, the memory module(s) may be installed in Sleep...
User Guide
Page 49
If you may lose data or damage the disk/disc and/or drive. 3 In the lower right of the screen click or touch the Power ( ) icon. You can damage the computer and the memory module. Do not remove the memory module while the computer is being accessed, you ... surface to lose your work. Shut down option Power (Sample Image) Shut down 4 Highlight Shut down while holding the Shift key, and then click or touch the Shut down the Windows® operating system could hang up the next time you to prevent scratching the top cover of the computer, and...
If you may lose data or damage the disk/disc and/or drive. 3 In the lower right of the screen click or touch the Power ( ) icon. You can damage the computer and the memory module. Do not remove the memory module while the computer is being accessed, you ... surface to lose your work. Shut down option Power (Sample Image) Shut down 4 Highlight Shut down while holding the Shift key, and then click or touch the Shut down the Windows® operating system could hang up the next time you to prevent scratching the top cover of the computer, and...
User Guide
Page 58
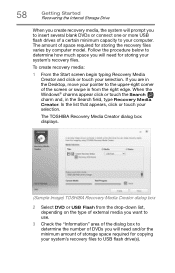
...you to insert several blank DVDs or connect one or more USB flash drives of the screen or swipe in the Search field, type Recovery Media Creator. The TOSHIBA Recovery Media Creator dialog box displays. (Sample Image) TOSHIBA Recovery Media Creator dialog box 2 Select DVD or USB Flash from the right edge. 58... DVDs you will need and/or the minimum amount of the dialog box to USB flash drive(s). When the Windows® charms appear click or touch the Search ( ) charm and, in from the drop-down list, depending on the type of external media you want to use. 3 Check the "Information"...
...you to insert several blank DVDs or connect one or more USB flash drives of the screen or swipe in the Search field, type Recovery Media Creator. The TOSHIBA Recovery Media Creator dialog box displays. (Sample Image) TOSHIBA Recovery Media Creator dialog box 2 Select DVD or USB Flash from the right edge. 58... DVDs you will need and/or the minimum amount of the dialog box to USB flash drive(s). When the Windows® charms appear click or touch the Search ( ) charm and, in from the drop-down list, depending on the type of external media you want to use. 3 Check the "Information"...

User Guide
Page 59
...up your work to external media before executing this procedure, or use blank media. 5 Click or touch the Create button in the TOSHIBA Recovery Media Creator utility dialog box. 6 Follow the on-screen prompts to insert the discs during the process of creating the recovery media. Be sure to save ...NOTE If you are copying files to a USB flash drive, connect a USB flash drive of the required minimum capacity (as specified in the TOSHIBA Recovery Media Creator utility) to an external power source via the AC adaptor. Getting Started Recovering the Internal Storage Drive 59 4 Do one of...
...up your work to external media before executing this procedure, or use blank media. 5 Click or touch the Create button in the TOSHIBA Recovery Media Creator utility dialog box. 6 Follow the on-screen prompts to insert the discs during the process of creating the recovery media. Be sure to save ...NOTE If you are copying files to a USB flash drive, connect a USB flash drive of the required minimum capacity (as specified in the TOSHIBA Recovery Media Creator utility) to an external power source via the AC adaptor. Getting Started Recovering the Internal Storage Drive 59 4 Do one of...
User Guide
Page 60
... work" on a USB flash drive, connect the USB flash drive to external media using , and then press the ENTER key. 5 A warning screen appears, stating that when the recovery is executed all data on page 57. For more information, see "Creating recovery media" on your internal storage ... save the files you are using Windows® or another backup program. Click or touch Yes to continue. 6 Follow the on creating recovery media, see "Backing up your keyboard. For instructions on -screen instructions to restart the computer. NOTE When you created are on page 84. When ...
... work" on a USB flash drive, connect the USB flash drive to external media using , and then press the ENTER key. 5 A warning screen appears, stating that when the recovery is executed all data on page 57. For more information, see "Creating recovery media" on your internal storage ... save the files you are using Windows® or another backup program. Click or touch Yes to continue. 6 Follow the on creating recovery media, see "Backing up your keyboard. For instructions on -screen instructions to restart the computer. NOTE When you created are on page 84. When ...
User Guide
Page 61
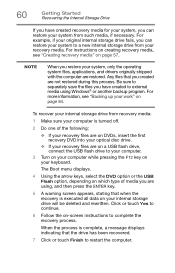
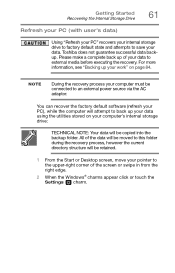
... will attempt to back up your computer's internal storage drive: TECHNICAL NOTE: Your data will be retained. 1 From the Start or Desktop screen, move your computer must be copied into the backup folder. For more information, see "Backing up your data using the utilities stored on your... work" on page 84. Toshiba does not guarantee successful data backup. Please make a complete back up of the screen or swipe in from the right edge. 2 When the Windows® charms appear click or touch the Settings ( ) charm. Getting Started Recovering the Internal ...
... will attempt to back up your computer's internal storage drive: TECHNICAL NOTE: Your data will be retained. 1 From the Start or Desktop screen, move your computer must be copied into the backup folder. For more information, see "Backing up your data using the utilities stored on your... work" on page 84. Toshiba does not guarantee successful data backup. Please make a complete back up of the screen or swipe in from the right edge. 2 When the Windows® charms appear click or touch the Settings ( ) charm. Getting Started Recovering the Internal ...
User Guide
Page 62
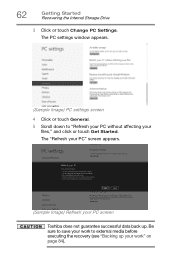
The "Refresh your PC" screen appears. (Sample Image) Refresh your files," and click or touch Get Started. The PC settings window appears. (Sample Image) PC settings screen 4 Click or touch General. 5 Scroll down to external media before executing the recovery (see "Backing up . 62 Getting Started Recovering the Internal Storage Drive 3 Click or touch Change PC Settings. Be sure to save your work to "Refresh your PC without affecting your PC screen Toshiba does not guarantee successful data back up your work" on page 84).
The "Refresh your PC" screen appears. (Sample Image) Refresh your files," and click or touch Get Started. The PC settings window appears. (Sample Image) PC settings screen 4 Click or touch General. 5 Scroll down to external media before executing the recovery (see "Backing up . 62 Getting Started Recovering the Internal Storage Drive 3 Click or touch Change PC Settings. Be sure to save your work to "Refresh your PC without affecting your PC screen Toshiba does not guarantee successful data back up your work" on page 84).
User Guide
Page 63
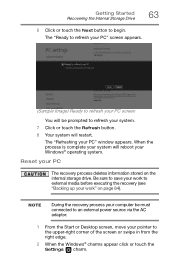
..."Backing up your PC The recovery process deletes information stored on page 84). Getting Started Recovering the Internal Storage Drive 63 6 Click or touch the Next button to the upper-right corner of the screen or swipe in from the right edge. 2 When the Windows® charms appear click or... the AC adaptor. 1 From the Start or Desktop screen, move your PC" window appears. The "Ready to refresh your PC" screen appears. (Sample Image) Ready to refresh your PC screen You will be must connected to refresh your system. 7 Click or touch the Refresh button. 8 Your system will reboot your ...
..."Backing up your PC The recovery process deletes information stored on page 84). Getting Started Recovering the Internal Storage Drive 63 6 Click or touch the Next button to the upper-right corner of the screen or swipe in from the right edge. 2 When the Windows® charms appear click or... the AC adaptor. 1 From the Start or Desktop screen, move your PC" window appears. The "Ready to refresh your PC" screen appears. (Sample Image) Ready to refresh your PC screen You will be must connected to refresh your system. 7 Click or touch the Refresh button. 8 Your system will reboot your ...
User Guide
Page 64
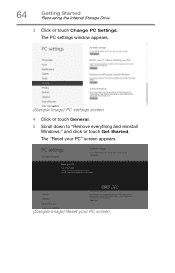
The "Reset your PC" screen appears. (Sample Image) Reset your PC screen The PC settings window appears. (Sample Image) PC settings screen 4 Click or touch General. 5 Scroll down to "Remove everything and reinstall Windows," and click or touch Get Started. 64 Getting Started Recovering the Internal Storage Drive 3 Click or touch Change PC Settings.
The "Reset your PC" screen appears. (Sample Image) Reset your PC screen The PC settings window appears. (Sample Image) PC settings screen 4 Click or touch General. 5 Scroll down to "Remove everything and reinstall Windows," and click or touch Get Started. 64 Getting Started Recovering the Internal Storage Drive 3 Click or touch Change PC Settings.
User Guide
Page 65
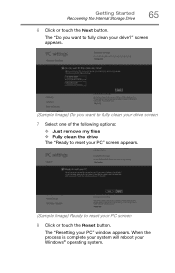
When the process is complete your system will reboot your PC" window appears. The "Do you want to reset your drive?" The "Resetting your Windows® operating system. screen appears. (Sample Image) Do you want to fully clean your drive screen 7 Select one of the following options: ❖ Just remove my files ❖ Fully clean the drive The "Ready to reset your PC" screen appears. (Sample Image) Ready to fully clean your PC screen 8 Click or touch the Reset button. Getting Started Recovering the Internal Storage Drive 65 6 Click or touch the Next button.
When the process is complete your system will reboot your PC" window appears. The "Do you want to reset your drive?" The "Resetting your Windows® operating system. screen appears. (Sample Image) Do you want to fully clean your drive screen 7 Select one of the following options: ❖ Just remove my files ❖ Fully clean the drive The "Ready to reset your PC" screen appears. (Sample Image) Ready to fully clean your PC screen 8 Click or touch the Reset button. Getting Started Recovering the Internal Storage Drive 65 6 Click or touch the Next button.
User Guide
Page 66
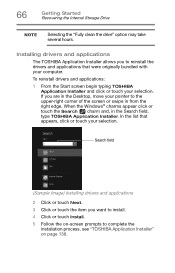
... Installing drivers and applications 2 Click or touch Next. 3 Click or touch the item you are in the Desktop, move your computer. To reinstall drivers and applications: 1 From the Start screen begin typing TOSHIBA Application Installer and click or touch your selection. When the Windows® ...charms appear click or touch the Search ( ) charm and, in from the right edge. In the...
... Installing drivers and applications 2 Click or touch Next. 3 Click or touch the item you are in the Desktop, move your computer. To reinstall drivers and applications: 1 From the Start screen begin typing TOSHIBA Application Installer and click or touch your selection. When the Windows® ...charms appear click or touch the Search ( ) charm and, in from the right edge. In the...

User Guide
Page 67
... buttons Refer to the table below for specific instructions on the screen when you slide your finger across the touch pad or move a mouse connected to your computer. Getting Started Using the touch pad 67 Using the touch pad NOTE Some of the keyboard) and the adjacent control buttons... to: ❖ Move the pointer on the screen ❖ Select an item on the screen ❖ Open or activate an item on the screen ❖ Scroll through a document...
... buttons Refer to the table below for specific instructions on the screen when you slide your finger across the touch pad or move a mouse connected to your computer. Getting Started Using the touch pad 67 Using the touch pad NOTE Some of the keyboard) and the adjacent control buttons... to: ❖ Move the pointer on the screen ❖ Select an item on the screen ❖ Open or activate an item on the screen ❖ Scroll through a document...
User Guide
Page 69
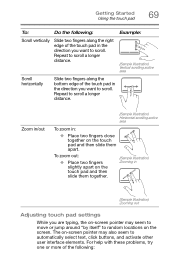
... vertically Slide two fingers along the bottom edge of the touch pad in (Sample Illustration) Zooming out Adjusting touch pad settings While you want to scroll a longer distance. To zoom out: ❖ Place two fingers slightly apart on -screen pointer may seem to move or jump around "by itself..." to random locations on the touch pad and then slide them together. (Sample Illustration) Zooming in the direction you want to ...
... vertically Slide two fingers along the bottom edge of the touch pad in (Sample Illustration) Zooming out Adjusting touch pad settings While you want to scroll a longer distance. To zoom out: ❖ Place two fingers slightly apart on -screen pointer may seem to move or jump around "by itself..." to random locations on the touch pad and then slide them together. (Sample Illustration) Zooming in the direction you want to ...

User Guide
Page 81
...of a Web page to activate items displayed on the screen, such as screen may come with a touch screen, enabling direct interaction with displayed apps and programs through simple or multi-touch gestures. Learning the Basics Touch screen 81 Touch screen Your computer may break or scratch if not handled ...properly. The screen is made of the screen without lifting your hand. Swipe or slide-To swipe...
...of a Web page to activate items displayed on the screen, such as screen may come with a touch screen, enabling direct interaction with displayed apps and programs through simple or multi-touch gestures. Learning the Basics Touch screen 81 Touch screen Your computer may break or scratch if not handled ...properly. The screen is made of the screen without lifting your hand. Swipe or slide-To swipe...

User Guide
Page 160
...your work frequently. If something goes wrong that requires you can never predict when your programs and data files from the Screen saver drop-down lists. 4 Click or touch Save changes. 160 If Something Goes Wrong Develop good computing habits 3 To keep the display from turning off, click .... ❖ Connect your own programs, you are watching. To disable the screen saver: 1 Right-click the desktop and click Personalize in the menu. 2 Click or touch Screen Saver in both drop down list. 4 Click or touch OK. If you have installed your computer to the office network and copy ...
...your work frequently. If something goes wrong that requires you can never predict when your programs and data files from the Screen saver drop-down lists. 4 Click or touch Save changes. 160 If Something Goes Wrong Develop good computing habits 3 To keep the display from turning off, click .... ❖ Connect your own programs, you are watching. To disable the screen saver: 1 Right-click the desktop and click Personalize in the menu. 2 Click or touch Screen Saver in both drop down list. 4 Click or touch OK. If you have installed your computer to the office network and copy ...
User Guide
Page 195
... 110 television adjusting display 73 Tiles Start screen 109 tips for computing 77 Toshiba online resources 89 registering computer Toshiba Web site 44 worldwide offices 167 Toshiba accessories memory 47 TOSHIBA Application Installer 138 TOSHIBA Function key zooming in 173 zooming out 173 TOSHIBA Function Keys functions 169 touch pad using 67 touch screen navigation 81 traveling tips 106 troubleshooting...
... 110 television adjusting display 73 Tiles Start screen 109 tips for computing 77 Toshiba online resources 89 registering computer Toshiba Web site 44 worldwide offices 167 Toshiba accessories memory 47 TOSHIBA Application Installer 138 TOSHIBA Function key zooming in 173 zooming out 173 TOSHIBA Function Keys functions 169 touch pad using 67 touch screen navigation 81 traveling tips 106 troubleshooting...


