
User Guide 1
Page 18
Contents Introduction 24 This guide 26 Safety icons 27 Other icons used 27 Your computer's features and specifications ....28 Other documentation 28 Service options 28 Chapter 1: Getting Started 29 Getting comfortable with your computer 29 Keeping yourself comfortable 30 Precautions 30 Important information on your computer's cooling fan 32 Setting up your computer 32 Connecting to a power source 33 Charging the main battery 35 Using the computer for the first time 36 Opening the display panel 36 Turning on the power 37 18
Contents Introduction 24 This guide 26 Safety icons 27 Other icons used 27 Your computer's features and specifications ....28 Other documentation 28 Service options 28 Chapter 1: Getting Started 29 Getting comfortable with your computer 29 Keeping yourself comfortable 30 Precautions 30 Important information on your computer's cooling fan 32 Setting up your computer 32 Connecting to a power source 33 Charging the main battery 35 Using the computer for the first time 36 Opening the display panel 36 Turning on the power 37 18
User Guide 1
Page 20
...keys 75 Function keys 75 Special Windows® keys 75 Overlay keys 76 Starting a program 77 Starting a program from the Start menu...........77 Starting a program from Windows® Explorer....77 Starting a program from the Run dialog box ....78 Saving your work 79 Printing... your work 81 Backing up your work 82 Restoring your work 83 Toshiba's online resources 83 Chapter 3: Mobile Computing 84 Toshiba...
...keys 75 Function keys 75 Special Windows® keys 75 Overlay keys 76 Starting a program 77 Starting a program from the Start menu...........77 Starting a program from Windows® Explorer....77 Starting a program from the Run dialog box ....78 Saving your work 79 Printing... your work 81 Backing up your work 82 Restoring your work 83 Toshiba's online resources 83 Chapter 3: Mobile Computing 84 Toshiba...
User Guide 1
Page 22
... Protection Utility 117 Fn-esse 118 Starting Fn-esse 118 TOSHIBA SD™ Memory Card Format Utility .........119 TOSHIBA Power Saver 120 Preset Power Profiles 121 Quickly creating a new power profile 121 Customizing a power profile 121 Mouse Utility 122 TOSHIBA Hardware Setup 123 TOSHIBA Zooming Utility 127 TOSHIBA Accessibility 128 Chapter 6: If Something Goes Wrong 129...
... Protection Utility 117 Fn-esse 118 Starting Fn-esse 118 TOSHIBA SD™ Memory Card Format Utility .........119 TOSHIBA Power Saver 120 Preset Power Profiles 121 Quickly creating a new power profile 121 Customizing a power profile 121 Mouse Utility 122 TOSHIBA Hardware Setup 123 TOSHIBA Zooming Utility 127 TOSHIBA Accessibility 128 Chapter 6: If Something Goes Wrong 129...

User Guide 1
Page 23
... offices 158 Appendix A: Hot Keys 160 Appendix B: Power Cord/Cable Connectors 166 Appendix C: Using ConfigFree® with your Toshiba Computer 167 Getting Started 168 Starting ConfigFree 168 ConfigFree® Utilities 170 Connectivity Doctor 170 Search for Wireless Devices 172 Profile Settings 177 ConfigFree® SUMMIT 180 Quick Connect 183 Using ...
... offices 158 Appendix A: Hot Keys 160 Appendix B: Power Cord/Cable Connectors 166 Appendix C: Using ConfigFree® with your Toshiba Computer 167 Getting Started 168 Starting ConfigFree 168 ConfigFree® Utilities 170 Connectivity Doctor 170 Search for Wireless Devices 172 Profile Settings 177 ConfigFree® SUMMIT 180 Quick Connect 183 Using ...

User Guide 1
Page 29
... computer in the "Instruction Manual for Safety and Comfort" that is shipped with your computer, contains important safety information. To keep your computer. Chapter 1 Getting Started This chapter provides tips for using , such as a printer. Leave enough space around the computer and other items you use your work area from: ❖...
... computer in the "Instruction Manual for Safety and Comfort" that is shipped with your computer, contains important safety information. To keep your computer. Chapter 1 Getting Started This chapter provides tips for using , such as a printer. Leave enough space around the computer and other items you use your work area from: ❖...
User Guide 1
Page 30
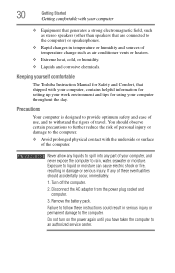
You should accidentally occur, immediately: 1. Turn off the computer. 2. Remove the battery pack. Keeping yourself comfortable The Toshiba Instruction Manual for Safety and Comfort, that are connected to the computer) or speakerphones. ❖ Rapid changes in temperature...rigors of the computer. Never allow any liquids to spill into any of these instructions could result in damage or serious injury. 30 Getting Started Getting comfortable with your computer ❖ Equipment that generates a strong electromagnetic field, such as air conditioner vents or heaters. ❖ ...
You should accidentally occur, immediately: 1. Turn off the computer. 2. Remove the battery pack. Keeping yourself comfortable The Toshiba Instruction Manual for Safety and Comfort, that are connected to the computer) or speakerphones. ❖ Rapid changes in temperature...rigors of the computer. Never allow any liquids to spill into any of these instructions could result in damage or serious injury. 30 Getting Started Getting comfortable with your computer ❖ Equipment that generates a strong electromagnetic field, such as air conditioner vents or heaters. ❖ ...

User Guide 1
Page 31
... may damage the disk/disc or flash media, the drive, or both. ❖ Keep the computer and disks away from or writing to skin. Getting Started Getting comfortable with your computer 31 ❖ Avoid prolonged physical contact with your dealer to a disk can become hot! It could damage the disc and...
... may damage the disk/disc or flash media, the drive, or both. ❖ Keep the computer and disks away from or writing to skin. Getting Started Getting comfortable with your computer 31 ❖ Avoid prolonged physical contact with your dealer to a disk can become hot! It could damage the disc and...
User Guide 1
Page 32
... that cools the CPU by drawing outside air into the computer. Setting up your computer TECHNICAL NOTE: You must attach the AC adaptor. 32 Getting Started Setting up your software" on page 38 before you must complete all setup steps up to and including "Setting up your computer Important information on...
... that cools the CPU by drawing outside air into the computer. Setting up your computer TECHNICAL NOTE: You must attach the AC adaptor. 32 Getting Started Setting up your software" on page 38 before you must complete all setup steps up to and including "Setting up your computer Important information on...

User Guide 1
Page 33
Getting Started Connecting to a power source 33 NOTE Please handle your computer), or use AC adaptors and battery chargers specified by TOSHIBA to avoid any damage caused by use of an incompatible adaptor or charger. Always use a multiple connector. Use the power cord/cable ... on a power cord/cable to charge the computer's battery. Use of fire or other damage to the computer possibly resulting in serious injury. TOSHIBA assumes no liability for any risk of an incompatible AC adaptor or Battery Charger could cause a fire or electric shock, possibly resulting in serious ...
Getting Started Connecting to a power source 33 NOTE Please handle your computer), or use AC adaptors and battery chargers specified by TOSHIBA to avoid any damage caused by use of an incompatible adaptor or charger. Always use a multiple connector. Use the power cord/cable ... on a power cord/cable to charge the computer's battery. Use of fire or other damage to the computer possibly resulting in serious injury. TOSHIBA assumes no liability for any risk of an incompatible AC adaptor or Battery Charger could cause a fire or electric shock, possibly resulting in serious ...

User Guide 1
Page 34
... Illustration) Connecting the AC adaptor cord to the computer 3 Connect the power cord/cable to connect or disconnect a power plug with wet hands. 34 Getting Started Connecting to a power source To connect AC power to the computer: 1 Connect the power cord/cable to the AC adaptor. (Sample Illustration) Connecting the power...
... Illustration) Connecting the AC adaptor cord to the computer 3 Connect the power cord/cable to connect or disconnect a power plug with wet hands. 34 Getting Started Connecting to a power source To connect AC power to the computer: 1 Connect the power cord/cable to the AC adaptor. (Sample Illustration) Connecting the power...

User Guide 1
Page 35
... charged and ready to run applications, features, and devices. See "Changing the main battery" on page 93 for information on replacing the main battery. Getting Started Charging the main battery 35 The computer's main battery light gives you must charge the battery.
... charged and ready to run applications, features, and devices. See "Changing the main battery" on page 93 for information on replacing the main battery. Getting Started Charging the main battery 35 The computer's main battery light gives you must charge the battery.
User Guide 1
Page 36
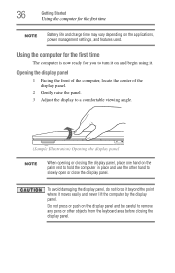
... on the palm rest to hold the computer in place and use the other hand to slowly open or close the display panel. 36 Getting Started Using the computer for you to turn it on and begin using it moves easily and never lift the computer by the display panel. Using...
... on the palm rest to hold the computer in place and use the other hand to slowly open or close the display panel. 36 Getting Started Using the computer for you to turn it on and begin using it moves easily and never lift the computer by the display panel. Using...

User Guide 1
Page 37
... on the power To turn on the computer: 1 Make sure any external devices (such as the AC adaptor, if you turn on your computer. Getting Started Using the computer for the first time, do not turn off the power again until the ON/OFF light on the system indicator panel glows...
... on the power To turn on the computer: 1 Make sure any external devices (such as the AC adaptor, if you turn on your computer. Getting Started Using the computer for the first time, do not turn off the power again until the ON/OFF light on the system indicator panel glows...

User Guide 1
Page 38
... Your Computer screen and click Next. 4 Enter the computer name and description and click Next or Skip. 5 Select how your software setup choices. 38 Getting Started Using the computer for the first time Setting up your software. 1 From the Welcome screen click Next to enter the Setup Wizard. 2 Confirm acceptance of...
... Your Computer screen and click Next. 4 Enter the computer name and description and click Next or Skip. 5 Select how your software setup choices. 38 Getting Started Using the computer for the first time Setting up your software. 1 From the Welcome screen click Next to enter the Setup Wizard. 2 Confirm acceptance of...

User Guide 1
Page 39
... external display devices" on page 58) ❖ Connect a local printer (see "Connecting a printer" on page 38. Getting Started Registering your computer with Toshiba 39 Registering your computer with Toshiba Product registration is strongly recommended, and allows Toshiba to send you periodic updates, announcements, and special offers applicable to your computer for the first time...
... external display devices" on page 58) ❖ Connect a local printer (see "Connecting a printer" on page 38. Getting Started Registering your computer with Toshiba 39 Registering your computer with Toshiba Product registration is strongly recommended, and allows Toshiba to send you periodic updates, announcements, and special offers applicable to your computer for the first time...

User Guide 1
Page 40
...is in Standby or Hibernation mode, data will need a small Phillips screwdriver for this procedure. NOTE Before adding external devices or memory, Toshiba recommends setting up your software. Avoid touching the cover, the module, and the surrounding area before replacing it. You may want to ... module may also be installed in minor bodily injury. If you install or remove a memory module, turn off the computer using the Start menu. Your computer comes with enough memory to room temperature before they have cooled. To avoid damaging the computer's screws, use complex ...
...is in Standby or Hibernation mode, data will need a small Phillips screwdriver for this procedure. NOTE Before adding external devices or memory, Toshiba recommends setting up your software. Avoid touching the cover, the module, and the surrounding area before replacing it. You may want to ... module may also be installed in minor bodily injury. If you install or remove a memory module, turn off the computer using the Start menu. Your computer comes with enough memory to room temperature before they have cooled. To avoid damaging the computer's screws, use complex ...

User Guide 1
Page 41
... and remove any cables connected to the computer, including the AC adaptor. 4 Close the display panel and turn the computer upside down to step 3. 1 Click Start, and then Turn Off computer. The operating system turns off computer window appears. 2 Click Turn Off. For information on removing the main battery, see "Removing... the battery from the computer" on , begin at step 1; otherwise, skip to locate the memory module slot cover. 5 Remove the main battery. Getting Started Adding memory (optional) 41 If the computer is on page 94.
... and remove any cables connected to the computer, including the AC adaptor. 4 Close the display panel and turn the computer upside down to step 3. 1 Click Start, and then Turn Off computer. The operating system turns off computer window appears. 2 Click Turn Off. For information on removing the main battery, see "Removing... the battery from the computer" on , begin at step 1; otherwise, skip to locate the memory module slot cover. 5 Remove the main battery. Getting Started Adding memory (optional) 41 If the computer is on page 94.

User Guide 1
Page 42
.... Grease or dust on the connector may cause memory access problems. NOTE If no memory slot is available, you may have built up. 42 Getting Started Adding memory (optional) 6 Using a small Phillips screwdriver, loosen the screw that you can damage the memory module. Before you handle the module, touch a grounded metal...
.... Grease or dust on the connector may cause memory access problems. NOTE If no memory slot is available, you may have built up. 42 Getting Started Adding memory (optional) 6 Using a small Phillips screwdriver, loosen the screw that you can damage the memory module. Before you handle the module, touch a grounded metal...
User Guide 1
Page 43
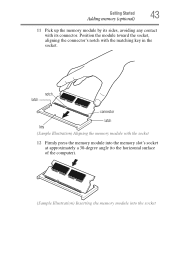
Position the module toward the socket, aligning the connector's notch with the socket 12 Firmly press the memory module into the memory slot's socket at approximately a 30-degree angle (to the horizontal surface of the computer). (Sample Illustration) Inserting the memory module into the socket notch latch connector latch key (Sample Illustration) Aligning the memory module with the matching key in the socket. Getting Started Adding memory (optional) 43 11 Pick up the memory module by its sides, avoiding any contact with its connector.
Position the module toward the socket, aligning the connector's notch with the socket 12 Firmly press the memory module into the memory slot's socket at approximately a 30-degree angle (to the horizontal surface of the computer). (Sample Illustration) Inserting the memory module into the socket notch latch connector latch key (Sample Illustration) Aligning the memory module with the matching key in the socket. Getting Started Adding memory (optional) 43 11 Pick up the memory module by its sides, avoiding any contact with its connector.

User Guide 1
Page 44
44 Getting Started Adding memory (optional) 13 Once the module's connector is fully inserted into the socket, press downward on the memory module Do not force the memory ...
44 Getting Started Adding memory (optional) 13 Once the module's connector is fully inserted into the socket, press downward on the memory module Do not force the memory ...


