

User Guide 1
Page 37
... load automatically. This is manufactured using highprecision technology. NOTE The power button is disabled when the display panel is operated on battery power, the screen will deteriorate. Any small bright dots that may appear on your computer. Turning on the power To turn on the computer: 1 Make sure ...to use AC power rather than battery power) are properly connected and ready. 2 Check to increase the brightness of the screen will dim and you may appear on your screen display when you turn on your display are empty. 3 Press the power button in until the operating system has loaded...
... load automatically. This is manufactured using highprecision technology. NOTE The power button is disabled when the display panel is operated on battery power, the screen will deteriorate. Any small bright dots that may appear on your computer. Turning on the power To turn on the computer: 1 Make sure ...to use AC power rather than battery power) are properly connected and ready. 2 Check to increase the brightness of the screen will dim and you may appear on your screen display when you turn on your display are empty. 3 Press the power button in until the operating system has loaded...

User Guide 1
Page 38
.... NOTE The names of Microsoft's End User License Agreement and click Next. 3 Select the appropriate option from the Help Protect Your Computer screen and click Next. 4 Enter the computer name and description and click Next or Skip. 5 Select how your computer will connect to your... computer name and network settings. 6 Follow the remaining screen prompts to continue. Once you choose your software setup choices. The computer will display the message: "An Internet connection could not be chosen."...
.... NOTE The names of Microsoft's End User License Agreement and click Next. 3 Select the appropriate option from the Help Protect Your Computer screen and click Next. 4 Enter the computer name and description and click Next or Skip. 5 Select how your computer will connect to your... computer name and network settings. 6 Follow the remaining screen prompts to continue. Once you choose your software setup choices. The computer will display the message: "An Internet connection could not be chosen."...
User Guide 1
Page 48
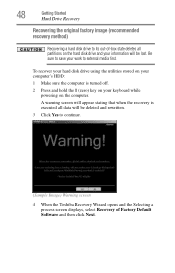
... drive using the utilities stored on your computer's HDD: 1 Make sure the computer is executed all partitions on the computer. A warning screen will appear stating that when the recovery is turned off. 2 Press and hold the 0 (zero) key on your keyboard while powering on ...the hard disk drive and your work to continue. (Sample Image) Warning screen 4 When the Toshiba Recovery Wizard opens and the Selecting a process screen displays, select Recovery of Factory Default Software and then click Next. Be sure to save your information will be...
... drive using the utilities stored on your computer's HDD: 1 Make sure the computer is executed all partitions on the computer. A warning screen will appear stating that when the recovery is turned off. 2 Press and hold the 0 (zero) key on your keyboard while powering on ...the hard disk drive and your work to continue. (Sample Image) Warning screen 4 When the Toshiba Recovery Wizard opens and the Selecting a process screen displays, select Recovery of Factory Default Software and then click Next. Be sure to save your information will be...

User Guide 1
Page 49
Getting Started Hard Drive Recovery 49 (Sample Image) Selecting a process screen 5 The Recovery of Factory Default Software screen 6 Click Next to begin the recovery. A confirmation message displays reminding you that the HDD has been recovered. 7 Press any key on the keyboard to out-of-box state, and then click Next. Be sure to save your work to external media before proceeding. (Sample Image) Recovery of Factory Default Software screen appears. Once complete, a message displays that all data will be lost during the recovery process. Select Recover to restart the computer.
Getting Started Hard Drive Recovery 49 (Sample Image) Selecting a process screen 5 The Recovery of Factory Default Software screen 6 Click Next to begin the recovery. A confirmation message displays reminding you that the HDD has been recovered. 7 Press any key on the keyboard to out-of-box state, and then click Next. Be sure to save your work to external media before proceeding. (Sample Image) Recovery of Factory Default Software screen appears. Once complete, a message displays that all data will be lost during the recovery process. Select Recover to restart the computer.
User Guide 1
Page 50
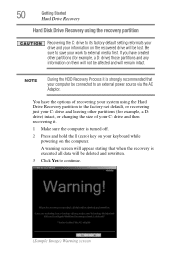
A warning screen will appear stating that your computer be connected to its factory default setting reformats your drive and your system using the recovery partition Recovering the C: ... them will remain intact. 50 Getting Started Hard Drive Recovery Hard Disk Drive Recovery using the Hard Drive Recovery partition to continue. (Sample Image) Warning screen Be sure to save your keyboard while powering on your work to external media first.
A warning screen will appear stating that your computer be connected to its factory default setting reformats your drive and your system using the recovery partition Recovering the C: ... them will remain intact. 50 Getting Started Hard Drive Recovery Hard Disk Drive Recovery using the Hard Drive Recovery partition to continue. (Sample Image) Warning screen Be sure to save your keyboard while powering on your work to external media first.
User Guide 1
Page 51
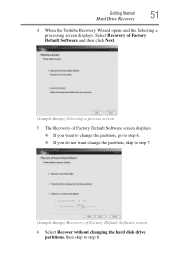
Getting Started Hard Drive Recovery 51 4 When the Toshiba Recovery Wizard opens and the Selecting a processing screen displays. Select Recovery of Factory Default Software and then click Next. (Sample Image) Selecting a process screen 5 The Recovery of Factory Default Software screen displays. ❖ If you want to change the partition, go to step 6. ❖ If you do not want change the partition, skip to step 7. (Sample Image) Recovery of Factory Default Software screen 6 Select Recover without changing the hard disk drive partitions, then skip to step 8.
Getting Started Hard Drive Recovery 51 4 When the Toshiba Recovery Wizard opens and the Selecting a processing screen displays. Select Recovery of Factory Default Software and then click Next. (Sample Image) Selecting a process screen 5 The Recovery of Factory Default Software screen displays. ❖ If you want to change the partition, go to step 6. ❖ If you do not want change the partition, skip to step 7. (Sample Image) Recovery of Factory Default Software screen 6 Select Recover without changing the hard disk drive partitions, then skip to step 8.
User Guide 1
Page 52
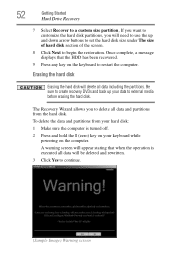
...will need to use the up your keyboard while powering on the computer. To delete the data and partitions from the hard disk. A warning screen will appear stating that the HDD has been recovered. 9 Press any key on your data to external media before erasing the hard disk. Erasing... the hard disk Erasing the hard disk will delete all data will be deleted and rewritten. 3 Click Yes to continue. (Sample Image) Warning screen 52 Getting Started Hard Drive Recovery 7 Select Recover to a custom size partition, If you want to customize the hard disk partitions, you to delete ...
...will need to use the up your keyboard while powering on the computer. To delete the data and partitions from the hard disk. A warning screen will appear stating that the HDD has been recovered. 9 Press any key on your data to external media before erasing the hard disk. Erasing... the hard disk Erasing the hard disk will delete all data will be deleted and rewritten. 3 Click Yes to continue. (Sample Image) Warning screen 52 Getting Started Hard Drive Recovery 7 Select Recover to a custom size partition, If you want to customize the hard disk partitions, you to delete ...
User Guide 1
Page 53
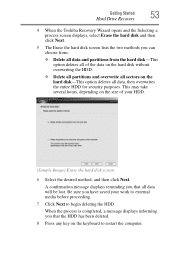
...sectors on the keyboard to begin deleting the HDD. A confirmation message displays reminding you have saved your HDD. (Sample Image) Erase the hard disk screen 6 Select the desired method, and then click Next. Be sure you that the HDD has been deleted. 8 Press any key on the hard...entire HDD for security purposes. Getting Started Hard Drive Recovery 53 4 When the Toshiba Recovery Wizard opens and the Selecting a process screen displays, select Erase the hard disk and then click Next. 5 The Erase the hard disk screen lists the two methods you can choose from: ❖ Delete all data ...
...sectors on the keyboard to begin deleting the HDD. A confirmation message displays reminding you have saved your HDD. (Sample Image) Erase the hard disk screen 6 Select the desired method, and then click Next. Be sure you that the HDD has been deleted. 8 Press any key on the hard...entire HDD for security purposes. Getting Started Hard Drive Recovery 53 4 When the Toshiba Recovery Wizard opens and the Selecting a process screen displays, select Erase the hard disk and then click Next. 5 The Erase the hard disk screen lists the two methods you can choose from: ❖ Delete all data ...
User Guide 1
Page 54
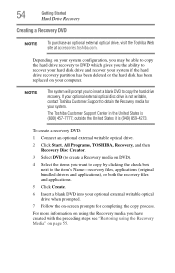
... Drive Recovery Creating a Recovery DVD NOTE To purchase an optional external optical drive, visit the Toshiba Web site at accessories.toshiba.com. To create a recovery DVD: 1 Connect an optional external writable optical drive. 2 Click Start, All Programs, TOSHIBA, Recovery, and then Recovery Disc Creator. 3 Select DVD (to create a Recovery media on... media for your system if the hard drive recovery partition has been deleted or the hard disk has been replaced on -screen prompts for completing the copy process. If your optional external optical disc drive is not writable, contact...
... Drive Recovery Creating a Recovery DVD NOTE To purchase an optional external optical drive, visit the Toshiba Web site at accessories.toshiba.com. To create a recovery DVD: 1 Connect an optional external writable optical drive. 2 Click Start, All Programs, TOSHIBA, Recovery, and then Recovery Disc Creator. 3 Select DVD (to create a Recovery media on... media for your system if the hard drive recovery partition has been deleted or the hard disk has been replaced on -screen prompts for completing the copy process. If your optional external optical disc drive is not writable, contact...
User Guide 1
Page 55
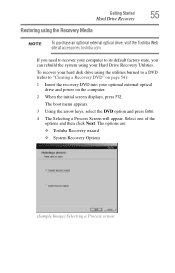
...the system using the utilities burned to a DVD (refer to "Creating a Recovery DVD" on the computer. 2 When the initial screen displays, press F12. The boot menu appears. 3 Using the arrow keys, select the DVD option and press Enter. 4 The Selecting a Process... Screen will appear. The options are: ❖ Toshiba Recovery wizard ❖ System Recovery Options (Sample Image) Selecting a Process screen Getting Started Hard Drive Recovery 55 Restoring using the Recovery Media NOTE To purchase an optional ...
...the system using the utilities burned to a DVD (refer to "Creating a Recovery DVD" on the computer. 2 When the initial screen displays, press F12. The boot menu appears. 3 Using the arrow keys, select the DVD option and press Enter. 4 The Selecting a Process... Screen will appear. The options are: ❖ Toshiba Recovery wizard ❖ System Recovery Options (Sample Image) Selecting a Process screen Getting Started Hard Drive Recovery 55 Restoring using the Recovery Media NOTE To purchase an optional ...
User Guide 1
Page 56
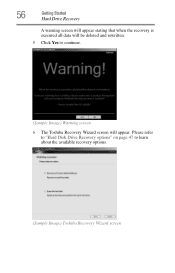
Please refer to "Hard Disk Drive Recovery options" on page 47 to continue. (Sample Image) Warning screen 6 The Toshiba Recovery Wizard screen will appear. 56 Getting Started Hard Drive Recovery A warning screen will appear stating that when the recovery is executed all data will be deleted and rewritten. 5 Click Yes to learn about the available recovery options. (Sample Image) Toshiba Recovery Wizard screen
Please refer to "Hard Disk Drive Recovery options" on page 47 to continue. (Sample Image) Warning screen 6 The Toshiba Recovery Wizard screen will appear. 56 Getting Started Hard Drive Recovery A warning screen will appear stating that when the recovery is executed all data will be deleted and rewritten. 5 Click Yes to learn about the available recovery options. (Sample Image) Toshiba Recovery Wizard screen
User Guide 1
Page 57
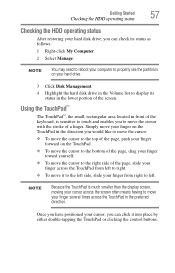
... Simply move your finger several times across the TouchPad from right to left to right. ❖ To move the cursor with the stroke of the screen. NOTE Because the TouchPad is sensitive to touch and enables you to move it into place by either double-tapping the TouchPad or clicking the... the right side of the page, slide your finger across the TouchPad in front of the keyboard, is much smaller than the display screen, moving your cursor across the screen often means having to move your finger on your hard drive. 3 Click Disk Management. 4 Highlight the hard disk drive in the...
... Simply move your finger several times across the TouchPad from right to left to right. ❖ To move the cursor with the stroke of the screen. NOTE Because the TouchPad is sensitive to touch and enables you to move it into place by either double-tapping the TouchPad or clicking the... the right side of the page, slide your finger across the TouchPad in front of the keyboard, is much smaller than the display screen, moving your cursor across the screen often means having to move your finger on your hard drive. 3 Click Disk Management. 4 Highlight the hard disk drive in the...

User Guide 1
Page 58
... with the TouchPad™ There are two active regions on the TouchPad™ that came with the monitor to see if you first need a larger screen. It usually corresponds to determine whether it uses the right mouse button. To do this: 1 Read the directions that allow you to scroll as you...
... with the TouchPad™ There are two active regions on the TouchPad™ that came with the monitor to see if you first need a larger screen. It usually corresponds to determine whether it uses the right mouse button. To do this: 1 Read the directions that allow you to scroll as you...

User Guide 1
Page 61
... need to set up your computer: 1 Connect the printer cable to the printer and then connect the other end to set it up a printer" on -screen instructions to one of the computer's USB ports. 2 Plug the printer's power cable into a live AC outlet. The Printers and Faxes window appears. 2 Click Add...
... need to set up your computer: 1 Connect the printer cable to the printer and then connect the other end to set it up a printer" on -screen instructions to one of the computer's USB ports. 2 Plug the printer's power cable into a live AC outlet. The Printers and Faxes window appears. 2 Click Add...
User Guide 1
Page 65
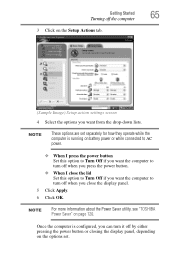
... turn off the computer 65 3 Click on page 120. NOTE For more information about the Power Saver utility, see "TOSHIBA Power Saver" on the Setup Actions tab. (Sample Image) Setup action settings screen 4 Select the options you close the lid Set this option to Turn Off if you want from the drop...
... turn off the computer 65 3 Click on page 120. NOTE For more information about the Power Saver utility, see "TOSHIBA Power Saver" on the Setup Actions tab. (Sample Image) Setup action settings screen 4 Select the options you close the lid Set this option to Turn Off if you want from the drop...

User Guide 1
Page 67
... put the computer in Hibernation mode by closing the display panel, depending on page 120. NOTE For more information about the Power Saver utility, see "TOSHIBA Power Saver" on the Hibernation options set separately for the options you want the computer to go into Hibernation mode by opening the display panel... mode when you press the power button. ❖ When I press the power button Set this option to Hibernate if you want the computer to the screen(s) you were using.
... put the computer in Hibernation mode by closing the display panel, depending on page 120. NOTE For more information about the Power Saver utility, see "TOSHIBA Power Saver" on the Hibernation options set separately for the options you want the computer to go into Hibernation mode by opening the display panel... mode when you press the power button. ❖ When I press the power button Set this option to Hibernate if you want the computer to the screen(s) you were using.
User Guide 1
Page 69
...computer's settings There are additional custom settings you were using. NOTE Please handle your battery" on page 120. NOTE For more information, see "TOSHIBA Power Saver" on page 96. Customizing your computer's battery, see "Taking care of the computer. Caring for details. Once the computer is ... can start up the computer from Standby mode, press the power button until the ON/OFF light glows green. Refer to the screen(s) you can place it again by opening the display panel. Closing the display panel After you can customize your computer to avoid ...
...computer's settings There are additional custom settings you were using. NOTE Please handle your battery" on page 120. NOTE For more information, see "TOSHIBA Power Saver" on page 96. Customizing your computer's battery, see "Taking care of the computer. Caring for details. Once the computer is ... can start up the computer from Standby mode, press the power button until the ON/OFF light glows green. Refer to the screen(s) you can place it again by opening the display panel. Closing the display panel After you can customize your computer to avoid ...
User Guide 1
Page 100
... will explore some of the special features of your system. 100 Chapter 4 Exploring Your Computer's Features In this guide may appear slightly different from the screens displayed by your computer.
... will explore some of the special features of your system. 100 Chapter 4 Exploring Your Computer's Features In this guide may appear slightly different from the screens displayed by your computer.

User Guide 1
Page 105
... ISP is a unique identifier for example, your ISP's home page on the Internet or your network administrator about connecting to zoom out. NOTE To improve screen resolution and increase/decrease screen size, press Fn+2 to zoom in the Web address.
... ISP is a unique identifier for example, your ISP's home page on the Internet or your network administrator about connecting to zoom out. NOTE To improve screen resolution and increase/decrease screen size, press Fn+2 to zoom in the Web address.

User Guide 1
Page 106
... types of communication tools to a particular subject, and unlike blogs, are generally short messages. A message board may be called "threads" or "posts") on their computer screens. ❖ Internet news groups A news group is an online journal where an individual, group, or corporation can offer a record of activities, thoughts, or beliefs. If...
... types of communication tools to a particular subject, and unlike blogs, are generally short messages. A message board may be called "threads" or "posts") on their computer screens. ❖ Internet news groups A news group is an online journal where an individual, group, or corporation can offer a record of activities, thoughts, or beliefs. If...


