
User Guide 1
Page 19
... Installing a memory module 40 Removing a memory module 45 Checking total memory 46 Hard Drive Recovery 47 Hard Disk Drive Recovery options 47 Creating a Recovery DVD 54 Restoring using the Recovery Media 55 Checking the HDD operating status 57 Using the TouchPad 57 Scrolling with the TouchPad 58 Control buttons 58 Disabling or enabling the TouchPad 58 Using external display devices 58 Directing the display output when you turn on the computer 59 Adjusting the quality of the external display......60 Using an external keyboard 60 Using a mouse 60 Connecting a printer 60 Setting...
... Installing a memory module 40 Removing a memory module 45 Checking total memory 46 Hard Drive Recovery 47 Hard Disk Drive Recovery options 47 Creating a Recovery DVD 54 Restoring using the Recovery Media 55 Checking the HDD operating status 57 Using the TouchPad 57 Scrolling with the TouchPad 58 Control buttons 58 Disabling or enabling the TouchPad 58 Using external display devices 58 Directing the display output when you turn on the computer 59 Adjusting the quality of the external display......60 Using an external keyboard 60 Using a mouse 60 Connecting a printer 60 Setting...
User Guide 1
Page 21
... The Internet 104 The World Wide Web 104 Internet Service Providers 105 Connecting to the Internet 105 Surfing the Internet 105 Internet features 106 Uploading to, and downloading files from, the Internet 107 Exploring audio features 107 Recording sounds 107 Using external speakers or headphones..........108 Using the Web Camera 109 Using the Bridge Media Adapter Slot 109 Inserting memory media 110 Removing memory media 110 Chapter 5: Utilities 112 TOSHIBA Recovery Disc Creator 113 TOSHIBA Application Installer 113 TOSHIBA Password Utility 114 Deleting a user password...
... The Internet 104 The World Wide Web 104 Internet Service Providers 105 Connecting to the Internet 105 Surfing the Internet 105 Internet features 106 Uploading to, and downloading files from, the Internet 107 Exploring audio features 107 Recording sounds 107 Using external speakers or headphones..........108 Using the Web Camera 109 Using the Bridge Media Adapter Slot 109 Inserting memory media 110 Removing memory media 110 Chapter 5: Utilities 112 TOSHIBA Recovery Disc Creator 113 TOSHIBA Application Installer 113 TOSHIBA Password Utility 114 Deleting a user password...

User Guide 1
Page 40
... external devices or memory, Toshiba recommends setting up your software" on may want to run most of data. Allow the module to cool to follow these directions could result in good condition. Failure to room temperature before they have cooled. See "Setting up your system or visit accessories.toshiba.com. If you install or remove a memory module, turn off the computer using the Start menu. 40 Getting Started...
... external devices or memory, Toshiba recommends setting up your software" on may want to run most of data. Allow the module to cool to follow these directions could result in good condition. Failure to room temperature before they have cooled. See "Setting up your system or visit accessories.toshiba.com. If you install or remove a memory module, turn off the computer using the Start menu. 40 Getting Started...

User Guide 1
Page 42
... the connector may cause memory access problems. NOTE If no memory slot is available, you may have built up. Avoid touching the connector on the memory module or on the underside of computer (Sample Illustration) Removing the memory module slot cover 7 Remove the memory module slot cover. 8 Place the screw and the cover in a safe place so that secures the memory module slot cover. Back of the computer. 42 Getting Started Adding memory (optional) 6 Using a small Phillips screwdriver...
... the connector may cause memory access problems. NOTE If no memory slot is available, you may have built up. Avoid touching the connector on the memory module or on the underside of computer (Sample Illustration) Removing the memory module slot cover 7 Remove the memory module slot cover. 8 Place the screw and the cover in a safe place so that secures the memory module slot cover. Back of the computer. 42 Getting Started Adding memory (optional) 6 Using a small Phillips screwdriver...

User Guide 1
Page 45
... memory module. Removing a memory module If you turn it on . Do not remove the memory module while the computer is in "Installing a memory module" on page 46. Do not try to Continue If the computer hangs up the computer. In either of the above cases, the Standby configuration will be saved. Getting Started Adding memory (optional) 45 15 Re-insert the main battery. The following : Press the power button...
... memory module. Removing a memory module If you turn it on . Do not remove the memory module while the computer is in "Installing a memory module" on page 46. Do not try to Continue If the computer hangs up the computer. In either of the above cases, the Standby configuration will be saved. Getting Started Adding memory (optional) 45 15 Re-insert the main battery. The following : Press the power button...
User Guide 1
Page 46
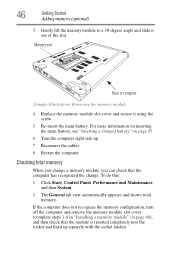
... memory configuration, turn off the computer and remove the memory module slot cover (complete steps 1-8 in "Installing a memory module" on page 95. 6 Turn the computer right side up squarely with the socket latches. Checking total memory When you change a memory module, you can check that the module is inserted completely into the socket and lined up . 7 Reconnect the cables. 8 Restart the computer. To do this: 1 Click Start, Control Panel, Performance and Maintenance...
... memory configuration, turn off the computer and remove the memory module slot cover (complete steps 1-8 in "Installing a memory module" on page 95. 6 Turn the computer right side up squarely with the socket latches. Checking total memory When you change a memory module, you can check that the module is inserted completely into the socket and lined up . 7 Reconnect the cables. 8 Restart the computer. To do this: 1 Click Start, Control Panel, Performance and Maintenance...

User Guide 1
Page 58
... external device. 5 Set the display mode by pressing Fn + F5, or by default. To do this: 1 Read the directions that allow you to scroll as you would with any wheel device on a mouse or trackball. 58 Getting Started Using external display devices Scrolling with the TouchPad™ There are using. The function of the computer. 3 Connect the device's power cable to the left -hand) button. This hot key enables/ disables the TouchPad. Disabling or enabling the TouchPad™ The TouchPad™ is enabled...
... external device. 5 Set the display mode by pressing Fn + F5, or by default. To do this: 1 Read the directions that allow you to scroll as you would with any wheel device on a mouse or trackball. 58 Getting Started Using external display devices Scrolling with the TouchPad™ There are using. The function of the computer. 3 Connect the device's power cable to the left -hand) button. This hot key enables/ disables the TouchPad. Disabling or enabling the TouchPad™ The TouchPad™ is enabled...

User Guide 1
Page 104
... as text, images, audio, or video to be referenced from , the Internet The Internet The Internet is a subset of the Internet-a collection of interlinked documents (located on computers connected to the Internet) that work together using the Internet Accessing a network To access a network, connect an Ethernet cable to the Network port (RJ45) on your computer. They make it easier to connect to share information. For specific information about connecting to the network, consult your computer...
... as text, images, audio, or video to be referenced from , the Internet The Internet The Internet is a subset of the Internet-a collection of interlinked documents (located on computers connected to the Internet) that work together using the Internet Accessing a network To access a network, connect an Ethernet cable to the Network port (RJ45) on your computer. They make it easier to connect to share information. For specific information about connecting to the network, consult your computer...
User Guide 1
Page 125
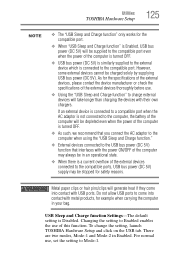
..., the battery of the computer will be supplied to the compatible port even when the power of the computer is turned OFF. ❖ USB bus power (DC 5V) is similarly supplied to the external device which is connected to the compatible port. USB Sleep and Charge function Settings-The default setting is Disabled. For normal use, set the setting to Enabled enables the use . ❖ Using the "USB Sleep and Charge function" to come into contact with USB ports. Utilities TOSHIBA Hardware Setup 125 NOTE...
..., the battery of the computer will be supplied to the compatible port even when the power of the computer is turned OFF. ❖ USB bus power (DC 5V) is similarly supplied to the external device which is connected to the compatible port. USB Sleep and Charge function Settings-The default setting is Disabled. For normal use, set the setting to Enabled enables the use . ❖ Using the "USB Sleep and Charge function" to come into contact with USB ports. Utilities TOSHIBA Hardware Setup 125 NOTE...

User Guide 1
Page 126
... in TOSHIBA Hardware Setup, the "USB Wakeup function" does not work , but the "USB Sleep and Charge function" will be displayed on the external devices connected to Mode-2. Any options that appear in either mode. When this function in the dialog boxes and clicking Apply, you can change the "USB Sleep and Charge function" setting to Disabled. Enables the function Disabled (Default) -- Setting item: Enabled (Mode-1) -- If you have the USB Sleep and Charge function-compatible icon ( ), change the settings the "USB Wakeup function" will not be able to all USB ports...
... in TOSHIBA Hardware Setup, the "USB Wakeup function" does not work , but the "USB Sleep and Charge function" will be displayed on the external devices connected to Mode-2. Any options that appear in either mode. When this function in the dialog boxes and clicking Apply, you can change the "USB Sleep and Charge function" setting to Disabled. Enables the function Disabled (Default) -- Setting item: Enabled (Mode-1) -- If you have the USB Sleep and Charge function-compatible icon ( ), change the settings the "USB Wakeup function" will not be able to all USB ports...

User Guide 1
Page 128
... a function key to activate the hot key function. (Sample Image) TOSHIBA Accessibility window To use the Fn key to the desired option. 4 Click OK. The TOSHIBA Accessibility window appears. 2 Check the Use Fn-StickyKey box. 3 Put a check mark next to create a hot key combination with one of the function keys without pressing the two keys simultaneously as is usually required. Using Accessibility lets you make the Fn key a sticky key, meaning you to use TOSHIBA Accessibility: 1 Click Start, All Programs, TOSHIBA, Utilities, and...
... a function key to activate the hot key function. (Sample Image) TOSHIBA Accessibility window To use the Fn key to the desired option. 4 Click OK. The TOSHIBA Accessibility window appears. 2 Check the Use Fn-StickyKey box. 3 Put a check mark next to create a hot key combination with one of the function keys without pressing the two keys simultaneously as is usually required. Using Accessibility lets you make the Fn key a sticky key, meaning you to use TOSHIBA Accessibility: 1 Click Start, All Programs, TOSHIBA, Utilities, and...
User Guide 1
Page 133
... bottom of these problems, use the options in the Startup menu to a different power outlet, preferably in some way such as installing a new program or adding a device. If the computer starts normally, there may not be equal to start from an AC adaptor that is correct, and the plug fits correctly in the DC-IN socket. Unless a hardware device has failed, problems usually occur...
... bottom of these problems, use the options in the Startup menu to a different power outlet, preferably in some way such as installing a new program or adding a device. If the computer starts normally, there may not be equal to start from an AC adaptor that is correct, and the plug fits correctly in the DC-IN socket. Unless a hardware device has failed, problems usually occur...
User Guide 1
Page 141
... Resolving a hardware conflict 141 Keyboard problems If, when you have registered a password, press any key, type the password and press Enter. A keypad overlay may be related to activate the screen. You have gone into effect. You may have connected an external keyboard and the operating system displays one or more keyboard error messages. Using the computer's TouchPad, click Start, then Turn off the numlock light. Display Auto Off may have activated the instant password feature...
... Resolving a hardware conflict 141 Keyboard problems If, when you have registered a password, press any key, type the password and press Enter. A keypad overlay may be related to activate the screen. You have gone into effect. You may have connected an external keyboard and the operating system displays one or more keyboard error messages. Using the computer's TouchPad, click Start, then Turn off the numlock light. Display Auto Off may have activated the instant password feature...
User Guide 1
Page 142
... are using fewer colors. To reduce the amount of the way the screen produces colors. To change the display settings by clicking a blank area of the color palette to one that the cable connecting the external monitor to the computer is firmly attached. ❖ Try adjusting the contrast and brightness controls on . ❖ Check that the monitor's power cord/cable is firmly plugged into a working power outlet...
... are using fewer colors. To reduce the amount of the way the screen produces colors. To change the display settings by clicking a blank area of the color palette to one that the cable connecting the external monitor to the computer is firmly attached. ❖ Try adjusting the contrast and brightness controls on . ❖ Check that the monitor's power cord/cable is firmly plugged into a working power outlet...
User Guide 1
Page 156
... Charge function" is important to Enabled the "USB Wakeup function" does not work for help. For more of assistance first. Try the following methods. ❖ Change the Enabled mode setting. ❖ Turn off the computer while external devices are using, it is set to investigate other sources of the following before you contact Toshiba: ❖ Review the troubleshooting information in this chapter and are connected to Enabled. ❖ Some external devices may need...
... Charge function" is important to Enabled the "USB Wakeup function" does not work for help. For more of assistance first. Try the following methods. ❖ Change the Enabled mode setting. ❖ Turn off the computer while external devices are using, it is set to investigate other sources of the following before you contact Toshiba: ❖ Review the troubleshooting information in this chapter and are connected to Enabled. ❖ Some external devices may need...

User Guide 1
Page 196
... limited area and connected by a communications link that enables any device to interact with the Fn key can set system options or control system parameters, such as the battery save mode. (2) A key or combination of keys that you turn on the screen that holds 1.44 MB of your work , including all open files and programs, when you use to help improve processing speed. Interlaced monitors take two...
... limited area and connected by a communications link that enables any device to interact with the Fn key can set system options or control system parameters, such as the battery save mode. (2) A key or combination of keys that you turn on the screen that holds 1.44 MB of your work , including all open files and programs, when you use to help improve processing speed. Interlaced monitors take two...
User Guide 1
Page 202
...; 99 changing 93 charge indicator light 35, 88 charge not lasting 140 charging 35, 87 conserving power 91 disposal 98 installing 93, 95 low charge 90 maintaining 97 202 monitoring power 35, 88 not charging 140 power profile hot key 93 real-time clock (RTC) 85, 87 remaining power 90 removing 94 safety precautions 96 BIOS Setup see TOSHIBA Hardware Setup Bridge Media Adapter inserting memory media 110 removing memory media 110 Bridge Media Adaptor slot 109 button power 37, 54, 113 start 102...
...; 99 changing 93 charge indicator light 35, 88 charge not lasting 140 charging 35, 87 conserving power 91 disposal 98 installing 93, 95 low charge 90 maintaining 97 202 monitoring power 35, 88 not charging 140 power profile hot key 93 real-time clock (RTC) 85, 87 remaining power 90 removing 94 safety precautions 96 BIOS Setup see TOSHIBA Hardware Setup Bridge Media Adapter inserting memory media 110 removing memory media 110 Bridge Media Adaptor slot 109 button power 37, 54, 113 start 102...
User Guide 1
Page 203
.../trouble accessing a drive 143 running slow 144 diskette drive cannot insert a diskette 145 cannot read a diskette 145 display does not look normal/flickers 142 external monitor not working 143 display devices external 58 display output settings 59 display panel opening 36 display problems screen is blank 141 display, external adjusting 60 disposal information 17 disposing of used batteries 98 double-click 58 E ENERGY STAR® 24 error messages device driver conflict 135 general hardware problem 135 non-system disk or disk error...
.../trouble accessing a drive 143 running slow 144 diskette drive cannot insert a diskette 145 cannot read a diskette 145 display does not look normal/flickers 142 external monitor not working 143 display devices external 58 display output settings 59 display panel opening 36 display problems screen is blank 141 display, external adjusting 60 disposal information 17 disposing of used batteries 98 double-click 58 E ENERGY STAR® 24 error messages device driver conflict 135 general hardware problem 135 non-system disk or disk error...
User Guide 1
Page 205
... problem solving 139 removing memory module slot cover 42 memory module installation 40 installing inserting into socket 43 removing 45, 46 memory module slot 42 microphone using 107 monitor connecting 58 monitor problems monitor not working 142 mouse installing 60 mouse utility 122 N networking wireless 103 O other documentation 28 overlay keys 76 P password disabling a user 115 Plug and Play 136 port monitor 58 power computer will not start 131 connecting cable to AC adaptor 34 cord/cable 34 cord/cable connectors 166 energy-saving features 84 problem solving 139 turning on 37 power button...
... problem solving 139 removing memory module slot cover 42 memory module installation 40 installing inserting into socket 43 removing 45, 46 memory module slot 42 microphone using 107 monitor connecting 58 monitor problems monitor not working 142 mouse installing 60 mouse utility 122 N networking wireless 103 O other documentation 28 overlay keys 76 P password disabling a user 115 Plug and Play 136 port monitor 58 power computer will not start 131 connecting cable to AC adaptor 34 cord/cable 34 cord/cable connectors 166 energy-saving features 84 problem solving 139 turning on 37 power button...
User Guide 1
Page 206
... files/trouble accessing a drive 143 no sound 145 non-system disk or disk error 132, 145 power and batteries 139 printer 146 program not responding 129 program not working properly 144 screen does not look right/flickers 142 Startup options 134 system resources 136 URL address not found 135 USB Wakeup function does not work 156 warning resume failure 131 Windows® operating system not working 133 program, starting 77...
... files/trouble accessing a drive 143 no sound 145 non-system disk or disk error 132, 145 power and batteries 139 printer 146 program not responding 129 program not working properly 144 screen does not look right/flickers 142 Startup options 134 system resources 136 URL address not found 135 USB Wakeup function does not work 156 warning resume failure 131 Windows® operating system not working 133 program, starting 77...


