

User Guide 1
Page 7
...lead (Pb), mercury (Hg) and/or cadmium (Cd) will appear below the crossed out wheeled bin symbol on how to trade-in Europe, Toshiba is intended to protect the quality of the environment and human health through the responsible use of natural resources and the adoption of lead (Pb...), mercury (Hg), and/or cadmium (Cd) defined in European Union (EU) member countries after August 2005 to discard this product. If the product's battery or accumulator contains more than the specified values of waste management strategies that when the last end user wishes to mark such products with a crossed...
...lead (Pb), mercury (Hg) and/or cadmium (Cd) will appear below the crossed out wheeled bin symbol on how to trade-in Europe, Toshiba is intended to protect the quality of the environment and human health through the responsible use of natural resources and the adoption of lead (Pb...), mercury (Hg), and/or cadmium (Cd) defined in European Union (EU) member countries after August 2005 to discard this product. If the product's battery or accumulator contains more than the specified values of waste management strategies that when the last end user wishes to mark such products with a crossed...

User Guide 1
Page 18
Contents Introduction 24 This guide 26 Safety icons 27 Other icons used 27 Your computer's features and specifications ....28 Other documentation 28 Service options 28 Chapter 1: Getting Started 29 Getting comfortable with your computer 29 Keeping yourself comfortable 30 Precautions 30 Important information on your computer's cooling fan 32 Setting up your computer 32 Connecting to a power source 33 Charging the main battery 35 Using the computer for the first time 36 Opening the display panel 36 Turning on the power 37 18
Contents Introduction 24 This guide 26 Safety icons 27 Other icons used 27 Your computer's features and specifications ....28 Other documentation 28 Service options 28 Chapter 1: Getting Started 29 Getting comfortable with your computer 29 Keeping yourself comfortable 30 Precautions 30 Important information on your computer's cooling fan 32 Setting up your computer 32 Connecting to a power source 33 Charging the main battery 35 Using the computer for the first time 36 Opening the display panel 36 Turning on the power 37 18
User Guide 1
Page 20
... 82 Restoring your work 83 Toshiba's online resources 83 Chapter 3: Mobile Computing 84 Toshiba's energy-saver design 84 Running the computer on battery power 84 Battery Notice 85 Power management 86 Using additional batteries 86 Charging batteries 86 Charging the main battery 87 Charging the RTC battery 87 Monitoring main battery power 88 Determining remaining battery power 90 What to...
... 82 Restoring your work 83 Toshiba's online resources 83 Chapter 3: Mobile Computing 84 Toshiba's energy-saver design 84 Running the computer on battery power 84 Battery Notice 85 Power management 86 Using additional batteries 86 Charging batteries 86 Charging the main battery 87 Charging the RTC battery 87 Monitoring main battery power 88 Determining remaining battery power 90 What to...
User Guide 1
Page 21
Contents 21 Changing the main battery 93 Removing the battery from the computer .........94 Inserting a charged battery 95 Taking care of your battery 96 Safety precautions 96 Maintaining your battery 97 Disposing of used batteries 98 Traveling tips 99 Chapter 4: Exploring Your Computer's Features 100 Exploring the desktop 100 Finding ... Using the Bridge Media Adapter Slot 109 Inserting memory media 110 Removing memory media 110 Chapter 5: Utilities 112 TOSHIBA Recovery Disc Creator 113 TOSHIBA Application Installer 113 TOSHIBA Password Utility 114 Deleting a user password 115
Contents 21 Changing the main battery 93 Removing the battery from the computer .........94 Inserting a charged battery 95 Taking care of your battery 96 Safety precautions 96 Maintaining your battery 97 Disposing of used batteries 98 Traveling tips 99 Chapter 4: Exploring Your Computer's Features 100 Exploring the desktop 100 Finding ... Using the Bridge Media Adapter Slot 109 Inserting memory media 110 Removing memory media 110 Chapter 5: Utilities 112 TOSHIBA Recovery Disc Creator 113 TOSHIBA Application Installer 113 TOSHIBA Password Utility 114 Deleting a user password 115
User Guide 1
Page 22
...Preset Power Profiles 121 Quickly creating a new power profile 121 Customizing a power profile 121 Mouse Utility 122 TOSHIBA Hardware Setup 123 TOSHIBA Zooming Utility 127 TOSHIBA Accessibility 128 Chapter 6: If Something Goes Wrong 129 Problems that are easy to fix 129 Problems when ... 136 Resolving hardware conflicts on your own .....136 Fixing a problem with Device Manager ...........137 Memory problems 139 Power and the batteries 139 Keyboard problems 141 Display problems 141 Disk, diskette, or storage drive problems........143 Sound system problems 145 Printer problems 146 ...
...Preset Power Profiles 121 Quickly creating a new power profile 121 Customizing a power profile 121 Mouse Utility 122 TOSHIBA Hardware Setup 123 TOSHIBA Zooming Utility 127 TOSHIBA Accessibility 128 Chapter 6: If Something Goes Wrong 129 Problems that are easy to fix 129 Problems when ... 136 Resolving hardware conflicts on your own .....136 Fixing a problem with Device Manager ...........137 Memory problems 139 Power and the batteries 139 Keyboard problems 141 Display problems 141 Disk, diskette, or storage drive problems........143 Sound system problems 145 Printer problems 146 ...

User Guide 1
Page 24
... wherever you leave this computer to meet the latest ENERGY STAR® guidelines for both AC power and battery modes. Introduction Welcome to the world of the Toshiba User's 24 Using the installed wireless technology, you purchased is compliant, it is labeled with your computer ...See the "Mobile Computing" section of portable, multimedia computing. To conserve energy, your favorite Web pages. We recommend that you go. Toshiba is set to a configuration that your entertainment can wake the computer from Standby mode by pressing the power button. Your computer ships with...
... wherever you leave this computer to meet the latest ENERGY STAR® guidelines for both AC power and battery modes. Introduction Welcome to the world of the Toshiba User's 24 Using the installed wireless technology, you purchased is compliant, it is labeled with your computer ...See the "Mobile Computing" section of portable, multimedia computing. To conserve energy, your favorite Web pages. We recommend that you go. Toshiba is set to a configuration that your entertainment can wake the computer from Standby mode by pressing the power button. Your computer ships with...
User Guide 1
Page 30
...fire, resulting in damage or serious injury. Exposure to withstand the rigors of travel. Turn off the computer. 2. Remove the battery pack. If any part of your computer throughout the day. Failure to follow these eventualities should observe certain precautions to further ... conditioner vents or heaters. ❖ Extreme heat, cold, or humidity. ❖ Liquids and corrosive chemicals. Keeping yourself comfortable The Toshiba Instruction Manual for Safety and Comfort, that are connected to spill into any of these instructions could result in temperature or humidity and ...
...fire, resulting in damage or serious injury. Exposure to withstand the rigors of travel. Turn off the computer. 2. Remove the battery pack. If any part of your computer throughout the day. Failure to follow these eventualities should observe certain precautions to further ... conditioner vents or heaters. ❖ Extreme heat, cold, or humidity. ❖ Liquids and corrosive chemicals. Keeping yourself comfortable The Toshiba Instruction Manual for Safety and Comfort, that are connected to spill into any of these instructions could result in temperature or humidity and ...
User Guide 1
Page 32
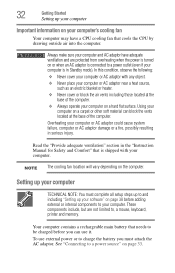
Your computer contains a rechargeable main battery that needs to be charged before you must complete all setup steps up to and including "Setting up your software" on page 38 before adding ...: ❖ Never cover your computer or AC adaptor with your computer on a carpet or other soft material can use external power or to charge the battery you can block the vents located at the base of the computer. Read the "Provide adequate ventilation" section in the "Instruction Manual for Safety and...
Your computer contains a rechargeable main battery that needs to be charged before you must complete all setup steps up to and including "Setting up your software" on page 38 before adding ...: ❖ Never cover your computer or AC adaptor with your computer on a carpet or other soft material can use external power or to charge the battery you can block the vents located at the base of the computer. Read the "Provide adequate ventilation" section in the "Instruction Manual for Safety and...

User Guide 1
Page 33
... avoid any risk of fire or other damage to the computer. Always confirm that may have been provided with your computer and the TOSHIBA Battery Charger (that the power plug (and extension cable plug if used) has been fully inserted into the socket, to ensure a secure ... in serious injury. Always use the TOSHIBA AC adaptor that was provided with your computer carefully to avoid scratching or damaging the surface. Getting Started Connecting to a power source 33 NOTE Please handle your computer), or use AC adaptors and battery chargers specified by use of an incompatible...
... avoid any risk of fire or other damage to the computer. Always confirm that may have been provided with your computer and the TOSHIBA Battery Charger (that the power plug (and extension cable plug if used) has been fully inserted into the socket, to ensure a secure ... in serious injury. Always use the TOSHIBA AC adaptor that was provided with your computer carefully to avoid scratching or damaging the surface. Getting Started Connecting to a power source 33 NOTE Please handle your computer), or use AC adaptors and battery chargers specified by use of an incompatible...

User Guide 1
Page 35
... off for the first time, avoid leaving the computer plugged in and turned off until the battery light glows green. Your computer's Power Saver utility can damage the battery. Charging the main battery Before using all of the power provided by the AC adaptor to power the computer, you ...an indication of the battery cannot occur when your computer is using the battery to run applications, features, and devices. To charge the battery, leave the computer plugged into the computer or AC outlet ❖ Flashes amber when ...
... off for the first time, avoid leaving the computer plugged in and turned off until the battery light glows green. Your computer's Power Saver utility can damage the battery. Charging the main battery Before using all of the power provided by the AC adaptor to power the computer, you ...an indication of the battery cannot occur when your computer is using the battery to run applications, features, and devices. To charge the battery, leave the computer plugged into the computer or AC outlet ❖ Flashes amber when ...
User Guide 1
Page 36
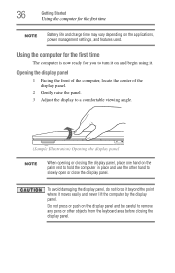
... the keyboard area before closing the display panel. Using the computer for the first time The computer is now ready for the first time NOTE Battery life and charge time may vary depending on and begin using it moves easily and never lift the computer by the display panel. To avoid...
... the keyboard area before closing the display panel. Using the computer for the first time The computer is now ready for the first time NOTE Battery life and charge time may vary depending on and begin using it moves easily and never lift the computer by the display panel. To avoid...

User Guide 1
Page 37
... may not be able to ensure all slots are empty. 3 Press the power button in until the operating system has loaded completely. Turning on battery power, the screen will load automatically. NOTE The power button is disabled when the display panel is operated on the power To turn off the.... Over a period of time, and depending on your display are properly connected and ready. 2 Check to increase the brightness of the screen while on battery power. Any small bright dots that may appear on your screen display when you turn on the usage of the computer, the brightness of the...
... may not be able to ensure all slots are empty. 3 Press the power button in until the operating system has loaded completely. Turning on battery power, the screen will load automatically. NOTE The power button is disabled when the display panel is operated on the power To turn off the.... Over a period of time, and depending on your display are properly connected and ready. 2 Check to increase the brightness of the screen while on battery power. Any small bright dots that may appear on your screen display when you turn on the usage of the computer, the brightness of the...

User Guide 1
Page 41
... the display panel and turn the computer upside down to step 3. 1 Click Start, and then Turn Off computer. For information on removing the main battery, see "Removing the battery from the computer" on , begin at step 1; The operating system turns off computer window appears. 2 Click Turn Off. otherwise, skip to locate the...
... the display panel and turn the computer upside down to step 3. 1 Click Start, and then Turn Off computer. For information on removing the main battery, see "Removing the battery from the computer" on , begin at step 1; The operating system turns off computer window appears. 2 Click Turn Off. otherwise, skip to locate the...

User Guide 1
Page 45
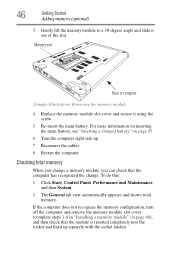
.... The computer could hang up the computer, verify that the computer has recognized the memory module. For more information on inserting the main battery, see "Inserting a charged battery" on . The memory module pops up . 17 Reconnect the cables. 18 Restart the computer. Removing a memory module If you turn...turned on page 95. 16 Turn the computer right side up slightly. Getting Started Adding memory (optional) 45 15 Re-insert the main battery. Do not remove the memory module while the computer is in "Checking total memory" on , perform the following message appears when you need...
.... The computer could hang up the computer, verify that the computer has recognized the memory module. For more information on inserting the main battery, see "Inserting a charged battery" on . The memory module pops up . 17 Reconnect the cables. 18 Restart the computer. Removing a memory module If you turn...turned on page 95. 16 Turn the computer right side up slightly. Getting Started Adding memory (optional) 45 15 Re-insert the main battery. Do not remove the memory module while the computer is in "Checking total memory" on , perform the following message appears when you need...
User Guide 1
Page 46
.... 46 Getting Started Adding memory (optional) 3 Gently lift the memory module to a 30-degree angle and slide it using the screw. 5 Re-insert the main battery. For more information on inserting the main battery, see "Inserting a charged battery" on page 40), and then check that the computer has recognized the change.
.... 46 Getting Started Adding memory (optional) 3 Gently lift the memory module to a 30-degree angle and slide it using the screw. 5 Re-insert the main battery. For more information on inserting the main battery, see "Inserting a charged battery" on page 40), and then check that the computer has recognized the change.

User Guide 1
Page 62
... to lose your work in -use light are not connected to a network, use the Windows® Standby or Hibernate commands to fully charge the main battery. It is a good idea to turn off your desktop setup, during its advantages. If you do not let the Windows® operating system turn on...
... to lose your work in -use light are not connected to a network, use the Windows® Standby or Hibernate commands to fully charge the main battery. It is a good idea to turn off your desktop setup, during its advantages. If you do not let the Windows® operating system turn on...

User Guide 1
Page 63
...being retrieved from the internal storage drive rather than from memory, restarting from Hibernation takes a little more time and consumes more main battery power than when restarting from turning off the computer or using Hibernation mode. ❖ When starting up again, the computer returns ... mode see "Using and configuring Hibernation mode" on Standby. ❖ Restarting from Standby takes less time and may consume more main battery power to start up than restarting from Standby. ❖ When starting up again, the computer returns to maintain the saved information, ...
...being retrieved from the internal storage drive rather than from memory, restarting from Hibernation takes a little more time and consumes more main battery power than when restarting from turning off the computer or using Hibernation mode. ❖ When starting up again, the computer returns ... mode see "Using and configuring Hibernation mode" on Standby. ❖ Restarting from Standby takes less time and may consume more main battery power to start up than restarting from Standby. ❖ When starting up again, the computer returns to maintain the saved information, ...

User Guide 1
Page 64
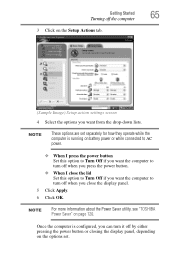
... Off Follow these steps to turn off the computer when you are not connected to activate it using Toshiba's Power Saver utility. 1 Click Start, Control Panel, and then Performance and Maintenance. 2 Click the TOSHIBA Power Saver icon. The Turn off computer dialog box appears. (Sample Image) Turn off computer Windows® dialog... save your computer. 64 Getting Started Turning off the computer If you power down completely. For information on using the Standby command and the main battery discharges fully, your unsaved information will be lost.
... Off Follow these steps to turn off the computer when you are not connected to activate it using Toshiba's Power Saver utility. 1 Click Start, Control Panel, and then Performance and Maintenance. 2 Click the TOSHIBA Power Saver icon. The Turn off computer dialog box appears. (Sample Image) Turn off computer Windows® dialog... save your computer. 64 Getting Started Turning off the computer If you power down completely. For information on using the Standby command and the main battery discharges fully, your unsaved information will be lost.
User Guide 1
Page 65
NOTE For more information about the Power Saver utility, see "TOSHIBA Power Saver" on battery power or while connected to AC power. ❖ When I press the power button Set this option to Turn Off if you want the computer to ...
NOTE For more information about the Power Saver utility, see "TOSHIBA Power Saver" on battery power or while connected to AC power. ❖ When I press the power button Set this option to Turn Off if you want the computer to ...

User Guide 1
Page 67
... to go into Hibernation mode by opening the display panel. NOTE These options are set . NOTE For more information about the Power Saver utility, see "TOSHIBA Power Saver" on page 120. Starting again from Hibernation mode, press the power button until the ON/OFF light glows green and the power button... light glows white. Once the computer is running on battery power or while connected to AC power. ❖ When I press the power button Set this option to Hibernate if you want the computer to go...
... to go into Hibernation mode by opening the display panel. NOTE These options are set . NOTE For more information about the Power Saver utility, see "TOSHIBA Power Saver" on page 120. Starting again from Hibernation mode, press the power button until the ON/OFF light glows green and the power button... light glows white. Once the computer is running on battery power or while connected to AC power. ❖ When I press the power button Set this option to Hibernate if you want the computer to go...


