Owners Manual
Page 1
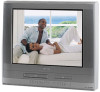
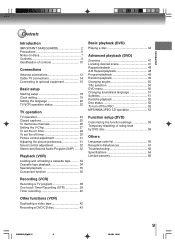
DIGITAL VIDEO Introduction 2 COMBINATION FLAT COLOR TELEVISION AND VIDEO CASSETTE RECORDER / DVD VIDEO PLAYER MW20FP1 MW24FP1 MW27FP1 Connections 13 Basic setup 18 TV operation 23 Playback (VCR) 33 Recording (VCR) 38 OWNER'S MANUAL Other functions (VCR) 42 Basic playback (DVD) 44 Advanced playback 47 (DVD) Function setup (DVD) 56 Others 60 Illustration of MW20FP1 ©2004 Toshiba Corporation This device does not tape-record copy protected DVD video discs. 5L00201C [E]Cover 1 20/4/04, 16:04
DIGITAL VIDEO Introduction 2 COMBINATION FLAT COLOR TELEVISION AND VIDEO CASSETTE RECORDER / DVD VIDEO PLAYER MW20FP1 MW24FP1 MW27FP1 Connections 13 Basic setup 18 TV operation 23 Playback (VCR) 33 Recording (VCR) 38 OWNER'S MANUAL Other functions (VCR) 42 Basic playback (DVD) 44 Advanced playback 47 (DVD) Function setup (DVD) 56 Others 60 Illustration of MW20FP1 ©2004 Toshiba Corporation This device does not tape-record copy protected DVD video discs. 5L00201C [E]Cover 1 20/4/04, 16:04
Owners Manual
Page 2
However, there is no guarantee that interference will not occur in the event that third party copyrights and other rights are not violated. Connect the equipment into an outlet on a circuit different from that may cause harmful interference to Part 15 of the FCC Rules. CAUTION: Changes or modifications not expressly approved by the party responsible for compliance with arrowhead symbol, within an equilateral triangle is intended to alert the user to the presence of uninsulated dangerous voltage within an equilateral triangle is connected. - SHOULD THE UNIT REQUIRE MAINTENANCE, ...
However, there is no guarantee that interference will not occur in the event that third party copyrights and other rights are not violated. Connect the equipment into an outlet on a circuit different from that may cause harmful interference to Part 15 of the FCC Rules. CAUTION: Changes or modifications not expressly approved by the party responsible for compliance with arrowhead symbol, within an equilateral triangle is intended to alert the user to the presence of uninsulated dangerous voltage within an equilateral triangle is connected. - SHOULD THE UNIT REQUIRE MAINTENANCE, ...
Owners Manual
Page 3
WATER AND MOISTURE Do not use this unit from the appliance. 3 5L00201C [E]p02-05 3 20/4/04, 16:04 S3126A These openings must not be placed in a built-in the cabinet back or bottom are provided for ventilation, and to ensure reliable operation of the unit, and to protect it from the type of power source indicated on the rating plate. The openings should never be equipped with a 3-wire grounding-type plug (a plug having one way. If you are not sure of the type of the polarized alternating-current line plug, your appliance dealer or local power company. This ...
WATER AND MOISTURE Do not use this unit from the appliance. 3 5L00201C [E]p02-05 3 20/4/04, 16:04 S3126A These openings must not be placed in a built-in the cabinet back or bottom are provided for ventilation, and to ensure reliable operation of the unit, and to protect it from the type of power source indicated on the rating plate. The openings should never be equipped with a 3-wire grounding-type plug (a plug having one way. If you are not sure of the type of the polarized alternating-current line plug, your appliance dealer or local power company. This ...
Owners Manual
Page 4
POWER LINES An outside antenna system should not be fatal. 15. SERVICING Do not attempt to do so may cause serious personal injury. 23. b. If liquid has been spilled, or objects have the same characteristics as they may cause hearing damage. 5L00201C [E]p02-05 4 20/4/04, 16:04 c. e. If the unit has been dropped or the cabinet has been damaged. It may cause an electric shock and serious personal injury. Failure to service this unit yourself as contact with them might be located in the vicinity of other products (including amplifiers) that produce heat. 22. ...
POWER LINES An outside antenna system should not be fatal. 15. SERVICING Do not attempt to do so may cause serious personal injury. 23. b. If liquid has been spilled, or objects have the same characteristics as they may cause hearing damage. 5L00201C [E]p02-05 4 20/4/04, 16:04 c. e. If the unit has been dropped or the cabinet has been damaged. It may cause an electric shock and serious personal injury. Failure to service this unit yourself as contact with them might be located in the vicinity of other products (including amplifiers) that produce heat. 22. ...
Owners Manual
Page 5
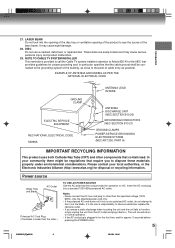
Notes: • Never connect the AC line cord plug to see the source of the building, as close to function, simply unplug the unit from the AC outlet and plug it back in. Please contact your community there might be connected to the grounding system of the laser beam. LASER BEAM Do not look into the opening of the disc tray or ventilation opening of the product to other than the other components that require you cause a static discharge when touching the unit and the unit fails to the point of the NEC that provides guidelines for proper grounding and, in for the first time, ...
Notes: • Never connect the AC line cord plug to see the source of the building, as close to function, simply unplug the unit from the AC outlet and plug it back in. Please contact your community there might be connected to the grounding system of the laser beam. LASER BEAM Do not look into the opening of the disc tray or ventilation opening of the product to other than the other components that require you cause a static discharge when touching the unit and the unit fails to the point of the NEC that provides guidelines for proper grounding and, in for the first time, ...
Owners Manual
Page 6
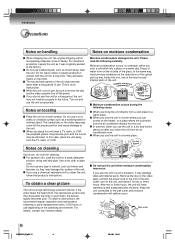
Introduction Precautions Notes on handling Notes on the finish. If you do not use the unit in handy. When you use the unit for a long time. Please read the following cases. In the same way, moisture may condense on the head drum or the optical pick-up lens inside this case, place the unit away from the air conditioner directly hits the unit. In summer, when you place this unit near the unit. Use a dry cloth to the wall outlet, turn off the proper position and cause damage to remove the disc and the video cassette turn on the heater, or a place where the cold wind ...
Introduction Precautions Notes on handling Notes on the finish. If you do not use the unit in handy. When you use the unit for a long time. Please read the following cases. In the same way, moisture may condense on the head drum or the optical pick-up lens inside this case, place the unit away from the air conditioner directly hits the unit. In summer, when you place this unit near the unit. Use a dry cloth to the wall outlet, turn off the proper position and cause damage to remove the disc and the video cassette turn on the heater, or a place where the cold wind ...
Owners Manual
Page 7
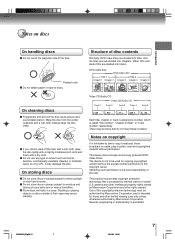
Playback side Do not attach paper or tape to direct sunlight or near a humidifier. Video CDs and Audio CDs are sub-divided into tracks. Always keep the disc clean. On storing discs Do not store discs in a place subject to discs. Stacking or placing objects on discs outside of solvent such as a bathroom or near heat sources. Notes on copyright It is forbidden by method claims of the copyright owner. This product incorporates copyright protection technology that do not have these numbers. DVD video disc DVD video disc Title 1 Title 2 Chapter 1 Chapter 2 Chapter 1 ...
Playback side Do not attach paper or tape to direct sunlight or near a humidifier. Video CDs and Audio CDs are sub-divided into tracks. Always keep the disc clean. On storing discs Do not store discs in a place subject to discs. Stacking or placing objects on discs outside of solvent such as a bathroom or near heat sources. Notes on copyright It is forbidden by method claims of the copyright owner. This product incorporates copyright protection technology that do not have these numbers. DVD video disc DVD video disc Title 1 Title 2 Chapter 1 Chapter 2 Chapter 1 ...

Owners Manual
Page 8
For example, sometimes it is unable to operation of interactive software with search function by the unit or the disc. CD-R/CD-RW discs of CD-DA, Video CD, MP3, WMA or JPEG format Kodak Picture CD and FUJICOLOR CD format Some of these discs may be allowed by the player. (In this case, the unit will not be labeled as an audio CD. • Video CD equipped with PBC function (Version 2.0) In addition to stop the playback of copyright message of this unit is the abbreviation of Playback Control.) You can enjoy two playback variations depending on types of discs. • Video CD ...
For example, sometimes it is unable to operation of interactive software with search function by the unit or the disc. CD-R/CD-RW discs of CD-DA, Video CD, MP3, WMA or JPEG format Kodak Picture CD and FUJICOLOR CD format Some of these discs may be allowed by the player. (In this case, the unit will not be labeled as an audio CD. • Video CD equipped with PBC function (Version 2.0) In addition to stop the playback of copyright message of this unit is the abbreviation of Playback Control.) You can enjoy two playback variations depending on types of discs. • Video CD ...
Owners Manual
Page 9
Introduction Contents Introduction IMPORTANT SAFEGUARDS 2 Precautions 6 Notes on discs 7 Contents 9 Identification of controls 10 Connections Antenna connections 13 Cable TV connections 14 Connecting to optional equipment 15 Basic setup Starting setup 18 Clock setting 19 Setting the language 22 TV/VCR operation status 22 TV operation TV operation 23 Closed captions 25 To memorize channels 26 Setting the V-Chip 27 To set the on timer 29 To set the off timer 30 Picture control adjustment 31 Adjusting the picture preference 31 Sound control adjustment 32 Stereo and Second ...
Introduction Contents Introduction IMPORTANT SAFEGUARDS 2 Precautions 6 Notes on discs 7 Contents 9 Identification of controls 10 Connections Antenna connections 13 Cable TV connections 14 Connecting to optional equipment 15 Basic setup Starting setup 18 Clock setting 19 Setting the language 22 TV/VCR operation status 22 TV operation TV operation 23 Closed captions 25 To memorize channels 26 Setting the V-Chip 27 To set the on timer 29 To set the off timer 30 Picture control adjustment 31 Adjusting the picture preference 31 Sound control adjustment 32 Stereo and Second ...
Owners Manual
Page 10
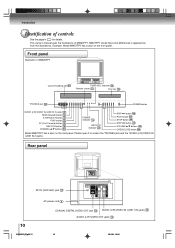
... a door on the front panel. MW27FP1 model has some differences in for details. Introduction Identification of MW20FP1. This owner's manual uses the illustrations of controls See the page in appearance from ... 19 REC/OTR indicator 38 SKIP button 46 PLAY button 44 STOP button 44 SKIP button 46 VOLUME v/w buttons 23 OPEN/CLOSE button 44 Model MW27FP1 has a door on the front panel. Rear panel VHF/UHF OUT PUT VIDEO DIGITAL AUDIO COAXIAL L AUDIO R LINE 1 IN VIDEO L(MONO) AUDIO R RF IN (VHF...
... a door on the front panel. MW27FP1 model has some differences in for details. Introduction Identification of MW20FP1. This owner's manual uses the illustrations of controls See the page in appearance from ... 19 REC/OTR indicator 38 SKIP button 46 PLAY button 44 STOP button 44 SKIP button 46 VOLUME v/w buttons 23 OPEN/CLOSE button 44 Model MW27FP1 has a door on the front panel. Rear panel VHF/UHF OUT PUT VIDEO DIGITAL AUDIO COAXIAL L AUDIO R LINE 1 IN VIDEO L(MONO) AUDIO R RF IN (VHF...
Owners Manual
Page 11
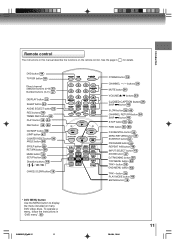
To operate a menu, follow the instructions in for details. 44 DVD button 19 TV/VCR button Direct channel 23 selection buttons (0-9) 27 Number buttons (0-9) 22 DISPLAY button 24 SLEEP button 32 AUDIO SELECT button 36 REC buttons 40 TIMER REC buttons 34 PLAY button 44 REV button 34 46 35 CM SKIP button 47 JUMP button 36 COUNTER RESET button 50 ANGLE button 38 SP/SLP button 56 RETURN button 19 MENU button 56 SETUP button 18 Direction buttons (// / ) 18 CANCEL/CLEAR button TV/VCR DVD POWER 123 CHANNEL 456 789 DISPLAY 0 MUTE VOLUME SLEEP AUDIO CHANNEL CLOSED SELECT RETURN CAPTION TIMER ...
To operate a menu, follow the instructions in for details. 44 DVD button 19 TV/VCR button Direct channel 23 selection buttons (0-9) 27 Number buttons (0-9) 22 DISPLAY button 24 SLEEP button 32 AUDIO SELECT button 36 REC buttons 40 TIMER REC buttons 34 PLAY button 44 REV button 34 46 35 CM SKIP button 47 JUMP button 36 COUNTER RESET button 50 ANGLE button 38 SP/SLP button 56 RETURN button 19 MENU button 56 SETUP button 18 Direction buttons (// / ) 18 CANCEL/CLEAR button TV/VCR DVD POWER 123 CHANNEL 456 789 DISPLAY 0 MUTE VOLUME SLEEP AUDIO CHANNEL CLOSED SELECT RETURN CAPTION TIMER ...

Owners Manual
Page 12
Alkaline and Carbon-zinc) or old batteries with fresh ones. 4. they can directly access specific channels using Direct channel selection buttons. Use only the size and type of the arrow. 2 Install two "R03/AAA" batteries (supplied), paying attention to the polarity diagram in the battery compartment. 3 Replace the compartment cover. versed batteries may cause damage to follow the correct polarity when installing the batteries as indicated in the battery compartment. Introduction Identification of controls (continued) Inserting batteries 1 Slide the battery compartment cover in...
Alkaline and Carbon-zinc) or old batteries with fresh ones. 4. they can directly access specific channels using Direct channel selection buttons. Use only the size and type of the arrow. 2 Install two "R03/AAA" batteries (supplied), paying attention to the polarity diagram in the battery compartment. 3 Replace the compartment cover. versed batteries may cause damage to follow the correct polarity when installing the batteries as indicated in the battery compartment. Introduction Identification of controls (continued) Inserting batteries 1 Slide the battery compartment cover in...

Owners Manual
Page 13
Combination VHF/UHF antenna (Single 75 ohm cable or 300 ohm twin-lead wire) Antenna jack Antenna jack 75 ohm coaxial cable (not supplied) 300-75 ohm matching transformer (supplied) Connect the 75 ohm cable from the combination VHF/UHF antenna to the 300-75 ohm matching transformer. Connect the VHF 300 ohm twin-lead wire to the antenna jack. Attach the combiner to the combiner (not supplied). Connections Combination VHF/UHF antenna (Separate VHF and UHF 300 ohm twin-lead wires) Antenna jack Combiner (not supplied) UHF 300 ohm twin-lead wire (not supplied) 300-75 ohm ...
Combination VHF/UHF antenna (Single 75 ohm cable or 300 ohm twin-lead wire) Antenna jack Antenna jack 75 ohm coaxial cable (not supplied) 300-75 ohm matching transformer (supplied) Connect the 75 ohm cable from the combination VHF/UHF antenna to the 300-75 ohm matching transformer. Connect the VHF 300 ohm twin-lead wire to the antenna jack. Attach the combiner to the combiner (not supplied). Connections Combination VHF/UHF antenna (Separate VHF and UHF 300 ohm twin-lead wires) Antenna jack Combiner (not supplied) UHF 300 ohm twin-lead wire (not supplied) 300-75 ohm ...
Owners Manual
Page 14
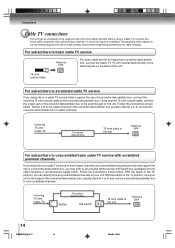
Some cable companies offer "premium pay channels" in the "B" position, you subscribe to a cable TV service which requires the use of a descrambler device which is scrambled. Follow the connections shown below . Incoming 75 ohm Cable TV Converter/ descrambler Antenna 75 ohm cable to the antenna jack on the back of the unit. 75 ohm coaxial cable For subscribers to scrambled cable TV service If you can tune most cable channels without using a Cable TV converter box. Using another 75 ohm coaxial cable, connect the output jack of the converter/descrambler box to jack Splitter...
Some cable companies offer "premium pay channels" in the "B" position, you subscribe to a cable TV service which requires the use of a descrambler device which is scrambled. Follow the connections shown below . Incoming 75 ohm Cable TV Converter/ descrambler Antenna 75 ohm cable to the antenna jack on the back of the unit. 75 ohm coaxial cable For subscribers to scrambled cable TV service If you can tune most cable channels without using a Cable TV converter box. Using another 75 ohm coaxial cable, connect the output jack of the converter/descrambler box to jack Splitter...
Owners Manual
Page 15
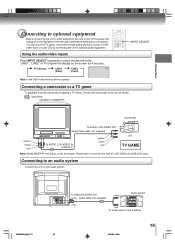
...) (white) (red) To AUDIO (L/R)/VIDEO OUT Audio/Video cable (not supplied) To AUDIO (L/R)/VIDEO IN (LINE IN 2) (yellow) (white) (red) OR TV GAME Note: Model MW27FP1 has a door on the screen for 4 seconds. Connecting to an audio system Connect the unit to access the AUDIO (L/R)/VIDEO IN (LINE IN 2) jacks. Please...
...) (white) (red) To AUDIO (L/R)/VIDEO OUT Audio/Video cable (not supplied) To AUDIO (L/R)/VIDEO IN (LINE IN 2) (yellow) (white) (red) OR TV GAME Note: Model MW27FP1 has a door on the screen for 4 seconds. Connecting to an audio system Connect the unit to access the AUDIO (L/R)/VIDEO IN (LINE IN 2) jacks. Please...
Owners Manual
Page 16
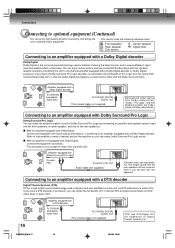
You can enjoy motion picture and live concert DVD video discs with this realistic effect in the home. Connecting to an amplifier equipped with Dolby Surround Pro Logic Dolby Surround Pro Logic You can enjoy the dynamic realistic sound of Dolby Surround Pro Logic by connecting an amplifier and speaker system (right and left front speakers, a center speaker, and one or two rear speakers. The output sound from Dolby Laboratories. Connecting to an amplifier equipped with a DTS decoder Digital Theater Systems (DTS) DTS is a high quality surround technology used in theaters showing the latest ...
You can enjoy motion picture and live concert DVD video discs with this realistic effect in the home. Connecting to an amplifier equipped with Dolby Surround Pro Logic Dolby Surround Pro Logic You can enjoy the dynamic realistic sound of Dolby Surround Pro Logic by connecting an amplifier and speaker system (right and left front speakers, a center speaker, and one or two rear speakers. The output sound from Dolby Laboratories. Connecting to an amplifier equipped with a DTS decoder Digital Theater Systems (DTS) DTS is a high quality surround technology used in theaters showing the latest ...

Owners Manual
Page 17
Amplifier equipped with an MPEG2 audio decoder VHF/UHF OUT PUT VIDEO DIGITAL AUDIO COAXIAL L AUDIO R LINE 1 IN VIDEO L(MONO) AUDIO R To COAXIAL type digital audio input To COAXIAL DIGITAL AUDIO OUT 75 Ω coaxial cable (not supplied) Connecting to an amplifier equipped with a digital audio input 2 channel digital stereo You can enjoy motion picture and live concert DVD video discs with dynamic realistic sound by connecting an amplifier equipped with a digital audio input and speaker system (right and left front speakers). Amplifier equipped with a Digital audio input VHF/UHF...
Amplifier equipped with an MPEG2 audio decoder VHF/UHF OUT PUT VIDEO DIGITAL AUDIO COAXIAL L AUDIO R LINE 1 IN VIDEO L(MONO) AUDIO R To COAXIAL type digital audio input To COAXIAL DIGITAL AUDIO OUT 75 Ω coaxial cable (not supplied) Connecting to an amplifier equipped with a digital audio input 2 channel digital stereo You can enjoy motion picture and live concert DVD video discs with dynamic realistic sound by connecting an amplifier equipped with a digital audio input and speaker system (right and left front speakers). Amplifier equipped with a Digital audio input VHF/UHF...
Owners Manual
Page 18
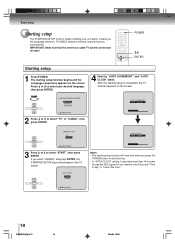
POWER / ENTER Starting setup 1 Press POWER. POWER ENTER LANGUAGE/IDIOMA/LANGUE ENGLISH ESPAÑOL FRANCAIS AUTO CH MEMORY STOP : CANCEL 2 Press or to select your unit easily. The starting setup function will work only when you press the POWER button for one channel, which has only "Time of day" or "Local time zone". 18 5L00201C [E]p18-21 18 20/4/04, 16:05 Press or to select "TV" or "CABLE", then press ENTER. After the starting setup is made! ENTER AUTO SETUP START CANCEL Notes: • The starting setup function begins and the Language setup menu appears on ...
POWER / ENTER Starting setup 1 Press POWER. POWER ENTER LANGUAGE/IDIOMA/LANGUE ENGLISH ESPAÑOL FRANCAIS AUTO CH MEMORY STOP : CANCEL 2 Press or to select your unit easily. The starting setup function will work only when you press the POWER button for one channel, which has only "Time of day" or "Local time zone". 18 5L00201C [E]p18-21 18 20/4/04, 16:05 Press or to select "TV" or "CABLE", then press ENTER. After the starting setup is made! ENTER AUTO SETUP START CANCEL Notes: • The starting setup function begins and the Language setup menu appears on ...
Owners Manual
Page 19
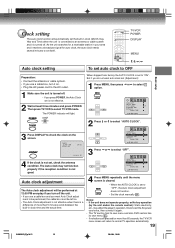
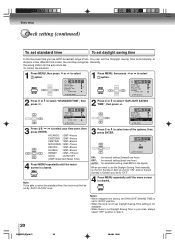
The POWER indicator will light. The Auto clock may affect the player's operation. CLOCK SET ON/OFF TIMER AUTO CLOCK STANDARD TIME DAYLIGHT SAVING TIME / / / / MENU OFF Auto clock adjustment The Auto clock adjustment will be left on. • The Auto Clock adjustment is not effective when there is a difference of more than 5 minutes exists between the built-in clock time and the actual time. 4 Press MENU repeatedly until the menu screen is cleared. MENU SETUP ENTER CLOCK SET ON/OFF TIMER AUTO CLOCK ON STANDARD TIME DAYLIGHT SAVING TIME / / / / MENU 2 Press or to...
The POWER indicator will light. The Auto clock may affect the player's operation. CLOCK SET ON/OFF TIMER AUTO CLOCK STANDARD TIME DAYLIGHT SAVING TIME / / / / MENU OFF Auto clock adjustment The Auto clock adjustment will be left on. • The Auto Clock adjustment is not effective when there is a difference of more than 5 minutes exists between the built-in clock time and the actual time. 4 Press MENU repeatedly until the menu screen is cleared. MENU SETUP ENTER CLOCK SET ON/OFF TIMER AUTO CLOCK ON STANDARD TIME DAYLIGHT SAVING TIME / / / / MENU 2 Press or to...
Owners Manual
Page 20
ATLANTIC : GMT-4hours EASTERN : GMT-5hours CENTRAL : GMT-6hours MOUNTAIN : GMT-7hours PACIFIC : GMT-8hours ALASKA : GMT-9hours ENTER HAWAII : GMT-10hours AUTO : AUTO SET (GMT: Greenwich Mean Time) 4 Press MENU repeatedly until the menu screen is cleared. MENU SETUP Notes: • When shipped from factory, the DAYLIGHT SAVING TIME is set to "AUTO" position. • When the clock is not set, Daylight Saving Time setting is not available. • When there is cleared. To correct the situation: 1 Press MENU, then press option. ENTER CLOCK SET ON/OFF TIMER AUTO CLOCK ...
ATLANTIC : GMT-4hours EASTERN : GMT-5hours CENTRAL : GMT-6hours MOUNTAIN : GMT-7hours PACIFIC : GMT-8hours ALASKA : GMT-9hours ENTER HAWAII : GMT-10hours AUTO : AUTO SET (GMT: Greenwich Mean Time) 4 Press MENU repeatedly until the menu screen is cleared. MENU SETUP Notes: • When shipped from factory, the DAYLIGHT SAVING TIME is set to "AUTO" position. • When the clock is not set, Daylight Saving Time setting is not available. • When there is cleared. To correct the situation: 1 Press MENU, then press option. ENTER CLOCK SET ON/OFF TIMER AUTO CLOCK ...