

User Manual
Page 3
... their operating instructions. 11. This plug will fit into the outlet, try reversing the plug. ATTACHMENTS The manufacturer of power source indicated on this Owner's Manual for attachments, as a bookcase or rack unless proper ventilation is equipped with a polarized alternating-current line plug (a plug having a third (grounding) pin). ENGLISH IMPORTANT SAFEGUARDS...
... their operating instructions. 11. This plug will fit into the outlet, try reversing the plug. ATTACHMENTS The manufacturer of power source indicated on this Owner's Manual for attachments, as a bookcase or rack unless proper ventilation is equipped with a polarized alternating-current line plug (a plug having a third (grounding) pin). ENGLISH IMPORTANT SAFEGUARDS...

User Manual
Page 7
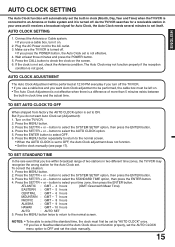
... TV/VCR. PREPARATION SAFETY PRECAUTIONS ...6 LOCATION OF CONTROLS ...8 REMOTE CONTROL ...9 ANTENNA CONNECTIONS ...11 CABLE TV CONNECTIONS ...13 SETTING THE LANGUAGE ...14 AUTO CLOCK SETTING ...15 MANUAL CLOCK SETTING ...17 TV OPERATION TV OPERATION ...18 TO MEMORIZE CHANNELS ...22 TO SET THE ON TIMER ...25 TO SET THE OFF TIMER ...26 PICTURE...
... TV/VCR. PREPARATION SAFETY PRECAUTIONS ...6 LOCATION OF CONTROLS ...8 REMOTE CONTROL ...9 ANTENNA CONNECTIONS ...11 CABLE TV CONNECTIONS ...13 SETTING THE LANGUAGE ...14 AUTO CLOCK SETTING ...15 MANUAL CLOCK SETTING ...17 TV OPERATION TV OPERATION ...18 TO MEMORIZE CHANNELS ...22 TO SET THE ON TIMER ...25 TO SET THE OFF TIMER ...26 PICTURE...

User Manual
Page 11
... + button to change to 120 minutes. 17. SLEEP Button - Buttons - During playback, they are used to decrease the volume level. 20. button to adjust tracking manually. 19. Additional presses activate One-touch Timer Recording. 21. Used to reset the counter to confirm the programmed timer recording and ON/OFF timer. 6. During...
... + button to change to 120 minutes. 17. SLEEP Button - Buttons - During playback, they are used to decrease the volume level. 20. button to adjust tracking manually. 19. Additional presses activate One-touch Timer Recording. 21. Used to reset the counter to confirm the programmed timer recording and ON/OFF timer. 6. During...
User Manual
Page 17
... function properly, set the AUTO CLOCK menu option to OFF and set to the normal screen. • When the AUTO CLOCK is set the clock manually. 15 But if you do not want Auto Clock adjustment to OFF, the Auto Clock adjustment does not function. • Set the clock... manually (see page 17). Press the SET/TR + or - button to select the AUTO CLOCK option. 5. Press the MENU button repeatedly to return to ON. NOTES: &#...
... function properly, set the AUTO CLOCK menu option to OFF and set to the normal screen. • When the AUTO CLOCK is set the clock manually. 15 But if you do not want Auto Clock adjustment to OFF, the Auto Clock adjustment does not function. • Set the clock... manually (see page 17). Press the SET/TR + or - button to select the AUTO CLOCK option. 5. Press the MENU button repeatedly to return to ON. NOTES: &#...
User Manual
Page 18
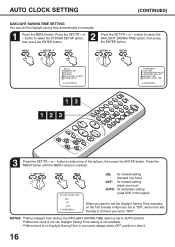
... SELECT VOL+ PAUSE/STILL 3 Press the SET/TR + or - SET/TR ENTER MENU DAYLIGHT SAVING TIME ON OFF AUTO 〈+/-/ENTER/MENU〉 ON: for manual setting (forward one hour) OFF: for automatic setting (read XDS in the signal) When you want to set the Daylight Saving Time... the MENU button. button to "OFF". REC CH- Press the MENU button until the MENU screen is set to select one hour) AUTO: for manual setting (back one of the options, then press the ENTER button. Press the SET/TR + or - REW STOP PLAY RTEIMCER FF MENU - button to AUTO ...
... SELECT VOL+ PAUSE/STILL 3 Press the SET/TR + or - SET/TR ENTER MENU DAYLIGHT SAVING TIME ON OFF AUTO 〈+/-/ENTER/MENU〉 ON: for manual setting (forward one hour) OFF: for automatic setting (read XDS in the signal) When you want to set the Daylight Saving Time... the MENU button. button to "OFF". REC CH- Press the MENU button until the MENU screen is set to select one hour) AUTO: for manual setting (back one of the options, then press the ENTER button. Press the SET/TR + or - REW STOP PLAY RTEIMCER FF MENU - button to AUTO ...

User Manual
Page 19
.../STILL 3 Press the SET/TR + or - REW STOP PLAY RTEIMCER FF MENU - Press the SET/TR + or - REC CH- ENGLISH MANUAL CLOCK SETTING You must set the date and time manually for Timer Recordings, ON/OFF Timer and Daylight Saving Time if the Auto Clock process did not set correctly. • To...
.../STILL 3 Press the SET/TR + or - REW STOP PLAY RTEIMCER FF MENU - Press the SET/TR + or - REC CH- ENGLISH MANUAL CLOCK SETTING You must set the date and time manually for Timer Recordings, ON/OFF Timer and Daylight Saving Time if the Auto Clock process did not set correctly. • To...

User Manual
Page 34
..., the Digital Auto Tracking system automatically adjusts the tracking to see the tape during playback, adjust the tracking manually as follows: • Press the SET/TR + or - SET/TR DIGITAL TRACKING MANUAL TRACK - + DIGITAL TRACK 32 REW FF FORWARD/REVERSE PICTURE SEARCH If you want to obtain the best ...REW or FF mode, press and hold the REW or FF button. REC CH- Press the FF (Fast Forward) button in the Stop mode. "MANUAL TRACK" will appear on the screen. EJECT PROGRAM VOL- "DIGITAL TRACK" will be seen on the screen. The backward or forward visual search picture...
..., the Digital Auto Tracking system automatically adjusts the tracking to see the tape during playback, adjust the tracking manually as follows: • Press the SET/TR + or - SET/TR DIGITAL TRACKING MANUAL TRACK - + DIGITAL TRACK 32 REW FF FORWARD/REVERSE PICTURE SEARCH If you want to obtain the best ...REW or FF mode, press and hold the REW or FF button. REC CH- Press the FF (Fast Forward) button in the Stop mode. "MANUAL TRACK" will appear on the screen. EJECT PROGRAM VOL- "DIGITAL TRACK" will be seen on the screen. The backward or forward visual search picture...

User Manual
Page 47
... start /end time is too far or too much light in the path of Clear the path of the beam. 10 the beam. Adjust tracking manually using the SET/TR +/- The remote control is not depressed. Aim the remote control at the sensor. CAUSE TV station stopped broadcasting. The TIMER REC...
... start /end time is too far or too much light in the path of Clear the path of the beam. 10 the beam. Adjust tracking manually using the SET/TR +/- The remote control is not depressed. Aim the remote control at the sensor. CAUSE TV station stopped broadcasting. The TIMER REC...

User Manual
Page 50
... TELEVISION AND VIDEO CASSETTE RECORDER Toshiba America Consumer Products, Inc. ("TACP") and Toshiba Hawaii Inc. ("THI") make the following conditions: ( 1 ) You must be made by this product must retain your rights under this product. Limited Ninety ... a TACP/THI Authorized Service Station. During this product. Commercial Units Products sold and used for commercial use in the replacement. You should read this owner's manual thoroughly before operating this warranty. or to units which have a limited ninety (90) day warranty for the set to no other proof of purchase. (...
... TELEVISION AND VIDEO CASSETTE RECORDER Toshiba America Consumer Products, Inc. ("TACP") and Toshiba Hawaii Inc. ("THI") make the following conditions: ( 1 ) You must be made by this product must retain your rights under this product. Limited Ninety ... a TACP/THI Authorized Service Station. During this product. Commercial Units Products sold and used for commercial use in the replacement. You should read this owner's manual thoroughly before operating this warranty. or to units which have a limited ninety (90) day warranty for the set to no other proof of purchase. (...

User Manual
Page 51
... is here by state law as hereby limited, the foregoing warranty is authorized to change, modify or extend the terms of sale to TOSHIBA OF CANADA to state. Products purchased in Canada and used in your home or the set forth above provisions may also have discovered, the... defect. The time within which may be commenced to complete the special Canadian "Warranty Registration Form" enclosed, and forward this manual and checking the section "PROBLEMS AND TROUBLE SHOOTING GUIDE", you " In the Continental United States contact: Toll Free 1-800-631-3811 In Hawaii...
... is here by state law as hereby limited, the foregoing warranty is authorized to change, modify or extend the terms of sale to TOSHIBA OF CANADA to state. Products purchased in Canada and used in your home or the set forth above provisions may also have discovered, the... defect. The time within which may be commenced to complete the special Canadian "Warranty Registration Form" enclosed, and forward this manual and checking the section "PROBLEMS AND TROUBLE SHOOTING GUIDE", you " In the Continental United States contact: Toll Free 1-800-631-3811 In Hawaii...


