
User Guide
Page 9
... Charging the Built-in Battery/Connecting to a computer 22 Disconnecting the gigabeat® from the computer ....24 Turning the gigabeat® On and Off 25 Chapter 2: Transferring and listening to audio files 26 Downloading Audio CD Tracks to your computer ...26 Downloading steps for Windows Media® Player 11 26 Downloading steps for Windows Media® Player 10 27 Transferring audio files on your computer to the gigabeat 29 Transferring audio files using Windows Media® Player...
... Charging the Built-in Battery/Connecting to a computer 22 Disconnecting the gigabeat® from the computer ....24 Turning the gigabeat® On and Off 25 Chapter 2: Transferring and listening to audio files 26 Downloading Audio CD Tracks to your computer ...26 Downloading steps for Windows Media® Player 11 26 Downloading steps for Windows Media® Player 10 27 Transferring audio files on your computer to the gigabeat 29 Transferring audio files using Windows Media® Player...

User Guide
Page 10
.../Reverse 44 Displaying the main menu 44 Listening to a playlist 44 Transferring playlists stored in Windows Media® Player 10 to the gigabeat 46 Repeat/Shuffle 47 Listening using A-B Repeat 50 Canceling A-B Repeat 52 Selecting the sound quality (using the equalizer)....52 User mode 55 Setting Favorites (Bookmarks 56 Removing favorites 57 Displaying Album Artworks 60 Deleting music files 62 Deleting music files using Windows Media® Player 11 62 Deleting music files using Windows Media® Player 10 63 Chapter 3: Transferring and Viewing Photos 64 Transferring photos to...
.../Reverse 44 Displaying the main menu 44 Listening to a playlist 44 Transferring playlists stored in Windows Media® Player 10 to the gigabeat 46 Repeat/Shuffle 47 Listening using A-B Repeat 50 Canceling A-B Repeat 52 Selecting the sound quality (using the equalizer)....52 User mode 55 Setting Favorites (Bookmarks 56 Removing favorites 57 Displaying Album Artworks 60 Deleting music files 62 Deleting music files using Windows Media® Player 11 62 Deleting music files using Windows Media® Player 10 63 Chapter 3: Transferring and Viewing Photos 64 Transferring photos to...
User Guide
Page 11
...-Sync 85 Recording without Auto-Sync 89 Playing recorded tracks 91 Splitting files recorded with the Line-in Recorder ...94 Editing the names of recorded tracks 96 Deleting recorded tracks 98 Using a computer to delete recordings 99 Chapter 6: Using the Timer 101 Using the timer to sound an alarm (count down timer 101 Shutting down the gigabeat® after a set time (sleep 103 Chapter 7: Other Settings 105 Display (screen off 105 Clock 107 Auto Power...
...-Sync 85 Recording without Auto-Sync 89 Playing recorded tracks 91 Splitting files recorded with the Line-in Recorder ...94 Editing the names of recorded tracks 96 Deleting recorded tracks 98 Using a computer to delete recordings 99 Chapter 6: Using the Timer 101 Using the timer to sound an alarm (count down timer 101 Shutting down the gigabeat® after a set time (sleep 103 Chapter 7: Other Settings 105 Display (screen off 105 Clock 107 Auto Power...

User Guide
Page 22
... Started Installing Windows Media® Player Installing Windows Media® Player Use Windows Media® Player to transfer music files to the latest version of Windows Media® Player 10 is not installed on your computer, please install it on your computer to upgrade to the gigabeat®. Charging the Built-in Battery/Connecting to a computer To charge the gigabeat®: 1 Connect the gigabeat® to the computer using the bundled USB cable. (Sample Illustration) Connecting the gigabeat® to the computer 2 Turn...
... Started Installing Windows Media® Player Installing Windows Media® Player Use Windows Media® Player to transfer music files to the latest version of Windows Media® Player 10 is not installed on your computer, please install it on your computer to upgrade to the gigabeat®. Charging the Built-in Battery/Connecting to a computer To charge the gigabeat®: 1 Connect the gigabeat® to the computer using the bundled USB cable. (Sample Illustration) Connecting the gigabeat® to the computer 2 Turn...
User Guide
Page 29
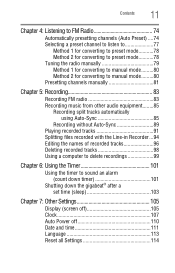
.... Connecting other devices using Windows Media® Player 11: 1 Use the USB cable to connect the gigabeat® to this device using Windows Media® Player 11 To transfer audio files from the computer. Do not connect other devices at the same time may prevent the computer from recognizing the gigabeat®. 2 Select Synchronize media files to a computer that has Windows Media® Player 11 installed. Transferring audio files using Windows Media Player and then click OK. (Sample Illustration) Synchronizing media files If you choose the operation performed...
.... Connecting other devices using Windows Media® Player 11: 1 Use the USB cable to connect the gigabeat® to this device using Windows Media® Player 11 To transfer audio files from the computer. Do not connect other devices at the same time may prevent the computer from recognizing the gigabeat®. 2 Select Synchronize media files to a computer that has Windows Media® Player 11 installed. Transferring audio files using Windows Media Player and then click OK. (Sample Illustration) Synchronizing media files If you choose the operation performed...
User Guide
Page 32
... operation in which you choose the operation performed when the gigabeat® is calculated with Windows Media® Player 10 installed. Data stored on the gigabeat® may prevent the computer from the computer to the gigabeat® using an Media Transfer Protocol connection at this device using Windows Media Player and then click OK. Transferring audio files using Windows Media® Player 10 To transfer audio files from recognizing the gigabeat®. 2 Select Synchronize media files to this time. A window opens...
... operation in which you choose the operation performed when the gigabeat® is calculated with Windows Media® Player 10 installed. Data stored on the gigabeat® may prevent the computer from the computer to the gigabeat® using an Media Transfer Protocol connection at this device using Windows Media Player and then click OK. Transferring audio files using Windows Media® Player 10 To transfer audio files from recognizing the gigabeat®. 2 Select Synchronize media files to this time. A window opens...

User Guide
Page 34
... is in progress, the Start Sync button changes to the synchronization list on the selected file and select Add to Start Sync when synchronization is added to Stop Sync. 34 Transferring and listening to audio files Transferring audio files on your computer to the gigabeat® 4 Select the files you want to transfer (synchronize) in the Windows Media® Player 10 Library tab. 5 Select All Music from the folder tree on the left...
... is in progress, the Start Sync button changes to the synchronization list on the selected file and select Add to Start Sync when synchronization is added to Stop Sync. 34 Transferring and listening to audio files Transferring audio files on your computer to the gigabeat® 4 Select the files you want to transfer (synchronize) in the Windows Media® Player 10 Library tab. 5 Select All Music from the folder tree on the left...

User Guide
Page 36
... using Windows Media® Player 11: 1 Right-click the JPEG file on your own image as "Folder.jpg" and move it into the folder containing the audio file you want to add to it will take some time to display on the gigabeat® playback screen. The selected album information is added. 3 Transfer the audio file with the added Album Artwork to the gigabeat® (synchronization). To download...
... using Windows Media® Player 11: 1 Right-click the JPEG file on your own image as "Folder.jpg" and move it into the folder containing the audio file you want to add to it will take some time to display on the gigabeat® playback screen. The selected album information is added. 3 Transfer the audio file with the added Album Artwork to the gigabeat® (synchronization). To download...

User Guide
Page 62
... been transferred to audio files Deleting music files The Album Artwork will now be displayed on the Playback screen. The selected music file is not displayed on the Playback screen. 62 Transferring and listening to the gigabeat®. Album Art ON OFF (Sample Illustration) Selecting ON in the shortcut menu that were transferred to the computer with the USB cable. 2 Launch Windows Media® Player 11. 3 Click the Sync tab, Select a category button, and...
... been transferred to audio files Deleting music files The Album Artwork will now be displayed on the Playback screen. The selected music file is not displayed on the Playback screen. 62 Transferring and listening to the gigabeat®. Album Art ON OFF (Sample Illustration) Selecting ON in the shortcut menu that were transferred to the computer with the USB cable. 2 Launch Windows Media® Player 11. 3 Click the Sync tab, Select a category button, and...
User Guide
Page 63
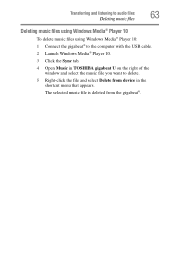
The selected music file is deleted from device in the shortcut menu that appears. Transferring and listening to audio files 63 Deleting music files Deleting music files using Windows Media® Player 10 To delete music files using Windows Media® Player 10: 1 Connect the gigabeat® to the computer with the USB cable. 2 Launch Windows Media® Player 10. 3 Click the Sync tab. 4 Open Music in TOSHIBA gigabeat U on the right of the window and select the music file you want to delete. 5 Right-click the file and select Delete from the gigabeat®.
The selected music file is deleted from device in the shortcut menu that appears. Transferring and listening to audio files 63 Deleting music files Deleting music files using Windows Media® Player 10 To delete music files using Windows Media® Player 10: 1 Connect the gigabeat® to the computer with the USB cable. 2 Launch Windows Media® Player 10. 3 Click the Sync tab. 4 Open Music in TOSHIBA gigabeat U on the right of the window and select the music file you want to delete. 5 Right-click the file and select Delete from the gigabeat®.
User Guide
Page 65
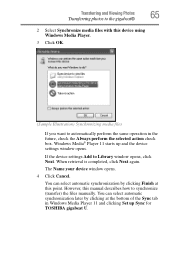
... the Sync tab in the future, check the Always perform the selected action check box. You can select automatic synchronization by clicking at this manual describes how to synchronize (transfer) the files manually. If the device settings Add to Library window opens, click Next. Transferring and Viewing Photos 65 Transferring photos to the gigabeat® 2 Select Synchronize media files with this device using Windows Media Player. 3 Click OK. (Sample Illustration) Synchronizing media files...
... the Sync tab in the future, check the Always perform the selected action check box. You can select automatic synchronization by clicking at this manual describes how to synchronize (transfer) the files manually. If the device settings Add to Library window opens, click Next. Transferring and Viewing Photos 65 Transferring photos to the gigabeat® 2 Select Synchronize media files with this device using Windows Media Player. 3 Click OK. (Sample Illustration) Synchronizing media files...

User Guide
Page 67
... Start Sync when synchronization is completed. Synchronization begins. Transferring photos using Windows Media® Player 10 To transfer photos to the gigabeat® using Windows Media Player and then click OK. To automatically perform the same operation in progress, the Start Sync button changes to Stop Sync. Transferring and Viewing Photos 67 Transferring photos to the gigabeat® 8 Click the Start Sync button at the same time. Do not connect other devices using an Media Transfer Protocol connection at the bottom right of files including music files...
... Start Sync when synchronization is completed. Synchronization begins. Transferring photos using Windows Media® Player 10 To transfer photos to the gigabeat® using Windows Media Player and then click OK. To automatically perform the same operation in progress, the Start Sync button changes to Stop Sync. Transferring and Viewing Photos 67 Transferring photos to the gigabeat® 8 Click the Start Sync button at the same time. Do not connect other devices using an Media Transfer Protocol connection at the bottom right of files including music files...
User Guide
Page 68
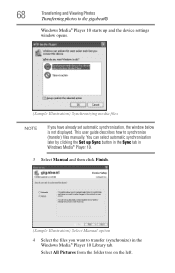
... Pictures from the folder tree on the left. This user guide describes how to synchronize (transfer) files manually. You can select automatic synchronization later by clicking the Set up and the device settings window opens. (Sample Illustration) Synchronizing media files NOTE If you want to transfer (synchronize) in the Windows Media® Player 10 Library tab. 68 Transferring and Viewing Photos Transferring photos to the gigabeat® Windows Media® Player 10 starts up Sync button in the Sync...
... Pictures from the folder tree on the left. This user guide describes how to synchronize (transfer) files manually. You can select automatic synchronization later by clicking the Set up and the device settings window opens. (Sample Illustration) Synchronizing media files NOTE If you want to transfer (synchronize) in the Windows Media® Player 10 Library tab. 68 Transferring and Viewing Photos Transferring photos to the gigabeat® Windows Media® Player 10 starts up Sync button in the Sync...

User Guide
Page 72
... shortcut menu that can delete photo files on the left, click the TOSHIBA gigabeat U library. The library on the gigabeat® is displayed. 5 Right-click the photo file you want to delete and select Delete in recorder or from the gigabeat®. This number includes transferred photos, transferred tracks, tracks recorded using the USB cable. 2 Launch Windows Media® Player 11. 3 Click the Sync tab, Select a category button, and then select Pictures. 4 In the folder tree...
... shortcut menu that can delete photo files on the left, click the TOSHIBA gigabeat U library. The library on the gigabeat® is displayed. 5 Right-click the photo file you want to delete and select Delete in recorder or from the gigabeat®. This number includes transferred photos, transferred tracks, tracks recorded using the USB cable. 2 Launch Windows Media® Player 11. 3 Click the Sync tab, Select a category button, and then select Pictures. 4 In the folder tree...

User Guide
Page 73
The selected photo file is deleted from device in TOSHIBA gigabeat U library on the right side of the window and select the photo file you want to delete. 5 Right-click the photo file you want to delete and select Delete from the gigabeat®. Transferring and Viewing Photos 73 Deleting photos Deleting photos using Windows Media® Player 10 To delete photos using Windows Media® Player 10: 1 Connect the gigabeat® to the computer using the USB cable. 2 Launch Windows Media® Player 10. 3 Click the Sync tab. 4 Open Pictures in the shortcut menu that appears.
The selected photo file is deleted from device in TOSHIBA gigabeat U library on the right side of the window and select the photo file you want to delete. 5 Right-click the photo file you want to delete and select Delete from the gigabeat®. Transferring and Viewing Photos 73 Deleting photos Deleting photos using Windows Media® Player 10 To delete photos using Windows Media® Player 10: 1 Connect the gigabeat® to the computer using the USB cable. 2 Launch Windows Media® Player 10. 3 Click the Sync tab. 4 Open Pictures in the shortcut menu that appears.
User Guide
Page 117
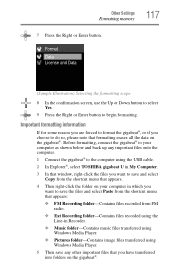
... select Paste from the shortcut menu that appears: ❖ FM Recording folder-Contains files recorded from FM radio. ❖ Ext Recording folder-Contains files recorded using the Line-in Recorder. ❖ Music folder-Contains music files transferred using Windows Media Player. ❖ Pictures folder-Contains image files transferred using Windows Media Player. 5 Then save any other important files that you choose to do so, please note that formatting erases all the data on the gigabeat®. Important formatting information If for some reason you...
... select Paste from the shortcut menu that appears: ❖ FM Recording folder-Contains files recorded from FM radio. ❖ Ext Recording folder-Contains files recorded using the Line-in Recorder. ❖ Music folder-Contains music files transferred using Windows Media Player. ❖ Pictures folder-Contains image files transferred using Windows Media Player. 5 Then save any other important files that you choose to do so, please note that formatting erases all the data on the gigabeat®. Important formatting information If for some reason you...

User Guide
Page 123
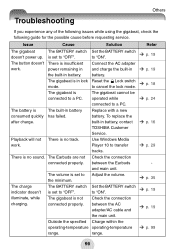
... . If you have problems Troubleshooting 123 Troubleshooting If you experience any of the following problems while using the USB cable and charge the built-in battery. Transfer some music files to the minimum. volume. Problem Cause Solution Reference The gigabeat® will not play music. Contact Toshiba See "Built-in Customer battery" on page 43 The gigabeat® will not turn on page 41 The volume is Reset the HOLD See "Turning the in HOLD mode.
... . If you have problems Troubleshooting 123 Troubleshooting If you experience any of the following problems while using the USB cable and charge the built-in battery. Transfer some music files to the minimum. volume. Problem Cause Solution Reference The gigabeat® will not play music. Contact Toshiba See "Built-in Customer battery" on page 43 The gigabeat® will not turn on page 41 The volume is Reset the HOLD See "Turning the in HOLD mode.
User Guide
Page 134
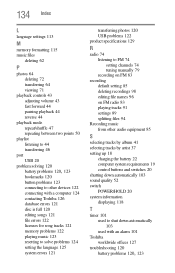
... M memory formatting 115 music files deleting 62 P photos 64 deleting 72 transferring 64 viewing 71 playback controls 43 adjusting volume 43 fast forward 44 pausing playback 44 reverse 44 playback mode repeat/shuffle 47 repeating between two points 50 playlist listening to 44 transferring 46 port USB 20 problem solving 120 battery problems 120, 123 bookmarks 120 button problems 123 connecting to other devices 122 connecting with a computer 124 contacting Toshiba 126 database errors 121 disc is full 120 editing songs...
... M memory formatting 115 music files deleting 62 P photos 64 deleting 72 transferring 64 viewing 71 playback controls 43 adjusting volume 43 fast forward 44 pausing playback 44 reverse 44 playback mode repeat/shuffle 47 repeating between two points 50 playlist listening to 44 transferring 46 port USB 20 problem solving 120 battery problems 120, 123 bookmarks 120 button problems 123 connecting to other devices 122 connecting with a computer 124 contacting Toshiba 126 database errors 121 disc is full 120 editing songs...
Owners Manual
Page 96
... lock mode. To replace the built-in lock mode. Others Troubleshooting If you experience any of the following issues while using the gigabeat, check the following guide for the possible cause before requesting service. The gigabeat is in battery, contact TOSHIBA Customer Service. Reset the Lock switch to a PC. Replace with a new battery. Use Windows Media Player 10 to "ON". Set the BATTERY switch to transfer tracks. work . Set the BATTERY switch to the minimum. The battery is not connected properly. The volume is set...
... lock mode. To replace the built-in lock mode. Others Troubleshooting If you experience any of the following issues while using the gigabeat, check the following guide for the possible cause before requesting service. The gigabeat is in battery, contact TOSHIBA Customer Service. Reset the Lock switch to a PC. Replace with a new battery. Use Windows Media Player 10 to "ON". Set the BATTERY switch to transfer tracks. work . Set the BATTERY switch to the minimum. The battery is not connected properly. The volume is set...
Owners Manual
Page 99
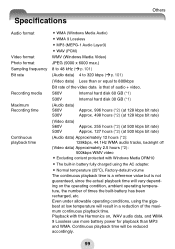
... number of times the built-battery has been recharged, etc. Even under allowable operating conditions, using the AC adapter. - Playback with Windows Media DRM10 - Continuous playback time will vary depending on , WAV audio data, and WMA 9 Lossless use more battery power for playback than or equal to 320 kbps (>p.101) (Video data) Less than MP3 and WMA. The built-in a reduction of audio + video. WMA (Windows Media Audio) - Others Specifications Audio format Video format Photo format Sampling frequency Bit rate Recording media Maximum Recording time...
... number of times the built-battery has been recharged, etc. Even under allowable operating conditions, using the AC adapter. - Playback with Windows Media DRM10 - Continuous playback time will vary depending on , WAV audio data, and WMA 9 Lossless use more battery power for playback than or equal to 320 kbps (>p.101) (Video data) Less than MP3 and WMA. The built-in a reduction of audio + video. WMA (Windows Media Audio) - Others Specifications Audio format Video format Photo format Sampling frequency Bit rate Recording media Maximum Recording time...


