
Owners Manual
Page 38
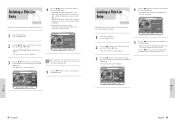
... that title cannot be played again. 1 Press the œ❷ button to select an entry to its original content. Playback screen for recorded entry. @ Information window for the selected entry: Title name, recording date, recording time, lock status, recording mode. # Recorded entry No. $ Recorded entry title. % Recording duration (i.e., playtime). ^ Record list...
... that title cannot be played again. 1 Press the œ❷ button to select an entry to its original content. Playback screen for recorded entry. @ Information window for the selected entry: Title name, recording date, recording time, lock status, recording mode. # Recorded entry No. $ Recorded entry title. % Recording duration (i.e., playtime). ^ Record list...
Owners Manual
Page 40
... the œ❷ button to select Title List, and then press the ENTER or ❿ button, or press the TITLE LIST button on the information window for the selected entry changes to delete?" Locking a Title List Entry 4 Press the œ❷ button to delete a protected entry, select "OFF" in the protection...
... the œ❷ button to select Title List, and then press the ENTER or ❿ button, or press the TITLE LIST button on the information window for the selected entry changes to delete?" Locking a Title List Entry 4 Press the œ❷ button to delete a protected entry, select "OFF" in the protection...

Owners Manual
Page 41
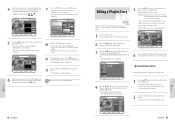
...ENTER button. • Message "Do you want to delete should be deleted. will be displayed. • If you want to delete is less than start window. 80 - The length of playback, that is Note created by selecting a desired scene in a playlist, even if that playlist is deleted, the original data... to delete?" English 7 Press the ENTER button at the end point. 8 The image and time at the start point are displayed the end point window. Creating a Playlist Entry DVD-RAM DVD-RW VR mode Follow these directions to delete a section from Title List, and then press the ENTER or ...
...ENTER button. • Message "Do you want to delete should be deleted. will be displayed. • If you want to delete is less than start window. 80 - The length of playback, that is Note created by selecting a desired scene in a playlist, even if that playlist is deleted, the original data... to delete?" English 7 Press the ENTER button at the end point. 8 The image and time at the start point are displayed the end point window. Creating a Playlist Entry DVD-RAM DVD-RW VR mode Follow these directions to delete a section from Title List, and then press the ENTER or ...
Owners Manual
Page 42
... the ENTER or ❿ button. 3 Press the œ❷ button to cancel. English English - 83 4 Select the start point are displayed on the End window. • The yellow-colored selection bar moves to 30 playlist entries. You can create up to the Make item. Press the MENU button when the....001 9 If you want to select Edit Playlist, and then press the ENTER or ❿ button, or press the PLAY LIST button on the Start window. • The yellow-colored selection bar moves to the End item. 8 Press the ENTER button to confirm. • A new make scene screen is the...
... the ENTER or ❿ button. 3 Press the œ❷ button to cancel. English English - 83 4 Select the start point are displayed on the End window. • The yellow-colored selection bar moves to 30 playlist entries. You can create up to the Make item. Press the MENU button when the....001 9 If you want to select Edit Playlist, and then press the ENTER or ❿ button, or press the PLAY LIST button on the Start window. • The yellow-colored selection bar moves to the End item. 8 Press the ENTER button to confirm. • A new make scene screen is the...
Owners Manual
Page 43
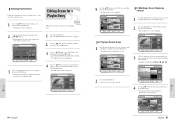
... is displayed. 3 Press the arrow buttons to select save, and then press the ENTER button. • The Name you changed is displayed on the Start window. Modifying a Scene (Replacing a Scene) 1 Press the arrow buttons to select the scene you want to modify the selected scene using the arrow buttons. • Functionality...
... is displayed. 3 Press the arrow buttons to select save, and then press the ENTER button. • The Name you changed is displayed on the Start window. Modifying a Scene (Replacing a Scene) 1 Press the arrow buttons to select the scene you want to modify the selected scene using the arrow buttons. • Functionality...

Owners Manual
Page 44
... scene to add as a new scene. 2 Press the œ❷ buttons to select Move, and then press the ENTER button. • A yellow selection window is added before that position. E. D. Adding a Scene 1 Press the arrow buttons to select the scene before which you want to add as a new scene ... select Add and then press the ENTER button. • The Add Scene screen is displayed. 3 Select the start point are displayed on the Start window. English 4 Press the œ❷ button to cancel select cancel and then press the ENTER button. English - 87 Editing Add Scene Scene NO....
... scene to add as a new scene. 2 Press the œ❷ buttons to select Move, and then press the ENTER button. • A yellow selection window is added before that position. E. D. Adding a Scene 1 Press the arrow buttons to select the scene before which you want to add as a new scene ... select Add and then press the ENTER button. • The Add Scene screen is displayed. 3 Select the start point are displayed on the Start window. English 4 Press the œ❷ button to cancel select cancel and then press the ENTER button. English - 87 Editing Add Scene Scene NO....

Owners Manual
Page 50
... the tape. English Specifications General Power requirements Power consumption Weight Dimensions Operating temp. Reference Problems and Solutions (VCR) Before contacting a Toshiba authorized service center, perform the following simple checks. Check if the safety tab is pressed during SLOW motion to see normal broadcasts... the TRK (œ or ❷) buttons to a wall outlet. When cleaning the video heads, read all instructions provided with the window side up and the safety tab facing you are converted into and output at standard recording Min. 75dB 20 Hz ~ 20 KHz &#...
... the tape. English Specifications General Power requirements Power consumption Weight Dimensions Operating temp. Reference Problems and Solutions (VCR) Before contacting a Toshiba authorized service center, perform the following simple checks. Check if the safety tab is pressed during SLOW motion to see normal broadcasts... the TRK (œ or ❷) buttons to a wall outlet. When cleaning the video heads, read all instructions provided with the window side up and the safety tab facing you are converted into and output at standard recording Min. 75dB 20 Hz ~ 20 KHz &#...

