
Owners Manual
Page 1
Printed on 70% Recycled Paper TOSHIBA DVD VIDEO RECORDER D-R4SU/D-R4SC/D-KR4SU DIGITAL VIDEO DVD VIDEO RECORDER D-R4SU D-R4SC D-KR4SU OWNER'S MANUAL OPERATIONS GUIDE Read "INSTALLATION GUIDE" first. Printed in China P000416410 H PM0020461012 © 2005 Toshiba Corporation Others Function setup Editing Playback Recording Introduction
Printed on 70% Recycled Paper TOSHIBA DVD VIDEO RECORDER D-R4SU/D-R4SC/D-KR4SU DIGITAL VIDEO DVD VIDEO RECORDER D-R4SU D-R4SC D-KR4SU OWNER'S MANUAL OPERATIONS GUIDE Read "INSTALLATION GUIDE" first. Printed in China P000416410 H PM0020461012 © 2005 Toshiba Corporation Others Function setup Editing Playback Recording Introduction

Owners Manual
Page 4
Introduction Caution for safety Read "SAFETY PRECAUTIONS", "IMPORTANT SAFETY INSTRUCTIONS", and all other sections of the "INSTALLATION GUIDE" that came with this product prior to reading this "OPERATIONS GUIDE". 4
Introduction Caution for safety Read "SAFETY PRECAUTIONS", "IMPORTANT SAFETY INSTRUCTIONS", and all other sections of the "INSTALLATION GUIDE" that came with this product prior to reading this "OPERATIONS GUIDE". 4
Owners Manual
Page 12
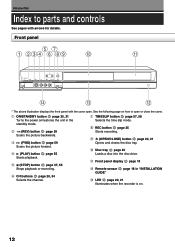
... backwards. u TIMESLIP button page 57, 58 Selects the time slip mode. q ON/STANDBY button page 20, 21 Turns the power on/restores the unit in "INSTALLATION GUIDE" !3 LED page 20, 21 Illuminates when the recorder is on how to parts and controls See pages with the cover open or close the cover...
... backwards. u TIMESLIP button page 57, 58 Selects the time slip mode. q ON/STANDBY button page 20, 21 Turns the power on/restores the unit in "INSTALLATION GUIDE" !3 LED page 20, 21 Illuminates when the recorder is on how to parts and controls See pages with the cover open or close the cover...
Owners Manual
Page 14
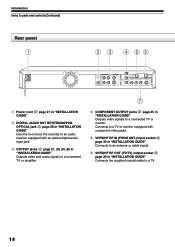
...antenna or cable signal. e OUTPUT jacks page 21, 23, 24, 25 in "INSTALLATION GUIDE" Outputs video and audio signals to a connected TV or amplifier. 7 r COMPONENT OUTPUT jacks page 25 in "INSTALLATION GUIDE" Outputs video signals to a TV or monitor equipped with an optical digital audio input...or monitor. Introduction Index to parts and controls (Continued) Rear panel 1 23 4 56 q Power cord page 21 in "INSTALLATION GUIDE" w DIGITAL AUDIO OUT BITSTREAM/PCM OPTICAL jack page 26 in "INSTALLATION GUIDE" Use this to connect the recorder to an audio receiver equipped with component video jacks.
...antenna or cable signal. e OUTPUT jacks page 21, 23, 24, 25 in "INSTALLATION GUIDE" Outputs video and audio signals to a connected TV or amplifier. 7 r COMPONENT OUTPUT jacks page 25 in "INSTALLATION GUIDE" Outputs video signals to a TV or monitor equipped with an optical digital audio input...or monitor. Introduction Index to parts and controls (Continued) Rear panel 1 23 4 56 q Power cord page 21 in "INSTALLATION GUIDE" w DIGITAL AUDIO OUT BITSTREAM/PCM OPTICAL jack page 26 in "INSTALLATION GUIDE" Use this to connect the recorder to an audio receiver equipped with component video jacks.
Owners Manual
Page 17
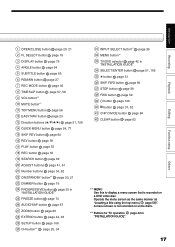
... button page 106 30 CH button*2 page 20, 34 31 INPUT SELECT button*2 page 39 32 MENU button*1 33 TV/DVD selector page 42 in "INSTALLATION GUIDE". 17 Others Function setup Editing Playback Recording Introduction Operate the menu screen as the same manner as "Locating a title using the top menu ( page 56...)". A menu screen is not recorded on some discs. *2 Buttons for TV operation page 42 in "INSTALLATION GUIDE" 34 SELECT/ENTER button page 51, 106 35 button page 51 36 SKIP FWD button page 60 37 STOP button page 39 38 FWD button...
... button page 106 30 CH button*2 page 20, 34 31 INPUT SELECT button*2 page 39 32 MENU button*1 33 TV/DVD selector page 42 in "INSTALLATION GUIDE". 17 Others Function setup Editing Playback Recording Introduction Operate the menu screen as the same manner as "Locating a title using the top menu ( page 56...)". A menu screen is not recorded on some discs. *2 Buttons for TV operation page 42 in "INSTALLATION GUIDE" 34 SELECT/ENTER button page 51, 106 35 button page 51 36 SKIP FWD button page 60 37 STOP button page 39 38 FWD button...
Owners Manual
Page 20
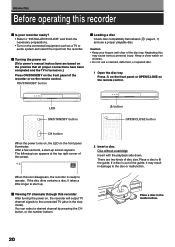
page 6, 7) Caution • Keep your recorder ready? • Refer to "INSTALLATION GUIDE" and finish the necessary preparations. • Turn on , the recorder will output TV channel signals to the connected TV (also in the stop mode). Press ... have been completed and the TV is out of the disc tray. Neglecting this recorder Is your fingers well clear of the guide, it takes a little longer to fit the guide. e.g. If the disc drive contains a disc, it may cause serious personal injury. There are based on the remote control. Place a disc...
page 6, 7) Caution • Keep your recorder ready? • Refer to "INSTALLATION GUIDE" and finish the necessary preparations. • Turn on , the recorder will output TV channel signals to the connected TV (also in the stop mode). Press ... have been completed and the TV is out of the disc tray. Neglecting this recorder Is your fingers well clear of the guide, it takes a little longer to fit the guide. e.g. If the disc drive contains a disc, it may cause serious personal injury. There are based on the remote control. Place a disc...
Owners Manual
Page 26
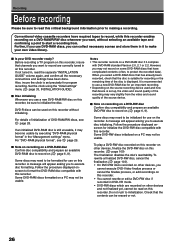
... set up, the video and sound quality of DVD-RAM/RW discs, see page 29. Set the clock using the "Initial settings" menu ( page 33, INSTALLATION GUIDE). DVD-R discs can be used and how that have complicated contents (often, to protect the recorded data). If an initialized DVD-RAM disc is set... on a PC may become usable by executing "DVD-RAM physical format" in on this recorder. Recording Before recording Please be sure to read the separate "INSTALLATION GUIDE" volume again, and confirm all the necessary connections and settings have been done.
... set up, the video and sound quality of DVD-RAM/RW discs, see page 29. Set the clock using the "Initial settings" menu ( page 33, INSTALLATION GUIDE). DVD-R discs can be used and how that have complicated contents (often, to protect the recorded data). If an initialized DVD-RAM disc is set... on a PC may become usable by executing "DVD-RAM physical format" in on this recorder. Recording Before recording Please be sure to read the separate "INSTALLATION GUIDE" volume again, and confirm all the necessary connections and settings have been done.
Owners Manual
Page 42
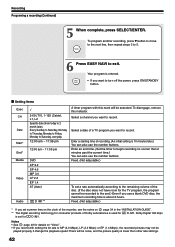
... picture quality is entered. Recording Programing a recording (Continued) 5 When complete, press SELECT/ENTER. Notes • See page 48 for details on page 34 in the "INSTALLATION GUIDE". ** The digital recording technology for consumer products of the disc. (If the disc does not have room for D /M1. There will be played properly if...
... picture quality is entered. Recording Programing a recording (Continued) 5 When complete, press SELECT/ENTER. Notes • See page 48 for details on page 34 in the "INSTALLATION GUIDE". ** The digital recording technology for consumer products of the disc. (If the disc does not have room for D /M1. There will be played properly if...
Owners Manual
Page 66
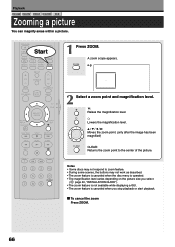
...; The zoom feature is canceled when the disc menu is operated. • The magnification level varies depending on the picture size you select ( page 40, "INSTALLATION GUIDE"). • The zoom feature is not available while displaying a GUI. • The zoom feature is canceled when you stop playback or start playback. Playback DVD...
...; The zoom feature is canceled when the disc menu is operated. • The magnification level varies depending on the picture size you select ( page 40, "INSTALLATION GUIDE"). • The zoom feature is not available while displaying a GUI. • The zoom feature is canceled when you stop playback or start playback. Playback DVD...
Owners Manual
Page 70
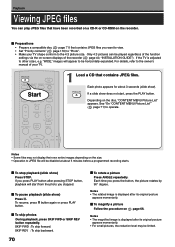
... REV button repeatedly. Each time you stopped. "WIDE," images will appear to operate. For details, refer to the owner's manual of the recorder ( page 40, "INSTALLATION GUIDE"). If you press PLAY button after pressing STOP button, playback will be disabled at about 3 seconds (slide show ) Press . To pause playback (slide show ). To...
... REV button repeatedly. Each time you stopped. "WIDE," images will appear to operate. For details, refer to the owner's manual of the recorder ( page 40, "INSTALLATION GUIDE"). If you press PLAY button after pressing STOP button, playback will be disabled at about 3 seconds (slide show ) Press . To pause playback (slide show ). To...
Owners Manual
Page 109
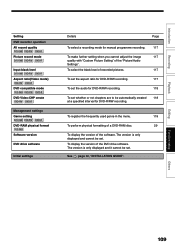
See page 30, "INSTALLATION GUIDE". To select the black level of recorded pictures. 117 To set the aspect ratio for DVD-R/RW recording. 117 To set the audio for DVD-R/...
See page 30, "INSTALLATION GUIDE". To select the black level of recorded pictures. 117 To set the aspect ratio for DVD-R/RW recording. 117 To set the audio for DVD-R/...

Owners Manual
Page 115
Note • Toshiba does not guarantee that this setting, see "TV shape setting" ( page 40, "INSTALLATION GUIDE"). Off: To disable closed caption. Closed caption To select where you turn on the signal condition, closed caption may return to the normal by all ...
Note • Toshiba does not guarantee that this setting, see "TV shape setting" ( page 40, "INSTALLATION GUIDE"). Off: To disable closed caption. Closed caption To select where you turn on the signal condition, closed caption may return to the normal by all ...
Owners Manual
Page 116
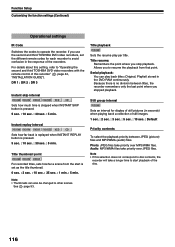
... titles, sets how far a scene from that point. Allows you stopped playback. Note • If this recorder" ( page 44, "INSTALLATION GUIDE"). Audio: MP3/WMA files take priority over JPEG files. Still group interval DVD-RAM Sets an interval for each recorder to avoid confusion in...thumbnail. 0 sec. : 3 sec. : 10 sec. : 35 sec. : 1 min. : 5 min. For details about this setting, refer to "Operating the second and third TOSHIBA DVD video recorders with the remote control of still images. 1 sec. : 2 sec. : 3 sec. : 5 sec. : 10 sec. : Default Priority contents To select the ...
... titles, sets how far a scene from that point. Allows you stopped playback. Note • If this recorder" ( page 44, "INSTALLATION GUIDE"). Audio: MP3/WMA files take priority over JPEG files. Still group interval DVD-RAM Sets an interval for each recorder to avoid confusion in...thumbnail. 0 sec. : 3 sec. : 10 sec. : 35 sec. : 1 min. : 5 min. For details about this setting, refer to "Operating the second and third TOSHIBA DVD video recorders with the remote control of still images. 1 sec. : 2 sec. : 3 sec. : 5 sec. : 10 sec. : Default Priority contents To select the ...
Owners Manual
Page 123
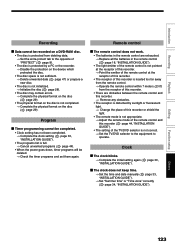
...does not work. • The batteries in the remote control are exhausted. → Replace all the batteries in the remote control ( page 18, "INSTALLATION GUIDE"). • The light emitter of the remote control is not pointed at the receptor of this recorder. → Point the emitter of the remote control...the light. • The remote mode is not appropriate. → Adjust the remote mode of the remote control and this recorder ( page 44, "INSTALLATION GUIDE"). • The setting of the TV/DVD selector is not correct. → Set the TV/DVD selector to the equipment to the opposite of ...
...does not work. • The batteries in the remote control are exhausted. → Replace all the batteries in the remote control ( page 18, "INSTALLATION GUIDE"). • The light emitter of the remote control is not pointed at the receptor of this recorder. → Point the emitter of the remote control...the light. • The remote mode is not appropriate. → Adjust the remote mode of the remote control and this recorder ( page 44, "INSTALLATION GUIDE"). • The setting of the TV/DVD selector is not correct. → Set the TV/DVD selector to the equipment to the opposite of ...
