
Owner's Manual - English
Page 1
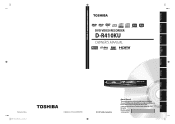
... Connections TOSHIBA DVD VIDEO RECORDER D-R410KU Basic Setup DVD VIDEO RECORDER D-R410KU OWNER'S MANUAL Disc Management Recording Playback Editing Printed in the spaces below. Refer to these numbers in China E7K7AUD_D-R410KU_cover.indd 2-3 1VMN24696 / E7K7AUD DVD VIDEO RECORDER D-R410 Function Setup © 2008 Toshiba Corporation Owner's Record The model number and serial number are on the back of your Toshiba...
... Connections TOSHIBA DVD VIDEO RECORDER D-R410KU Basic Setup DVD VIDEO RECORDER D-R410KU OWNER'S MANUAL Disc Management Recording Playback Editing Printed in the spaces below. Refer to these numbers in China E7K7AUD_D-R410KU_cover.indd 2-3 1VMN24696 / E7K7AUD DVD VIDEO RECORDER D-R410 Function Setup © 2008 Toshiba Corporation Owner's Record The model number and serial number are on the back of your Toshiba...
Owner's Manual - English
Page 3
... S2898A ANTENNA DISCHARGE UNIT (NEC SECTION 810-20) GROUNDING CONDUCTORS (NEC SECTION 810-21) GROUND CLAMP POWER SERVICE GROUNDING ELECTRODE SYSTEM (NEC ART 250, PART H) Recording Playback Editing Function Setup Others E7K7AUD_D-R410KU_EN.indd 3 EN 3 2007/12/14 15:02:35 Read these instructions. 3. A grounding type plug has two blades and...
... S2898A ANTENNA DISCHARGE UNIT (NEC SECTION 810-20) GROUNDING CONDUCTORS (NEC SECTION 810-21) GROUND CLAMP POWER SERVICE GROUNDING ELECTRODE SYSTEM (NEC ART 250, PART H) Recording Playback Editing Function Setup Others E7K7AUD_D-R410KU_EN.indd 3 EN 3 2007/12/14 15:02:35 Read these instructions. 3. A grounding type plug has two blades and...
Owner's Manual - English
Page 4
... compatible with this product and may occur inside gets dry. quick setup guide About Copyright The unauthorized recording, use this unit: • Install the unit in the picture. Use of this 480p DVD recorder, please contact Toshiba Customer Service. 4 EN E7K7AUD_D-R410KU_EN.indd 4 2007/12/14 15:02:36 PRECAUTIONS Installation Location For...
... compatible with this product and may occur inside gets dry. quick setup guide About Copyright The unauthorized recording, use this unit: • Install the unit in the picture. Use of this 480p DVD recorder, please contact Toshiba Customer Service. 4 EN E7K7AUD_D-R410KU_EN.indd 4 2007/12/14 15:02:36 PRECAUTIONS Installation Location For...
Owner's Manual - English
Page 5
...8226; Never use solvents such as benzine, thinner, commercially available cleaners, detergent, abrasive cleaning agents or antistatic spray intended for analog records. DTS and DTS Digital Out are registered trademarks and the DTS logos and Symbol are trademarks of Dolby Laboratories. Cleaning the Cabinet...With an AM radio: Tune an AM radio to clean the unit. Sound will help you with actual recordable DVD discs. Manufactured under U.S. All Rights Reserved. Recording Playback Editing Function Setup Others E7K7AUD_D-R410KU_EN.indd 5 EN 5 2007/12/14 15:02:37 Also, ...
...8226; Never use solvents such as benzine, thinner, commercially available cleaners, detergent, abrasive cleaning agents or antistatic spray intended for analog records. DTS and DTS Digital Out are registered trademarks and the DTS logos and Symbol are trademarks of Dolby Laboratories. Cleaning the Cabinet...With an AM radio: Tune an AM radio to clean the unit. Sound will help you with actual recordable DVD discs. Manufactured under U.S. All Rights Reserved. Recording Playback Editing Function Setup Others E7K7AUD_D-R410KU_EN.indd 5 EN 5 2007/12/14 15:02:37 Also, ...
Owner's Manual - English
Page 6
... CONNECTION TO AN AUDIO SYSTEM 21 Basic Setup INITIAL SETTING 22 SETTING THE CLOCK 23 Clock Setting 23 Disc Management FORMATTING A DISC 24 Choosing the Recording Format of a Brand-New DVD-RW 24 Reformatting a Disc Manually 25 SETTING A DISC TO PROTECT 26 PLAYING THE DISCS IN OTHER DVD PLAYERS . . . . . 27 Auto...
... CONNECTION TO AN AUDIO SYSTEM 21 Basic Setup INITIAL SETTING 22 SETTING THE CLOCK 23 Clock Setting 23 Disc Management FORMATTING A DISC 24 Choosing the Recording Format of a Brand-New DVD-RW 24 Reformatting a Disc Manually 25 SETTING A DISC TO PROTECT 26 PLAYING THE DISCS IN OTHER DVD PLAYERS . . . . . 27 Auto...
Owner's Manual - English
Page 7
...Rapid Playback 53 Step by Step Playback 53 Slow Forward / Slow Reverse Playback 53 Zoom 54 Marker Setting 54 Chasing Playback during Recording 55 Simultaneous Playback and Recording 56 SEARCH 57 Title/Chapter Search 57 Track Search 57 Time Search 58 REPEAT/RANDOM/PROGRAM PLAYBACK/ SLIDE SHOW 59 Repeat Playback 59... 89 Reset All 91 Others TROUBLESHOOTING 92 Frequently Asked Questions 95 LANGUAGE CODE 96 GLOSSARY 97 SPECIFICATIONS 98 LIMITED WARRANTY 99 Disc Management Recording Playback Editing Function Setup Others E7K7AUD_D-R410KU_EN.indd 7 EN 7 2007/12/14 15:02:37
...Rapid Playback 53 Step by Step Playback 53 Slow Forward / Slow Reverse Playback 53 Zoom 54 Marker Setting 54 Chasing Playback during Recording 55 Simultaneous Playback and Recording 56 SEARCH 57 Title/Chapter Search 57 Track Search 57 Time Search 58 REPEAT/RANDOM/PROGRAM PLAYBACK/ SLIDE SHOW 59 Repeat Playback 59... 89 Reset All 91 Others TROUBLESHOOTING 92 Frequently Asked Questions 95 LANGUAGE CODE 96 GLOSSARY 97 SPECIFICATIONS 98 LIMITED WARRANTY 99 Disc Management Recording Playback Editing Function Setup Others E7K7AUD_D-R410KU_EN.indd 7 EN 7 2007/12/14 15:02:37
Owner's Manual - English
Page 8
...within a month in your home: When connecting the unit to watch : You can delete titles which is applicable to DVD. Symbol Description For Recording, Playing Back, and Editing Description refers to DVD-RW in video mode Description refers to DVD-RW in VR mode Description refers to DVD-R...the title name you prefer. 8 EN Compatibility Available for what you want to an amplifier or a decoder which you prefer. Daily or weekly program recordings are playable on a disc by 30 minutes up to 8 hours. Dividing or combining titles: You can delete a specific part of each function is...
...within a month in your home: When connecting the unit to watch : You can delete titles which is applicable to DVD. Symbol Description For Recording, Playing Back, and Editing Description refers to DVD-RW in video mode Description refers to DVD-RW in VR mode Description refers to DVD-R...the title name you prefer. 8 EN Compatibility Available for what you want to an amplifier or a decoder which you prefer. Daily or weekly program recordings are playable on a disc by 30 minutes up to 8 hours. Dividing or combining titles: You can delete a specific part of each function is...
Owner's Manual - English
Page 9
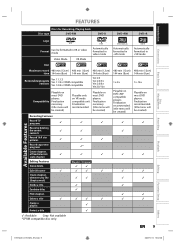
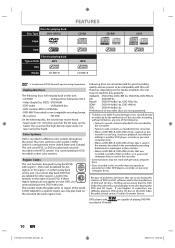
.../12/14 15:02:38 Playable on most DVD players. Introduction Connections Basic Setup Disc Management Recording FEATURES Discs for Recording, Playing back Disc type DVD-RW DVD-R DVD+RW DVD+R Logo Format Can be created) Recording Features Record TV programs ✓ ✓ ✓ Available Features Reuse by deleting the current ✓ ✓ contents...
.../12/14 15:02:38 Playable on most DVD players. Introduction Connections Basic Setup Disc Management Recording FEATURES Discs for Recording, Playing back Disc type DVD-RW DVD-R DVD+RW DVD+R Logo Format Can be created) Recording Features Record TV programs ✓ ✓ ✓ Available Features Reuse by deleting the current ✓ ✓ contents...
Owner's Manual - English
Page 10
... every disc bearing the DVD and CD logos. You cannot play back the DVD in this DVD Video Recorder will not play back DVD with this DVD Video Recorder, please contact Toshiba Customer Service. Only the sound on the unit. The number inside the globe refers to be...will successfully play back must be compatible with region 1. Following discs are recommended for good recording quality and are capable of DVD and CD discs, Toshiba cannot assure that was recorded in another DVD player, recorder or personal computer drive. • When a DVD-RW/-R, DVD+RW/+R disc that is...
... every disc bearing the DVD and CD logos. You cannot play back the DVD in this DVD Video Recorder will not play back DVD with this DVD Video Recorder, please contact Toshiba Customer Service. Only the sound on the unit. The number inside the globe refers to be...will successfully play back must be compatible with region 1. Following discs are recommended for good recording quality and are capable of DVD and CD discs, Toshiba cannot assure that was recorded in another DVD player, recorder or personal computer drive. • When a DVD-RW/-R, DVD+RW/+R disc that is...
Owner's Manual - English
Page 11
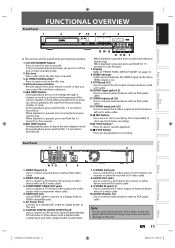
... Use to the next chapter or track. If timer programmings have been set the unit in quick succession, playback will start one-touch timer recording. 14. Infrared sensor window Receive signals from your remote control so that you can also be turned on and off. C STOP button Press... to set , press to stop playback or recording. VIDEO IN jack (L1) Use to the unit. Electrostatic discharge may cause permanent damage to connect external device with an S-video cable. 8. VIDEO...
... Use to the next chapter or track. If timer programmings have been set the unit in quick succession, playback will start one-touch timer recording. 14. Infrared sensor window Receive signals from your remote control so that you can also be turned on and off. C STOP button Press... to set , press to stop playback or recording. VIDEO IN jack (L1) Use to the unit. Electrostatic discharge may cause permanent damage to connect external device with an S-video cable. 8. VIDEO...
Owner's Manual - English
Page 13
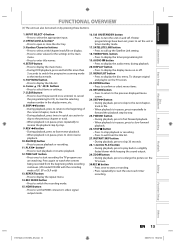
...the timer programming list. 19. button • Press to select items or settings. 7. AUDIO button • Press to display the disc menu. Recording Playback Editing Function Setup Others E7K7AUD_D-R410KU_EN.indd 13 EN 13 2007/12/14 15:02:42 MENU/LIST button • Press to display the... is in the main menu. • Press to set the HDMI connector's video signal output mode . 16. HDMI button • Press to start recording the TV program you are watching. PLAY B button* • Press to set the unit in a slightly faster/slower while keeping the sound output. ...
...the timer programming list. 19. button • Press to select items or settings. 7. AUDIO button • Press to display the disc menu. Recording Playback Editing Function Setup Others E7K7AUD_D-R410KU_EN.indd 13 EN 13 2007/12/14 15:02:42 MENU/LIST button • Press to display the... is in the main menu. • Press to set the HDMI connector's video signal output mode . 16. HDMI button • Press to start recording the TV program you are watching. PLAY B button* • Press to set the unit in a slightly faster/slower while keeping the sound output. ...
Owner's Manual - English
Page 14
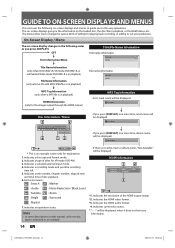
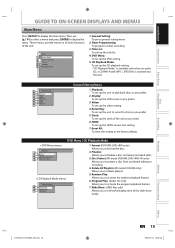
...following on-screen displays and menus to guide you to suit your preference. Indicates a type of disc playback. 6. Indicates a recording mode and possible recording time left. 5. Indicates the HDMI audio format. 4. The on this manual, only one more time, album name will be... album name, "Not Available" will be displayed. Indicates a title number, chapter number, elapsed time and total time of titles for playing back, recording, or editing to the easy operations. Note • In some descriptions on -screen displays give you press [DISPLAY]. Indicates current disc status. *...
...following on-screen displays and menus to guide you to suit your preference. Indicates a type of disc playback. 6. Indicates a recording mode and possible recording time left. 5. Indicates the HDMI audio format. 4. The on this manual, only one more time, album name will be... album name, "Not Available" will be displayed. Indicates a title number, chapter number, elapsed time and total time of titles for playing back, recording, or editing to the easy operations. Note • In some descriptions on -screen displays give you press [DISPLAY]. Indicates current disc status. *...
Owner's Manual - English
Page 15
...Title List 4 DVD Menu 5 CD Playback Mode 1. Video: To set up the OSD screen as you to protect a disc from accidental editing or recording. 4. Recording: To set up the HDMI connection setting. 7. Random Play: Allows you prefer. 5. Disc Protect (VR mode DVD-RW, DVD+RW/+R only): Allows... you to activate the random playback feature. 6. Finalize: Allows you to delete playlist. 5. Recording Playback Editing Function Setup Others E7K7AUD_D-R410KU_EN.indd 15 EN 15 2007/12/14 15:02:44 Then use [K / L] to select a menu and...
...Title List 4 DVD Menu 5 CD Playback Mode 1. Video: To set up the OSD screen as you to protect a disc from accidental editing or recording. 4. Recording: To set up the HDMI connection setting. 7. Random Play: Allows you prefer. 5. Disc Protect (VR mode DVD-RW, DVD+RW/+R only): Allows... you to activate the random playback feature. 6. Finalize: Allows you to delete playlist. 5. Recording Playback Editing Function Setup Others E7K7AUD_D-R410KU_EN.indd 15 EN 15 2007/12/14 15:02:44 Then use [K / L] to select a menu and...

Owner's Manual - English
Page 16
...the following • Elapsed playback time • Current title / chapter / track number • Recording time / remaining time • Clock • Remaining time for one-touch timer recording • Selected HDMI output mode Display Message Appears when the disc tray is selected. Current status...Appears when the timer programming or OTR has been set and is proceeding. : Flashes when all timer recordings have been finished. : Appears during recording process. : Flashes when a recording pauses. : Appears when a disc is in the afternoon with the clock display. 2. Title/Track ...
...the following • Elapsed playback time • Current title / chapter / track number • Recording time / remaining time • Clock • Remaining time for one-touch timer recording • Selected HDMI output mode Display Message Appears when the disc tray is selected. Current status...Appears when the timer programming or OTR has been set and is proceeding. : Flashes when all timer recordings have been finished. : Appears during recording process. : Flashes when a recording pauses. : Appears when a disc is in the afternoon with the clock display. 2. Title/Track ...
Owner's Manual - English
Page 17
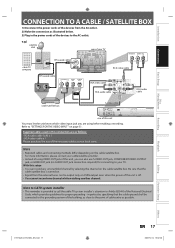
..., or HDMI OUT jack (no AUDIO OUT jack connection required) for proper grounding - Refer to your cable/satellite provider. • Instead of using before making a recording. Be sure that the cable ground shall be output only on CVBS output even when the power of the unit is off. • You cannot... record one channel while watching another channel. Note to the point of cable entry as possible. For more information, please contact your TV. With this unit...
..., or HDMI OUT jack (no AUDIO OUT jack connection required) for proper grounding - Refer to your cable/satellite provider. • Instead of using before making a recording. Be sure that the cable ground shall be output only on CVBS output even when the power of the unit is off. • You cannot... record one channel while watching another channel. Note to the point of cable entry as possible. For more information, please contact your TV. With this unit...
Owner's Manual - English
Page 18
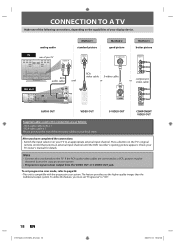
....indd 18 2007/12/14 15:02:46 Press a button on the TV's original remote control that selects an external input channel until the DVD recorder's opening picture appears. To set "Progressive" to the TV. After you the higher quality images than the traditional output system. Check your TV owner's manual...
....indd 18 2007/12/14 15:02:46 Press a button on the TV's original remote control that selects an external input channel until the DVD recorder's opening picture appears. To set "Progressive" to the TV. After you the higher quality images than the traditional output system. Check your TV owner's manual...

Owner's Manual - English
Page 19
Cables not included. The output mode changes as follows every time [HDMI] is not supported by display device will be skipped. Disc Management Recording Playback Editing Function Setup Others E7K7AUD_D-R410KU_EN.indd 19 EN 19 2007/12/14 15:02:47 HDMI Mode and Actual Output Signals Press [HDMI] ...
Cables not included. The output mode changes as follows every time [HDMI] is not supported by display device will be skipped. Disc Management Recording Playback Editing Function Setup Others E7K7AUD_D-R410KU_EN.indd 19 EN 19 2007/12/14 15:02:47 HDMI Mode and Actual Output Signals Press [HDMI] ...
Owner's Manual - English
Page 20
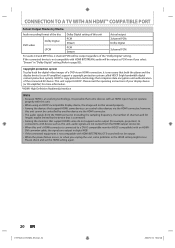
... E7K7AUD_D-R410KU_EN.indd 20 2007/12/14 15:02:48 CONNECTION TO A TV WITH AN HDMI™ COMPATIBLE PORT Actual Output Modes by Media Audio recording format of the disc Dolby Digital setting of this unit's HDMI connector is connected to page 83). Copyright protection system To play back the digital...
... E7K7AUD_D-R410KU_EN.indd 20 2007/12/14 15:02:48 CONNECTION TO A TV WITH AN HDMI™ COMPATIBLE PORT Actual Output Modes by Media Audio recording format of the disc Dolby Digital setting of this unit's HDMI connector is connected to page 83). Copyright protection system To play back the digital...
Owner's Manual - English
Page 21
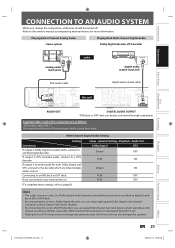
...Digital Audio Dolby Digital decoder, DTS decoder Connections AUDIO IN L R analog audio input jacks audio COAXIAL digital audio coaxial input jack Basic Setup Disc Management Recording Playback RCA audio cable digital audio coaxial cable VIDEO VIDEO IN OUT L Y L PB/CB R AUDIO IN (L1) IN R PR/CR S-...PCM ON Stream ON PCM OFF PCM OFF Note • The audio source on a disc in a Dolby Digital multi channel surround format cannot be recorded as follows: • RCA audio cable (L/R) x 1 Please purchase the rest of the necessary cables at your local store. If output is ...
...Digital Audio Dolby Digital decoder, DTS decoder Connections AUDIO IN L R analog audio input jacks audio COAXIAL digital audio coaxial input jack Basic Setup Disc Management Recording Playback RCA audio cable digital audio coaxial cable VIDEO VIDEO IN OUT L Y L PB/CB R AUDIO IN (L1) IN R PR/CR S-...PCM ON Stream ON PCM OFF PCM OFF Note • The audio source on a disc in a Dolby Digital multi channel surround format cannot be recorded as follows: • RCA audio cable (L/R) x 1 Please purchase the rest of the necessary cables at your local store. If output is ...
Owner's Manual - English
Page 23
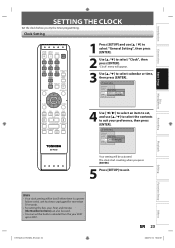
...ZOOM SE-R0265 1 Press [SETUP] and use [K / L] to select the contents to select "Clock", then press [ENTER]. General Setting Playback Display Video Clock Setting Recording Clock JAN / 01 / 2008 ( TUE ) HDMI 12 : 00 AM Reset All 4 Use [{ / B] to select an item to set the built-in ...calendar from the year 2007 up to 2057. Recording Playback Editing Function Setup Note • Your clock setting will appear. 3 Use [K / L] to exit. Clock Setting OPEN/ INPUT CLOSE SELECT HDMI .@/: ABC DEF...
...ZOOM SE-R0265 1 Press [SETUP] and use [K / L] to select the contents to select "Clock", then press [ENTER]. General Setting Playback Display Video Clock Setting Recording Clock JAN / 01 / 2008 ( TUE ) HDMI 12 : 00 AM Reset All 4 Use [{ / B] to select an item to set the built-in ...calendar from the year 2007 up to 2057. Recording Playback Editing Function Setup Note • Your clock setting will appear. 3 Use [K / L] to exit. Clock Setting OPEN/ INPUT CLOSE SELECT HDMI .@/: ABC DEF...


