
User Guide
Page 13
... time 30 Turning on the power 30 Setting up your device 31 Setting up your Wi-Fi® connection 32 Setting the date and time 32 Make it Google 33 Setting up Wi-Fi® and Bluetooth® connections 37 Registering your Toshiba device 38 Backing up your data 38 Backing up data using TOSHIBA File Manager ..38 Backing up data using your Google™ Account 38 Restoring your data using your Google™ Account 39 Navigation and features 39 Home screen 41 Touch screen...
... time 30 Turning on the power 30 Setting up your device 31 Setting up your Wi-Fi® connection 32 Setting the date and time 32 Make it Google 33 Setting up Wi-Fi® and Bluetooth® connections 37 Registering your Toshiba device 38 Backing up your data 38 Backing up data using TOSHIBA File Manager ..38 Backing up data using your Google™ Account 38 Restoring your data using your Google™ Account 39 Navigation and features 39 Home screen 41 Touch screen...
User Guide
Page 14
... your device's settings 59 Apps and Settings menus 59 Wireless and networks settings 64 Sound settings 66 Display settings 67 Multimedia settings 68 Location services settings 68 Security settings 69 Apps settings 71 Accounts & sync settings 72 Backup & reset settings 72 Storage settings 73 Language & input settings 74 Accessibility settings 75 Date & time settings 75 About tablet 76 Chapter 3: Working with Apps 78 Downloading Toshiba Apps 78 TOSHIBA Media Player 78 Apps 79 Downloading from Google Play Store 79 Preinstalled Apps on your tablet 80 Uninstalling Apps on...
... your device's settings 59 Apps and Settings menus 59 Wireless and networks settings 64 Sound settings 66 Display settings 67 Multimedia settings 68 Location services settings 68 Security settings 69 Apps settings 71 Accounts & sync settings 72 Backup & reset settings 72 Storage settings 73 Language & input settings 74 Accessibility settings 75 Date & time settings 75 About tablet 76 Chapter 3: Working with Apps 78 Downloading Toshiba Apps 78 TOSHIBA Media Player 78 Apps 79 Downloading from Google Play Store 79 Preinstalled Apps on your tablet 80 Uninstalling Apps on...

User Guide
Page 15
...external devices 87 Connecting an HDMI®-compatible television or display device 88 Using a docking station 88 Connecting your tablet to a docking station ......89 Chapter 5: Utilities 90 TOSHIBA Service Station 90 Check for application updates 92 Downloading updates 92 Installing updates 93 Downloading and installing System updates.....93 TOSHIBA File Manager Utility 93 File browsing screen 95 Operation of files/folders 95 TOSHIBA Adaptive display 97 Chapter 6: If Something Goes Wrong 98 Problems when you turn on the device 98 The operating system is not working 99 Internet...
...external devices 87 Connecting an HDMI®-compatible television or display device 88 Using a docking station 88 Connecting your tablet to a docking station ......89 Chapter 5: Utilities 90 TOSHIBA Service Station 90 Check for application updates 92 Downloading updates 92 Installing updates 93 Downloading and installing System updates.....93 TOSHIBA File Manager Utility 93 File browsing screen 95 Operation of files/folders 95 TOSHIBA Adaptive display 97 Chapter 6: If Something Goes Wrong 98 Problems when you turn on the device 98 The operating system is not working 99 Internet...

User Guide
Page 27
... time of publication and is normal for all batteries. Failure to handle it into a power source. Your device contains a rechargeable battery that may vary depending on the select models and configurations tested by Toshiba under any conditions other factors. Never attempt to charge the battery you must attach the USB/AC adaptor. To use . To charge the device plug it . Getting Started 27 Battery Notice 3 Connect...
... time of publication and is normal for all batteries. Failure to handle it into a power source. Your device contains a rechargeable battery that may vary depending on the select models and configurations tested by Toshiba under any conditions other factors. Never attempt to charge the battery you must attach the USB/AC adaptor. To use . To charge the device plug it . Getting Started 27 Battery Notice 3 Connect...
User Guide
Page 31
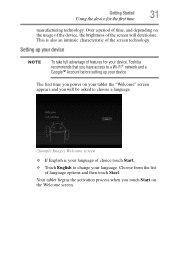
... power on the Welcome screen. Choose from the list of choice touch Start. ❖ Touch English to change your language. Your tablet begins the activation process when you touch Start on your tablet the "Welcome" screen appears and you will deteriorate. This is your language of language options and then touch Start. Getting Started 31 Using the device for your device, Toshiba recommends that you have access to a Wi-Fi® network and a Google™ Account before setting...
... power on the Welcome screen. Choose from the list of choice touch Start. ❖ Touch English to change your language. Your tablet begins the activation process when you touch Start on your tablet the "Welcome" screen appears and you will deteriorate. This is your language of language options and then touch Start. Getting Started 31 Using the device for your device, Toshiba recommends that you have access to a Wi-Fi® network and a Google™ Account before setting...
User Guide
Page 35
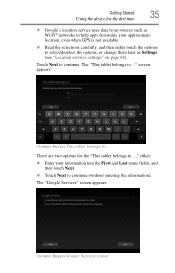
... First and Last name fields, and then touch Next. ❖ Touch Next to continue (without entering the information). The "This tablet belongs to ... Getting Started 35 Using the device for the "This tablet belongs to...," either touch the options to select/deselect the options, or change them later in Settings (see "Location services settings" on page 68). Touch Next to continue. The "Google Services" screen appears. (Sample Image) Google Services screen
... First and Last name fields, and then touch Next. ❖ Touch Next to continue (without entering the information). The "This tablet belongs to ... Getting Started 35 Using the device for the "This tablet belongs to...," either touch the options to select/deselect the options, or change them later in Settings (see "Location services settings" on page 68). Touch Next to continue. The "Google Services" screen appears. (Sample Image) Google Services screen
User Guide
Page 46
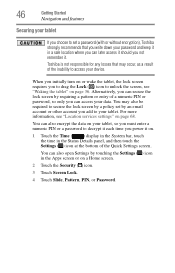
... must enter a numeric PIN or a password to decrypt it each time you power it in the Status Details panel, and then touch the Settings ( ) icon at the bottom of the inability to access your device. Alternatively, you can access your data. Toshiba is not responsible for any losses that you write down your password and keep it on a Home screen. 2 Touch the Security ( ) icon. 3 Touch Screen Lock. 4 Touch Slide, Pattern, PIN, or Password. You...
... must enter a numeric PIN or a password to decrypt it each time you power it in the Status Details panel, and then touch the Settings ( ) icon at the bottom of the inability to access your device. Alternatively, you can access your data. Toshiba is not responsible for any losses that you write down your password and keep it on a Home screen. 2 Touch the Security ( ) icon. 3 Touch Screen Lock. 4 Touch Slide, Pattern, PIN, or Password. You...

User Guide
Page 49
... Image) Dragging an app NOTE The item has been removed from the Home screen, but not deleted from a Home screen 1 Touch and hold , and drag the second app to a Home screen" on page 48. The Remove button appears in the app list). 3 Touch, hold the item you want to the Remove button. 3 Lift your finger when the icon turns red. Getting Started 49 Customizing your Home screens Removing an item from the...
... Image) Dragging an app NOTE The item has been removed from the Home screen, but not deleted from a Home screen 1 Touch and hold , and drag the second app to a Home screen" on page 48. The Remove button appears in the app list). 3 Touch, hold the item you want to the Remove button. 3 Lift your finger when the icon turns red. Getting Started 49 Customizing your Home screens Removing an item from the...

User Guide
Page 57
..., visit the Google Help Center. The recovery process deletes all data, restoring the tablet to confirm the deletion. The Downloaded menu appears. 4 Touch an item to open , or delete downloaded items. Factory data reset This restores the device to view, open it. Getting Started 57 Managing downloads Latitude: Locate points-of businesses and neighborhoods. Some areas support street-level views of -interest directly on the top right of box state. Use the Downloads app to the out of the screen.
..., visit the Google Help Center. The recovery process deletes all data, restoring the tablet to confirm the deletion. The Downloaded menu appears. 4 Touch an item to open , or delete downloaded items. Factory data reset This restores the device to view, open it. Getting Started 57 Managing downloads Latitude: Locate points-of businesses and neighborhoods. Some areas support street-level views of -interest directly on the top right of box state. Use the Downloads app to the out of the screen.

User Guide
Page 62
... Location Services Security Language & input Backup & reset Date & time Accessibility About tablet Touch to adjust the multimedia playback settings, see "Apps settings" on page 71. Add, remove, and manage all of your preferences for the way in which dates are displayed, see "Date & time settings" on page 75. Configure your accounts, and sync accounts to Google™ servers, using your operating system software and hardware, see "Battery Notice" on page 76. Monitor the used and available space on your tablet's internal storage and other storage media installed...
... Location Services Security Language & input Backup & reset Date & time Accessibility About tablet Touch to adjust the multimedia playback settings, see "Apps settings" on page 71. Add, remove, and manage all of your preferences for the way in which dates are displayed, see "Date & time settings" on page 75. Configure your accounts, and sync accounts to Google™ servers, using your operating system software and hardware, see "Battery Notice" on page 76. Monitor the used and available space on your tablet's internal storage and other storage media installed...

User Guide
Page 72
... Gmail-Touch to also control the ways in the Accounts & sync menu. For more information, see "Backing up your Google™ Accounts and other applications may have their own schedules, or how applications synchronize user data automatically. To change the Accounts & sync settings: 1 Touch the Settings ( ) icon. Backup & reset settings You can add, remove, and manage your settings and data to Google™ servers, using the Accounts & sync settings. The Settings menu appears. 2 Touch the Accounts & sync...
... Gmail-Touch to also control the ways in the Accounts & sync menu. For more information, see "Backing up your Google™ Accounts and other applications may have their own schedules, or how applications synchronize user data automatically. To change the Accounts & sync settings: 1 Touch the Settings ( ) icon. Backup & reset settings You can add, remove, and manage your settings and data to Google™ servers, using the Accounts & sync settings. The Settings menu appears. 2 Touch the Accounts & sync...

User Guide
Page 73
... may also take advantage of this option to restore the associated settings and data when reinstalling an application. ❖ Factory data reset-Restores your device to change the Storage settings: 1 Touch the Settings ( ) icon. Sign in the Backup & reset menu. Storage settings The Storage settings can choose from Google servers. ❖ Backup account-Displays the Google Account used to monitor the used to back up your Google Account. The recovery process deletes all data, restoring the tablet to its out-of the categories you...
... may also take advantage of this option to restore the associated settings and data when reinstalling an application. ❖ Factory data reset-Restores your device to change the Storage settings: 1 Touch the Settings ( ) icon. Sign in the Backup & reset menu. Storage settings The Storage settings can choose from Google servers. ❖ Backup account-Displays the Google Account used to monitor the used to back up your Google Account. The recovery process deletes all data, restoring the tablet to its out-of the categories you...
User Guide
Page 76
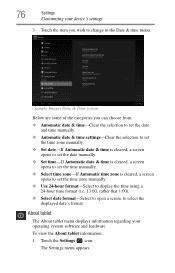
...About tablet menu displays information regarding your device's settings 3 Touch the item you wish to change in the Date & time menu. (Sample Image) Date & Time screen Below are some of the categories you can choose from: ❖ Automatic date & time-Clear the selection to set the date and time manually. ❖ Automatic date & time settings-Clear the selection to set the time zone manually. ❖ Set date-If Automatic date & time is cleared, a screen opens to set the date manually. ❖ Set time-If Automatic date & time is cleared, a screen opens to set the time manually. ❖...
...About tablet menu displays information regarding your device's settings 3 Touch the item you wish to change in the Date & time menu. (Sample Image) Date & Time screen Below are some of the categories you can choose from: ❖ Automatic date & time-Clear the selection to set the date and time manually. ❖ Automatic date & time settings-Clear the selection to set the time zone manually. ❖ Set date-If Automatic date & time is cleared, a screen opens to set the date manually. ❖ Set time-If Automatic date & time is cleared, a screen opens to set the time manually. ❖...
User Guide
Page 78
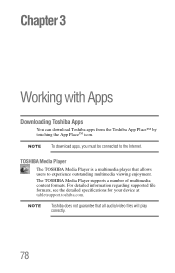
Chapter 3 Working with Apps Downloading Toshiba Apps You can download Toshiba apps from the Toshiba App Place™ by touching the App PlaceTM icon. The TOSHIBA Media Player supports a number of multimedia content formats. NOTE To download apps, you must be connected to experience outstanding multimedia viewing enjoyment. For detailed information regarding supported file formats, see the detailed specifications for your device at tabletsupport.toshiba.com. NOTE Toshiba does not guarantee that allows users to the Internet. TOSHIBA Media Player The TOSHIBA Media Player is a ...
Chapter 3 Working with Apps Downloading Toshiba Apps You can download Toshiba apps from the Toshiba App Place™ by touching the App PlaceTM icon. The TOSHIBA Media Player supports a number of multimedia content formats. NOTE To download apps, you must be connected to experience outstanding multimedia viewing enjoyment. For detailed information regarding supported file formats, see the detailed specifications for your device at tabletsupport.toshiba.com. NOTE Toshiba does not guarantee that allows users to the Internet. TOSHIBA Media Player The TOSHIBA Media Player is a ...
User Guide
Page 93
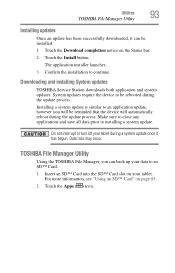
... an SD™ Card into the SD™ Card slot on page 85. 2 Touch the Apps ( ) icon. Installing a system update is similar to an application update, however you can be reminded that the device will automatically reboot during the update process. Data loss may occur. TOSHIBA File Manager Utility Using the TOSHIBA File Manager, you will be installed. 1 Touch the Download completion notice on the Status bar. 2 Touch the Install button. Make sure to close...
... an SD™ Card into the SD™ Card slot on page 85. 2 Touch the Apps ( ) icon. Installing a system update is similar to an application update, however you can be reminded that the device will automatically reboot during the update process. Data loss may occur. TOSHIBA File Manager Utility Using the TOSHIBA File Manager, you will be installed. 1 Touch the Download completion notice on the Status bar. 2 Touch the Install button. Make sure to close...
User Guide
Page 99
... does not resolve the issue, use the About tablet setting to locate the site. They include: network speed, network conditions, time of day (when everyone else is constantly changing. For example: ❖ The operating system responds differently from the normal routine ❖ Screens and apps take a long time to load ❖ The screen does not look right Unless a hardware device has failed, problems usually occur when you...
... does not resolve the issue, use the About tablet setting to locate the site. They include: network speed, network conditions, time of day (when everyone else is constantly changing. For example: ❖ The operating system responds differently from the normal routine ❖ Screens and apps take a long time to load ❖ The screen does not look right Unless a hardware device has failed, problems usually occur when you...

User Guide
Page 110
... can be external (outside the tablet's case) or internal (inside the tablet's case). 110 Glossary cursor-An on-screen symbol (usually a flashing vertical line) that indicates the position where characters will appear when you reach the target position. Application programs and batch files are port expander, port replicator, docking station, or network adapter. Names of executable files. D default-The setting selected by which a device or program...
... can be external (outside the tablet's case) or internal (inside the tablet's case). 110 Glossary cursor-An on-screen symbol (usually a flashing vertical line) that indicates the position where characters will appear when you reach the target position. Application programs and batch files are port expander, port replicator, docking station, or network adapter. Names of executable files. D default-The setting selected by which a device or program...

User Guide
Page 111
.... external device-See device. file name-A set of file. The extension indicates the type of characters that can contain files and other external media and are used to transmit high quality audio and video signal via a single cable in digital format, providing better picture quality than analog signal. It has a potential of zero (0) volts, is connected to add or remove devices from the tablet while it is usually fixed...
.... external device-See device. file name-A set of file. The extension indicates the type of characters that can contain files and other external media and are used to transmit high quality audio and video signal via a single cable in digital format, providing better picture quality than analog signal. It has a potential of zero (0) volts, is connected to add or remove devices from the tablet while it is usually fixed...

User Guide
Page 117
... wireless & networks 65 button power 30 buttons power button 24 screen rotation lock/unlock switch 24 volume control 24 C camera back camera 23 front camera 23 cameras using 85 caring for your device 58 charging the battery 27 cleaning the device 58 connecting HDMI®-compatible TV or display device 88 power source 26 power/docking connector cord 27 USB/AC adaptor 25 USB/AC adaptor cord to power/ docking connector 26 Creating Folders 49 customize device settings 59 D data backing up 21, 38 restoring 39 date & time settings 75 date & time settings automatic date & time 76 Select date...
... wireless & networks 65 button power 30 buttons power button 24 screen rotation lock/unlock switch 24 volume control 24 C camera back camera 23 front camera 23 cameras using 85 caring for your device 58 charging the battery 27 cleaning the device 58 connecting HDMI®-compatible TV or display device 88 power source 26 power/docking connector cord 27 USB/AC adaptor 25 USB/AC adaptor cord to power/ docking connector 26 Creating Folders 49 customize device settings 59 D data backing up 21, 38 restoring 39 date & time settings 75 date & time settings automatic date & time 76 Select date...
User Guide
Page 120
... date & time settings 76 service options standard limited warranty 20 set date date & time settings 76 set time date & time settings 76 setting up USB/AC adaptor 25 Settings using Quick Settings 63 settings about tablet 76 accounts & sync 72 applications 71 customize device settings 59 date & time 75 device administrators 70 icon 59 language & input 74 location & security 68 menu 59 multimedia 68 open 59 privacy settings 72 Quick Settings menu 63 screen 67 sound 66 storage 73 wireless & networks 64 settings menu settings 59 setup Bluetooth® 37 date and time 32 language 31 Make it Google...
... date & time settings 76 service options standard limited warranty 20 set date date & time settings 76 set time date & time settings 76 setting up USB/AC adaptor 25 Settings using Quick Settings 63 settings about tablet 76 accounts & sync 72 applications 71 customize device settings 59 date & time 75 device administrators 70 icon 59 language & input 74 location & security 68 menu 59 multimedia 68 open 59 privacy settings 72 Quick Settings menu 63 screen 67 sound 66 storage 73 wireless & networks 64 settings menu settings 59 setup Bluetooth® 37 date and time 32 language 31 Make it Google...


