
Toshiba Online User's Guide for Tecra A9
Page 28
... display devices 69 Directing the display output when you turn on the computer 70 Adjusting the quality of the external display......71 Using an external keyboard 71 Using a mouse 72 Connecting a printer 72 Setting up a printer 73 Connecting an optional external diskette drive........73 Turning off the computer 74 Options for...
... display devices 69 Directing the display output when you turn on the computer 70 Adjusting the quality of the external display......71 Using an external keyboard 71 Using a mouse 72 Connecting a printer 72 Setting up a printer 73 Connecting an optional external diskette drive........73 Turning off the computer 74 Options for...
Toshiba Online User's Guide for Tecra A9
Page 29
... computer 84 Moving the computer 84 Using a computer lock 85 Chapter 2: Learning the Basics 86 Computing tips 86 Using the keyboard 88 Character keys 88 Making your keyboard emulate a full-size keyboard 88 Ctrl, Fn, and Alt keys 89 Function keys 89 Special Windows® keys 89 Overlay keys 90 Using the overlay...
... computer 84 Moving the computer 84 Using a computer lock 85 Chapter 2: Learning the Basics 86 Computing tips 86 Using the keyboard 88 Character keys 88 Making your keyboard emulate a full-size keyboard 88 Ctrl, Fn, and Alt keys 89 Function keys 89 Special Windows® keys 89 Overlay keys 90 Using the overlay...

Toshiba Online User's Guide for Tecra A9
Page 33
...conflict 180 A plan of action 180 Fixing a problem with Device Manager ...........181 Memory problems 182 Power and the batteries 183 Keyboard problems 184 Display problems 185 Disk drive problems 187 Optical drive problems 188 Sound system problems 189 PC Card problems 190 ExpressCard...Windows® operating system 200 If you need further assistance 204 Before you contact Toshiba 204 Contacting Toshiba 205 Other Toshiba Internet Web sites 205 Toshiba's worldwide offices 206 Appendix A: Hot Keys/TOSHIBA Cards 208 Hot Key Cards 208 Using the Hot Key Cards 209 Application Cards...
...conflict 180 A plan of action 180 Fixing a problem with Device Manager ...........181 Memory problems 182 Power and the batteries 183 Keyboard problems 184 Display problems 185 Disk drive problems 187 Optical drive problems 188 Sound system problems 189 PC Card problems 190 ExpressCard...Windows® operating system 200 If you need further assistance 204 Before you contact Toshiba 204 Contacting Toshiba 205 Other Toshiba Internet Web sites 205 Toshiba's worldwide offices 206 Appendix A: Hot Keys/TOSHIBA Cards 208 Hot Key Cards 208 Using the Hot Key Cards 209 Application Cards...

Toshiba Online User's Guide for Tecra A9
Page 34
34 Contents Hibernation mode 217 Display modes 218 Display brightness 219 Disabling or enabling wireless devices............220 Disabling or enabling the TouchPad™ or Dual Mode Pad 221 Changing screen resolution 222 Keyboard hot key functions 223 Appendix B: Power Cord/Cable Connectors 224 Glossary 225 Index 239
34 Contents Hibernation mode 217 Display modes 218 Display brightness 219 Disabling or enabling wireless devices............220 Disabling or enabling the TouchPad™ or Dual Mode Pad 221 Changing screen resolution 222 Keyboard hot key functions 223 Appendix B: Power Cord/Cable Connectors 224 Glossary 225 Index 239

Toshiba Online User's Guide for Tecra A9
Page 42
... Wizard. 2 Confirm acceptance of windows displayed, and the order in which windows appear, may restart your software. 1 From the Welcome screen click Next to , a mouse, keyboard, printer, memory, and PC Cards. To use it. Setting up your computer.
... Wizard. 2 Confirm acceptance of windows displayed, and the order in which windows appear, may restart your software. 1 From the Welcome screen click Next to , a mouse, keyboard, printer, memory, and PC Cards. To use it. Setting up your computer.
Toshiba Online User's Guide for Tecra A9
Page 43
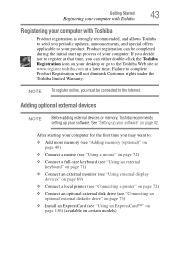
...is strongly recommended, and allows Toshiba to send you may want to: ❖ Add more memory (see "Adding memory (optional)" on page 49) ❖ Connect a mouse (see "Using a mouse" on page 72) ❖ Connect a full-size keyboard (see "Using an external keyboard" on page 71) ❖... the initial start up your software" on certain models) Adding optional external devices NOTE Before adding external devices or memory, Toshiba recommends setting up your product. After starting your computer for the first time you periodic updates, announcements, and special offers applicable...
...is strongly recommended, and allows Toshiba to send you may want to: ❖ Add more memory (see "Adding memory (optional)" on page 49) ❖ Connect a mouse (see "Using a mouse" on page 72) ❖ Connect a full-size keyboard (see "Using an external keyboard" on page 71) ❖... the initial start up your software" on certain models) Adding optional external devices NOTE Before adding external devices or memory, Toshiba recommends setting up your product. After starting your computer for the first time you periodic updates, announcements, and special offers applicable...

Toshiba Online User's Guide for Tecra A9
Page 47
... that may not be careful to remove any pens or other hand to hold the computer in place and use the other objects from the keyboard area before closing the display panel. This is manufactured using it. Do not press or push on the display panel and be able to turn...
... that may not be careful to remove any pens or other hand to hold the computer in place and use the other objects from the keyboard area before closing the display panel. This is manufactured using it. Do not press or push on the display panel and be able to turn...
Toshiba Online User's Guide for Tecra A9
Page 60
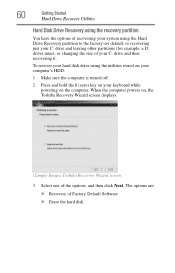
... stored on your computer's HDD: 1 Make sure the computer is turned off. 2 Press and hold the 0 (zero) key on your keyboard while powering on , the Toshiba Recovery Wizard screen displays. (Sample Image) Toshiba Recovery Wizard screen 3 Select one of your C: drive and leaving other partitions (for example, a D: drive) intact, or changing the size...
... stored on your computer's HDD: 1 Make sure the computer is turned off. 2 Press and hold the 0 (zero) key on your keyboard while powering on , the Toshiba Recovery Wizard screen displays. (Sample Image) Toshiba Recovery Wizard screen 3 Select one of your C: drive and leaving other partitions (for example, a D: drive) intact, or changing the size...
Toshiba Online User's Guide for Tecra A9
Page 61
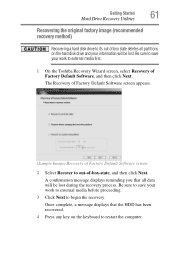
... work to external media before proceeding. 3 Click Next to external media first. 1 On the Toshiba Recovery Wizard screen, select Recovery of Factory Default Software, and then click Next. Once complete, a message displays that all partitions on the keyboard to out-of Factory Default Software screen 2 Select Recover to restart the computer. The...
... work to external media before proceeding. 3 Click Next to external media first. 1 On the Toshiba Recovery Wizard screen, select Recovery of Factory Default Software, and then click Next. Once complete, a message displays that all partitions on the keyboard to out-of Factory Default Software screen 2 Select Recover to restart the computer. The...
Toshiba Online User's Guide for Tecra A9
Page 62
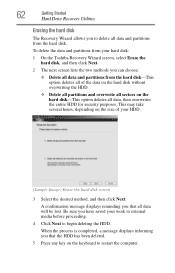
... key on the hard disk-This option deletes all data will be lost. To delete the data and partitions from your hard disk: 1 On the Toshiba Recovery Wizard screen, select Erase the hard disk, and then click Next. 2 The next screen lists the two methods you can choose: ❖ Delete all..., depending on the size of the data on the hard disk without overwriting the HDD. ❖ Delete all partitions and overwrite all sectors on the keyboard to begin deleting the HDD. 62 Getting Started Hard Drive Recovery Utilities Erasing the hard disk The Recovery Wizard allows you to delete all data...
... key on the hard disk-This option deletes all data will be lost. To delete the data and partitions from your hard disk: 1 On the Toshiba Recovery Wizard screen, select Erase the hard disk, and then click Next. 2 The next screen lists the two methods you can choose: ❖ Delete all..., depending on the size of the data on the hard disk without overwriting the HDD. ❖ Delete all partitions and overwrite all sectors on the keyboard to begin deleting the HDD. 62 Getting Started Hard Drive Recovery Utilities Erasing the hard disk The Recovery Wizard allows you to delete all data...
Toshiba Online User's Guide for Tecra A9
Page 63
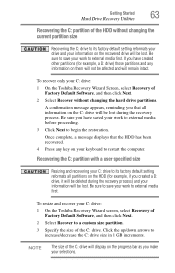
... changing the current partition size Recovering the C: drive to a custom size partition. 3 Specify the size of the C: drive. To recover only your C: drive: 1 On the Toshiba Recovery Wizard screen, select Recovery of Factory Default Software, and then click Next. 2 Select Recover to its factory default setting reformats all information on the... lost during the recovery process) and your information will be lost. Be sure you that the HDD has been recovered. 4 Press any information on your keyboard to external media first. Be sure to save your work to restart the computer.
... changing the current partition size Recovering the C: drive to a custom size partition. 3 Specify the size of the C: drive. To recover only your C: drive: 1 On the Toshiba Recovery Wizard screen, select Recovery of Factory Default Software, and then click Next. 2 Select Recover to its factory default setting reformats all information on the... lost during the recovery process) and your information will be lost. Be sure you that the HDD has been recovered. 4 Press any information on your keyboard to external media first. Be sure to save your work to restart the computer.
Toshiba Online User's Guide for Tecra A9
Page 64
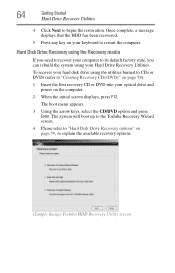
... CDs or DVDs (refer to restart the computer. Once complete, a message displays that the HDD has been recovered. 5 Press any key on your keyboard to "Creating Recovery CDs/DVDs" on page 58): 1 Insert the first recovery CD or DVD into your optical drive and power on page 59,...using your hard disk drive using the Recovery media If you need to recover your computer to explain the available recovery options. (Sample Image) Toshiba HDD Recovery Utility screen To recover your Hard Drive Recovery Utilities. 64 Getting Started Hard Drive Recovery Utilities 4 Click Next to begin the restoration...
... CDs or DVDs (refer to restart the computer. Once complete, a message displays that the HDD has been recovered. 5 Press any key on your keyboard to "Creating Recovery CDs/DVDs" on page 58): 1 Insert the first recovery CD or DVD into your optical drive and power on page 59,...using your hard disk drive using the Recovery media If you need to recover your computer to explain the available recovery options. (Sample Image) Toshiba HDD Recovery Utility screen To recover your Hard Drive Recovery Utilities. 64 Getting Started Hard Drive Recovery Utilities 4 Click Next to begin the restoration...

Toshiba Online User's Guide for Tecra A9
Page 65
.... ❖ To move the cursor with your finger from right to complete the installation process. To reinstall drivers and applications: 1 Double-click the TOSHIBA Application Installer icon on the Windows® desktop. 2 Click Next. 3 Click the item(s) you want to install. 4 Click Install. 5 Follow... bundled with the stroke of a finger. Using the TouchPad™ The TouchPad™, the small, smooth, square cutout located in front of the keyboard, is sensitive to touch and enables you to display its status as follows: 1 Click Start. 2 Right-click Computer. 3 Select Manage. 4 Click...
.... ❖ To move the cursor with your finger from right to complete the installation process. To reinstall drivers and applications: 1 Double-click the TOSHIBA Application Installer icon on the Windows® desktop. 2 Click Next. 3 Click the item(s) you want to install. 4 Click Install. 5 Follow... bundled with the stroke of a finger. Using the TouchPad™ The TouchPad™, the small, smooth, square cutout located in front of the keyboard, is sensitive to touch and enables you to display its status as follows: 1 Click Start. 2 Right-click Computer. 3 Select Manage. 4 Click...
Toshiba Online User's Guide for Tecra A9
Page 71
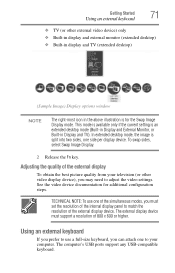
...best picture quality from your computer. See the video device documentation for the Swap Image Display mode. The computer's USB ports support any USB-compatible keyboard. This mode is available only if the current setting is an extended desktop mode (Built-in Display and External Monitor, or Built-in the ... and TV (extended desktop) (Sample Image) Display options window NOTE The right-most icon in Display and TV). TECHNICAL NOTE: To use a full-size keyboard, you can attach one to adjust the video settings. To swap sides, select Swap Image Display. 2 Release the Fn key.
...best picture quality from your computer. See the video device documentation for the Swap Image Display mode. The computer's USB ports support any USB-compatible keyboard. This mode is available only if the current setting is an extended desktop mode (Built-in Display and External Monitor, or Built-in the ... and TV (extended desktop) (Sample Image) Display options window NOTE The right-most icon in Display and TV). TECHNICAL NOTE: To use a full-size keyboard, you can attach one to adjust the video settings. To swap sides, select Swap Image Display. 2 Release the Fn key.

Toshiba Online User's Guide for Tecra A9
Page 84
... the computer Before moving your operating system documentation or Help and Support for details. Refer to the screen(s) you can choose. See "Toshiba Utilities" on /off the computer, close the display panel to suit your power usage settings. Caring for your computer This section gives ...The computer returns to your computer. You may also wish to clean the computer. For more information, see "Taking care of the computer's keyboard, speaker, and other openings. Never spray cleaner directly onto the computer and/or display. To keep dust and dirt out of the computer...
... the computer Before moving your operating system documentation or Help and Support for details. Refer to the screen(s) you can choose. See "Toshiba Utilities" on /off the computer, close the display panel to suit your power usage settings. Caring for your computer This section gives ...The computer returns to your computer. You may also wish to clean the computer. For more information, see "Taking care of the computer's keyboard, speaker, and other openings. Never spray cleaner directly onto the computer and/or display. To keep dust and dirt out of the computer...

Toshiba Online User's Guide for Tecra A9
Page 88
... the Fn key, you to simulate the Enter key on the full-sized keyboard. Press Fn and Enter simultaneously to emulate a full-size keyboard. Making your keyboard emulate a full-size keyboard Although your computer's keyboard layout is very much like typing on a typewriter, except that: ❖...; Pressing the Fn key simultaneously in combination with a standard full-size keyboard, it has fewer keys. and a numeric keypad. 88 Learning the Basics Using the keyboard Using the keyboard Your computer's keyboard contains character keys, control keys, function keys, and special Windows®...
... the Fn key, you to simulate the Enter key on the full-sized keyboard. Press Fn and Enter simultaneously to emulate a full-size keyboard. Making your keyboard emulate a full-size keyboard Although your computer's keyboard layout is very much like typing on a typewriter, except that: ❖...; Pressing the Fn key simultaneously in combination with a standard full-size keyboard, it has fewer keys. and a numeric keypad. 88 Learning the Basics Using the keyboard Using the keyboard Your computer's keyboard contains character keys, control keys, function keys, and special Windows®...
Toshiba Online User's Guide for Tecra A9
Page 89
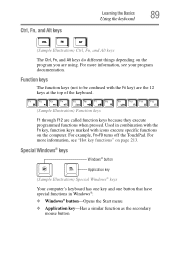
...Fn+F9 turns off the TouchPad. Special Windows® keys Windows® button Application key (Sample Illustration) Special Windows® keys Your computer's keyboard has one key and one button that have special functions in combination with the Fn key, function keys marked with the Fn key) are the... program you are called function keys because they execute programmed functions when pressed. Ctrl, Fn, and Alt keys Learning the Basics 89 Using the keyboard (Sample Illustration) Ctrl, Fn, and Alt keys The Ctrl, Fn, and Alt keys do different things depending on page 213. For more ...
...Fn+F9 turns off the TouchPad. Special Windows® keys Windows® button Application key (Sample Illustration) Special Windows® keys Your computer's keyboard has one key and one button that have special functions in combination with the Fn key, function keys marked with the Fn key) are the... program you are called function keys because they execute programmed functions when pressed. Ctrl, Fn, and Alt keys Learning the Basics 89 Using the keyboard (Sample Illustration) Ctrl, Fn, and Alt keys The Ctrl, Fn, and Alt keys do different things depending on page 213. For more ...

Toshiba Online User's Guide for Tecra A9
Page 90
... panel goes out. To disable the numeric overlay, hold down the Fn key and press F11 again. The cursor control mode light on the keyboard indicator panel glows when the cursor control overlay is on , press Fn and F11 simultaneously. The numeric mode light on . To disable the cursor ...numeric overlay keys. This overlay lets you enter numeric data or control the cursor as you would using the 10-key keypad on a desktop computer's keyboard. (Sample Illustration) Numeric and cursor control overlay Using the overlay to type numeric data The keys with the gray arrows and symbols on , press Fn...
... panel goes out. To disable the numeric overlay, hold down the Fn key and press F11 again. The cursor control mode light on the keyboard indicator panel glows when the cursor control overlay is on , press Fn and F11 simultaneously. The numeric mode light on . To disable the cursor ...numeric overlay keys. This overlay lets you enter numeric data or control the cursor as you would using the 10-key keypad on a desktop computer's keyboard. (Sample Illustration) Numeric and cursor control overlay Using the overlay to type numeric data The keys with the gray arrows and symbols on , press Fn...
Toshiba Online User's Guide for Tecra A9
Page 94
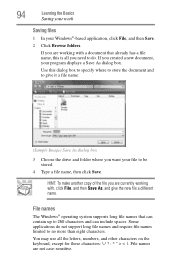
... that can contain up to be stored. 4 Type a file name, then click Save. Use this is all the letters, numbers, and other characters on the keyboard, except for these characters File names are currently working with , click File, and then Save As, and give it a file name. (Sample Image) Save As...
... that can contain up to be stored. 4 Type a file name, then click Save. Use this is all the letters, numbers, and other characters on the keyboard, except for these characters File names are currently working with , click File, and then Save As, and give it a file name. (Sample Image) Save As...
Toshiba Online User's Guide for Tecra A9
Page 155
Toshiba Utilities Toshiba Hardware Setup 155 ❖ CPU-Allows you to enable or disable CPU frequency switching modes (...a quick-booting system, you must press the arrow keys immediately after pressing the power button. ❖ Keyboard-Allows you to configure an external keyboard to emulate the Fn function key and access the wake-on battery power, the CPU frequency mode is running... on keyboard function ❖ USB-Allows you to low for the operating system You can reconfigure that appear in...
Toshiba Utilities Toshiba Hardware Setup 155 ❖ CPU-Allows you to enable or disable CPU frequency switching modes (...a quick-booting system, you must press the arrow keys immediately after pressing the power button. ❖ Keyboard-Allows you to configure an external keyboard to emulate the Fn function key and access the wake-on battery power, the CPU frequency mode is running... on keyboard function ❖ USB-Allows you to low for the operating system You can reconfigure that appear in...

