A25 S307 Memory - Toshiba Satellite Pentium 4 2 8 GHz
A25 S307 Memory
Related Manual Pages


Similar Questions

What Kind Of Memory Does It Take? Where Can I Get It And How Much Can I Put In
looking to find the right memory and was wondering the Max I can install
looking to find the right memory and was wondering the Max I can install
(Posted by terrydunn1313 7 years ago)

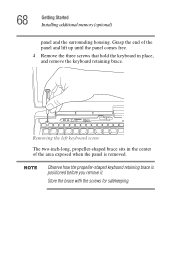
How To Open The Case Of A Qosmio X875 To Install Additional Memory
Step by step diagrams of how to open the case to a Qosimo X875 and install memory.
Step by step diagrams of how to open the case to a Qosimo X875 and install memory.
(Posted by Anonymous-112999 11 years ago)

How Much Memory Can This Model Hold And Can I Use The Second Memory Card Slot
i installed a 2G memory card and the computer does not reconize the upgrade. how much memory can thi...
i installed a 2G memory card and the computer does not reconize the upgrade. how much memory can thi...
(Posted by zakeeh 11 years ago)