User Guide
Page 17
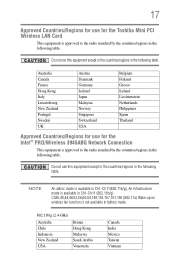
... Infrastructure mode is available in Ch1-Ch11 (802.11b/g) Ch36,40,44,48,52,56,60,64,149,153,157,161,165 (802.11a) Wake-up on wireless lan function is approved to ...by the countries/regions in the following table. 17 Approved Countries/Regions for use for the Toshiba Mini PCI Wireless LAN Card This equipment is approved to the radio standard by the countries/regions...following table. Do not use for use this equipment except in the countries/regions in battery mode. 802.11b/g (2.4 GHz) Australia Chile Indonesia New Zealand USA Brunei Hong Kong Malaysia Saudi Arabia Venezuela Canada ...
... Infrastructure mode is available in Ch1-Ch11 (802.11b/g) Ch36,40,44,48,52,56,60,64,149,153,157,161,165 (802.11a) Wake-up on wireless lan function is approved to ...by the countries/regions in the following table. 17 Approved Countries/Regions for use for the Toshiba Mini PCI Wireless LAN Card This equipment is approved to the radio standard by the countries/regions...following table. Do not use for use this equipment except in the countries/regions in battery mode. 802.11b/g (2.4 GHz) Australia Chile Indonesia New Zealand USA Brunei Hong Kong Malaysia Saudi Arabia Venezuela Canada ...
User Guide
Page 27
Contents Introduction 35 This guide 36 Safety icons 37 Other icons used 37 Other documentation 38 Service options 38 Chapter 1: Getting Started 39 Selecting a place to work 39 Creating a computer-friendly environment........39 Keeping yourself comfortable 40 Precautions 40 Important information on your computer's cooling fan 41 Setting up your computer 42 Setting up your software 42 Registering your computer with Toshiba 43 Adding optional external devices 43 Connecting to a power source 44 Charging the main battery 46 27
Contents Introduction 35 This guide 36 Safety icons 37 Other icons used 37 Other documentation 38 Service options 38 Chapter 1: Getting Started 39 Selecting a place to work 39 Creating a computer-friendly environment........39 Keeping yourself comfortable 40 Precautions 40 Important information on your computer's cooling fan 41 Setting up your computer 42 Setting up your software 42 Registering your computer with Toshiba 43 Adding optional external devices 43 Connecting to a power source 44 Charging the main battery 46 27
User Guide
Page 30
... Computing 104 Toshiba's energy-saver design 104 Running the computer on battery power 104 Battery Notice 105 Power management 106 Using additional batteries 106 Charging batteries 106 Charging the main battery 107 Charging the RTC battery 107 Monitoring main battery power 108 Determining remaining battery power 110 What to do when the main battery runs low ...110 Setting battery notifications 111...
... Computing 104 Toshiba's energy-saver design 104 Running the computer on battery power 104 Battery Notice 105 Power management 106 Using additional batteries 106 Charging batteries 106 Charging the main battery 107 Charging the RTC battery 107 Monitoring main battery power 108 Determining remaining battery power 110 What to do when the main battery runs low ...110 Setting battery notifications 111...
User Guide
Page 32
... Support 156 CD/DVD Drive Acoustic Silencer 157 TOSHIBA Accessibility 158 Fingerprint Authentication Utility 159 Fingerprint utility limitations 159 Fingerprint Enrollment 159 Fingerprint Logon 161 Power-on Security 161 Control Center 161 Password Bank ... system can help you 179 Resolving a hardware conflict 179 A plan of action 179 Fixing a problem with Device Manager ...........180 Memory problems 181 Power and the batteries 182 Keyboard problems 183 Display problems 184 Disk drive problems 186 Optical drive problems 187 Sound system problems 188 PC Card problems 189
... Support 156 CD/DVD Drive Acoustic Silencer 157 TOSHIBA Accessibility 158 Fingerprint Authentication Utility 159 Fingerprint utility limitations 159 Fingerprint Enrollment 159 Fingerprint Logon 161 Power-on Security 161 Control Center 161 Password Bank ... system can help you 179 Resolving a hardware conflict 179 A plan of action 179 Fixing a problem with Device Manager ...........180 Memory problems 181 Power and the batteries 182 Keyboard problems 183 Display problems 184 Disk drive problems 186 Optical drive problems 187 Sound system problems 188 PC Card problems 189
User Guide
Page 40
You should accidentally occur, immediately: 1. Remove the battery pack. It could result in damage or serious injury. Never place a heavy object on the power again until you have taken the computer to liquid ... prevent heat injury to work environment and tips for working comfortably throughout the day. 40 Getting Started Selecting a place to skin. Keeping yourself comfortable The Toshiba Instruction Manual for Safety and Comfort, that shipped with the underside or surface of these instructions could damage the computer or cause system failure. Computer...
You should accidentally occur, immediately: 1. Remove the battery pack. It could result in damage or serious injury. Never place a heavy object on the power again until you have taken the computer to liquid ... prevent heat injury to work environment and tips for working comfortably throughout the day. 40 Getting Started Selecting a place to skin. Keeping yourself comfortable The Toshiba Instruction Manual for Safety and Comfort, that shipped with the underside or surface of these instructions could damage the computer or cause system failure. Computer...
User Guide
Page 42
...of windows displayed, and the order in which windows appear, may restart your software When you must complete all setup steps up to charge the battery you turn off the power again until the operating system has loaded completely. The Windows® operating system checks the system's performance, and ... Getting Started Setting up your computer Setting up your computer TECHNICAL NOTE: You must attach the AC adaptor. Your computer contains a rechargeable main battery that needs to , a mouse, keyboard, printer, memory, and PC Cards. To use it. Setting up your computer.
...of windows displayed, and the order in which windows appear, may restart your software When you must complete all setup steps up to charge the battery you turn off the power again until the operating system has loaded completely. The Windows® operating system checks the system's performance, and ... Getting Started Setting up your computer Setting up your computer TECHNICAL NOTE: You must attach the AC adaptor. Your computer contains a rechargeable main battery that needs to , a mouse, keyboard, printer, memory, and PC Cards. To use it. Setting up your computer.
User Guide
Page 44
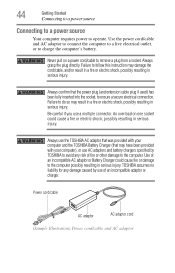
... that may have been provided with your computer), or use AC adaptors and battery chargers specified by use a multiple connector. Always use the TOSHIBA AC adaptor that was provided with your computer and the TOSHIBA Battery Charger (that the power plug (and extension cable plug if used) has... Use of an incompatible AC adaptor or Battery Charger could cause a fire or electric shock, possibly resulting in serious injury. Failure to the computer possibly resulting in serious injury. TOSHIBA assumes no liability for any damage caused by TOSHIBA to avoid any risk of an incompatible ...
... that may have been provided with your computer), or use AC adaptors and battery chargers specified by use a multiple connector. Always use the TOSHIBA AC adaptor that was provided with your computer and the TOSHIBA Battery Charger (that the power plug (and extension cable plug if used) has... Use of an incompatible AC adaptor or Battery Charger could cause a fire or electric shock, possibly resulting in serious injury. Failure to the computer possibly resulting in serious injury. TOSHIBA assumes no liability for any damage caused by TOSHIBA to avoid any risk of an incompatible ...
User Guide
Page 46
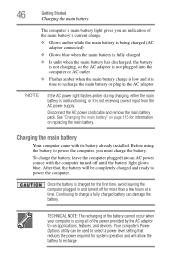
... charged for system operation and will be used to power the computer. TECHNICAL NOTE: The recharging of the battery cannot occur when your computer is using the battery to power the computer, you an indication of the power provided by the AC adaptor to run applications, features, and devices. See "... first time, avoid leaving the computer plugged in the AC adaptor NOTE If the AC power light flashes amber during charging, either the main battery is malfunctioning, or it is not receiving correct input from the AC power supply. Your computer's Power Options utility can damage the...
... charged for system operation and will be used to power the computer. TECHNICAL NOTE: The recharging of the battery cannot occur when your computer is using the battery to power the computer, you an indication of the power provided by the AC adaptor to run applications, features, and devices. See "... first time, avoid leaving the computer plugged in the AC adaptor NOTE If the AC power light flashes amber during charging, either the main battery is malfunctioning, or it is not receiving correct input from the AC power supply. Your computer's Power Options utility can damage the...
User Guide
Page 47
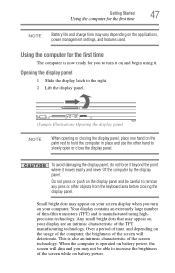
Your display contains an extremely large number of thin-film transistors (TFT) and is operated on battery power, the screen will deteriorate. When the computer is manufactured using it. Opening the display panel 1 Slide the display latch to remove any pens or ... and begin using highprecision technology. Any small bright dots that may appear on the usage of the computer, the brightness of the screen while on battery power. Do not press or push on the display panel and be able to increase the brightness of the screen will dim and you may...
Your display contains an extremely large number of thin-film transistors (TFT) and is operated on battery power, the screen will deteriorate. When the computer is manufactured using it. Opening the display panel 1 Slide the display latch to remove any pens or ... and begin using highprecision technology. Any small bright dots that may appear on the usage of the computer, the brightness of the screen while on battery power. Do not press or push on the display panel and be able to increase the brightness of the screen will dim and you may...
User Guide
Page 48
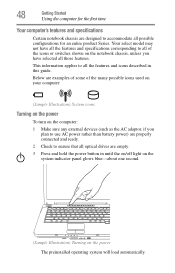
Below are examples of some of the icons or switches shown on the notebook chassis, unless you plan to use AC power rather than battery power) are properly connected and ready. 2 Check to all optical drives are empty. 3 Press and hold the power button in this guide. This information applies ...
Below are examples of some of the icons or switches shown on the notebook chassis, unless you plan to use AC power rather than battery power) are properly connected and ready. 2 Check to all optical drives are empty. 3 Press and hold the power button in this guide. This information applies ...
User Guide
Page 50
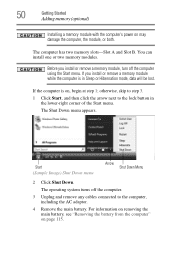
... a memory module with the computer's power on page 115. You can install one or two memory modules. For information on removing the main battery, see "Removing the battery from the computer" on may damage the computer, the module, or both. The Shut Down menu appears. If you install or remove a ... lost. otherwise, skip to step 3. 1 Click Start, and then click the arrow next to the computer, including the AC adaptor. 4 Remove the main battery. Before you install or remove a memory module while the computer is on, begin at step 1; Start (Sample Image) Shut Down menu Arrow Shut Down Menu...
... a memory module with the computer's power on page 115. You can install one or two memory modules. For information on removing the main battery, see "Removing the battery from the computer" on may damage the computer, the module, or both. The Shut Down menu appears. If you install or remove a ... lost. otherwise, skip to step 3. 1 Click Start, and then click the arrow next to the computer, including the AC adaptor. 4 Remove the main battery. Before you install or remove a memory module while the computer is on, begin at step 1; Start (Sample Image) Shut Down menu Arrow Shut Down Menu...
User Guide
Page 54
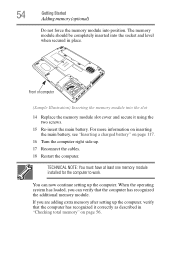
... module installed for the computer to work. You can verify that the computer has recognized it using the two screws. 15 Re-insert the main battery. Front of computer (Sample Illustration) Inserting the memory module into the slot 14 Replace the memory module slot cover and secure it correctly as described..." on page 117. 16 Turn the computer right side up. 17 Reconnect the cables. 18 Restart the computer. For more information on inserting the main battery, see "Inserting a charged battery" on page 56. The memory module should be completely inserted into position.
... module installed for the computer to work. You can verify that the computer has recognized it using the two screws. 15 Re-insert the main battery. Front of computer (Sample Illustration) Inserting the memory module into the slot 14 Replace the memory module slot cover and secure it correctly as described..." on page 117. 16 Turn the computer right side up. 17 Reconnect the cables. 18 Restart the computer. For more information on inserting the main battery, see "Inserting a charged battery" on page 56. The memory module should be completely inserted into position.
User Guide
Page 56
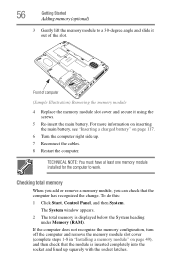
... module 4 Replace the memory module slot cover and secure it using the screws. 5 Re-insert the main battery. To do this: 1 Click Start, Control Panel, and then System. For more information on inserting the main battery, see "Inserting a charged battery" on page 49), and then check that the computer has recognized the change.
... module 4 Replace the memory module slot cover and secure it using the screws. 5 Re-insert the main battery. To do this: 1 Click Start, Control Panel, and then System. For more information on inserting the main battery, see "Inserting a charged battery" on page 49), and then check that the computer has recognized the change.
User Guide
Page 74
... the computer for the first time, leave the computer plugged into a power source (even though the computer is a good idea to fully charge the main battery. If you may lose data or damage the disk/disc and/or drive. If you turn off your computer when you must turn off your...
... the computer for the first time, leave the computer plugged into a power source (even though the computer is a good idea to fully charge the main battery. If you may lose data or damage the disk/disc and/or drive. If you turn off your computer when you must turn off your...
User Guide
Page 75
... working after turning off the computer using the Shut down command. ❖ Restarting from Hibernation takes a little more time and consumes more main battery power than restarting from Sleep. ❖ When starting up again, the computer returns to the state in which you left it, including all ...mode Hibernation mode shuts the computer down completely, but it first saves the current state of the system is stored to hard disk, no main battery power. ❖ Because the state of the computer to hard disk. Factors to consider when choosing Hibernation: ❖ While in Hibernation mode,...
... working after turning off the computer using the Shut down command. ❖ Restarting from Hibernation takes a little more time and consumes more main battery power than restarting from Sleep. ❖ When starting up again, the computer returns to the state in which you left it, including all ...mode Hibernation mode shuts the computer down completely, but it first saves the current state of the system is stored to hard disk, no main battery power. ❖ Because the state of the computer to hard disk. Factors to consider when choosing Hibernation: ❖ While in Hibernation mode,...
User Guide
Page 76
... sleeps for an extended period of the system is in Sleep mode. ❖ Restarting from where you were using. ❖ If the battery charge becomes critically low, the computer will try to enter Hibernation mode. 76 Getting Started Turning off the computer using the Hibernation or Shut ... open programs and files you left it, including all open documents and programs to save your unsaved information will lose data if the main battery discharges while the computer is stored in memory, you will be lost. If you power down using Sleep, see "Using and configuring Sleep...
... sleeps for an extended period of the system is in Sleep mode. ❖ Restarting from where you were using. ❖ If the battery charge becomes critically low, the computer will try to enter Hibernation mode. 76 Getting Started Turning off the computer using the Hibernation or Shut ... open programs and files you left it, including all open documents and programs to save your unsaved information will lose data if the main battery discharges while the computer is stored in memory, you will be lost. If you power down using Sleep, see "Using and configuring Sleep...
User Guide
Page 78
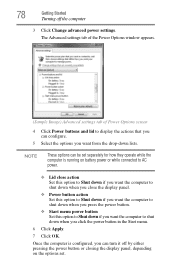
... the computer 3 Click Change advanced power settings. 78 Getting Started Turning off by either pressing the power button or closing the display panel, depending on battery power or while connected to AC power. ❖ Lid close action Set this option to Shut down if you want the computer to shut down...
... the computer 3 Click Change advanced power settings. 78 Getting Started Turning off by either pressing the power button or closing the display panel, depending on battery power or while connected to AC power. ❖ Lid close action Set this option to Shut down if you want the computer to shut down...
User Guide
Page 80
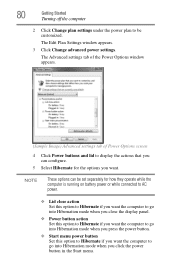
... display the actions that you can be customized. NOTE These options can configure. 5 Select Hibernate for how they operate while the computer is running on battery power or while connected to AC power. ❖ Lid close action Set this option to Hibernate if you want the computer to go into Hibernation...
... display the actions that you can be customized. NOTE These options can configure. 5 Select Hibernate for how they operate while the computer is running on battery power or while connected to AC power. ❖ Lid close action Set this option to Hibernate if you want the computer to go into Hibernation...
User Guide
Page 82
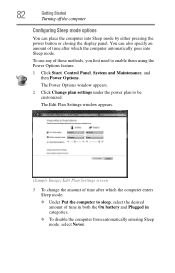
... to be customized. The Edit Plan Settings window appears. (Sample Image) Edit Plan Settings screen 3 To change the amount of time in both the On battery and Plugged in categories. ❖ To disable the computer from automatically entering Sleep mode, select Never. To use any of time after which the computer...
... to be customized. The Edit Plan Settings window appears. (Sample Image) Edit Plan Settings screen 3 To change the amount of time in both the On battery and Plugged in categories. ❖ To disable the computer from automatically entering Sleep mode, select Never. To use any of time after which the computer...
User Guide
Page 83
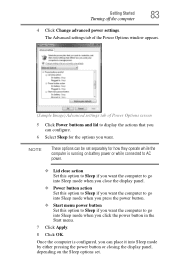
... want. Getting Started 83 Turning off the computer 4 Click Change advanced power settings. NOTE These options can be set . Once the computer is running on battery power or while connected to AC power. ❖ Lid close action Set this option to Sleep if you want the computer to go into Sleep...
... want. Getting Started 83 Turning off the computer 4 Click Change advanced power settings. NOTE These options can be set . Once the computer is running on battery power or while connected to AC power. ❖ Lid close action Set this option to Sleep if you want the computer to go into Sleep...


