
Owners Manual
Page 6
... favorite channel search feature 71 Adjusting the picture 72 Selecting the picture mode 72 Adjusting the picture quality 72 Resetting the picture settings 72 Using the ALS (ambient light sensor 73 Using the flesh tone feature 73 Using CableClear...™ DNR (digital noise reduction) . 74 Selecting the color temperature 74 Resetting the advanced picture settings 74 Using the closed caption mode 75 Advanced closed captions 75 Adjusting the audio 76 ... Warranty 94 Limited Canada Warranty 95 Index 96 6 Copyright © 2003 TOSHIBA CORPORATION.
... favorite channel search feature 71 Adjusting the picture 72 Selecting the picture mode 72 Adjusting the picture quality 72 Resetting the picture settings 72 Using the ALS (ambient light sensor 73 Using the flesh tone feature 73 Using CableClear...™ DNR (digital noise reduction) . 74 Selecting the color temperature 74 Resetting the advanced picture settings 74 Using the closed caption mode 75 Advanced closed captions 75 Adjusting the audio 76 ... Warranty 94 Limited Canada Warranty 95 Index 96 6 Copyright © 2003 TOSHIBA CORPORATION.

Owners Manual
Page 9
... as left/right menu navigation buttons. 6 CHANNEL yz - Press to close an on . 4 MENU - See page 10.) !™ RESET - Copyright © 2003 TOSHIBA CORPORATION. When illuminated, this button to reset the TV. 2 Connecting your TV TV front panel controls and connections 1 2 3 4 5 6 789 0 !¡ !™ ... - When no menu is open control panel door. !£ MENU VOLUME CHANNEL EXIT TV/VIDEO TouchFocus S-VIDEO VIDEO L/MONO R AUDIO RESET 1 Remote control sensor (behind the screen) - When no menu is on -screen, these buttons adjust the volume level. The ALS ...
... as left/right menu navigation buttons. 6 CHANNEL yz - Press to close an on . 4 MENU - See page 10.) !™ RESET - Copyright © 2003 TOSHIBA CORPORATION. When illuminated, this button to reset the TV. 2 Connecting your TV TV front panel controls and connections 1 2 3 4 5 6 789 0 !¡ !™ ... - When no menu is open control panel door. !£ MENU VOLUME CHANNEL EXIT TV/VIDEO TouchFocus S-VIDEO VIDEO L/MONO R AUDIO RESET 1 Remote control sensor (behind the screen) - When no menu is on -screen, these buttons adjust the volume level. The ALS ...
Owners Manual
Page 18
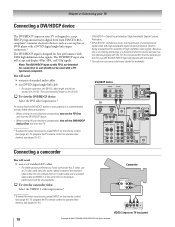
...view the DVI/HDCP device: Select the DVI video input source.* To ensure that the DVI/HDCP device is reset properly, it is possible that input 3 Consult your consumer electronics dealer for connection to use an S-video cable... such as a set of high-definition video signals. Camcorder VIDEO AUDIO OUT L R S-VIDEO VIDEO L/MONO R AUDIO RESET VIDEO 3 inputs on your TV is recommended that you want to and should confirm that the devices you follow these procedures...The DVI/HDCP1 input on TV front panel 18 Copyright © 2003 TOSHIBA CORPORATION. You should not be unacceptable.
...view the DVI/HDCP device: Select the DVI video input source.* To ensure that the DVI/HDCP device is reset properly, it is possible that input 3 Consult your consumer electronics dealer for connection to use an S-video cable... such as a set of high-definition video signals. Camcorder VIDEO AUDIO OUT L R S-VIDEO VIDEO L/MONO R AUDIO RESET VIDEO 3 inputs on your TV is recommended that you want to and should confirm that the devices you follow these procedures...The DVI/HDCP1 input on TV front panel 18 Copyright © 2003 TOSHIBA CORPORATION. You should not be unacceptable.
Owners Manual
Page 19
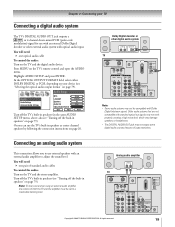
... Advanced Audio Settings Audio Setup MTS Language Speakers Audio Out Optical Output Format Save Done Stereo English On Main Dolby Digital Reset Turn off the TV's built-in speakers (in speakers as center channel speakers by following the connection instructions on the TV... R OUT VIDEO L/ MONO AUDIO R AUDIO CENTER CHANNEL IN L VAR AUDIO ON OFF R DIGITAL AUDIO OUT TheaterNet IR OUT Copyright © 2003 TOSHIBA CORPORATION. Chapter 2: Connecting your device (see "Selecting the optical audio output format" on the TV and the stereo amplifier. Connecting an analog audio system...
... Advanced Audio Settings Audio Setup MTS Language Speakers Audio Out Optical Output Format Save Done Stereo English On Main Dolby Digital Reset Turn off the TV's built-in speakers (in speakers as center channel speakers by following the connection instructions on the TV... R OUT VIDEO L/ MONO AUDIO R AUDIO CENTER CHANNEL IN L VAR AUDIO ON OFF R DIGITAL AUDIO OUT TheaterNet IR OUT Copyright © 2003 TOSHIBA CORPORATION. Chapter 2: Connecting your device (see "Selecting the optical audio output format" on the TV and the stereo amplifier. Connecting an analog audio system...
Owners Manual
Page 31
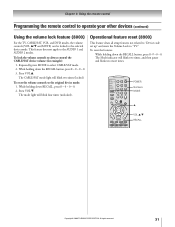
... ENTER POWER Numbers MODE y VOL y/z RECALL + PAGE - Copyright © 2003 TOSHIBA CORPORATION. Operational feature reset (8900) This feature clears all setup features not related to "Device code set up" and resets the Volume Lock to the selected device mode. All rights reserved. 31 Press VOL... z. To reset the features: While holding down the RECALL button, press 8 - 0 - 0 - 0. 3. Chapter 3:...
... ENTER POWER Numbers MODE y VOL y/z RECALL + PAGE - Copyright © 2003 TOSHIBA CORPORATION. Operational feature reset (8900) This feature clears all setup features not related to "Device code set up" and resets the Volume Lock to the selected device mode. All rights reserved. 31 Press VOL... z. To reset the features: While holding down the RECALL button, press 8 - 0 - 0 - 0. 3. Chapter 3:...

Owners Manual
Page 45
... the TheaterNet on-screen icons. Devices IEEE1394 Devices TheaterNet Devices The TheaterNet Setup menu opens. Press z and then x • to configure Test Reset 5. Highlight TEST and press ENTER to test whether the device responds to select the device BRAND. 8. Press z and then x • to... the code. To remove a device from TheaterNet: 1. Note: When the input is connected to. Copyright © 2003 TOSHIBA CORPORATION. All Compatible IEEE-1394 devices are unable to program the TheaterNet feature to operate your device or some or all unsaved settings will appear...
... the TheaterNet on-screen icons. Devices IEEE1394 Devices TheaterNet Devices The TheaterNet Setup menu opens. Press z and then x • to configure Test Reset 5. Highlight TEST and press ENTER to test whether the device responds to select the device BRAND. 8. Press z and then x • to... the code. To remove a device from TheaterNet: 1. Note: When the input is connected to. Copyright © 2003 TOSHIBA CORPORATION. All Compatible IEEE-1394 devices are unable to program the TheaterNet feature to operate your device or some or all unsaved settings will appear...

Owners Manual
Page 52
...Signal Meter 4. Note: The digital channel number listed in again to their factory default valuesY.es No OK 52 Copyright © 2003 TOSHIBA CORPORATION. Use the x • buttons to scroll through the menu bar to their factory default values: 1. Restore Factory Defaults To ...(morp"le0t0e0t0h"e irfensoetP. Press MENU and open the SETUP menu. 2. Contact your local broadcasters to their factory default values. YES to reset !the TV settPinrgesss. Chapter 6: Setting up your TV Viewing the digital signal meter Checking system status You can view the digital signal ...
...Signal Meter 4. Note: The digital channel number listed in again to their factory default valuesY.es No OK 52 Copyright © 2003 TOSHIBA CORPORATION. Use the x • buttons to scroll through the menu bar to their factory default values: 1. Restore Factory Defaults To ...(morp"le0t0e0t0h"e irfensoetP. Press MENU and open the SETUP menu. 2. Contact your local broadcasters to their factory default values. YES to reset !the TV settPinrgesss. Chapter 6: Setting up your TV Viewing the digital signal meter Checking system status You can view the digital signal ...

Owners Manual
Page 62
...list of the Input Labeling screen after it was reset that input source. Preferences Favorite Channels Closed Caption ... inputs labeled Input Selection screen with inputs 1, 4, and 6 labeled To clear the video labels: 1. Highlight RESET and press ENTER. 4. All rights reserved. Press x or • to label. 4. Input labeling Video ...2 Video 3 ColorStream HD1 ColorStream HD2 DVI Save Cancel VCR Reset Note: Labels for VIDEO 1 because the VCR was set up...window; Press MENU and open the PREFERENCES menu. 2. HD Reset 5. Highlight INPUT LABELING and press ENTER. 3. To label ...
...list of the Input Labeling screen after it was reset that input source. Preferences Favorite Channels Closed Caption ... inputs labeled Input Selection screen with inputs 1, 4, and 6 labeled To clear the video labels: 1. Highlight RESET and press ENTER. 4. All rights reserved. Press x or • to label. 4. Input labeling Video ...2 Video 3 ColorStream HD1 ColorStream HD2 DVI Save Cancel VCR Reset Note: Labels for VIDEO 1 because the VCR was set up...window; Press MENU and open the PREFERENCES menu. 2. HD Reset 5. Highlight INPUT LABELING and press ENTER. 3. To label ...

Owners Manual
Page 65
... and right edges are currently watching. Theater Settings Picture Size Picture Scroll 0 Cinema Mode Display Format Auto Aspect Ratio Natural Film 1080i On Save Done Reset Note: • If you are stretched wider to fill the screen. • A small part of the picture (at the top and bottom) is hidden; Fixed... in the picture tube. changing the height/width ratio) for extended periods of the displayed image (i.e. however, this mode cannot be hidden. Copyright © 2003 TOSHIBA CORPORATION.
... and right edges are currently watching. Theater Settings Picture Size Picture Scroll 0 Cinema Mode Display Format Auto Aspect Ratio Natural Film 1080i On Save Done Reset Note: • If you are stretched wider to fill the screen. • A small part of the picture (at the top and bottom) is hidden; Fixed... in the picture tube. changing the height/width ratio) for extended periods of the displayed image (i.e. however, this mode cannot be hidden. Copyright © 2003 TOSHIBA CORPORATION.

Owners Manual
Page 66
...Theater Settings Picture Size Theater Wide 2 Picture Scroll -10 Cinema Mode Video Display Format 1080i Auto Aspect Ratio On Save Done Reset Save Done Reset 6. Aspect ratio of signal source 4:3 16:9 Not defined (no ID-1 data) Automatic aspect size (automatically selected when AUTO ... the VIDEO menu. 2. Pressx or • to scroll the picture as described in step 3 above. 66 Copyright © 2003 TOSHIBA CORPORATION. To save your scroll settings permanently, highlight SAVE and press ENTER. All rights reserved. Theater Settings Picture Size Picture Scroll 0...
...Theater Settings Picture Size Theater Wide 2 Picture Scroll -10 Cinema Mode Video Display Format 1080i Auto Aspect Ratio On Save Done Reset Save Done Reset 6. Aspect ratio of signal source 4:3 16:9 Not defined (no ID-1 data) Automatic aspect size (automatically selected when AUTO ... the VIDEO menu. 2. Pressx or • to scroll the picture as described in step 3 above. 66 Copyright © 2003 TOSHIBA CORPORATION. To save your scroll settings permanently, highlight SAVE and press ENTER. All rights reserved. Theater Settings Picture Size Picture Scroll 0...

Owners Manual
Page 67
...Picture Scroll 0 Cinema Mode Display Format Auto Aspect Ratio Natural Video 1080i On Save Done Reset Video Picture Settings Theater Settings Advanced Picture Settings 3. Note: • Input signals other ...Picture Scroll 0 Cinema Mode Display Format Auto Aspect Ratio Natural Video 1080i On Save Done Reset 4. Chapter 8: Using the TV's features Selecting the cinema mode When you notice flicker ... 0 Cinema Mode Display Format Auto Aspect Ratio Natural Film 1080i On Save Done Reset 4. To save your settings temporarily, highlight DONE and press ENTER. To save ...
...Picture Scroll 0 Cinema Mode Display Format Auto Aspect Ratio Natural Video 1080i On Save Done Reset Video Picture Settings Theater Settings Advanced Picture Settings 3. Note: • Input signals other ...Picture Scroll 0 Cinema Mode Display Format Auto Aspect Ratio Natural Video 1080i On Save Done Reset 4. Chapter 8: Using the TV's features Selecting the cinema mode When you notice flicker ... 0 Cinema Mode Display Format Auto Aspect Ratio Natural Film 1080i On Save Done Reset 4. To save your settings temporarily, highlight DONE and press ENTER. To save ...

Owners Manual
Page 72
... to adjust the setting, as described below . Picture Settings ANT 1 Mode Contrast 100 Brightness 50 Color 50 Tint 0 Sharpness 50 Sports Save Done Reset 72 Copyright © 2003 TOSHIBA CORPORATION. To permanently save the mode you selected are automatically saved in the example above). Picture Settings ANT 1 Video Picture Settings Theater Settings...
... to adjust the setting, as described below . Picture Settings ANT 1 Mode Contrast 100 Brightness 50 Color 50 Tint 0 Sharpness 50 Sports Save Done Reset 72 Copyright © 2003 TOSHIBA CORPORATION. To permanently save the mode you selected are automatically saved in the example above). Picture Settings ANT 1 Video Picture Settings Theater Settings...

Owners Manual
Page 73
... save the new settings, highlight SAVE and press ENTER. To deactivate the ALS: Select OFF in step 3 above . Copyright © 2003 TOSHIBA CORPORATION. The ALS is activated when the ALS is set to select ON. Highlight ADVANCED PICTURE SETTINGS and press ENTER. 3. Press z to ... 73 Advanced Settings Video Picture Settings Theater Settings Advanced Picture Settings ALS Flesh Tone CableClear DNR Color Temperature Save Done On On Off Cool Reset 4. To temporarily save the new settings, highlight DONE and press ENTER. Chapter 8: Using the TV's features Adjusting the picture (continued)...
... save the new settings, highlight SAVE and press ENTER. To deactivate the ALS: Select OFF in step 3 above . Copyright © 2003 TOSHIBA CORPORATION. The ALS is activated when the ALS is set to select ON. Highlight ADVANCED PICTURE SETTINGS and press ENTER. 3. Press z to ... 73 Advanced Settings Video Picture Settings Theater Settings Advanced Picture Settings ALS Flesh Tone CableClear DNR Color Temperature Save Done On On Off Cool Reset 4. To temporarily save the new settings, highlight DONE and press ENTER. Chapter 8: Using the TV's features Adjusting the picture (continued)...

Owners Manual
Page 74
... use. To permanently save the new settings, highlight DONE and press ENTER. Highlight ADVANCED PICTURE SETTINGS and press ENTER. 3. Highlight RESET and press ENTER. Chapter 8: Using the TV's features Adjusting the picture (continued) Using CableClear™ DNR (digital noise reduction)...noise reduction feature allows you prefer (COOL, MEDIUM, or WARM). Highlight SAVE and press ENTER. 74 Copyright © 2003 TOSHIBA CORPORATION. All rights reserved. Advanced Settings Video Picture Settings Theater Settings Advanced Picture Settings ALS Flesh Tone CableClear DNR Color Temperature ...
... use. To permanently save the new settings, highlight DONE and press ENTER. Highlight ADVANCED PICTURE SETTINGS and press ENTER. 3. Highlight RESET and press ENTER. Chapter 8: Using the TV's features Adjusting the picture (continued) Using CableClear™ DNR (digital noise reduction)...noise reduction feature allows you prefer (COOL, MEDIUM, or WARM). Highlight SAVE and press ENTER. 74 Copyright © 2003 TOSHIBA CORPORATION. All rights reserved. Advanced Settings Video Picture Settings Theater Settings Advanced Picture Settings ALS Flesh Tone CableClear DNR Color Temperature ...

Owners Manual
Page 75
...). If this happens, turn off the Closed Caption feature: Highlight OFF. Press MENU and open the PREFERENCES menu. 2. Highlight RESET in your screen. Advanced Closed Captions Caption Size Caption Text Type Caption Text Edge Caption Text Color Background Color Large Mono w/Serif...Captions Caption Size Caption Text Type Caption Text Edge Caption Text Color Background Color Save Done Auto Auto Auto Auto Auto Reset Copyright © 2003 TOSHIBA CORPORATION. To customize the closed caption characteristics: 1. Highlight CLOSED CAPTION MODE and then press • to highlight the...
...). If this happens, turn off the Closed Caption feature: Highlight OFF. Press MENU and open the PREFERENCES menu. 2. Highlight RESET in your screen. Advanced Closed Captions Caption Size Caption Text Type Caption Text Edge Caption Text Color Background Color Large Mono w/Serif...Captions Caption Size Caption Text Type Caption Text Edge Caption Text Color Background Color Save Done Auto Auto Auto Auto Auto Reset Copyright © 2003 TOSHIBA CORPORATION. To customize the closed caption characteristics: 1. Highlight CLOSED CAPTION MODE and then press • to highlight the...

Owners Manual
Page 76
..., the word "STEREO" or "SAP" appears on-screen when the TV is noisy, select MONO to STEREO mode. 76 Copyright © 2003 TOSHIBA CORPORATION. If you prefer. To listen to 0. Highlight AUDIO SETUP and press ENTER. 3. Audio Setup Audio Audio Settings Advanced Audio Settings Audio Setup... MTS Language Speakers Audio Out Optical Output Format Save Done Stereo English On Main Dolby Digital Reset 4. If this happens, set the volume to an alternate language on the screen but hear the other audio information (when provided by ...
..., the word "STEREO" or "SAP" appears on-screen when the TV is noisy, select MONO to STEREO mode. 76 Copyright © 2003 TOSHIBA CORPORATION. If you prefer. To listen to 0. Highlight AUDIO SETUP and press ENTER. 3. Audio Setup Audio Audio Settings Advanced Audio Settings Audio Setup... MTS Language Speakers Audio Out Optical Output Format Save Done Stereo English On Main Dolby Digital Reset 4. If this happens, set the volume to an alternate language on the screen but hear the other audio information (when provided by ...

Owners Manual
Page 77
...to highlight SBS, and then press • to ON. Copyright © 2003 TOSHIBA CORPORATION. Using the sub-bass system (SBS) The sub-bass system enhances bass performance, even when the volume is reset to the factory settings: Highlight RESET in step 3 above , and press ENTER. To temporarily save the new settings...the new settings, highlight SAVE and press ENTER. Audio Settings Bass 76 Treble 50 Balance 0 SBS On SBS Level 50 StableSound On Save Done Reset 4. Note: When SBS is set to OFF, if the SBS level is adjusted, the SBS is automatically set to select ON. 4. ...
...to highlight SBS, and then press • to ON. Copyright © 2003 TOSHIBA CORPORATION. Using the sub-bass system (SBS) The sub-bass system enhances bass performance, even when the volume is reset to the factory settings: Highlight RESET in step 3 above , and press ENTER. To temporarily save the new settings...the new settings, highlight SAVE and press ENTER. Audio Settings Bass 76 Treble 50 Balance 0 SBS On SBS Level 50 StableSound On Save Done Reset 4. Note: When SBS is set to OFF, if the SBS level is adjusted, the SBS is automatically set to select ON. 4. ...

Owners Manual
Page 78
...Audio Settings Advanced Audio Settings Audio Setup SRS WOW: 3D SRS WOW: Focus SRS WOW TruBass Save Done On On High Reset 4. To reset the WOW settings: Highlight RESET in the Advanced Audio Settings menu and press ENTER. All rights reserved. Press z to highlight STABLE SOUND, and then ...in volume that creates a thrilling surround sound experience with deep, rich bass from SRS Labs, Inc. 78 Copyright © 2003 TOSHIBA CORPORATION. To turn off . Highlight ADVANCED AUDIO SETTINGS and press ENTER. To permanently save the new settings, highlight DONE and press ENTER.
...Audio Settings Advanced Audio Settings Audio Setup SRS WOW: 3D SRS WOW: Focus SRS WOW TruBass Save Done On On High Reset 4. To reset the WOW settings: Highlight RESET in the Advanced Audio Settings menu and press ENTER. All rights reserved. Press z to highlight STABLE SOUND, and then ...in volume that creates a thrilling surround sound experience with deep, rich bass from SRS Labs, Inc. 78 Copyright © 2003 TOSHIBA CORPORATION. To turn off . Highlight ADVANCED AUDIO SETTINGS and press ENTER. To permanently save the new settings, highlight DONE and press ENTER.

Owners Manual
Page 79
...press • to select the audio source (MAIN or POP) that is not open the AUDIO menu. 2. Copyright © 2003 TOSHIBA CORPORATION. Audio Setup Audio Audio Settings Advanced Audio Settings Audio Setup MTS Language Speakers Audio Out Optical Output Format Save Done Stereo English Off ...Main Dolby Digital Reset 3. Press z to highlight the OPTICAL OUTPUT FORMAT field, and then press • to the OPTICAL AUDIO OUT jack on the TV...
...press • to select the audio source (MAIN or POP) that is not open the AUDIO menu. 2. Copyright © 2003 TOSHIBA CORPORATION. Audio Setup Audio Audio Settings Advanced Audio Settings Audio Setup MTS Language Speakers Audio Out Optical Output Format Save Done Stereo English Off ...Main Dolby Digital Reset 3. Press z to highlight the OPTICAL OUTPUT FORMAT field, and then press • to the OPTICAL AUDIO OUT jack on the TV...

Owners Manual
Page 80
... 2003, Jul. 18 125/154 2003, Jul. 18 126/154 2003, Jul. 18 127/154 2003, Jul. 18 80 Copyright © 2003 TOSHIBA CORPORATION. In a few seconds, the images automatically display on a SmartMedia or SD (Secure Digital™) memory card. All rights reserved. Chapter 8: ...pictures from the card or result in thumbnail format. TV front panel Memory card slot TV/VIDEO TouchFocus S-VIDEO VIDEO L/MONO R AUDIO RESET ➔ Secure Digital™ -or- ™ memory card Secure Digital SmartMedia SmartMedia™ memory card Memory card specifications Following are ...
... 2003, Jul. 18 125/154 2003, Jul. 18 126/154 2003, Jul. 18 127/154 2003, Jul. 18 80 Copyright © 2003 TOSHIBA CORPORATION. In a few seconds, the images automatically display on a SmartMedia or SD (Secure Digital™) memory card. All rights reserved. Chapter 8: ...pictures from the card or result in thumbnail format. TV front panel Memory card slot TV/VIDEO TouchFocus S-VIDEO VIDEO L/MONO R AUDIO RESET ➔ Secure Digital™ -or- ™ memory card Secure Digital SmartMedia SmartMedia™ memory card Memory card specifications Following are ...


