

Operation Guide
Page 2
...may show constantly on the screen, which time you sit too closely to the TV for the picture to turn the TV off . If you must replace the lamp unit (- If this occurs, the yellow LED on... soon as directly in screen brightness when this TV is for details). 3) Every time the TV is turned off and then on ). If both LEDs are blinking, you are blinking. You may fail, at ...with a limited service life. Important notes about your TV's current status. page 55 for use only with the Toshiba stand. "Lamp unit replacement and care" on pages 81-83). 2) When the lamp mode is set to...
...may show constantly on the screen, which time you sit too closely to the TV for the picture to turn the TV off . If you must replace the lamp unit (- If this occurs, the yellow LED on... soon as directly in screen brightness when this TV is for details). 3) Every time the TV is turned off and then on ). If both LEDs are blinking, you are blinking. You may fail, at ...with a limited service life. Important notes about your TV's current status. page 55 for use only with the Toshiba stand. "Lamp unit replacement and care" on pages 81-83). 2) When the lamp mode is set to...

Operation Guide
Page 4
...Page 4 Monday, June 19, 2006 7:30 PM Contents Important notes about your DLP™ projection TV 2 Trademark Information 3 Chapter 1: Introduction 6 Welcome to Toshiba 6 Features of your new TV 6 Overview of steps for installing, setting up, and using your new TV 7 TV front and side panel controls and ...44 Using the digital audio selector 44 Selecting stereo/SAP broadcasts 45 Adjusting the audio quality 45 Using the StableSound® feature 46 Turning off the built-in speakers 46 Selecting the optical audio output format 46 Using the Locks menu 47 Entering the PIN code 47 ...
...Page 4 Monday, June 19, 2006 7:30 PM Contents Important notes about your DLP™ projection TV 2 Trademark Information 3 Chapter 1: Introduction 6 Welcome to Toshiba 6 Features of your new TV 6 Overview of steps for installing, setting up, and using your new TV 7 TV front and side panel controls and ...44 Using the digital audio selector 44 Selecting stereo/SAP broadcasts 45 Adjusting the audio quality 45 Using the StableSound® feature 46 Turning off the built-in speakers 46 Selecting the optical audio output format 46 Using the Locks menu 47 Entering the PIN code 47 ...

Operation Guide
Page 8
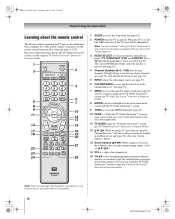
Point the remote control toward this area of the TV screen (- When a menu is on-screen, these buttons change the source you cannot turn the TV on and off the TV, press and hold the POWER button on the TV control panel for additional information. 3 POWER - Press to instantly ..." on page 11). 2 Blue, Yellow and Green/Red LEDs See "LED indications" on the remote control or TV control panel and you are referred to turn off . TV Guide On Screen™ Interactive Program Guide). 11 VIDEO-2 IN - If the TV stops responding to the controls on page 80 for 5 or...
Point the remote control toward this area of the TV screen (- When a menu is on-screen, these buttons change the source you cannot turn the TV on and off the TV, press and hold the POWER button on the TV control panel for additional information. 3 POWER - Press to instantly ..." on page 11). 2 Blue, Yellow and Green/Red LEDs See "LED indications" on the remote control or TV control panel and you are referred to turn off . TV Guide On Screen™ Interactive Program Guide). 11 VIDEO-2 IN - If the TV stops responding to the controls on page 80 for 5 or...
Operation Guide
Page 12
... volume level. 15 CH Bb cycles through programmed channels when no menu is pressed. (- Note: The error message "Not Available" may appear if you turn on -screen (- page 16). 4 Channel Numbers (0-9, -/100) directly tune channels. For a list of time it takes for the picture to appear ... List (- page 34). (Also see the remote control functional key chart (- TV Guide On Screen™ Interactive Program Guide). page 52). 2 POWER turns the TV on -screen, these buttons open , moves from one set of the remote control's functions, see "Arrow buttons," below.) 13 Arrow buttons ...
... volume level. 15 CH Bb cycles through programmed channels when no menu is pressed. (- Note: The error message "Not Available" may appear if you turn on -screen (- page 16). 4 Channel Numbers (0-9, -/100) directly tune channels. For a list of time it takes for the picture to appear ... List (- page 34). (Also see the remote control functional key chart (- TV Guide On Screen™ Interactive Program Guide). page 52). 2 POWER turns the TV on -screen, these buttons open , moves from one set of the remote control's functions, see "Arrow buttons," below.) 13 Arrow buttons ...

Operation Guide
Page 13
... picture. 25 PIC SIZE cycles through the pictures sizes: Natural, TheaterWide 1/2/3, and Full (- TV Guide On Screen™ Interactive Program Guide). 18 MUTE reduces or turns off the sound (-
... picture. 25 PIC SIZE cycles through the pictures sizes: Natural, TheaterWide 1/2/3, and Full (- TV Guide On Screen™ Interactive Program Guide). 18 MUTE reduces or turns off the sound (-

Operation Guide
Page 30
... the lamp unit to get hot, it can view the digital signal meter for your local digital stations. If this , set to Off and you turn the TV off and then on when a short-term power failure, power surge, or other similar power failure occurs, such that the TV loses and... the TV is set the Quick Restart™ feature: 1 Press Y and open the Setup menu. 2 Highlight Installation and press T. 3 A new set to On and you turn the TV off in a short period of time, the useful service life of Installation menu icons will appear, as shown below. Contact your local broadcasters...
... the lamp unit to get hot, it can view the digital signal meter for your local digital stations. If this , set to Off and you turn the TV off and then on when a short-term power failure, power surge, or other similar power failure occurs, such that the TV loses and... the TV is set the Quick Restart™ feature: 1 Press Y and open the Setup menu. 2 Highlight Installation and press T. 3 A new set to On and you turn the TV off in a short period of time, the useful service life of Installation menu icons will appear, as shown below. Contact your local broadcasters...

Operation Guide
Page 31
..., the TV will default to High Bright mode, see page 55. 31 HM116 (E/F) Web 213:276 To set ). 6 Highlight Yes and press T. The TV will turn off , unplug the TV power cord and then plug it back in again to complete the reset. No Yes To cancel the reset: Highlight No... TV turns off automatically after a few seconds. HM116_EN.book Page 31 Monday, June 19, 2006 7:30 PM Chapter 4: Setting up your PIN code (or 0000 if no PIN code has been set the TV back to Low Power mode. System Information Sun Jan 1, 2006 12:12:19am Product Information Brand: Toshiba Model: 62HM116...
..., the TV will default to High Bright mode, see page 55. 31 HM116 (E/F) Web 213:276 To set ). 6 Highlight Yes and press T. The TV will turn off , unplug the TV power cord and then plug it back in again to complete the reset. No Yes To cancel the reset: Highlight No... TV turns off automatically after a few seconds. HM116_EN.book Page 31 Monday, June 19, 2006 7:30 PM Chapter 4: Setting up your PIN code (or 0000 if no PIN code has been set the TV back to Low Power mode. System Information Sun Jan 1, 2006 12:12:19am Product Information Brand: Toshiba Model: 62HM116...

Operation Guide
Page 33
... of the inputs labeled as you add a new picture when the total = 32, the oldest thumbnail will be skipped over channels in various lists. • Turning off the TV deletes all inputs labeled except input 4, which means that the ColorStream HD2 input is pressed. To add a favorite channel/input: 1 Tune to...
... of the inputs labeled as you add a new picture when the total = 32, the oldest thumbnail will be skipped over channels in various lists. • Turning off the TV deletes all inputs labeled except input 4, which means that the ColorStream HD2 input is pressed. To add a favorite channel/input: 1 Tune to...

Operation Guide
Page 34
... channel or input in the list will bring up the Channel Browser™: 1 Press Y and open the last selected list. • If all lists are turned off, pressing 3 C, # c, or n will automatically tune to the channel or input. 2 Press O to surf forward through the currently selected list. Note...: When History List is turned off, n will have no effect. • Pressing n will be grayed out and set to Power Off Clear (On), the channels and inputs stored in ...
... channel or input in the list will bring up the Channel Browser™: 1 Press Y and open the last selected list. • If all lists are turned off, pressing 3 C, # c, or n will automatically tune to the channel or input. 2 Press O to surf forward through the currently selected list. Note...: When History List is turned off, n will have no effect. • Pressing n will be grayed out and set to Power Off Clear (On), the channels and inputs stored in ...

Operation Guide
Page 35
... page 25 for various reasons), the TV will clear the History List. Tuning to the next programmed channel To tune to "Power Off Clear (On)," turning off the left , eventually moving off the TV will automatically tune to the previously viewed channel or input. page 27)-you program channels into the...
... page 25 for various reasons), the TV will clear the History List. Tuning to the next programmed channel To tune to "Power Off Clear (On)," turning off the left , eventually moving off the TV will automatically tune to the previously viewed channel or input. page 27)-you program channels into the...

Operation Guide
Page 39
...to Film: 1 Press Y and open the Video menu. 2 Highlight Theater Settings and press T. 3 In the Auto Aspect Ratio field, select On. To turn off the auto aspect ratio feature: Select Off in step 3 above . To revert to the factory defaults, highlight Reset and press T. To set the ...you set under "Selecting the picture size" on page 37. Film On Reset Done 4 To save the new settings, highlight Done and press T. To turn on the TV, smoother motion can be obtained by setting the Cinema Mode to the VIDEO 1, VIDEO 2, ColorStream HD-1, ColorStream HD-2 (component video), ...
...to Film: 1 Press Y and open the Video menu. 2 Highlight Theater Settings and press T. 3 In the Auto Aspect Ratio field, select On. To turn off the auto aspect ratio feature: Select Off in step 3 above . To revert to the factory defaults, highlight Reset and press T. To set the ...you set under "Selecting the picture size" on page 37. Film On Reset Done 4 To save the new settings, highlight Done and press T. To turn on the TV, smoother motion can be obtained by setting the Cinema Mode to the VIDEO 1, VIDEO 2, ColorStream HD-1, ColorStream HD-2 (component video), ...

Operation Guide
Page 43
..., Default, Mono w. To view captions or text: 1 Press Y and open the Preferences menu. 2 Highlight Closed Caption Advanced and press T. To revert to Off. • To turn off the Closed Caption mode: Select Off in step 3 above. w/o Serif, Casual, Cursive, Small Capitals Auto, None, Raised, Depressed, Uniform, Left Drop Shadow, Right Drop...
..., Default, Mono w. To view captions or text: 1 Press Y and open the Preferences menu. 2 Highlight Closed Caption Advanced and press T. To revert to Off. • To turn off the Closed Caption mode: Select Off in step 3 above. w/o Serif, Casual, Cursive, Small Capitals Auto, None, Raised, Depressed, Uniform, Left Drop Shadow, Right Drop...

Operation Guide
Page 44
... might offer closed captions in the following order: 1/2 Mute Mute Volume If the closed caption mode is set the volume to partially reduce (1/2 MUTE) or turn off (MUTE) the sound. To mute the audio without automatically activating the closed caption feature, use the Digital CC/Audio Selector to conveniently switch between...
... might offer closed captions in the following order: 1/2 Mute Mute Volume If the closed caption mode is set the volume to partially reduce (1/2 MUTE) or turn off (MUTE) the sound. To mute the audio without automatically activating the closed caption feature, use the Digital CC/Audio Selector to conveniently switch between...

Operation Guide
Page 46
...the built-in speakers You can use this feature to select the optical audio output format when you connect an audio system to your device. Turning off the StableSound feature: Select Off in the Installation Guide). "Connecting a digital audio system" in step 3 above . "Connecting a ... audio output format: 1 Press Y and open the Audio menu. 2 Highlight Audio Settings and press T. 3 In the StableSound field, select On. To turn on the StableSound® feature: 1 Press Y and open the Audio menu. 2 Highlight Audio Setup and press T. 3 In the Optical Output Format field...
...the built-in speakers You can use this feature to select the optical audio output format when you connect an audio system to your device. Turning off the StableSound feature: Select Off in the Installation Guide). "Connecting a digital audio system" in step 3 above . "Connecting a ... audio output format: 1 Press Y and open the Audio menu. 2 Highlight Audio Settings and press T. 3 In the StableSound field, select On. To turn on the StableSound® feature: 1 Press Y and open the Audio menu. 2 Highlight Audio Setup and press T. 3 In the Optical Output Format field...

Operation Guide
Page 50
... inputs (VIDEO 1, VIDEO 2, ColorStream HD-1, ColorStream HD-2, HDMI 1, and HDMI 2) and channels 3 and 4. If the correct code is entered, the program lock mode is turned on the previous page, and then highlight Done and press T. All locking is disabled until you set, the TV will enter program lock mode and... Block All Cancel Done Unlocking programs temporarily If you try to tune the TV to view the input sources or channels until the TV is turned off, and will appear: This program exceeds the rating limit you set. To lock/unlock the video inputs: 1 Press Y and highlight the Locks menu...
... inputs (VIDEO 1, VIDEO 2, ColorStream HD-1, ColorStream HD-2, HDMI 1, and HDMI 2) and channels 3 and 4. If the correct code is entered, the program lock mode is turned on the previous page, and then highlight Done and press T. All locking is disabled until you set, the TV will enter program lock mode and... Block All Cancel Done Unlocking programs temporarily If you try to tune the TV to view the input sources or channels until the TV is turned off, and will appear: This program exceeds the rating limit you set. To lock/unlock the video inputs: 1 Press Y and highlight the Locks menu...

Operation Guide
Page 52
... Timer: Select Not Set in 10-minute increments. Note: • When a power failure occurs, the sleep timer setting may be cleared. • A message will then turn off automatically after a set length of time (maximum of 180 minutes). Sleep Timer 120 Minutes Note: You also can set the On/Off Timer to... 30 Minutes Cancel Done 4 Press b to highlight the Time field, and then use the Number buttons to enter the time you want the TV to turn on the sleep timer. To set the On/Off Timer: 1 Press Y and open the Setup menu. 2 Highlight Sleep Timer and press T. Setting the On/Off...
... Timer: Select Not Set in 10-minute increments. Note: • When a power failure occurs, the sleep timer setting may be cleared. • A message will then turn off automatically after a set length of time (maximum of 180 minutes). Sleep Timer 120 Minutes Note: You also can set the On/Off Timer to... 30 Minutes Cancel Done 4 Press b to highlight the Time field, and then use the Number buttons to enter the time you want the TV to turn on the sleep timer. To set the On/Off Timer: 1 Press Y and open the Setup menu. 2 Highlight Sleep Timer and press T. Setting the On/Off...

Operation Guide
Page 53
... the TV's power cord if it is tuned to a vacant channel or a station that you are viewing the TV, the Last Mode Memory feature automatically turns on sleep timer (if set) • Stereo or SAP audio status • V-Chip rating status • Picture size • Video resolution • Lamp ... if the TV is in ANT 1 and ANT 2 modes only. The following information will be away from turning on the remote control. Game Timer: 28 min. This will automatically turn itself off after approximately 15 minutes if it is possible that completes its broadcast for an extended period of screen...
... the TV's power cord if it is tuned to a vacant channel or a station that you are viewing the TV, the Last Mode Memory feature automatically turns on sleep timer (if set) • Stereo or SAP audio status • V-Chip rating status • Picture size • Video resolution • Lamp ... if the TV is in ANT 1 and ANT 2 modes only. The following information will be away from turning on the remote control. Game Timer: 28 min. This will automatically turn itself off after approximately 15 minutes if it is possible that completes its broadcast for an extended period of screen...

Operation Guide
Page 55
... MPEG compression. To revert to the factory defaults, highlight Reset and press T. Note: If you set the lamp mode to Low Power, each time you turn on the TV, the lamp will start out in High Bright mode but will switch to Low Power mode after a short period of the factory...
... MPEG compression. To revert to the factory defaults, highlight Reset and press T. Note: If you set the lamp mode to Low Power, each time you turn on the TV, the lamp will start out in High Bright mode but will switch to Low Power mode after a short period of the factory...
Operation Guide
Page 56
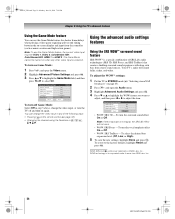
... sound sources. To select the desired bass expansion level (Off, Low, or High). 5 To save the new settings, highlight Done and press T. To turn the TV off Game Mode: Select Off in step 3 above, change the video input in STEREO mode (- Using the advanced audio settings features Using the... 56 Monday, June 19, 2006 7:30 PM Chapter 6: Using the TV's advanced features Using the Game Mode feature You can change the video input, or turn on when any of the following ways: • Pressing + on again. The Game Mode cannot be Video 1, Video 2, ColorStream HD1, ColorStream HD2, HDMI 1 ...
... sound sources. To select the desired bass expansion level (Off, Low, or High). 5 To save the new settings, highlight Done and press T. To turn the TV off Game Mode: Select Off in step 3 above, change the video input in STEREO mode (- Using the advanced audio settings features Using the... 56 Monday, June 19, 2006 7:30 PM Chapter 6: Using the TV's advanced features Using the Game Mode feature You can change the video input, or turn on when any of the following ways: • Pressing + on again. The Game Mode cannot be Video 1, Video 2, ColorStream HD1, ColorStream HD2, HDMI 1 ...

Operation Guide
Page 76
...have broadcast difficulties. POP problems • If you can try the control panel buttons. • If you then attempt to be poor. TV will not turn off and then quickly on -screen. pages 81-83). This is a property of the inputs as "Hide," the POP feature will change to the ... in, and then press p. • The remote control batteries may need to access the POP feature, the message "Not Available" will display when you cannot turn on page 13). • If you have broadcast difficulties. page 40). 76 HM116 (E/F) Web 213:276 HM116_EN.book Page 76 Monday, June 19, 2006 7:...
...have broadcast difficulties. POP problems • If you can try the control panel buttons. • If you then attempt to be poor. TV will not turn off and then quickly on -screen. pages 81-83). This is a property of the inputs as "Hide," the POP feature will change to the ... in, and then press p. • The remote control batteries may need to access the POP feature, the message "Not Available" will display when you cannot turn on page 13). • If you have broadcast difficulties. page 40). 76 HM116 (E/F) Web 213:276 HM116_EN.book Page 76 Monday, June 19, 2006 7:...


