

Operation Guide
Page 4
...4 Monday, June 19, 2006 7:30 PM Contents Important notes about your DLP™ projection TV 2 Trademark Information 3 Chapter 1: Introduction 6 Welcome to Toshiba 6 Features of your new TV 6 Overview of steps for installing, setting up, and using your new TV 7 TV front and side panel controls and... for the ANT 1 and ANT 2 terminals 25 Programming channels into the TV's channel memory . . . . 26 Programming channels automatically 26 Manually adding and deleting channels in the channel memory 27 Setting the time and date 28 Setting the ColorStream® HD audio mode 28 Setting the...
...4 Monday, June 19, 2006 7:30 PM Contents Important notes about your DLP™ projection TV 2 Trademark Information 3 Chapter 1: Introduction 6 Welcome to Toshiba 6 Features of your new TV 6 Overview of steps for installing, setting up, and using your new TV 7 TV front and side panel controls and... for the ANT 1 and ANT 2 terminals 25 Programming channels into the TV's channel memory . . . . 26 Programming channels automatically 26 Manually adding and deleting channels in the channel memory 27 Setting the time and date 28 Setting the ColorStream® HD audio mode 28 Setting the...

Operation Guide
Page 5
... up file sharing on a PC with Microsoft® Windows® 2000 61 D. Setting up the network address 57 Automatically setting up the network address 57 Manually setting up SMTP authentication 69 Description of the used lamp unit 83 Specifications 84 Limited United States Warranty for DLP™ Television Models 85 Index...
... up file sharing on a PC with Microsoft® Windows® 2000 61 D. Setting up the network address 57 Automatically setting up the network address 57 Manually setting up SMTP authentication 69 Description of the used lamp unit 83 Specifications 84 Limited United States Warranty for DLP™ Television Models 85 Index...

Operation Guide
Page 6
... purposes only and may require the use the Guides in the "Specifications" section of your antenna and equipment. 2) The Operating Guide (this manual. Installation Guide). • Dolby Digital (- Installation Guide) and SRS WOW™ (- Chapter 7 and Installation Guide). 6 HM116 (E/F) Web..., 2006 7:30 PM Chapter 1: Introduction NOTICE OF POSSIBLE TV STAND INSTABILITY DANGER: RISK OF SERIOUS PERSONAL INJURY OR DEATH! Use this Toshiba TV, one of a set -top box (in instability, causing possible injury or death. TV Guide On Screen™ Interactive Program ...
... purposes only and may require the use the Guides in the "Specifications" section of your antenna and equipment. 2) The Operating Guide (this manual. Installation Guide). • Dolby Digital (- Installation Guide) and SRS WOW™ (- Chapter 7 and Installation Guide). 6 HM116 (E/F) Web..., 2006 7:30 PM Chapter 1: Introduction NOTICE OF POSSIBLE TV STAND INSTABILITY DANGER: RISK OF SERIOUS PERSONAL INJURY OR DEATH! Use this Toshiba TV, one of a set -top box (in instability, causing possible injury or death. TV Guide On Screen™ Interactive Program ...

Operation Guide
Page 7
...the remote control. 9 Program the remote control to operate your other objects to allow proper ventilation. THIS TYPE OF DAMAGE IS NOT COVERED UNDER THE TOSHIBA WARRANTY. 3 Do not plug in any power cords until the yellow LED stops blinking and then press p on the screen. • Place ...you plug in the TV power cord, the yellow LED (on the applicable optional TV stand listed in the "Specifications" section (if available for this manual for future reference. 2 Observe the following when choosing a location for the TV: • Read the separate Installation Guide. • Read the separate...
...the remote control. 9 Program the remote control to operate your other objects to allow proper ventilation. THIS TYPE OF DAMAGE IS NOT COVERED UNDER THE TOSHIBA WARRANTY. 3 Do not plug in any power cords until the yellow LED stops blinking and then press p on the screen. • Place ...you plug in the TV power cord, the yellow LED (on the applicable optional TV stand listed in the "Specifications" section (if available for this manual for future reference. 2 Observe the following when choosing a location for the TV: • Read the separate Installation Guide. • Read the separate...
Operation Guide
Page 26
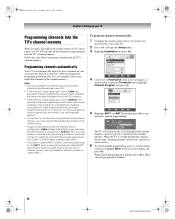
Programming channels automatically Your TV can manually add or erase individual channels in its memory. After the channels are programmed automatically, you can automatically detect all active channels in the channel memory, ... above). 6 To cancel channel programming, press O on the remote control (or highlight Abort in your Cable TV service lineup changes significantly. • If you must manually delete it. • To tune the TV to repeat the programming process again unless your area and store them in the channel memory.
Programming channels automatically Your TV can manually add or erase individual channels in its memory. After the channels are programmed automatically, you can automatically detect all active channels in the channel memory, ... above). 6 To cancel channel programming, press O on the remote control (or highlight Abort in your Cable TV service lineup changes significantly. • If you must manually delete it. • To tune the TV to repeat the programming process again unless your area and store them in the channel memory.
Operation Guide
Page 27
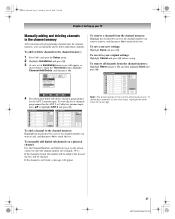
... channels from the channel memory: Highlight the checked box next to the channel number you want to remove, and then press T to your TV Manually adding and deleting channels in the channel memory: 1 Press Y and open the Setup menu. 2 Highlight Installation and press T. 3 (A new ... input. To add or delete channels in the channel memory After automatically programming channels into the channel memory, you can manually add or delete individual channels. To manually add digital subchannels on a physical channel: Use the Channel Numbers and the Dash (=) on the other input, highlight ...
... channels from the channel memory: Highlight the checked box next to the channel number you want to remove, and then press T to your TV Manually adding and deleting channels in the channel memory: 1 Press Y and open the Setup menu. 2 Highlight Installation and press T. 3 (A new ... input. To add or delete channels in the channel memory After automatically programming channels into the channel memory, you can manually add or delete individual channels. To manually add digital subchannels on a physical channel: Use the Channel Numbers and the Dash (=) on the other input, highlight ...
Operation Guide
Page 28
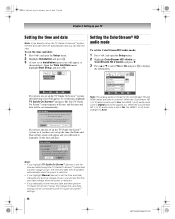
... and a power outage occurs, the time and date will be updated automatically when the power is restored. • If you highlight Manual (above) to set the time and date manually and a power outage occurs, you will lose the time and date settings when the power is recommended you set automatically and you... Auto Navigate ENTER Select CH RTN Back EXIT Exit Note: The analog audio terminals for the ColorStream HD and HDMI inputs are used in common. Manual TV Guide On Screen Cancel If you have not set up the TV Guide On Screen™ system, the time and date were set up...
... and a power outage occurs, the time and date will be updated automatically when the power is restored. • If you highlight Manual (above) to set the time and date manually and a power outage occurs, you will lose the time and date settings when the power is recommended you set automatically and you... Auto Navigate ENTER Select CH RTN Back EXIT Exit Note: The analog audio terminals for the ColorStream HD and HDMI inputs are used in common. Manual TV Guide On Screen Cancel If you have not set up the TV Guide On Screen™ system, the time and date were set up...
Operation Guide
Page 57
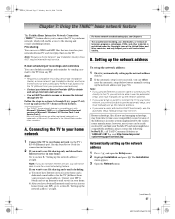
...57 Monday, June 19, 2006 7:30 PM Chapter 7: Using the THINC™ home network feature The Toshiba Home Interactive Network Connection (THINC™) feature allows you think your Toshiba TV and router might have compatibility problems, please contact the following: In the U.S., call TACP Consumer ...router systems implemented by sending an email to your home network, you can be able to use file sharing and e-mail scheduling: a) You must manually set up the network address 1 Press Y and open the Setup menu. 2 Highlight Installation and press T. Note: • Requires a compatible ...
...57 Monday, June 19, 2006 7:30 PM Chapter 7: Using the THINC™ home network feature The Toshiba Home Interactive Network Connection (THINC™) feature allows you think your Toshiba TV and router might have compatibility problems, please contact the following: In the U.S., call TACP Consumer ...router systems implemented by sending an email to your home network, you can be able to use file sharing and e-mail scheduling: a) You must manually set up the network address 1 Press Y and open the Setup menu. 2 Highlight Installation and press T. Note: • Requires a compatible ...

Operation Guide
Page 58
...sections C, D, and E (- b) Make sure your home network is successful, go to set up the network address." Also consult the owner's manuals for your home router are securely connected. pages 59-66) (to step 9.) 9 If, after repeating steps 1-6, you receive the error message ...automatic network address setup is set up and use e-mail scheduling). See the Installation Guide for your other components. Consult the owner's manual for TV connection information. appears. Highlight No and press T. b) Skip to step 7. Network Basic Network Setup E-mail Scheduling Setup ...
...sections C, D, and E (- b) Make sure your home network is successful, go to set up the network address." Also consult the owner's manuals for your home router are securely connected. pages 59-66) (to step 9.) 9 If, after repeating steps 1-6, you receive the error message ...automatic network address setup is set up and use e-mail scheduling). See the Installation Guide for your other components. Consult the owner's manual for TV connection information. appears. Highlight No and press T. b) Skip to step 7. Network Basic Network Setup E-mail Scheduling Setup ...

Operation Guide
Page 59
Would you like to "Manually setting up file sharing on your PC." Basic Network Setup Obtain network address automatically? page 63) for details on your PC Compatible operating systems The ...'s current operating system and service pack. To continue, highlight Yes and press T. Would you selected Yes in step 5, the message "Obtain network address automatically?" To manually enter the network address, go to input the IP address. HM116_EN.book Page 59 Monday, June 19, 2006 7:30 PM Chapter 7: Using the THINC™...
Would you like to "Manually setting up file sharing on your PC." Basic Network Setup Obtain network address automatically? page 63) for details on your PC Compatible operating systems The ...'s current operating system and service pack. To continue, highlight Yes and press T. Would you selected Yes in step 5, the message "Obtain network address automatically?" To manually enter the network address, go to input the IP address. HM116_EN.book Page 59 Monday, June 19, 2006 7:30 PM Chapter 7: Using the THINC™...
Operation Guide
Page 70
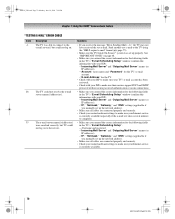
See "IMPORTANT NOTE" on to the TV using the "HELP request e-mail" format (- Solutions • If you manually set up properly. HM116_EN.book Page 70 Monday, June 19, 2006 7:30 PM Chapter 7: Using the THINC™ home network feature "TESTING E-MAIL" ...": --Username and password. -"Incoming Mail Server" and "Outgoing Mail Server" names (or IP addresses). -"IP," "Netmask," "Gateway," and "DNS" settings (applicable if you manually set up the network address). • Make sure all cables are connected properly and securely. • Check your router hardware/settings to make sure your...
See "IMPORTANT NOTE" on to the TV using the "HELP request e-mail" format (- Solutions • If you manually set up properly. HM116_EN.book Page 70 Monday, June 19, 2006 7:30 PM Chapter 7: Using the THINC™ home network feature "TESTING E-MAIL" ...": --Username and password. -"Incoming Mail Server" and "Outgoing Mail Server" names (or IP addresses). -"IP," "Netmask," "Gateway," and "DNS" settings (applicable if you manually set up the network address). • Make sure all cables are connected properly and securely. • Check your router hardware/settings to make sure your...

Operation Guide
Page 77
... the U.S. page 11). • Your TV remote control may have broadcast difficulties. Refer to reduce the effect of this feature to help to the owner's manual for the program you selected is not available, a black rectangle may have been erased from the channel memory by broadcasters in the following suggestions, which...
... the U.S. page 11). • Your TV remote control may have broadcast difficulties. Refer to reduce the effect of this feature to help to the owner's manual for the program you selected is not available, a black rectangle may have been erased from the channel memory by broadcasters in the following suggestions, which...

Operation Guide
Page 78
... to locate all playable files. "No media found will not be able to change digital channels while the recording is otherwise not compatible with this manual. • Make sure your network address and e-mail account are set up on -screen. • If you are set up the network address properly (- Installation...
... to locate all playable files. "No media found will not be able to change digital channels while the recording is otherwise not compatible with this manual. • Make sure your network address and e-mail account are set up on -screen. • If you are set up the network address properly (- Installation...

Operation Guide
Page 79
... scheduling ON (page 67). • The sender's e-mail address is not available. If you are using the same network type (DHCP/ manual) and have compatible network settings. • The networked PC does not have shared folders set up e-mail scheduling (- Connect all cables (- ...30 PM Chapter 8: Troubleshooting Automatic setup fails • The Ethernet cables are not connected properly or at all. The TV IP address must manually set up e-mail scheduling" in Chapter 7. Connect all cables(- See "Setting up correctly. Connect all cables(- page 58). • Internet...
... scheduling ON (page 67). • The sender's e-mail address is not available. If you are using the same network type (DHCP/ manual) and have compatible network settings. • The networked PC does not have shared folders set up e-mail scheduling (- Connect all cables (- ...30 PM Chapter 8: Troubleshooting Automatic setup fails • The Ethernet cables are not connected properly or at all. The TV IP address must manually set up e-mail scheduling" in Chapter 7. Connect all cables(- See "Setting up correctly. Connect all cables(- page 58). • Internet...

Operation Guide
Page 81
REFER ALL SERVICING NOT SPECIFIED IN THIS MANUAL TO QUALIFIED SERVICE PERSONNEL. The lamp has a limited service life that increases during use and user settings. See "Limited United States Warranty" (- The lamp unit ... of the lamp in the Limited Warranty applicable to intentional abuse (such as excessive mechanical abuse or handling by Toshiba may result in the colors and/or brightness of Visit www.ceaccessories.toshiba.com or warranty: consult your experience may vary from other than those recommended by children or pets), the unit...
REFER ALL SERVICING NOT SPECIFIED IN THIS MANUAL TO QUALIFIED SERVICE PERSONNEL. The lamp has a limited service life that increases during use and user settings. See "Limited United States Warranty" (- The lamp unit ... of the lamp in the Limited Warranty applicable to intentional abuse (such as excessive mechanical abuse or handling by Toshiba may result in the colors and/or brightness of Visit www.ceaccessories.toshiba.com or warranty: consult your experience may vary from other than those recommended by children or pets), the unit...
Operation Guide
Page 82
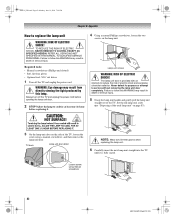
... injury. 5 Grasp the lamp unit handle and gently pull the lamp unit straight out of the TV. REFER ALL SERVICING NOT SPECIFIED IN THIS MANUAL TO QUALIFIED SERVICE PERSONNEL. Always turn off the TV and unplug the power cord. TO REDUCE THE RISK OF ELECTRIC SHOCK, NEVER REMOVE TV COVERS..., EXCEPT AS SPECIFIED HEREIN. Set the old lamp unit aside (- Required tools: • Manual screwdrivers (Phillips and slotted) • Soft, lint-free gloves • Optional tool: 5/16" nut driver 1 Turn off the TV and unplug the power cord ...
... injury. 5 Grasp the lamp unit handle and gently pull the lamp unit straight out of the TV. REFER ALL SERVICING NOT SPECIFIED IN THIS MANUAL TO QUALIFIED SERVICE PERSONNEL. Always turn off the TV and unplug the power cord. TO REDUCE THE RISK OF ELECTRIC SHOCK, NEVER REMOVE TV COVERS..., EXCEPT AS SPECIFIED HEREIN. Set the old lamp unit aside (- Required tools: • Manual screwdrivers (Phillips and slotted) • Soft, lint-free gloves • Optional tool: 5/16" nut driver 1 Turn off the TV and unplug the power cord ...

Operation Guide
Page 83
... 9: Appendix Note: • Never subject the lamp unit to cool for at least one (1) hour, such chemicals may ignite. 7 Using a manual Phillips screwdriver, tighten the two lamp unit screws. CLEANING THE LAMP UNIT GLASS If you accidentally touch the lamp unit glass or otherwise get it...276 Many ordinary cleaning agents (such as excessive mechanical abuse or handling by consumers; See "Cleaning the lamp unit glass" below. Do not use manual Phillips screwdriver only) NOTE : Make sure the lamp unit and screws are installed correctly: • No picture • Dark picture •...
... 9: Appendix Note: • Never subject the lamp unit to cool for at least one (1) hour, such chemicals may ignite. 7 Using a manual Phillips screwdriver, tighten the two lamp unit screws. CLEANING THE LAMP UNIT GLASS If you accidentally touch the lamp unit glass or otherwise get it...276 Many ordinary cleaning agents (such as excessive mechanical abuse or handling by consumers; See "Cleaning the lamp unit glass" below. Do not use manual Phillips screwdriver only) NOTE : Make sure the lamp unit and screws are installed correctly: • No picture • Dark picture •...
Operation Guide
Page 85
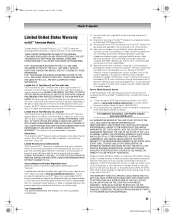
... Product Registration Card Read this owner's manual thoroughly before operating this DLP™ Television is purchased and operated in the Continental U.S.A. For additional information, visit TACP's website: www.tacp.toshiba.com. This limitation does not apply to complete and return the ...HM116_EN.book Page 85 Monday, June 19, 2006 7:30 PM Chapter 9: Appendix Limited United States Warranty for DLP™ Television Models Toshiba America Consumer Products, L.L.C. ("TACP") makes the following all parts are not covered by this DLP™ Television against defects in materials...
... Product Registration Card Read this owner's manual thoroughly before operating this DLP™ Television is purchased and operated in the Continental U.S.A. For additional information, visit TACP's website: www.tacp.toshiba.com. This limitation does not apply to complete and return the ...HM116_EN.book Page 85 Monday, June 19, 2006 7:30 PM Chapter 9: Appendix Limited United States Warranty for DLP™ Television Models Toshiba America Consumer Products, L.L.C. ("TACP") makes the following all parts are not covered by this DLP™ Television against defects in materials...
Operation Guide
Page 87
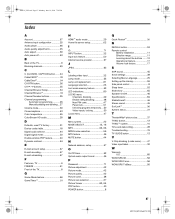
... CableClear 54 CH RTN button 36 CH U u buttons 35 Channel Browser Setup 34 Channel Browser 33 Channel Number buttons 35 Channel programming Automatic programming 26 Manually adding and deleting... 27 Cinema mode 39 Closed captions 43 Color temperature 55 ColorStream HD audio 28 D Defaults, reset TV factory 31 Device codes table...
... CableClear 54 CH RTN button 36 CH U u buttons 35 Channel Browser Setup 34 Channel Browser 33 Channel Number buttons 35 Channel programming Automatic programming 26 Manually adding and deleting... 27 Cinema mode 39 Closed captions 43 Color temperature 55 ColorStream HD audio 28 D Defaults, reset TV factory 31 Device codes table...


