

Owners Manual
Page 2
...attention to check for proper grounding, and, in particular, specifies that important operating and maintenance instructions follow this product may result in -picture (PIP) display, Multi-Window display, computer displays, video games, stock market reports, etc., can become permanently engrained on page ...the plug does not fit into a standard electrical outlet (120 volt AC, wide prong 60 Hz). Use with the Toshiba stand shown on the picture tube. Avoid areas subject to allow proper ventilation. Stationary patterns generated by the weight of 41˚F(5˚C) or ...
...attention to check for proper grounding, and, in particular, specifies that important operating and maintenance instructions follow this product may result in -picture (PIP) display, Multi-Window display, computer displays, video games, stock market reports, etc., can become permanently engrained on page ...the plug does not fit into a standard electrical outlet (120 volt AC, wide prong 60 Hz). Use with the Toshiba stand shown on the picture tube. Avoid areas subject to allow proper ventilation. Stationary patterns generated by the weight of 41˚F(5˚C) or ...

Owners Manual
Page 3
Introduction 4 Welcome to Toshiba 4 Exploring your new TV 4 Connecting your TV 5 Connecting a VCR 5 Connecting a cable converter box 6 Connecting a cable converter box and VCR 6 Connecting a DVD player or satellite receiver ... 28 BLOCKING OPTION 28 Unlocking programs temporarily 29 Locking channels 29 Locking video inputs 30 Changing the PIN code 30 Adjusting the picture 31 Selecting the picture mode 31 Adjusting the picture quality 31 Saving new preference 32 Using the flesh tone feature 32 Using the Digital Noise Reduction (DNR) feature 32 Selecting...
Introduction 4 Welcome to Toshiba 4 Exploring your new TV 4 Connecting your TV 5 Connecting a VCR 5 Connecting a cable converter box 6 Connecting a cable converter box and VCR 6 Connecting a DVD player or satellite receiver ... 28 BLOCKING OPTION 28 Unlocking programs temporarily 29 Locking channels 29 Locking video inputs 30 Changing the PIN code 30 Adjusting the picture 31 Selecting the picture mode 31 Adjusting the picture quality 31 Saving new preference 32 Using the flesh tone feature 32 Using the Digital Noise Reduction (DNR) feature 32 Selecting...

Owners Manual
Page 5
... white audio cable is the standard cable that the terminals are color-coded in the same manner as the cables. • S-video cables provide better picture performance. Introduction Connecting your TV Using the Remote Control Setting up your TV Connecting your TV If you have not connected electronic equipment before, or... AUDIO PR R COLOR STREAM HD 2 IN ANT-2 Note: If you will need: • one coaxial cable • one pair of three and provide the best picture performance.
... white audio cable is the standard cable that the terminals are color-coded in the same manner as the cables. • S-video cables provide better picture performance. Introduction Connecting your TV Using the Remote Control Setting up your TV Connecting your TV If you have not connected electronic equipment before, or... AUDIO PR R COLOR STREAM HD 2 IN ANT-2 Note: If you will need: • one coaxial cable • one pair of three and provide the best picture performance.
Owners Manual
Page 7
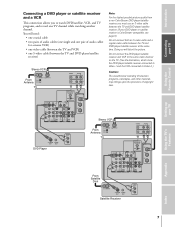
.../satellite receiver connected to Video-1 and the VCR connected to TV CH 3 CH 4 TV VIDEO AUDIO LR IN OUT Note: For the highest possible picture quality from a non-ColorStream DVD player/satellite receiver, you to TV CH 3 CH 4 TV VIDEO AUDIO LR IN OUT From Satellite Dish S-VIDEO... so will need: • one coaxial cable • two pairs of audio cables (one single and one pair of copyright laws. You will distort the picture. S-VIDEO AUDIO CENTER CHANNEL IN ON OFF ANT( 75 ) ANT-1 OUT R L VAR AUDIO OUT VIDEO Y VIDEO Y L/ MONO L/ PB L MONO PB L AUDIO R PR R R ...
.../satellite receiver connected to Video-1 and the VCR connected to TV CH 3 CH 4 TV VIDEO AUDIO LR IN OUT Note: For the highest possible picture quality from a non-ColorStream DVD player/satellite receiver, you to TV CH 3 CH 4 TV VIDEO AUDIO LR IN OUT From Satellite Dish S-VIDEO... so will need: • one coaxial cable • two pairs of audio cables (one single and one pair of copyright laws. You will distort the picture. S-VIDEO AUDIO CENTER CHANNEL IN ON OFF ANT( 75 ) ANT-1 OUT R L VAR AUDIO OUT VIDEO Y VIDEO Y L/ MONO L/ PB L MONO PB L AUDIO R PR R R ...

Owners Manual
Page 8
...and DVD player at right) Note: For the highest possible picture quality, you to Video-1. Your TV has ColorStream component video inputs. Connecting your TV to a ColorStream-compatible DVD player (such as a Toshiba ColorStream-equipped DVD player) can connect the ColorStream cables from...S-video connections (both audio and video) instead of the ColorStream connections. (Be aware, however, that a ColorStream connection provides higher picture quality than an S-video connection.) Do not connect both S-Video and ColorStream cables between the TV and DVD player. Introduction Connecting your...
...and DVD player at right) Note: For the highest possible picture quality, you to Video-1. Your TV has ColorStream component video inputs. Connecting your TV to a ColorStream-compatible DVD player (such as a Toshiba ColorStream-equipped DVD player) can connect the ColorStream cables from...S-video connections (both audio and video) instead of the ColorStream connections. (Be aware, however, that a ColorStream connection provides higher picture quality than an S-video connection.) Do not connect both S-Video and ColorStream cables between the TV and DVD player. Introduction Connecting your...

Owners Manual
Page 9
...of audio cables for a non-ColorStream DTV receiver; Connecting your TV Using the TV's Features Appendix Index 9 You will need to change the picture size (see notes at the same time. From DTV Antenna Satelite IN Y CB CR S-VIDEO COMPONENT VIDEO VIDEO OUT AUDIO OUT L L...mono VCR) • two video cables • one set of the ColorStream connections. (Be aware, however, that a ColorStream connection provides higher picture quality than an S-video connection.) Do not connect both S-Video and ColorStream cables between the TV and DTV receiver at right) From Antenna Stereo ...
...of audio cables for a non-ColorStream DTV receiver; Connecting your TV Using the TV's Features Appendix Index 9 You will need to change the picture size (see notes at the same time. From DTV Antenna Satelite IN Y CB CR S-VIDEO COMPONENT VIDEO VIDEO OUT AUDIO OUT L L...mono VCR) • two video cables • one set of the ColorStream connections. (Be aware, however, that a ColorStream connection provides higher picture quality than an S-video connection.) Do not connect both S-Video and ColorStream cables between the TV and DTV receiver at right) From Antenna Stereo ...

Owners Manual
Page 10
... To dub or edit, VCR 2 must select Line IN, and the TV must select Video-1. * The Video OUT jack does not output the PIP picture. **The Audio OUT jacks can also record from one coaxial cable • two pairs of either the Main or PIP... * ** VCR2 CH 3 CH 4 VIDEO AUDIO L R IN OUT Caution: The unauthorized recording of television programs, videotapes, and other materials may infringe upon the provisions of 55H70/61H70 Index Camcorder VIDEO AUDIO OUT L R 10 VIDEO-3 IN S-VIDEO VIDEO AUDIO L/MONO R Video-3 (front panel) of 43H70 Camcorder VIDEO AUDIO OUT L R M Video-355(fHro7n0t...
... To dub or edit, VCR 2 must select Line IN, and the TV must select Video-1. * The Video OUT jack does not output the PIP picture. **The Audio OUT jacks can also record from one coaxial cable • two pairs of either the Main or PIP... * ** VCR2 CH 3 CH 4 VIDEO AUDIO L R IN OUT Caution: The unauthorized recording of television programs, videotapes, and other materials may infringe upon the provisions of 55H70/61H70 Index Camcorder VIDEO AUDIO OUT L R 10 VIDEO-3 IN S-VIDEO VIDEO AUDIO L/MONO R Video-3 (front panel) of 43H70 Camcorder VIDEO AUDIO OUT L R M Video-355(fHro7n0t...

Owners Manual
Page 15
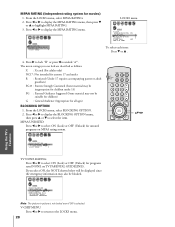
... PIP turns the PIP on and off STILL freezes the PIP LOCATE changes the position of the PIP SWAP switches between the main and PIP pictures VCR Buttons allow access to VCR functions (page 5) STOP stops a videotape from playing, recording, rewinding, or fast-forwarding PLAY plays a videotape REC starts recording a videotape...
... PIP turns the PIP on and off STILL freezes the PIP LOCATE changes the position of the PIP SWAP switches between the main and PIP pictures VCR Buttons allow access to VCR functions (page 5) STOP stops a videotape from playing, recording, rewinding, or fast-forwarding PLAY plays a videotape REC starts recording a videotape...

Owners Manual
Page 19
...DEMO VOL CH POWER MENU x •zy Channel yz 5. Repeat steps 1-4 for at least 30 minutes. Press y or z to form a full color picture. The red, green, and blue images are projected onto the screen where they converge correctly. Press x or • to select ADD or ERASE, whichever...Channel Number buttons. 2. R DEMO MENU TV/VIDEO VOLUME CHANNEL To add or erase channels: 1. Select the channel you want to perform. MENU 55H70/61H70 x •zy Channel zy 3. If you must select the channel to the next programmed channel: Press Channel y or z on for other channels ...
...DEMO VOL CH POWER MENU x •zy Channel yz 5. Repeat steps 1-4 for at least 30 minutes. Press y or z to form a full color picture. The red, green, and blue images are projected onto the screen where they converge correctly. Press x or • to select ADD or ERASE, whichever...Channel Number buttons. 2. R DEMO MENU TV/VIDEO VOLUME CHANNEL To add or erase channels: 1. Select the channel you want to perform. MENU 55H70/61H70 x •zy Channel zy 3. If you must select the channel to the next programmed channel: Press Channel y or z on for other channels ...

Owners Manual
Page 20
.... Press MENU, then press x or • until you have to converge the red or blue line into the green line. Repeat steps 8 and 9 until the PICTURE menu appears. 2. Press EXIT once to select another area to highlight CONVERGENCE. 1 2 3 4 5 6 7 8 9 10 11 12 13 14 15 16 17 18 19 20 21 22...
.... Press MENU, then press x or • until you have to converge the red or blue line into the green line. Repeat steps 8 and 9 until the PICTURE menu appears. 2. Press EXIT once to select another area to highlight CONVERGENCE. 1 2 3 4 5 6 7 8 9 10 11 12 13 14 15 16 17 18 19 20 21 22...

Owners Manual
Page 21
... the screen. • The favorite channel feature is not available for details). To program your favorite channels: Press (FAV) x or •. Select a second channel with a 9-picture multi-window, press FAVORITE (see page 25 for the ANT2 input. Because this feature scans through only your favorite channels with the Channel Number buttons...
... the screen. • The favorite channel feature is not available for details). To program your favorite channels: Press (FAV) x or •. Select a second channel with a 9-picture multi-window, press FAVORITE (see page 25 for the ANT2 input. Because this feature scans through only your favorite channels with the Channel Number buttons...

Owners Manual
Page 23
...characters. Press MENU, then press x or • until the character you must choose an empty space from an external source, such as a small picture: 1. To display a TV broadcast as a VCR. Press x or • to enter a character in that space. 8. Repeat steps 4-6 to...8226; to display the CH LABELING menu. 4. To erase channel labels: 1. Repeat steps 4 through the ANT-2 terminal as a small picture. 23 Press y or z to watch . 2. Watching picture-in-picture (PIP) The picture-in the label name, you want appears on the screen, then press ENTER. 1 2 3 4 5 6 7 8 9 10 ...
...characters. Press MENU, then press x or • until the character you must choose an empty space from an external source, such as a small picture: 1. To display a TV broadcast as a VCR. Press x or • to enter a character in that space. 8. Repeat steps 4-6 to...8226; to display the CH LABELING menu. 4. To erase channel labels: 1. Repeat steps 4 through the ANT-2 terminal as a small picture. 23 Press y or z to watch . 2. Watching picture-in-picture (PIP) The picture-in the label name, you want appears on the screen, then press ENTER. 1 2 3 4 5 6 7 8 9 10 ...

Owners Manual
Page 24
... selected source will switch each time you want to be selected. ColorStream HD1 and HD2 can not be displayed as a small picture: 1. P I P SOURCE SELECT I ON TV V I DEO 1 V I DEO 2 V I DEO 3 SOURCE : TO SELECT To turn PIP off: Press PIP once or twice, depending on the TV and ... your TV Using the TV's Features Appendix Index Changing the position of the screen will enter into the program block mode. The main and small pictures will be displayed in a counter-clockwise manner. 24 Press PIP CH y z to watch a TV program that exceeds the rating limits you are using the ...
... selected source will switch each time you want to be selected. ColorStream HD1 and HD2 can not be displayed as a small picture: 1. P I P SOURCE SELECT I ON TV V I DEO 1 V I DEO 2 V I DEO 3 SOURCE : TO SELECT To turn PIP off: Press PIP once or twice, depending on the TV and ... your TV Using the TV's Features Appendix Index Changing the position of the screen will enter into the program block mode. The main and small pictures will be displayed in a counter-clockwise manner. 24 Press PIP CH y z to watch a TV program that exceeds the rating limits you are using the ...

Owners Manual
Page 25
... the Favorite that scans the channels programmed in the TV memory by the FAVORITE CH function (9-picture multi-search). The 6-picture multi-search will become a still picture. Each time you want to the moving picture. 3. FAVORITE CH2 -- Note: • V-Chip program blocking may not work when the...PREVIEW and FAVORITE channel scanning. Press y z x • to select a channel you press FAVORITE, the display will be displayed with a moving picture such as a black window with an "X" in the upper right corner. • The PREVIEW, FAVORITE, STROBE, and CH PROGRAM features do ...
... the Favorite that scans the channels programmed in the TV memory by the FAVORITE CH function (9-picture multi-search). The 6-picture multi-search will become a still picture. Each time you want to the moving picture. 3. FAVORITE CH2 -- Note: • V-Chip program blocking may not work when the...PREVIEW and FAVORITE channel scanning. Press y z x • to select a channel you press FAVORITE, the display will be displayed with a moving picture such as a black window with an "X" in the upper right corner. • The PREVIEW, FAVORITE, STROBE, and CH PROGRAM features do ...

Owners Manual
Page 26
Note: The STROBE feature does not work when the main picture source is already stored: Press the Number buttons (0-9) to enter the 4-digit PIN code used to display the PIN code entering mode. • Factory reset ... STROBE FAV MENU/ ENTER FAV PREVIEW ADV/ EXIT PIP CH Number MENU/ENTER 26 Using the TV's Features Appendix Index Entering the PIN code 1. Nine-picture multi-strobe starts for the current main...
Note: The STROBE feature does not work when the main picture source is already stored: Press the Number buttons (0-9) to enter the 4-digit PIN code used to display the PIN code entering mode. • Factory reset ... STROBE FAV MENU/ ENTER FAV PREVIEW ADV/ EXIT PIP CH Number MENU/ENTER 26 Using the TV's Features Appendix Index Entering the PIN code 1. Nine-picture multi-strobe starts for the current main...
Owners Manual
Page 28
... 13 14 15 16 17 18 19 20 21 22 23 24 25 26 27 28 29 30 31 32 33 34 35 Note: The picture-in-picture is not locked even if ON is selected. Press • to lock "X" or press x to select ON (Lock) or OFF (Unlock) for unrated programs...
... 13 14 15 16 17 18 19 20 21 22 23 24 25 26 27 28 29 30 31 32 33 34 35 Note: The picture-in-picture is not locked even if ON is selected. Press • to lock "X" or press x to select ON (Lock) or OFF (Unlock) for unrated programs...

Owners Manual
Page 29
..., press MUTE. 3. If the number is reapplied. It will be enabled when the power is correct, the lock mode will be released and the normal picture will not be locked.) 4. TH I N CODE 0 0 0 0 16 17 TV CABLE 17 18 CLEAR 18 1 2 3 4 5 6 7 8 9 10 11 12 13 14 15 16 17 18 19 20...
..., press MUTE. 3. If the number is reapplied. It will be enabled when the power is correct, the lock mode will be released and the normal picture will not be locked.) 4. TH I N CODE 0 0 0 0 16 17 TV CABLE 17 18 CLEAR 18 1 2 3 4 5 6 7 8 9 10 11 12 13 14 15 16 17 18 19 20...

Owners Manual
Page 31
...8226;zy Mode Sports Standard Movie Preference Picture Quality Bright and dynamic picture (factory setting) Standard picture setting (factory setting) Movie-like picture setting (factory setting) Your personal preferences* *(See "Saving new preference" on page 32.) 55H70/61H70 MENU VOL CH EXIT TV/VIDEO ...DEMO VOL CH MENU yzx • POWER Adjusting the picture quality You can adjust the picture quality to PREFERENCE in your personal preferences, including the contrast, brightness...
...8226;zy Mode Sports Standard Movie Preference Picture Quality Bright and dynamic picture (factory setting) Standard picture setting (factory setting) Movie-like picture setting (factory setting) Your personal preferences* *(See "Saving new preference" on page 32.) 55H70/61H70 MENU VOL CH EXIT TV/VIDEO ...DEMO VOL CH MENU yzx • POWER Adjusting the picture quality You can adjust the picture quality to PREFERENCE in your personal preferences, including the contrast, brightness...

Owners Manual
Page 32
...29 30 31 32 33 34 35 You can save new preference: 1. Using the flesh tone feature This feature allows you have adjusted in the picture preference mode. To turn off the flesh tone feature: Choose OFF in step 3 above . 32 LIGHT RECALL POWER TV CABLE VCR MUTE TV/...35 To turn on the flesh tone feature: 1. Index Appendix Using the TV's Features Setting up your TV Using the Remote Control Connecting your TV picture. This is useful when receiving a broadcast with a weak signal or playing back a video cassette or disc damaged by correcting the difference of tint between...
...29 30 31 32 33 34 35 You can save new preference: 1. Using the flesh tone feature This feature allows you have adjusted in the picture preference mode. To turn off the flesh tone feature: Choose OFF in step 3 above . 32 LIGHT RECALL POWER TV CABLE VCR MUTE TV/...35 To turn on the flesh tone feature: 1. Index Appendix Using the TV's Features Setting up your TV Using the Remote Control Connecting your TV picture. This is useful when receiving a broadcast with a weak signal or playing back a video cassette or disc damaged by correcting the difference of tint between...
Owners Manual
Page 33
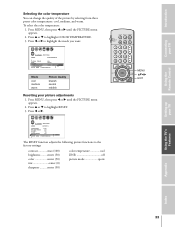
... 17 18 19 20 21 22 23 24 25 26 27 28 29 30 31 32 33 34 35 The RESET function adjusts the following picture functions to highlight RESET. 3. To select the color temperature: 1. center (50) color center (50) tint center (0) sharpness ......... Press x or • to highlight COLOR... ADV/ PIP CH MENU EXIT Setting up your TV Using the Remote Control Selecting the color temperature You can change the quality of the picture by selecting from three preset color temperatures: cool, medium, and warm. Introduction Connecting your TV Using the TV's Features Appendix Index 33 Press...
... 17 18 19 20 21 22 23 24 25 26 27 28 29 30 31 32 33 34 35 The RESET function adjusts the following picture functions to highlight RESET. 3. To select the color temperature: 1. center (50) color center (50) tint center (0) sharpness ......... Press x or • to highlight COLOR... ADV/ PIP CH MENU EXIT Setting up your TV Using the Remote Control Selecting the color temperature You can change the quality of the picture by selecting from three preset color temperatures: cool, medium, and warm. Introduction Connecting your TV Using the TV's Features Appendix Index 33 Press...

