

Owners Manual
Page 4
... TV before cleaning. or viewing normal style (4:3) media on a widescreen (16:9) display (gray bars on the screen. Turn the TV off . Never attempt to a Toshiba Authorized Service Center. Refer all servicing to service the TV yourself. QUALIFIED SERVICE TECHNICIAN 35) If you have the TV ...34) WARNING: RISK OF ELECTRIC SHOCK! Opening and removing the covers may make occasional snapping or popping sounds. Never leave your TOSHIBA TV, follow these sounds become permanently engrained in front of damage is first delivered), condensation may result in contact with, such as...
... TV before cleaning. or viewing normal style (4:3) media on a widescreen (16:9) display (gray bars on the screen. Turn the TV off . Never attempt to a Toshiba Authorized Service Center. Refer all servicing to service the TV yourself. QUALIFIED SERVICE TECHNICIAN 35) If you have the TV ...34) WARNING: RISK OF ELECTRIC SHOCK! Opening and removing the covers may make occasional snapping or popping sounds. Never leave your TOSHIBA TV, follow these sounds become permanently engrained in front of damage is first delivered), condensation may result in contact with, such as...

Owners Manual
Page 6
... adjustments 77 Using the SRS WOW™ surround sound feature ...... 78 Resetting the advanced audio settings 78 Using the Dolby Virtual SRS TruSurround feature ... 78 Turning off the built-in speakers 79 Selecting the optical audio output format 79 Selecting the AUDIO OUT sound 79 Using the SmartMedia™ memory card... Guide On Screen FAQs 90 Chapter 11: Appendix 93 Specifications 93 Limited United States Warranty 94 Limited Canada Warranty 95 Index 98 6 Copyright © 2003 TOSHIBA CORPORATION.
... adjustments 77 Using the SRS WOW™ surround sound feature ...... 78 Resetting the advanced audio settings 78 Using the Dolby Virtual SRS TruSurround feature ... 78 Turning off the built-in speakers 79 Selecting the optical audio output format 79 Selecting the AUDIO OUT sound 79 Using the SmartMedia™ memory card... Guide On Screen FAQs 90 Chapter 11: Appendix 93 Specifications 93 Limited United States Warranty 94 Limited Canada Warranty 95 Index 98 6 Copyright © 2003 TOSHIBA CORPORATION.

Owners Manual
Page 7
...as a "slide show" on your TV (page 80) • TheaterNet™ on using your TV. • Model 57HX93 is turned on the back of your new Toshiba widescreen projection TV: • Integrated digital tuning (8VSB ATSC and QAM) eliminates the need to connect other related marks are ...reading, check the model number on . IN NO EVENT SHALL GEMSTAR-TV GUIDE INTERNATIONAL, INC., AND/OR ITS RELATED AFFILIATES, AND/OR TOSHIBA AMERICA CONSUMER PRODUCTS BE LIABLE FOR ANY AMOUNTS REPRESENTING LOSS OF PROFITS, LOSS OF BUSINESS, OR INDIRECT, SPECIAL, OR CONSEQUENTIAL DAMAGES IN CONNECTION...
...as a "slide show" on your TV (page 80) • TheaterNet™ on using your TV. • Model 57HX93 is turned on the back of your new Toshiba widescreen projection TV: • Integrated digital tuning (8VSB ATSC and QAM) eliminates the need to connect other related marks are ...reading, check the model number on . IN NO EVENT SHALL GEMSTAR-TV GUIDE INTERNATIONAL, INC., AND/OR ITS RELATED AFFILIATES, AND/OR TOSHIBA AMERICA CONSUMER PRODUCTS BE LIABLE FOR ANY AMOUNTS REPRESENTING LOSS OF PROFITS, LOSS OF BUSINESS, OR INDIRECT, SPECIAL, OR CONSEQUENTIAL DAMAGES IN CONNECTION...

Owners Manual
Page 8
... configuring the TV's settings and setting up the TV Guide On Screen™ program guide. (The Quick Connect Guide starts automatically the first time you turn on the TV.) See page 36 for your TV: • Place the TV on the floor only. • Place the TV in a location ..., setting up, and using your new TV Follow these steps to the Troubleshooting Guide on pages 3-4. 5. THIS TYPE OF DAMAGE IS NOT COVERED UNDER THE TOSHIBA WARRANTY BECAUSE IT IS A RESULT OF MISUSE. • Read "Installation" on pages 88-92. 23. All rights reserved. Chapter 1: Introduction Overview of steps for...
... configuring the TV's settings and setting up the TV Guide On Screen™ program guide. (The Quick Connect Guide starts automatically the first time you turn on the TV.) See page 36 for your TV: • Place the TV on the floor only. • Place the TV in a location ..., setting up, and using your new TV Follow these steps to the Troubleshooting Guide on pages 3-4. 5. THIS TYPE OF DAMAGE IS NOT COVERED UNDER THE TOSHIBA WARRANTY BECAUSE IT IS A RESULT OF MISUSE. • Read "Installation" on pages 88-92. 23. All rights reserved. Chapter 1: Introduction Overview of steps for...
Owners Manual
Page 9
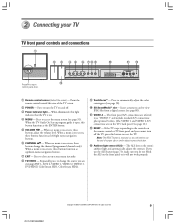
... you use the end of the TV screen. 2 POWER - When a menu is on the remote control or TV front panel and you cannot turn the TV on -screen, these buttons function as up/down menu navigation buttons. 7 EXIT - Press to access the menu system (see page 80...). 9 TouchFocus™ - If you do not block the ALS on -screen, these buttons function as left/right menu navigation buttons. 6 CHANNEL yz - Copyright © 2003 TOSHIBA CORPORATION. 2 Connecting your TV TV front panel controls and connections 1 2 3 4 5 6 789 0 !¡ !™ { { { Press/lift to open , this button functions ...
... you use the end of the TV screen. 2 POWER - When a menu is on the remote control or TV front panel and you cannot turn the TV on -screen, these buttons function as up/down menu navigation buttons. 7 EXIT - Press to access the menu system (see page 80...). 9 TouchFocus™ - If you do not block the ALS on -screen, these buttons function as left/right menu navigation buttons. 6 CHANNEL yz - Copyright © 2003 TOSHIBA CORPORATION. 2 Connecting your TV TV front panel controls and connections 1 2 3 4 5 6 789 0 !¡ !™ { { { Press/lift to open , this button functions ...
Owners Manual
Page 12
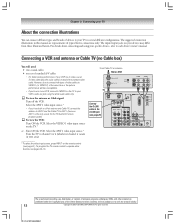
...vacant in your area). To select the video input source, press INPUT on the TV to civil and criminal liability. 12 Copyright © 2003 TOSHIBA CORPORATION. For details about connecting and using the white audio cable only. However, do not connect both an off the VCR. Select the VIDEO 1... source for the TV Guide On Screen program guide). The suggested connection illustrations in several different configurations. To view the antenna or Cable signal: Turn off -air antenna and Cable TV, connect the antenna to ANT-2 and the Cable TV to the G-LINK jack (see page 61). To...
...vacant in your area). To select the video input source, press INPUT on the TV to civil and criminal liability. 12 Copyright © 2003 TOSHIBA CORPORATION. For details about connecting and using the white audio cable only. However, do not connect both an off the VCR. Select the VIDEO 1... source for the TV Guide On Screen program guide). The suggested connection illustrations in several different configurations. To view the antenna or Cable signal: Turn off -air antenna and Cable TV, connect the antenna to ANT-2 and the Cable TV to the G-LINK jack (see page 61). To...

Owners Manual
Page 13
... program or access certain features on the remote control (see pages 30-33. To select the video input source, press INPUT on the TV. or...Turn ON the VCR. Do not connect an S-video cable and a standard video cable to VIDEO 1 (or VIDEO 2) at the same time or the ... you use a Cable box, you may subject you to civil and criminal liability. To view basic and premium Cable channels: Turn OFF the VCR. All rights reserved. 13 Copyright © 2003 TOSHIBA CORPORATION. Tune the VCR to channel 3 or 4 (whichever channel is vacant in your VCR has S-video, connect an S-...
... program or access certain features on the remote control (see pages 30-33. To select the video input source, press INPUT on the TV. or...Turn ON the VCR. Do not connect an S-video cable and a standard video cable to VIDEO 1 (or VIDEO 2) at the same time or the ... you use a Cable box, you may subject you to civil and criminal liability. To view basic and premium Cable channels: Turn OFF the VCR. All rights reserved. 13 Copyright © 2003 TOSHIBA CORPORATION. Tune the VCR to channel 3 or 4 (whichever channel is vacant in your VCR has S-video, connect an S-...
Owners Manual
Page 14
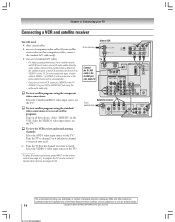
...61). To program the TV remote control to operate other countries, and may subject you to civil and criminal liability. 14 Copyright © 2003 TOSHIBA CORPORATION. Select the VIDEO 1 video input source on the TV.* To select the video input source, press INPUT on the VCR. To view satellite... mono VCR, connect L/MONO on the TV (VIDEO 1) to your VCR's AUDIO OUT jack using the standard video connections or to record satellite programs: Turn on all three devices. Do not connect both types of standard A/V cables • For better picture performance, if your area). Tune the VCR to...
...61). To program the TV remote control to operate other countries, and may subject you to civil and criminal liability. 14 Copyright © 2003 TOSHIBA CORPORATION. Select the VIDEO 1 video input source on the TV.* To select the video input source, press INPUT on the VCR. To view satellite... mono VCR, connect L/MONO on the TV (VIDEO 1) to your VCR's AUDIO OUT jack using the standard video connections or to record satellite programs: Turn on all three devices. Do not connect both types of standard A/V cables • For better picture performance, if your area). Tune the VCR to...
Owners Manual
Page 15
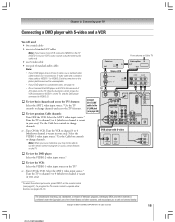
... controls to channel 3 or 4 (whichever channel is vacant in your area). To select the video input source, press INPUT on the TV.* or...Turn ON the VCR. Chapter 2: Connecting your TV Connecting a DVD player with S-video (whichever channel is vacant in your area). Select the AUDIO VIDEO ...1 video input source.* Use the Cable box controls OUT to change channels. Copyright © 2003 TOSHIBA CORPORATION. To view the DVD player: Select the VIDEO 2 video input source.* To view the VCR: Select the VIDEO 1 video input source on...
... controls to channel 3 or 4 (whichever channel is vacant in your area). To select the video input source, press INPUT on the TV.* or...Turn ON the VCR. Chapter 2: Connecting your TV Connecting a DVD player with S-video (whichever channel is vacant in your area). Select the AUDIO VIDEO ...1 video input source.* Use the Cable box controls OUT to change channels. Copyright © 2003 TOSHIBA CORPORATION. To view the DVD player: Select the VIDEO 2 video input source.* To view the VCR: Select the VIDEO 1 video input source on...

Owners Manual
Page 16
...Chapter 2: Connecting your TV Connecting a DVD player with component video To view the VCR: Select the VIDEO 1 video input source on the TV.* or...Turn ON the VCR. However, do not connect both types of component video cables • You can be unacceptable. • If you to civil and ...criminal liability. 16 Copyright © 2003 TOSHIBA CORPORATION. one pair of standard audio cables one set of the United States and other countries, and may subject you have component video, see page...
...Chapter 2: Connecting your TV Connecting a DVD player with component video To view the VCR: Select the VIDEO 1 video input source on the TV.* or...Turn ON the VCR. However, do not connect both types of component video cables • You can be unacceptable. • If you to civil and ...criminal liability. 16 Copyright © 2003 TOSHIBA CORPORATION. one pair of standard audio cables one set of the United States and other countries, and may subject you have component video, see page...

Owners Manual
Page 17
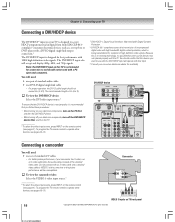
... two VCRs You will need : one set of video cable to VIDEO 1 (or VIDEO 2) at the same time. To view the antenna or Cable signal: Turn OFF the VCR. To view VCR 1: Select the VIDEO 1 video input source.* To dub or edit from VCR 1 to ANT-1 (ANT-1 and VIDEO 1 are the... IEEE-1394 ports, you have a Cable box, connect the Cable box and splitter to the output and input jacks on page 61. Copyright © 2003 TOSHIBA CORPORATION. b The AUDIO OUT jacks can use From ATSC antenna or digital Cable TV ANT( 75 ) G-LINK DVI/HDCP IN TheaterNet the REC OUT jacks...
... two VCRs You will need : one set of video cable to VIDEO 1 (or VIDEO 2) at the same time. To view the antenna or Cable signal: Turn OFF the VCR. To view VCR 1: Select the VIDEO 1 video input source.* To dub or edit from VCR 1 to ANT-1 (ANT-1 and VIDEO 1 are the... IEEE-1394 ports, you have a Cable box, connect the Cable box and splitter to the output and input jacks on page 61. Copyright © 2003 TOSHIBA CORPORATION. b The AUDIO OUT jacks can use From ATSC antenna or digital Cable TV ANT( 75 ) G-LINK DVI/HDCP IN TheaterNet the REC OUT jacks...
Owners Manual
Page 18
... signals. The recommended length is designed to and should confirm that the devices you follow these procedures: • When turning on your electronic components, turn off the DVI/HDCP device first, and then the TV. You will operate with that you want to operate other ...-D cable length should not exceed 3m (9.8 ft). To select the video input source, press INPUT on TV front panel 18 Copyright © 2003 TOSHIBA CORPORATION. The DVI/HDCP input also will be used with a PC (personal computer). compliant2 consumer electronic devices, such as a set of standard A/V...
... signals. The recommended length is designed to and should confirm that the devices you follow these procedures: • When turning on your electronic components, turn off the DVI/HDCP device first, and then the TV. You will operate with that you want to operate other ...-D cable length should not exceed 3m (9.8 ft). To select the video input source, press INPUT on TV front panel 18 Copyright © 2003 TOSHIBA CORPORATION. The DVI/HDCP input also will be used with a PC (personal computer). compliant2 consumer electronic devices, such as a set of standard A/V...
Owners Manual
Page 19
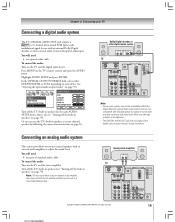
...ON OFF R DIGITAL AUDIO OUT TheaterNet IR OUT Copyright © 2003 TOSHIBA CORPORATION. Or you to use external speakers with an external audio amplifier to a reasonable listening level. Turn off the TV's built-in speakers (see "Turning off the TV's built-in speakers (in the same AUDIO SETUP menu...Dolby Digital decoder or other external audio system with optical audio input. All rights reserved. 19 Chapter 2: Connecting your device (see "Turning off the built-in speakers" on page 79). Press MENU on the TV and the digital audio device. Audio Setup Audio Audio Settings...
...ON OFF R DIGITAL AUDIO OUT TheaterNet IR OUT Copyright © 2003 TOSHIBA CORPORATION. Or you to use external speakers with an external audio amplifier to a reasonable listening level. Turn off the TV's built-in speakers (see "Turning off the TV's built-in speakers (in the same AUDIO SETUP menu...Dolby Digital decoder or other external audio system with optical audio input. All rights reserved. 19 Chapter 2: Connecting your device (see "Turning off the built-in speakers" on page 79). Press MENU on the TV and the digital audio device. Audio Setup Audio Audio Settings...

Owners Manual
Page 20
...IN L VAR AUDIO ON OFF R DIGITAL AUDIO OUT TheaterNet IR OUT ON OFF CAUTION-To avoid damaging the TV's speakers: • Turn off the TV before connecting or disconnecting the Audio Center Channel cable. • Do not connect from the A/V receiver's amplified center ... reserved. A/V receiver Audio Video Audio center channel T V Left speaker Right speaker Surround speaker L Surround speaker R 20 Copyright © 2003 TOSHIBA CORPORATION. Chapter 2: Connecting your TV Connecting an A/V receiver This connection allows you can add to the realism of standard A/V cables one single ...
...IN L VAR AUDIO ON OFF R DIGITAL AUDIO OUT TheaterNet IR OUT ON OFF CAUTION-To avoid damaging the TV's speakers: • Turn off the TV before connecting or disconnecting the Audio Center Channel cable. • Do not connect from the A/V receiver's amplified center ... reserved. A/V receiver Audio Video Audio center channel T V Left speaker Right speaker Surround speaker L Surround speaker R 20 Copyright © 2003 TOSHIBA CORPORATION. Chapter 2: Connecting your TV Connecting an A/V receiver This connection allows you can add to the realism of standard A/V cables one single ...
Owners Manual
Page 21
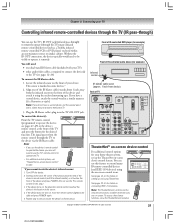
.../SPTUEDPTVDECXPLLISERTAEAKCYRIAPL/LSEARFMFCUHTE VTCVR/ AM/FM DISC STOP REC POP CH SPLIT SWAP POP DIRECT CH FREEZE CH SCAN SOURCE Copyright © 2003 TOSHIBA CORPORATION. The signal passes from the remote control through the TV) many IR remote-controlled devices (and IEEE-1394 devices) using the...control many infrared remote-controlled devices (such as required to connect the device(s) to operate it behind the TV. 3. If the device does not turn on -screen device control" at right.) Note: If you do not have a second device, attach the second wand in a similar manner....
.../SPTUEDPTVDECXPLLISERTAEAKCYRIAPL/LSEARFMFCUHTE VTCVR/ AM/FM DISC STOP REC POP CH SPLIT SWAP POP DIRECT CH FREEZE CH SCAN SOURCE Copyright © 2003 TOSHIBA CORPORATION. The signal passes from the remote control through the TV) many IR remote-controlled devices (and IEEE-1394 devices) using the...control many infrared remote-controlled devices (such as required to connect the device(s) to operate it behind the TV. 3. If the device does not turn on -screen device control" at right.) Note: If you do not have a second device, attach the second wand in a similar manner....

Owners Manual
Page 23
...Connecting IEEE-1394 (Firewire™) video devices (continued) IEEE-1394 device initialization When you connect a new IEEE-1394 device to the TV and turn it on, the device immediately announces its presence to input the label. 3. otherwise, leave it set of INSTALLATION menu icons will appear on... Analog Type Label Input Connected Brandname VCR Brandname STB Brandname VCR None Yes VIDEO 2 No ColorStr Yes Delete All Exit Copyright © 2003 TOSHIBA CORPORATION. You can edit this device information (for this screen to edit, and follow the on -screen, as shown in the TV's ...
...Connecting IEEE-1394 (Firewire™) video devices (continued) IEEE-1394 device initialization When you connect a new IEEE-1394 device to the TV and turn it on, the device immediately announces its presence to input the label. 3. otherwise, leave it set of INSTALLATION menu icons will appear on... Analog Type Label Input Connected Brandname VCR Brandname STB Brandname VCR None Yes VIDEO 2 No ColorStr Yes Delete All Exit Copyright © 2003 TOSHIBA CORPORATION. You can edit this device information (for this screen to edit, and follow the on -screen, as shown in the TV's ...
Owners Manual
Page 25
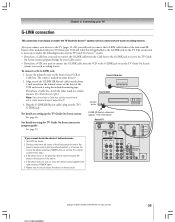
... AUDIO R R OUT VIDEO L/ MONO AUDIO R AUDIO CENTER CHANNEL IN L VAR AUDIO ON OFF R DIGITAL AUDIO OUT TheaterNet IR OUT Copyright © 2003 TOSHIBA CORPORATION. The sensor is the location of TV ANT( 75 ) ANT-1 ANT-2 REC OUT G-LINK DVI/HDCP IN TheaterNet IEEE1394 1 IEEE1394 2 *If you ...Guide On Screen™ system's device control and one-touch recording features. Align one -touch recording feature. If the device does not turn on using the included mounting tape. Chapter 2: Connecting your TV G-LINK connection This connection is necessary to the right and press POWER again...
... AUDIO R R OUT VIDEO L/ MONO AUDIO R AUDIO CENTER CHANNEL IN L VAR AUDIO ON OFF R DIGITAL AUDIO OUT TheaterNet IR OUT Copyright © 2003 TOSHIBA CORPORATION. The sensor is the location of TV ANT( 75 ) ANT-1 ANT-2 REC OUT G-LINK DVI/HDCP IN TheaterNet IEEE1394 1 IEEE1394 2 *If you ...Guide On Screen™ system's device control and one-touch recording features. Align one -touch recording feature. If the device does not turn on using the included mounting tape. Chapter 2: Connecting your TV G-LINK connection This connection is necessary to the right and press POWER again...
Owners Manual
Page 26
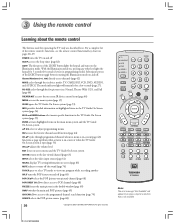
...) CH SCAN allows access to the programmed channel search function (page 70) SOURCE selects the POP picture source (page 68) 26 Copyright © 2003 TOSHIBA CORPORATION. PIC SIZE cycles through the five pictures sizes: Natural, Theater Wide 1/2/3, and Full (page 64) THEATER NET accesses the on-screen IR device ... viewed channel (page 63) INPUT selects the video input source (page 61) RECALL displays TV setting information on-screen (page 83) MUTE reduces or turns off (page 68) POP CH yz selects the POP (picture-out-picture) channel (page 68) POP DIRECT CH allows direct access to POP channels ...
...) CH SCAN allows access to the programmed channel search function (page 70) SOURCE selects the POP picture source (page 68) 26 Copyright © 2003 TOSHIBA CORPORATION. PIC SIZE cycles through the five pictures sizes: Natural, Theater Wide 1/2/3, and Full (page 64) THEATER NET accesses the on-screen IR device ... viewed channel (page 63) INPUT selects the video input source (page 61) RECALL displays TV setting information on-screen (page 83) MUTE reduces or turns off (page 68) POP CH yz selects the POP (picture-out-picture) channel (page 68) POP DIRECT CH allows direct access to POP channels ...

Owners Manual
Page 36
.... Press yzx • to highlight the language you in updating your TV's settings. English Español Francais 2. Press ENTER to the TOSHIBA Quick Connect Guide. Configuring the antenna input sources. (See page 41 for details on this feature.) - Automatically programming channels into the TV's channel...assisted setup The Quick Connect Guide automatically starts the first time the TV is already on-screen, start at right. If you turned on the TV before connecting your devices and the Quick Connect Guide assisted setup already began, you in configuring the following basic ...
.... Press yzx • to highlight the language you in updating your TV's settings. English Español Francais 2. Press ENTER to the TOSHIBA Quick Connect Guide. Configuring the antenna input sources. (See page 41 for details on this feature.) - Automatically programming channels into the TV's channel...assisted setup The Quick Connect Guide automatically starts the first time the TV is already on-screen, start at right. If you turned on the TV before connecting your devices and the Quick Connect Guide assisted setup already began, you in configuring the following basic ...

Owners Manual
Page 39
... box or VCR setup, the setup confirmation screen (below ). All rights reserved. 39 Code testing begins. 3. If the information on this page). Copyright © 2003 TOSHIBA CORPORATION. To allow the TV Guide On Screen system to find the correct code for finding the code. If your VCR to exit the TV...
... box or VCR setup, the setup confirmation screen (below ). All rights reserved. 39 Code testing begins. 3. If the information on this page). Copyright © 2003 TOSHIBA CORPORATION. To allow the TV Guide On Screen system to find the correct code for finding the code. If your VCR to exit the TV...


