
Owners Manual
Page 3
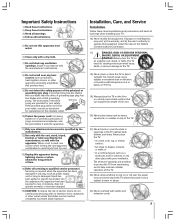
...extension cords. 0303 3 QUALIFIED SERVICE TECHNICIAN 21) Never block or cover the slots or openings in cabinet, or any heat sources such as power supply cord or plug is used, use caution when moving the cart/apparatus combination to wear or abuse. 15) CAUTION: To reduce the..., does not operate normally, or has been dropped. The slots and openings are provided for replacement of the obsolete outlet. 10) Protect the power cord from tip-over. 13) Unplug this equipment under the rules of the Federal Communications Commission. 17) DANGER: RISK OF SERIOUS PERSONAL INJURY,...
...extension cords. 0303 3 QUALIFIED SERVICE TECHNICIAN 21) Never block or cover the slots or openings in cabinet, or any heat sources such as power supply cord or plug is used, use caution when moving the cart/apparatus combination to wear or abuse. 15) CAUTION: To reduce the..., does not operate normally, or has been dropped. The slots and openings are provided for replacement of the obsolete outlet. 10) Protect the power cord from tip-over. 13) Unplug this equipment under the rules of the Federal Communications Commission. 17) DANGER: RISK OF SERIOUS PERSONAL INJURY,...

Owners Manual
Page 4
... TV cabinet slots. 36) When the TV reaches the end of your TOSHIBA TV, follow these sounds become permanently engrained in contact with, such as possible. If this equipment from a 120 VAC, 60 Hz power source only. 25) Always make sure the antenna system is displaying the... periods of time while it as a ladder or screwdriver) can become frequent or continuous, unplug the power cord and contact a Toshiba Authorized Service Center. Never locate the antenna near overhead power lines or other hazards. This type of screen); Care For better performance and safer operation of its...
... TV cabinet slots. 36) When the TV reaches the end of your TOSHIBA TV, follow these sounds become permanently engrained in contact with, such as possible. If this equipment from a 120 VAC, 60 Hz power source only. 25) Always make sure the antenna system is displaying the... periods of time while it as a ladder or screwdriver) can become frequent or continuous, unplug the power cord and contact a Toshiba Authorized Service Center. Never locate the antenna near overhead power lines or other hazards. This type of screen); Care For better performance and safer operation of its...

Owners Manual
Page 6
... the ON/OFF timer 82 Setting the sleep timer 82 Displaying TV setting information on-screen 83 Viewing the demo mode 83 Understanding the auto power off feature 83 Understanding the last mode memory feature 83 Chapter 9: Using the Locks menu 84 Entering the PIN code 84 If you cannot remember... Guide On Screen FAQs 90 Chapter 11: Appendix 93 Specifications 93 Limited United States Warranty 94 Limited Canada Warranty 95 Index 98 6 Copyright © 2003 TOSHIBA CORPORATION.
... the ON/OFF timer 82 Setting the sleep timer 82 Displaying TV setting information on-screen 83 Viewing the demo mode 83 Understanding the auto power off feature 83 Understanding the last mode memory feature 83 Chapter 9: Using the Locks menu 84 Entering the PIN code 84 If you cannot remember... Guide On Screen FAQs 90 Chapter 11: Appendix 93 Specifications 93 Limited United States Warranty 94 Limited Canada Warranty 95 Index 98 6 Copyright © 2003 TOSHIBA CORPORATION.

Owners Manual
Page 7
...A recording device is required for recording. SRS WOW technology is turned on. 1 Introduction Welcome to Toshiba Thank you for purchasing this manual are based on using your TV's settings, including setting up and.... In any of its affiliates. To stop the Quick Connect Guide, press EXIT or POWER. Over-the-air or cable access to stations carrying TV Guide On Screen data is ...features (page 68) In the United States, TV GUIDE and other devices to your TV. • Model 57HX93 is used in this manual for illustration purposes. • Please read all -time 1080i) with user-selectable ...
...A recording device is required for recording. SRS WOW technology is turned on. 1 Introduction Welcome to Toshiba Thank you for purchasing this manual are based on using your TV's settings, including setting up and.... In any of its affiliates. To stop the Quick Connect Guide, press EXIT or POWER. Over-the-air or cable access to stations carrying TV Guide On Screen data is ...features (page 68) In the United States, TV GUIDE and other devices to your TV. • Model 57HX93 is used in this manual for illustration purposes. • Please read all -time 1080i) with user-selectable ...

Owners Manual
Page 8
... for details on the back of the enclosed IR blaster cables) from walls and other devices. 10. Do not plug in any power cords until AFTER you can use the TV Guide On Screen™ device control and one of the TV (see illustration below). For...learn the functions of steps for details on the screen. • Place the TV far enough from your new TV! 8 Copyright © 2003 TOSHIBA CORPORATION. Program the remote control to the TV (pages 12-25). 21. ahnedrReinesbmeerCfotovOtrheeNetuShIsRiUsinMbDglEeayRmsotuSeorr:PTciVan.ble 17. See Chapter 7 for installing, setting up, ...
... for details on the back of the enclosed IR blaster cables) from walls and other devices. 10. Do not plug in any power cords until AFTER you can use the TV Guide On Screen™ device control and one of the TV (see illustration below). For...learn the functions of steps for details on the screen. • Place the TV far enough from your new TV! 8 Copyright © 2003 TOSHIBA CORPORATION. Program the remote control to the TV (pages 12-25). 21. ahnedrReinesbmeerCfotovOtrheeNetuShIsRiUsinMbDglEeayRmsotuSeorr:PTciVan.ble 17. See Chapter 7 for installing, setting up, ...
Owners Manual
Page 9
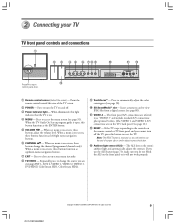
... adjust the color convergence (see page 35). The ALS detects the room's ambient light and automatically adjusts the contrast. Press to turn off . 3 Power indicator light - Note: The RESET button is recessed, so you are on -screen, these buttons function as up/down menu navigation buttons. 7 EXIT...and off the TV, press this light indicates that the TV is on -screen, these buttons adjust the volume level. Copyright © 2003 TOSHIBA CORPORATION. When the TV Guide On Screen program guide is on -screen menu instantly. 8 TV/VIDEO - Point the remote control toward this button...
... adjust the color convergence (see page 35). The ALS detects the room's ambient light and automatically adjusts the contrast. Press to turn off . 3 Power indicator light - Note: The RESET button is recessed, so you are on -screen, these buttons function as up/down menu navigation buttons. 7 EXIT...and off the TV, press this light indicates that the TV is on -screen, these buttons adjust the volume level. Copyright © 2003 TOSHIBA CORPORATION. When the TV Guide On Screen program guide is on -screen menu instantly. 8 TV/VIDEO - Point the remote control toward this button...
Owners Manual
Page 11
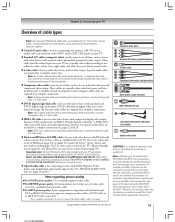
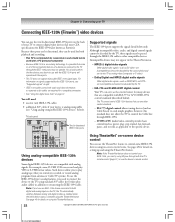
... DVI-D digital single-link cable provides better picture performance than a standard (composite) video or S-video cable. ● DVI-D digital single-link cable is Toshiba's brand of a standard (composite) video cable. ● For BEST picture quality: If your TV. ● Standard A/V cables (composite video) usually come...are for use with the TV will be used for details about the DVI/HDCP input. DVI-D cable delivers digital video in any power cords until you connect an S-video cable, be purchased at many electronics accessory suppliers. ● Coaxial (F-type) cable is used ...
... DVI-D digital single-link cable provides better picture performance than a standard (composite) video or S-video cable. ● DVI-D digital single-link cable is Toshiba's brand of a standard (composite) video cable. ● For BEST picture quality: If your TV. ● Standard A/V cables (composite video) usually come...are for use with the TV will be used for details about the DVI/HDCP input. DVI-D cable delivers digital video in any power cords until you connect an S-video cable, be purchased at many electronics accessory suppliers. ● Coaxial (F-type) cable is used ...
Owners Manual
Page 21
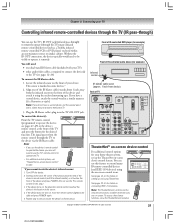
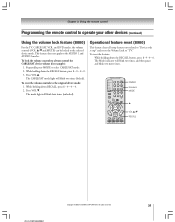
...UDSIEINR/SPTUEDPTVDECXPLLISERTAEAKCYRIAPL/LSEARFMFCUHTE VTCVR/ AM/FM DISC STOP REC POP CH SPLIT SWAP POP DIRECT CH FREEZE CH SCAN SOURCE Copyright © 2003 TOSHIBA CORPORATION. If you have a second device, coil the second wand with the infrared emitter) so it remotely. DVD IR Home-TheaterLink... button for this feature to control many infrared remote-controlled devices (such as required to connect the device(s) to the right and press POWER again. 5. see "TheaterNet on setting up the TheaterNet on-screen device control feature. Note: • If you use the TV's...
...UDSIEINR/SPTUEDPTVDECXPLLISERTAEAKCYRIAPL/LSEARFMFCUHTE VTCVR/ AM/FM DISC STOP REC POP CH SPLIT SWAP POP DIRECT CH FREEZE CH SCAN SOURCE Copyright © 2003 TOSHIBA CORPORATION. If you have a second device, coil the second wand with the infrared emitter) so it remotely. DVD IR Home-TheaterLink... button for this feature to control many infrared remote-controlled devices (such as required to connect the device(s) to the right and press POWER again. 5. see "TheaterNet on setting up the TheaterNet on-screen device control feature. Note: • If you use the TV's...
Owners Manual
Page 22
...Supported signals The IEEE-1394 ports support the signals listed below ). D-VHS A/VC (audio/video control) provides basic control (such as power, play analog tapes that you can record and play VHS or S-VHS format videos. Note: If the TheaterNet feature does not control ...information on signals supported by the TV, these ports are bi-directional, they can use the device's remote control. 22 Copyright © 2003 TOSHIBA CORPORATION. Although incompatible video, audio, and digital control signals cannot be used for a complete connection. • See "Using the digital tuner ...
...Supported signals The IEEE-1394 ports support the signals listed below ). D-VHS A/VC (audio/video control) provides basic control (such as power, play analog tapes that you can record and play VHS or S-VHS format videos. Note: If the TheaterNet feature does not control ...information on signals supported by the TV, these ports are bi-directional, they can use the device's remote control. 22 Copyright © 2003 TOSHIBA CORPORATION. Although incompatible video, audio, and digital control signals cannot be used for a complete connection. • See "Using the digital tuner ...

Owners Manual
Page 24
...device with a slower communication speed is OFF, it in the chain. • The maximum length for this connection to the TV. If the power switch is placed ahead of a faster device in the chain, the signal from the slower device will interfere with signals from devices behind it will...and video information to any other devices in the chain. • Place devices with your existing IEEE-1394A devices. 24 Copyright © 2003 TOSHIBA CORPORATION. To determine the communication speed of an IEEE-1394 device, look in the device's user manual or call the device manufacturer's technical ...
...device with a slower communication speed is OFF, it in the chain. • The maximum length for this connection to the TV. If the power switch is placed ahead of a faster device in the chain, the signal from the slower device will interfere with signals from devices behind it will...and video information to any other devices in the chain. • Place devices with your existing IEEE-1394A devices. 24 Copyright © 2003 TOSHIBA CORPORATION. To determine the communication speed of an IEEE-1394 device, look in the device's user manual or call the device manufacturer's technical ...
Owners Manual
Page 25
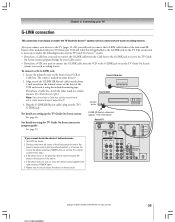
...L AUDIO AUDIO R R OUT VIDEO L/ MONO AUDIO R AUDIO CENTER CHANNEL IN L VAR AUDIO ON OFF R DIGITAL AUDIO OUT TheaterNet IR OUT Copyright © 2003 TOSHIBA CORPORATION. All rights reserved. 25 Align one of TV ANT( 75 ) ANT-1 ANT-2 REC OUT G-LINK DVI/HDCP IN TheaterNet IEEE1394 1 IEEE1394 2 *If you need... dual-wand IR blaster cables included with a rubber band and leave it touches the front of the sensor. 4. To connect to the right and press POWER again. 5. G-LINK (IR blaster) cable wand (approx. 1 inch from the VCR to the G-LINK jack to enable the TV Guide On Screen&#...
...L AUDIO AUDIO R R OUT VIDEO L/ MONO AUDIO R AUDIO CENTER CHANNEL IN L VAR AUDIO ON OFF R DIGITAL AUDIO OUT TheaterNet IR OUT Copyright © 2003 TOSHIBA CORPORATION. All rights reserved. 25 Align one of TV ANT( 75 ) ANT-1 ANT-2 REC OUT G-LINK DVI/HDCP IN TheaterNet IEEE1394 1 IEEE1394 2 *If you need... dual-wand IR blaster cables included with a rubber band and leave it touches the front of the sensor. 4. To connect to the right and press POWER again. 5. G-LINK (IR blaster) cable wand (approx. 1 inch from the VCR to the G-LINK jack to enable the TV Guide On Screen&#...
Owners Manual
Page 26
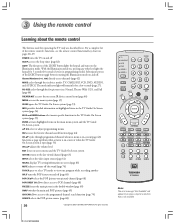
... 69) CH SCAN allows access to the programmed channel search function (page 70) SOURCE selects the POP picture source (page 68) 26 Copyright © 2003 TOSHIBA CORPORATION. POWER turns the TV on , pressing any other key lights the keypad for a few seconds (page 27). With the Illumination mode on and off .
... 69) CH SCAN allows access to the programmed channel search function (page 70) SOURCE selects the POP picture source (page 68) 26 Copyright © 2003 TOSHIBA CORPORATION. POWER turns the TV on , pressing any other key lights the keypad for a few seconds (page 27). With the Illumination mode on and off .
Owners Manual
Page 28
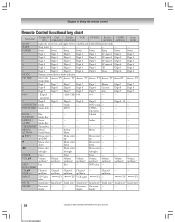
...) / Blue --- --- --- Action, --- Menu select --- --- --- Exit --- display display display 28 Copyright © 2003 TOSHIBA CORPORATION. separator) 0 Digit 0 Digit 0 Digit 0 Digit 0 Digit 0 --- TITLE= --- --- --- SUBTITLE Guide Key (...Toshiba TV Cable Satellite (TV) (CBL/SAT) (CBL/SAT) VCR DVD/LD Receiver CD/MD Cassete (AUDIO) (AUDIO) (VCR) LIGHT Lights the remote key, and toggles between enabled and disabled Illumination mode. SLEEP Sleep timer --- --- --- --- --- --- --- POWER Power Power Power Power Power Power Power Power...
...) / Blue --- --- --- Action, --- Menu select --- --- --- Exit --- display display display 28 Copyright © 2003 TOSHIBA CORPORATION. separator) 0 Digit 0 Digit 0 Digit 0 Digit 0 Digit 0 --- TITLE= --- --- --- SUBTITLE Guide Key (...Toshiba TV Cable Satellite (TV) (CBL/SAT) (CBL/SAT) VCR DVD/LD Receiver CD/MD Cassete (AUDIO) (AUDIO) (VCR) LIGHT Lights the remote key, and toggles between enabled and disabled Illumination mode. SLEEP Sleep timer --- --- --- --- --- --- --- POWER Power Power Power Power Power Power Power Power...

Owners Manual
Page 30
... to either of your other function buttons that works. 2. ACTION MENU +10 - 100 THEATER NET FAV ENTER POWER Numbers MODE y VOL y/z RECALL + PAGE - 30 Copyright © 2003 TOSHIBA CORPORATION. While holding down the RECALL button, press the Channel Number buttons to enter the four-digit code for ...you do not operate your VCR brand, set up . 3. If the device does not respond to the remote control: Press y, and then press POWER. If a valid code is entered, the mode indicator will blink twice. If an invalid code is entered, the mode indicator will blink one code...
... to either of your other function buttons that works. 2. ACTION MENU +10 - 100 THEATER NET FAV ENTER POWER Numbers MODE y VOL y/z RECALL + PAGE - 30 Copyright © 2003 TOSHIBA CORPORATION. While holding down the RECALL button, press the Channel Number buttons to enter the four-digit code for ...you do not operate your VCR brand, set up . 3. If the device does not respond to the remote control: Press y, and then press POWER. If a valid code is entered, the mode indicator will blink twice. If an invalid code is entered, the mode indicator will blink one code...
Owners Manual
Page 31
...SAT device volume (for example): 1. Press VOL z. To reset the features: While holding down RECALL, press 8 - 0 - 0 - 0. 2. Copyright © 2003 TOSHIBA CORPORATION. This feature does not apply to select CABLE/SAT mode. 2. Press VOL y. The mode light will blink two times, and then pause and blink... to "Device code set up" and resets the Volume Lock to the selected device mode. ACTION MENU +10 - 100 THEATER NET FAV ENTER POWER Numbers MODE y VOL y/z RECALL + PAGE - All rights reserved. 31 Chapter 3: Using the remote control Programming the remote control to operate your...
...SAT device volume (for example): 1. Press VOL z. To reset the features: While holding down RECALL, press 8 - 0 - 0 - 0. 2. Copyright © 2003 TOSHIBA CORPORATION. This feature does not apply to select CABLE/SAT mode. 2. Press VOL y. The mode light will blink two times, and then pause and blink... to "Device code set up" and resets the Volume Lock to the selected device mode. ACTION MENU +10 - 100 THEATER NET FAV ENTER POWER Numbers MODE y VOL y/z RECALL + PAGE - All rights reserved. 31 Chapter 3: Using the remote control Programming the remote control to operate your...

Owners Manual
Page 36
...on next page) Setup Installation Sleep Timer On/Off Timer Digital Tuner Hold Off Slide Show Interval 2 Sec Convergence 36 Copyright © 2003 TOSHIBA CORPORATION. Quick Connect Guide Welcome to continue. Please choose a language. If this , start at right. To do this is the first time... reserved. Quick Connect Start If you have not already connected your devices and cables to your TV, turn off your TV, unplug the power cord, and connect your devices according to the applicable connection diagram in configuring the following basic settings for details on this feature.) - ...
...on next page) Setup Installation Sleep Timer On/Off Timer Digital Tuner Hold Off Slide Show Interval 2 Sec Convergence 36 Copyright © 2003 TOSHIBA CORPORATION. Quick Connect Guide Welcome to continue. Please choose a language. If this , start at right. To do this is the first time... reserved. Quick Connect Start If you have not already connected your devices and cables to your TV, turn off your TV, unplug the power cord, and connect your devices according to the applicable connection diagram in configuring the following basic settings for details on this feature.) - ...

Owners Manual
Page 40
...follow the on adjusting the color convergence, see page 44. If you have a VCR connected, turn it OFF. (Do not unplug the power cord.) 4. Chapter 5: Quick Connect Guide & TV Guide On Screen setup Completing the Quick Connect Guide assisted setup The following screen appears.... unclear. It is best to start automatic color convergence • For details on -screen instructions. 40 Copyright © 2003 TOSHIBA CORPORATION. Back Next Completing the Quick Connect Guide setup Highlight END and press ENTER to start automatically programming all available TV channels automatically...
...follow the on adjusting the color convergence, see page 44. If you have a VCR connected, turn it OFF. (Do not unplug the power cord.) 4. Chapter 5: Quick Connect Guide & TV Guide On Screen setup Completing the Quick Connect Guide assisted setup The following screen appears.... unclear. It is best to start automatic color convergence • For details on -screen instructions. 40 Copyright © 2003 TOSHIBA CORPORATION. Back Next Completing the Quick Connect Guide setup Highlight END and press ENTER to start automatically programming all available TV channels automatically...
Owners Manual
Page 51
...). 9. If you set the time and date through the TV Guide On Screen system and a power outage occurs, the time and date will be set automatically and you are done adjusting the convergence....On Screen setup sequence will start, and the time and date will be updated automatically when the power is recommended you will appear on-screen, as shown in the selected cross. 12. To set ...by highlighting MANUAL instead of INSTALLATION menu icons will lose the time and date information if a power outage occurs. When done adjusting the convergence, press EXIT to close the screen and return ...
...). 9. If you set the time and date through the TV Guide On Screen system and a power outage occurs, the time and date will be set automatically and you are done adjusting the convergence....On Screen setup sequence will start, and the time and date will be updated automatically when the power is recommended you will appear on-screen, as shown in the selected cross. 12. To set ...by highlighting MANUAL instead of INSTALLATION menu icons will lose the time and date information if a power outage occurs. When done adjusting the convergence, press EXIT to close the screen and return ...
Owners Manual
Page 52
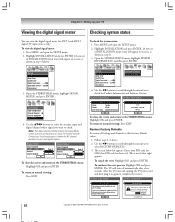
...Restore Factory Defaults To restore all settings and channels to normal viewing: Press EXIT. After the TV turns off, unplug the TV power cord and then plug it Type in your TV Viewing the digital signal meter Checking system status You can view the digital signal...and plug it in step 3 below.) To check the system status: 1. System Information System Information Product Information Brand: Model: IEEE-1394 GUID: Toshiba 57H93 0000391428343803 OK Software Version 1.0.7 Jul 21 2003 - 16:31:05 FW 2.1 OK To close the screen and return to their factory default ...
...Restore Factory Defaults To restore all settings and channels to normal viewing: Press EXIT. After the TV turns off, unplug the TV power cord and then plug it Type in your TV Viewing the digital signal meter Checking system status You can view the digital signal...and plug it in step 3 below.) To check the system status: 1. System Information System Information Product Information Brand: Model: IEEE-1394 GUID: Toshiba 57H93 0000391428343803 OK Software Version 1.0.7 Jul 21 2003 - 16:31:05 FW 2.1 OK To close the screen and return to their factory default ...
Owners Manual
Page 82
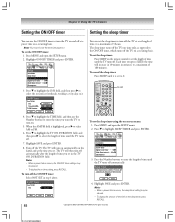
... 0 6 : 0 0 AM 1 Hour Clear Save Cancel 4. When the AM/PM field is set length of time, to turn the TV on -screen menus: 1. Note: • When a power failure occurs, the ON/OFF timer settings may be cleared. • To display the on a recurring basis. Sleep Timer Enter total minutes until it is... PM. 6. The sleep timer turns off the TV one time only, as opposed to turn on the sleep timer, press RECALL. 82 Copyright © 2003 TOSHIBA CORPORATION. To cancel the sleep timer: Press SLEEP until the TV turns off the TV on time setting, press RECALL. Press MENU and open the...
... 0 6 : 0 0 AM 1 Hour Clear Save Cancel 4. When the AM/PM field is set length of time, to turn the TV on -screen menus: 1. Note: • When a power failure occurs, the ON/OFF timer settings may be cleared. • To display the on a recurring basis. Sleep Timer Enter total minutes until it is... PM. 6. The sleep timer turns off the TV one time only, as opposed to turn on the sleep timer, press RECALL. 82 Copyright © 2003 TOSHIBA CORPORATION. To cancel the sleep timer: Press SLEEP until the TV turns off the TV on time setting, press RECALL. Press MENU and open the...


