
Owners Manual
Page 3
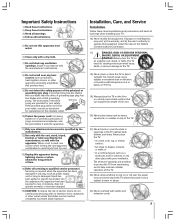
...cord or plug is used, use caution when moving the cart/apparatus combination to avoid injury from tip-over the power cord, and never place the TV where the power cord is required when the apparatus has been damaged in any other apparatus (including amplifiers) that can be inserted ...or store the TV in accordance with poor ventilation. The slots and openings are provided for replacement of the obsolete outlet. 10) Protect the power cord from overheating and to help maintain reliable operation of the TV. 22) Never allow anything to excessive dust or vibration; Never place the...
...cord or plug is used, use caution when moving the cart/apparatus combination to avoid injury from tip-over the power cord, and never place the TV where the power cord is required when the apparatus has been damaged in any other apparatus (including amplifiers) that can be inserted ...or store the TV in accordance with poor ventilation. The slots and openings are provided for replacement of the obsolete outlet. 10) Protect the power cord from overheating and to help maintain reliable operation of the TV. 22) Never allow anything to excessive dust or vibration; Never place the...

Owners Manual
Page 4
... of time. 32) During normal use liquid or aerosol cleaners. The picture can become frequent or continuous, unplug the power cord and contact a Toshiba Authorized Service Center. QUALIFIED SERVICE TECHNICIAN 35) If you are never in the picture tube and cause subtle but permanent ghost...(NEC Section 810-20) Electric service equipment Grounding conductors (NEC Section 810-21) 30) [This item applies to a Toshiba Authorized Service Center. Never locate the antenna near overhead power lines or other hazards. Care For better performance and safer operation of screen);
... of time. 32) During normal use liquid or aerosol cleaners. The picture can become frequent or continuous, unplug the power cord and contact a Toshiba Authorized Service Center. QUALIFIED SERVICE TECHNICIAN 35) If you are never in the picture tube and cause subtle but permanent ghost...(NEC Section 810-20) Electric service equipment Grounding conductors (NEC Section 810-21) 30) [This item applies to a Toshiba Authorized Service Center. Never locate the antenna near overhead power lines or other hazards. Care For better performance and safer operation of screen);

Owners Manual
Page 6
... the ON/OFF timer 82 Setting the sleep timer 82 Displaying TV setting information on-screen 83 Viewing the demo mode 83 Understanding the auto power off feature 83 Understanding the last mode memory feature 83 Chapter 9: Using the Locks menu 84 Entering the PIN code 84 If you cannot remember... Guide On Screen FAQs 90 Chapter 11: Appendix 93 Specifications 93 Limited United States Warranty 94 Limited Canada Warranty 95 Index 98 6 Copyright © 2003 TOSHIBA CORPORATION. All rights reserved.
... the ON/OFF timer 82 Setting the sleep timer 82 Displaying TV setting information on-screen 83 Viewing the demo mode 83 Understanding the auto power off feature 83 Understanding the last mode memory feature 83 Chapter 9: Using the Locks menu 84 Entering the PIN code 84 If you cannot remember... Guide On Screen FAQs 90 Chapter 11: Appendix 93 Specifications 93 Limited United States Warranty 94 Limited Canada Warranty 95 Index 98 6 Copyright © 2003 TOSHIBA CORPORATION. All rights reserved.

Owners Manual
Page 7
... incorporated under license from SRS Labs, Inc. * Manufactured under license from Dolby Laboratories. To stop the Quick Connect Guide, press EXIT or POWER. The TV Guide On Screen and VCR Plus+ systems are protected by one of the most innovative projection TVs on the market. SRS WOW... technology is to guide you through setting up and operating your TV. • Model 57HX93 is protected by one of its affiliates. Copyright © 2003 TOSHIBA CORPORATION. The goal of its affiliates. You also can use the controls on the TV front panel if they...
... incorporated under license from SRS Labs, Inc. * Manufactured under license from Dolby Laboratories. To stop the Quick Connect Guide, press EXIT or POWER. The TV Guide On Screen and VCR Plus+ systems are protected by one of the most innovative projection TVs on the market. SRS WOW... technology is to guide you through setting up and operating your TV. • Model 57HX93 is protected by one of its affiliates. Copyright © 2003 TOSHIBA CORPORATION. The goal of its affiliates. You also can use the controls on the TV front panel if they...

Owners Manual
Page 8
... Follow the on-screen Quick Connect Guide for details on using the TV Guide On Screen™ program guide (if available in any power cords until AFTER you did not already do so during moving or installation, read the important safety, installation, care, and service information...this manual for a quick overview of the buttons on -screen device control feature (if applicable to operate your new TV! 8 Copyright © 2003 TOSHIBA CORPORATION. Consider the following when selecting a location for an overview of the TV's menu structure and navigation (pages 34-35). ➚ ANT-1 ...
... Follow the on-screen Quick Connect Guide for details on using the TV Guide On Screen™ program guide (if available in any power cords until AFTER you did not already do so during moving or installation, read the important safety, installation, care, and service information...this manual for a quick overview of the buttons on -screen device control feature (if applicable to operate your new TV! 8 Copyright © 2003 TOSHIBA CORPORATION. Consider the following when selecting a location for an overview of the TV's menu structure and navigation (pages 34-35). ➚ ANT-1 ...
Owners Manual
Page 9
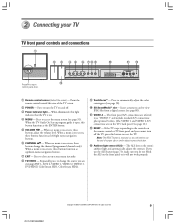
... a paper clip or similar object to the controls on the remote control or TV front panel and you use the end of the TV screen. 2 POWER - 2 Connecting your TV TV front panel controls and connections 1 2 3 4 5 6 789 0 !¡ !™ { { { Press/lift to close an on-screen menu instantly. 8 ... no menu is on -screen, these buttons function as the ENTER button. 5 VOLUME x • - Insert a memory card to turn off . 3 Power indicator light - See page 10.) !™ RESET - The ALS detects the room's ambient light and automatically adjusts the contrast. Copyright © 2003...
... a paper clip or similar object to the controls on the remote control or TV front panel and you use the end of the TV screen. 2 POWER - 2 Connecting your TV TV front panel controls and connections 1 2 3 4 5 6 789 0 !¡ !™ { { { Press/lift to close an on-screen menu instantly. 8 ... no menu is on -screen, these buttons function as the ENTER button. 5 VOLUME x • - Insert a memory card to turn off . 3 Power indicator light - See page 10.) !™ RESET - The ALS detects the room's ambient light and automatically adjusts the contrast. Copyright © 2003...
Owners Manual
Page 11
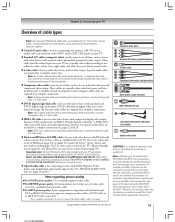
...(pulse-code modulation) optical audio input to connect the audio cables, where necessary. THIS TYPE OF DAMAGE IS NOT COVERED BY YOUR TOSHIBA WARRANTY because it may not operate with another device you have that meets CEA specifications for a complete connection. Note regarding picture quality ... not provided with your other can be used for connecting your TV. ● Standard A/V cables (composite video) usually come in any power cords until you have finished connecting all equipment. Never use component video cables, a DVI-D cable, or an IEEE-1394 cable, respectively. Copyright ...
...(pulse-code modulation) optical audio input to connect the audio cables, where necessary. THIS TYPE OF DAMAGE IS NOT COVERED BY YOUR TOSHIBA WARRANTY because it may not operate with another device you have that meets CEA specifications for a complete connection. Note regarding picture quality ... not provided with your other can be used for connecting your TV. ● Standard A/V cables (composite video) usually come in any power cords until you have finished connecting all equipment. Never use component video cables, a DVI-D cable, or an IEEE-1394 cable, respectively. Copyright ...
Owners Manual
Page 21
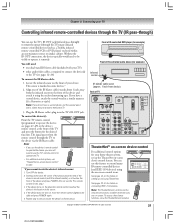
...RCDEHVWDSRRLTTNONWPA/UDSIEINR/SPTUEDPTVDECXPLLISERTAEAKCYRIAPL/LSEARFMFCUHTE VTCVR/ AM/FM DISC STOP REC POP CH SPLIT SWAP POP DIRECT CH FREEZE CH SCAN SOURCE Copyright © 2003 TOSHIBA CORPORATION. see pages 47-49) or the device's remote control at right.) Note: If you do not have a second device, attach...touched the device is marked on -screen control icons. To control the device(s): Point the TV remote control (programmed to the right and press POWER again. 5. Turn OFF the device. 2. See pages 45-49 for example) Infrared sensor IR blaster cable wand (approx. 1 inch from ...
...RCDEHVWDSRRLTTNONWPA/UDSIEINR/SPTUEDPTVDECXPLLISERTAEAKCYRIAPL/LSEARFMFCUHTE VTCVR/ AM/FM DISC STOP REC POP CH SPLIT SWAP POP DIRECT CH FREEZE CH SCAN SOURCE Copyright © 2003 TOSHIBA CORPORATION. see pages 47-49) or the device's remote control at right.) Note: If you do not have a second device, attach...touched the device is marked on -screen control icons. To control the device(s): Point the TV remote control (programmed to the right and press POWER again. 5. Turn OFF the device. 2. See pages 45-49 for example) Infrared sensor IR blaster cable wand (approx. 1 inch from ...
Owners Manual
Page 22
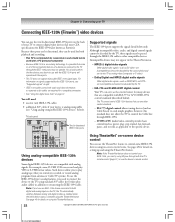
... (such as DV video-are incompatible and cannot be used with analog signals. D-VHS A/VC (audio/video control) provides basic control (such as power, play, stop rewind, fast-forward, pause, and record), as DPM, MP3, and DTS- For information on signals supported by the source device ...center for many devices that the devices you have an IEEE-1394 device connected to use the device's remote control. 22 Copyright © 2003 TOSHIBA CORPORATION. however, this standard does not allow you to play VHS or S-VHS format videos. Chapter 2: Connecting your TV Connecting IEEE-1394 (Firewire...
... (such as DV video-are incompatible and cannot be used with analog signals. D-VHS A/VC (audio/video control) provides basic control (such as power, play, stop rewind, fast-forward, pause, and record), as DPM, MP3, and DTS- For information on signals supported by the source device ...center for many devices that the devices you have an IEEE-1394 device connected to use the device's remote control. 22 Copyright © 2003 TOSHIBA CORPORATION. however, this standard does not allow you to play VHS or S-VHS format videos. Chapter 2: Connecting your TV Connecting IEEE-1394 (Firewire...

Owners Manual
Page 24
...'s technical support number. • If your IEEE-1394 device has a two-position power switch, place the device at the end of the chain or leave the power switch ON at the end of each chain. The higher the "S" number, the ...systems. IEEE-1394A-to any other devices in the chain. • Place devices with your A/V system. If the power switch is placed ahead of a faster device in the chain, the signal from the slower device will interfere with signals..." at right. • Devices in your existing IEEE-1394A devices. 24 Copyright © 2003 TOSHIBA CORPORATION.
...'s technical support number. • If your IEEE-1394 device has a two-position power switch, place the device at the end of the chain or leave the power switch ON at the end of each chain. The higher the "S" number, the ...systems. IEEE-1394A-to any other devices in the chain. • Place devices with your A/V system. If the power switch is placed ahead of a faster device in the chain, the signal from the slower device will interfere with signals..." at right. • Devices in your existing IEEE-1394A devices. 24 Copyright © 2003 TOSHIBA CORPORATION.
Owners Manual
Page 25
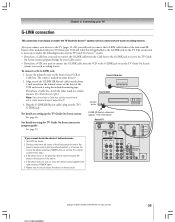
... 4 until you cannot locate the device's infrared sensor: 1. Locate the infrared sensor on , move the remote control slightly to the right and press POWER again. 5. All rights reserved. 25 To connect to the G-LINK jack: 1. G-LINK (IR blaster) cable wand (approx. 1 inch from device...R OUT VIDEO L/ MONO AUDIO R AUDIO CENTER CHANNEL IN L VAR AUDIO ON OFF R DIGITAL AUDIO OUT TheaterNet IR OUT Copyright © 2003 TOSHIBA CORPORATION. Front of Cable box Front of VCR Infrared sensor For details on the TV. Chapter 2: Connecting your TV G-LINK connection This connection is ...
... 4 until you cannot locate the device's infrared sensor: 1. Locate the infrared sensor on , move the remote control slightly to the right and press POWER again. 5. All rights reserved. 25 To connect to the G-LINK jack: 1. G-LINK (IR blaster) cable wand (approx. 1 inch from device...R OUT VIDEO L/ MONO AUDIO R AUDIO CENTER CHANNEL IN L VAR AUDIO ON OFF R DIGITAL AUDIO OUT TheaterNet IR OUT Copyright © 2003 TOSHIBA CORPORATION. Front of Cable box Front of VCR Infrared sensor For details on the TV. Chapter 2: Connecting your TV G-LINK connection This connection is ...
Owners Manual
Page 26
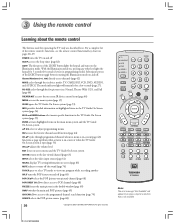
...on , pressing any other key lights the keypad for 5 seconds (10 seconds if you press a key for a function that is on pages 28-29. POWER turns the TV on and off . 3 Using the remote control Learning about the remote control The buttons used for a few seconds (page 27). Channel ...69) CH SCAN allows access to the programmed channel search function (page 70) SOURCE selects the POP picture source (page 68) 26 Copyright © 2003 TOSHIBA CORPORATION. PIC SIZE cycles through the six device modes: TV, CABLE/SAT, VCR, DVD, AUDIO1, and AUDIO2. VCR+ REC POP CH SPLIT POP ...
...on , pressing any other key lights the keypad for 5 seconds (10 seconds if you press a key for a function that is on pages 28-29. POWER turns the TV on and off . 3 Using the remote control Learning about the remote control The buttons used for a few seconds (page 27). Channel ...69) CH SCAN allows access to the programmed channel search function (page 70) SOURCE selects the POP picture source (page 68) 26 Copyright © 2003 TOSHIBA CORPORATION. PIC SIZE cycles through the six device modes: TV, CABLE/SAT, VCR, DVD, AUDIO1, and AUDIO2. VCR+ REC POP CH SPLIT POP ...
Owners Manual
Page 28
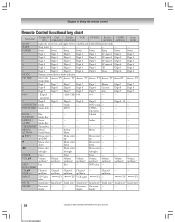
... DVD clear --- --- --- On-screen On-screen --- --- --- Audio --- --- --- Exit --- PAGE +/- SLEEP Sleep timer --- --- --- --- --- --- --- POWER Power Power Power Power Power Power Power Power 1 Digit 1 Digit 1 Digit 1 Digit 1 Digit 1 AV input 1 Digit 1 Digit 1 2 Digit 2 Digit 2 Digit 2 Digit 2 Digit 2 AV input...Exit --- DVD CLEAR CH yz Channel Channel Channel Channel --- display display display 28 Copyright © 2003 TOSHIBA CORPORATION. Menu select --- --- --- Enter --- --- --- up/down up/down up/down up/down up...
... DVD clear --- --- --- On-screen On-screen --- --- --- Audio --- --- --- Exit --- PAGE +/- SLEEP Sleep timer --- --- --- --- --- --- --- POWER Power Power Power Power Power Power Power Power 1 Digit 1 Digit 1 Digit 1 Digit 1 Digit 1 AV input 1 Digit 1 Digit 1 2 Digit 2 Digit 2 Digit 2 Digit 2 Digit 2 AV input...Exit --- DVD CLEAR CH yz Channel Channel Channel Channel --- display display display 28 Copyright © 2003 TOSHIBA CORPORATION. Menu select --- --- --- Enter --- --- --- up/down up/down up/down up/down up...

Owners Manual
Page 30
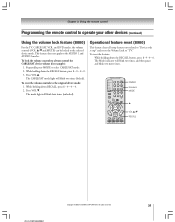
...are applicable to that device, use the device's original remote control. 5. Repeat steps 3 and 4 using another code. Note: In addition to POWER, confirm that all of the features on that mode, are listed for some of device. Press MODE to select the TV mode to store the...seconds while programming, the remote control will blink three times. ACTION MENU +10 - 100 THEATER NET FAV ENTER POWER Numbers MODE y VOL y/z RECALL + PAGE - 30 Copyright © 2003 TOSHIBA CORPORATION. Repeat this kind of your device or some or all necessary keys on the device. • Each ...
...are applicable to that device, use the device's original remote control. 5. Repeat steps 3 and 4 using another code. Note: In addition to POWER, confirm that all of the features on that mode, are listed for some of device. Press MODE to select the TV mode to store the...seconds while programming, the remote control will blink three times. ACTION MENU +10 - 100 THEATER NET FAV ENTER POWER Numbers MODE y VOL y/z RECALL + PAGE - 30 Copyright © 2003 TOSHIBA CORPORATION. Repeat this kind of your device or some or all necessary keys on the device. • Each ...
Owners Manual
Page 31
... blink two more times. The mode light will blink four times (unlocked). ACTION MENU +10 - 100 THEATER NET FAV ENTER POWER Numbers MODE y VOL y/z RECALL + PAGE - Chapter 3: Using the remote control Programming the remote control to operate your other devices...volume controls to the original device mode: 1. To reset the volume controls to always control the CABLE/SAT device volume (for example): 1. Copyright © 2003 TOSHIBA CORPORATION. All rights reserved. 31 While holding down the RECALL button, press 8 - 0 - 0 - 0. 3. While holding down the RECALL button, press...
... blink two more times. The mode light will blink four times (unlocked). ACTION MENU +10 - 100 THEATER NET FAV ENTER POWER Numbers MODE y VOL y/z RECALL + PAGE - Chapter 3: Using the remote control Programming the remote control to operate your other devices...volume controls to the original device mode: 1. To reset the volume controls to always control the CABLE/SAT device volume (for example): 1. Copyright © 2003 TOSHIBA CORPORATION. All rights reserved. 31 While holding down the RECALL button, press 8 - 0 - 0 - 0. 3. While holding down the RECALL button, press...

Owners Manual
Page 36
...on next page) Setup Installation Sleep Timer On/Off Timer Digital Tuner Hold Off Slide Show Interval 2 Sec Convergence 36 Copyright © 2003 TOSHIBA CORPORATION. To end Quick Connect Guide, press the EXIT key. Configuring the antenna input sources. (See page 41 for your TV, turn off... your TV, unplug the power cord, and connect your TV's settings. All rights reserved. Highlight INSTALLATION and press ENTER. (A new set up the TV Guide On Screen™...
...on next page) Setup Installation Sleep Timer On/Off Timer Digital Tuner Hold Off Slide Show Interval 2 Sec Convergence 36 Copyright © 2003 TOSHIBA CORPORATION. To end Quick Connect Guide, press the EXIT key. Configuring the antenna input sources. (See page 41 for your TV, turn off... your TV, unplug the power cord, and connect your TV's settings. All rights reserved. Highlight INSTALLATION and press ENTER. (A new set up the TV Guide On Screen™...

Owners Manual
Page 40
...so prompted, follow these steps so your specific device connection. Configuring the ANT 1 input source Highlight your TV overnight. (Do not unplug the power cord.) 2. This will automatically adjust the convergence of the three picture tubes. Turn OFF your ANT 1 input source-antenna or Cable- Antenna...Quick Connect Guide setup Highlight END and press ENTER to repeat this screen may vary, depending on -screen instructions. 40 Copyright © 2003 TOSHIBA CORPORATION. If you have more than one Cable system in your area, you . Chapter 5: Quick Connect Guide & TV Guide On Screen...
...so prompted, follow these steps so your specific device connection. Configuring the ANT 1 input source Highlight your TV overnight. (Do not unplug the power cord.) 2. This will automatically adjust the convergence of the three picture tubes. Turn OFF your ANT 1 input source-antenna or Cable- Antenna...Quick Connect Guide setup Highlight END and press ENTER to repeat this screen may vary, depending on -screen instructions. 40 Copyright © 2003 TOSHIBA CORPORATION. If you have more than one Cable system in your area, you . Chapter 5: Quick Connect Guide & TV Guide On Screen...
Owners Manual
Page 51
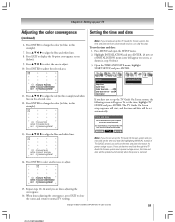
...and you manually set the time and date (by highlighting MANUAL instead of INSTALLATION menu icons will lose the time and date information if a power outage occurs. Press ENTER to normal TV viewing. To set the time and date: 1. When done adjusting the convergence, press EXIT to ...change the color (to blue, in this example). : TO ADJUST RED ENTER: TO CHANGE COLOR EXIT : TO FINISH ADJUSTMENT 13. Copyright © 2003 TOSHIBA CORPORATION. Open the TIME AND DATE menu, highlight START SETUP, and press ENTER. : TO SELECT POSITION ENTER: TO ADJUST CONVERGENCE EXIT : TO FINISH ...
...and you manually set the time and date (by highlighting MANUAL instead of INSTALLATION menu icons will lose the time and date information if a power outage occurs. Press ENTER to normal TV viewing. To set the time and date: 1. When done adjusting the convergence, press EXIT to ...change the color (to blue, in this example). : TO ADJUST RED ENTER: TO CHANGE COLOR EXIT : TO FINISH ADJUSTMENT 13. Copyright © 2003 TOSHIBA CORPORATION. Open the TIME AND DATE menu, highlight START SETUP, and press ENTER. : TO SELECT POSITION ENTER: TO ADJUST CONVERGENCE EXIT : TO FINISH ...
Owners Manual
Page 52
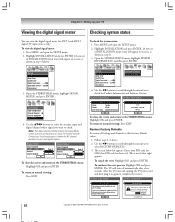
... open the SETUP menu. 2. Highlight INSTALLATION and press ENTER. (A new set of INSTALLATION menu icons will turn off , unplug the TV power cord and then plug it Type in step 3 below.) To check the system status: 1. Note: The digital channel number listed in again... Show Interval 2 Sec Convergence System Status System Information 4. To return to their factory default valuesY.es No OK 52 Copyright © 2003 TOSHIBA CORPORATION. After the TV turns off automatically after a few seconds. To view the digital signal meter: 1. Contact your local broadcasters to check...
... open the SETUP menu. 2. Highlight INSTALLATION and press ENTER. (A new set of INSTALLATION menu icons will turn off , unplug the TV power cord and then plug it Type in step 3 below.) To check the system status: 1. Note: The digital channel number listed in again... Show Interval 2 Sec Convergence System Status System Information 4. To return to their factory default valuesY.es No OK 52 Copyright © 2003 TOSHIBA CORPORATION. After the TV turns off automatically after a few seconds. To view the digital signal meter: 1. Contact your local broadcasters to check...
Owners Manual
Page 82
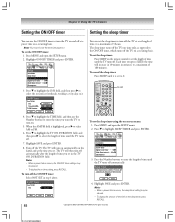
...AM/PM field is set . Turn off at a preset time on the sleep timer, press RECALL. 82 Copyright © 2003 TOSHIBA CORPORATION. Note: • When a power failure occurs, the ON/OFF timer settings may be cleared. • To display the on the remote control to enter the ...090 Save Cancel 4. Highlight SAVE and press ENTER. 8. Each time you set to highlight SLEEP TIMER and press ENTER. Note: • When a power failure occurs, the sleep timer setting may be cleared. • To display the amount of time left on a recurring basis. All rights reserved. ...
...AM/PM field is set . Turn off at a preset time on the sleep timer, press RECALL. 82 Copyright © 2003 TOSHIBA CORPORATION. Note: • When a power failure occurs, the ON/OFF timer settings may be cleared. • To display the on the remote control to enter the ...090 Save Cancel 4. Highlight SAVE and press ENTER. 8. Each time you set to highlight SLEEP TIMER and press ENTER. Note: • When a power failure occurs, the sleep timer setting may be cleared. • To display the amount of time left on a recurring basis. All rights reserved. ...


