
User Manual
Page 2
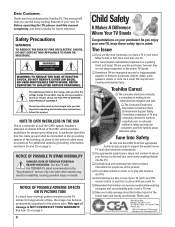
... a TV over , causing unnecessary injury. Use appropriate furniture large enough to climb on your TV (and other enclosed instructions for purchasing this Toshiba TV. Do not allow children to support the weight of your purchase! Child Safety It Makes A Difference Where Your TV Stands Safety Precautions...22201 U.S.A. As a result, TVs may result in your family and friends. Use with your home. Avoid placing any item on the TV screen for proper grounding and, in mind: TO REDUCE THE RISK OF FIRE OR ELECTRIC SHOCK, DO NOT EXPOSE THIS APPLIANCE TO RAIN OR MOISTURE....
... a TV over , causing unnecessary injury. Use appropriate furniture large enough to climb on your TV (and other enclosed instructions for purchasing this Toshiba TV. Do not allow children to support the weight of your purchase! Child Safety It Makes A Difference Where Your TV Stands Safety Precautions...22201 U.S.A. As a result, TVs may result in your family and friends. Use with your home. Avoid placing any item on the TV screen for proper grounding and, in mind: TO REDUCE THE RISK OF FIRE OR ELECTRIC SHOCK, DO NOT EXPOSE THIS APPLIANCE TO RAIN OR MOISTURE....
User Manual
Page 4
...05/02.2 4 Turn the TV off to check for reflections on the TV screen for long periods of time, the image can become frequent or continuous, unplug the power cord and contact a Toshiba Authorized Service Center. Ground clamps Power service grounding electrode system (NEC Art 250 ...yourself. Improper disposal may result in front of it is displaying the following during lightning activity: a) an antenna system; Never attempt to a Toshiba Authorized Service Center. 23) Always operate this happens, turn off the TV for 6 to 7 hours to allow the condensation to evaporate....
...05/02.2 4 Turn the TV off to check for reflections on the TV screen for long periods of time, the image can become frequent or continuous, unplug the power cord and contact a Toshiba Authorized Service Center. Ground clamps Power service grounding electrode system (NEC Art 250 ...yourself. Improper disposal may result in front of it is displaying the following during lightning activity: a) an antenna system; Never attempt to a Toshiba Authorized Service Center. 23) Always operate this happens, turn off the TV for 6 to 7 hours to allow the condensation to evaporate....

User Manual
Page 5
Important safety information 2-5 Introduction 7 Welcome to Toshiba 7 Exploring your new TV 7 Note regarding Quick Connect Guide 7 Connecting your TV 8 Note regarding picture quality 8 Connecting a VCR 8 Connecting a cable converter box 9 Connecting a cable... between two channels using Channel Return 32 Switching between two channels using SurfLock 32 Programming your favorite channels 32 Labeling channels 33 Viewing the wide-screen picture formats 35 Selecting the picture size 35 Scrolling the Theater Wide picture (Theater Wide 2 and 3 only 37 Selecting the cinema mode 37 Using...
Important safety information 2-5 Introduction 7 Welcome to Toshiba 7 Exploring your new TV 7 Note regarding Quick Connect Guide 7 Connecting your TV 8 Note regarding picture quality 8 Connecting a VCR 8 Connecting a cable converter box 9 Connecting a cable... between two channels using Channel Return 32 Switching between two channels using SurfLock 32 Programming your favorite channels 32 Labeling channels 33 Viewing the wide-screen picture formats 35 Selecting the picture size 35 Scrolling the Theater Wide picture (Theater Wide 2 and 3 only 37 Selecting the cinema mode 37 Using...

User Manual
Page 6
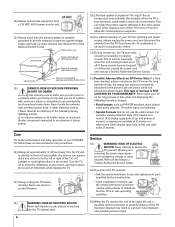
... Appendix Index 7 Exploring your new TV You can use the controls on . This feature provides on-screen instructions to models 42HDX82, 50HDX82, 57HDX82, and 65HDX82. Front Remote control sensor (Behind the screen) Behind the door Menu x •zy ALS (Automatic Light Sensor VIDEO-3 IN S-VIDEO VIDEO AUDIO...VIDEO OUT VAR. See page 26 for future reference. Introduction Connecting your TV Using the Remote Control Setting up and operating your Toshiba TV as quickly as those on the remote control. The goal of your TV. Before you through the initial setup of the...
... Appendix Index 7 Exploring your new TV You can use the controls on . This feature provides on-screen instructions to models 42HDX82, 50HDX82, 57HDX82, and 65HDX82. Front Remote control sensor (Behind the screen) Behind the door Menu x •zy ALS (Automatic Light Sensor VIDEO-3 IN S-VIDEO VIDEO AUDIO...VIDEO OUT VAR. See page 26 for future reference. Introduction Connecting your TV Using the Remote Control Setting up and operating your Toshiba TV as quickly as those on the remote control. The goal of your TV. Before you through the initial setup of the...
User Manual
Page 17
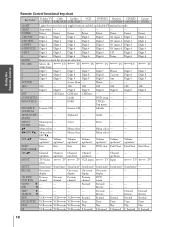
...VCR VCR F. Forward F. Introduction Connecting your TV Remote Control functional key chart Key Label Toshiba TV Cable Satellite (TV) (CBL/SAT) (CBL/SAT) VCR DVD/LD Receiver CD/... --- --- 100/- 100 --- 100 100 100 100 100 100 0 Digit 0 Digit 0 Digit 0 Digit 0 Digit 0 Digit 0 Digit 0 Digit 0 ENT --- INFO/TITLE --- --- On-screen On-screen On-screen --- --- --- Forward F. Top menu FAVORITE/ Favorite CH --- Favorite CH --- DIR x --- --- --- --- Reverse --- --- --- Select --- Enter --- --- --- Menu select --- Forward F. SLEEP...
...VCR VCR F. Forward F. Introduction Connecting your TV Remote Control functional key chart Key Label Toshiba TV Cable Satellite (TV) (CBL/SAT) (CBL/SAT) VCR DVD/LD Receiver CD/... --- --- 100/- 100 --- 100 100 100 100 100 100 0 Digit 0 Digit 0 Digit 0 Digit 0 Digit 0 Digit 0 Digit 0 Digit 0 ENT --- INFO/TITLE --- --- On-screen On-screen On-screen --- --- --- Forward F. Top menu FAVORITE/ Favorite CH --- Favorite CH --- DIR x --- --- --- --- Reverse --- --- --- Select --- Enter --- --- --- Menu select --- Forward F. SLEEP...

User Manual
Page 23
... programming menus (page 25) INPUT selects the video input source (page 50) MUTE mutes the sound (page 53) RECALL displays on-screen information (page 57) CH RTN returns to on-screen programming menus (page 25) ENTER sets programming menu information (page 25) yz x • select or adjust programming menus (page 25) (FAV...
... programming menus (page 25) INPUT selects the video input source (page 50) MUTE mutes the sound (page 53) RECALL displays on-screen information (page 57) CH RTN returns to on-screen programming menus (page 25) ENTER sets programming menu information (page 25) yz x • select or adjust programming menus (page 25) (FAV...
User Manual
Page 24
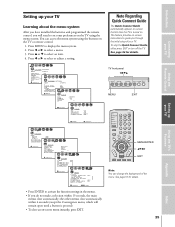
...on the TV or remote control. 1. Press MENU to select an item. 4. Note Regarding Quick Connect Guide The Quick Connect Guide automatically appears on-screen the first time the TV is pressed). • To close automatically; See page 26 for details. 25 Index MENU/ENTER yzx • EXIT... EXIT Using the Remote Control Setting up your TV. the other menus close automatically within 15 seconds, the main menus close an on-screen menu instantly, press EXIT. You can change the background of your TV Learning about the menu system After you have installed the batteries...
...on the TV or remote control. 1. Press MENU to select an item. 4. Note Regarding Quick Connect Guide The Quick Connect Guide automatically appears on-screen the first time the TV is pressed). • To close automatically; See page 26 for details. 25 Index MENU/ENTER yzx • EXIT... EXIT Using the Remote Control Setting up your TV. the other menus close automatically within 15 seconds, the main menus close an on-screen menu instantly, press EXIT. You can change the background of your TV Learning about the menu system After you have installed the batteries...
User Manual
Page 25
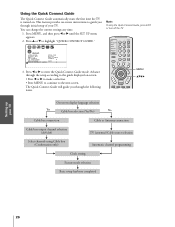
...stop the Quick Connect Guide, press EXIT or turn off the TV. Press y or z to the next screen. The Quick Connect Guide will guide you through the following items. MENU yzx • On-screen display language selection Yes ▼ Cable box selection (Yes/No) No ▼ Cable box connection ▼ ... your TV Using the Remote Control Using the Quick Connect Guide The Quick Connect Guide automatically starts the first time the TV is turned on -screen instructions to enter the Quick Connect Guide mode. Press MENU, and then press x or • until the SET UP menu appears. 2. SET ...
...stop the Quick Connect Guide, press EXIT or turn off the TV. Press y or z to the next screen. The Quick Connect Guide will guide you through the following items. MENU yzx • On-screen display language selection Yes ▼ Cable box selection (Yes/No) No ▼ Cable box connection ▼ ... your TV Using the Remote Control Using the Quick Connect Guide The Quick Connect Guide automatically starts the first time the TV is turned on -screen instructions to enter the Quick Connect Guide mode. Press MENU, and then press x or • until the SET UP menu appears. 2. SET ...
User Manual
Page 26
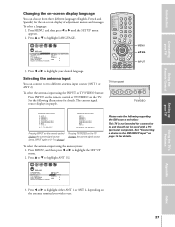
... and should not be used with a PC (personal computer). See the following regarding the DVI source selection: This TV is not intended for the on-screen display of adjustment menus and messages. MENU yzx • INPUT Selecting the antenna input You can choose from three different languages (English, French and Spanish...
... and should not be used with a PC (personal computer). See the following regarding the DVI source selection: This TV is not intended for the on-screen display of adjustment menus and messages. MENU yzx • INPUT Selecting the antenna input You can choose from three different languages (English, French and Spanish...

User Manual
Page 28
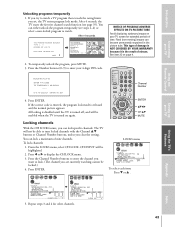
Select the channel you want to a specific programmed channel using the Channel Number buttons. 2. Press x or • to select ADD or ERASE, depending on -screen to perform. 5. Changing channels using SpeedSurf To change to add or erase. Press MENU, and then press x or • until the SET UP menu appears. 3. ...
Select the channel you want to a specific programmed channel using the Channel Number buttons. 2. Press x or • to select ADD or ERASE, depending on -screen to perform. 5. Changing channels using SpeedSurf To change to add or erase. Press MENU, and then press x or • until the SET UP menu appears. 3. ...
User Manual
Page 29
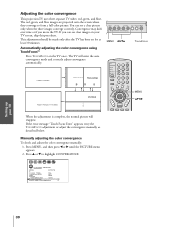
...your TV Using the TV's Features Appendix Index 30 Convergence may drift over time or if you can see clear images on your TV screen, skip this procedure. Automatically adjusting the color convergence using TouchFocus™ Press TOUCHFOCUS on for at least 30 minutes. Manually adjusting the color ... Focus Error" appears, retry the TOUCHFOCUS adjustment or adjust the convergence manually, as described below. The red, green, and blue images are projected onto the screen where they converge to highlight CONVERGENCE. 1 2 3 4 5 6 7 8 9 10 11 12 13 14 15 16 17 18 19 20 21 22 23 24 25...
...your TV Using the TV's Features Appendix Index 30 Convergence may drift over time or if you can see clear images on your TV screen, skip this procedure. Automatically adjusting the color convergence using TouchFocus™ Press TOUCHFOCUS on for at least 30 minutes. Manually adjusting the color ... Focus Error" appears, retry the TOUCHFOCUS adjustment or adjust the convergence manually, as described below. The red, green, and blue images are projected onto the screen where they converge to highlight CONVERGENCE. 1 2 3 4 5 6 7 8 9 10 11 12 13 14 15 16 17 18 19 20 21 22 23 24 25...

User Manual
Page 31
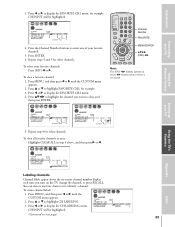
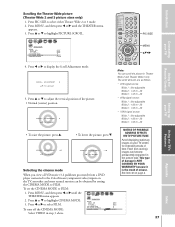
...RTN. Once you want to view. 2. Press MENU, and then press x or • until the message "Channel Memorized" appears (flashing) on -screen. The TV will function as menu x • buttons when a menu is not available in the CH RTN button: 1. Because this feature scans through ...your favorite channels: 1. Note: The favorite channel feature is on the screen. Using the TV's Features Appendix Index 32 Introduction Connecting your TV Using the Remote Control Setting up to 9 of your favorite channels each ...
...RTN. Once you want to view. 2. Press MENU, and then press x or • until the message "Channel Memorized" appears (flashing) on -screen. The TV will function as menu x • buttons when a menu is not available in the CH RTN button: 1. Because this feature scans through ...your favorite channels: 1. Note: The favorite channel feature is on the screen. Using the TV's Features Appendix Index 32 Introduction Connecting your TV Using the Remote Control Setting up to 9 of your favorite channels each ...
User Manual
Page 32
... 13 14 15 16 17 18 19 20 21 22 23 24 25 26 27 28 29 30 31 32 33 34 35 (Continued on -screen channel number display each time you want to highlight FAVORITE CH2, for other channels. You can choose any four characters to highlight CH LABELING. 10..., for other channels. Press MENU, and then press x or • until the CUSTOM menu appears. Press x or • to highlight the channel you turn on -screen. 2. CH INPUT will be highlighted. 1 2 3 4 5 6 7 8 9 10 11 12 13 14 15 16 17 18 19 20 21 22 23 24 25 26 27 28 29...
... 13 14 15 16 17 18 19 20 21 22 23 24 25 26 27 28 29 30 31 32 33 34 35 (Continued on -screen channel number display each time you want to highlight FAVORITE CH2, for other channels. You can choose any four characters to highlight CH LABELING. 10..., for other channels. Press MENU, and then press x or • until the CUSTOM menu appears. Press x or • to highlight the channel you turn on -screen. 2. CH INPUT will be highlighted. 1 2 3 4 5 6 7 8 9 10 11 12 13 14 15 16 17 18 19 20 21 22 23 24 25 26 27 28 29...
User Manual
Page 34
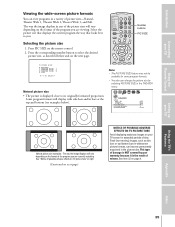
... displays the current program the way that looks best to its originally formatted proportion. Some program formats will vary depending on your TV screen for some program formats. • You also can change the picture size by your warranty because it is the result of damage...of misuse. Setting up your TV Using the TV's Features Appendix Index 35 Introduction Connecting your TV Using the Remote Control Viewing the wide-screen picture formats You can become permanently engrained in the picture tube. Fixed (non-moving) images, such as described below ). See "Notice ...
... displays the current program the way that looks best to its originally formatted proportion. Some program formats will vary depending on your TV screen for some program formats. • You also can change the picture size by your warranty because it is the result of damage...of misuse. Setting up your TV Using the TV's Features Appendix Index 35 Introduction Connecting your TV Using the Remote Control Viewing the wide-screen picture formats You can become permanently engrained in the picture tube. Fixed (non-moving) images, such as described below ). See "Notice ...
User Manual
Page 35
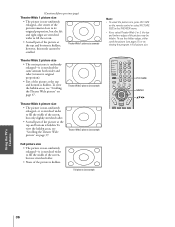
...be scrolled. PIC SIZE MENU yzx • Full picture size • The picture is non-uniformly enlarged-it is stretched wider to fill the screen. • A small part of the picture at the top and bottom is hidden. Introduction Connecting your TV Using the TV's Features Appendix Index...) Theater Wide 1 picture size • The picture is non-uniformly enlarged-the center of the picture remains close to fill the width of the screen, but only slightly stretched taller. • A small part of the picture is hidden; To view the hidden areas, see "Scrolling the Theater Wide...
...be scrolled. PIC SIZE MENU yzx • Full picture size • The picture is non-uniformly enlarged-it is stretched wider to fill the screen. • A small part of the picture at the top and bottom is hidden. Introduction Connecting your TV Using the TV's Features Appendix Index...) Theater Wide 1 picture size • The picture is non-uniformly enlarged-the center of the picture remains close to fill the width of the screen, but only slightly stretched taller. • A small part of the picture is hidden; To view the hidden areas, see "Scrolling the Theater Wide...
User Manual
Page 36
... 16 17 18 19 20 21 22 23 24 25 26 27 28 29 30 31 32 33 34 35 PIC SIZE Connecting your TV screen for extended periods of misuse. Press y or z to FILM: 1. See item 32 on the TV, smoother and more natural motion can scroll the picture in...
... 16 17 18 19 20 21 22 23 24 25 26 27 28 29 30 31 32 33 34 35 PIC SIZE Connecting your TV screen for extended periods of misuse. Press y or z to FILM: 1. See item 32 on the TV, smoother and more natural motion can scroll the picture in...
User Manual
Page 37
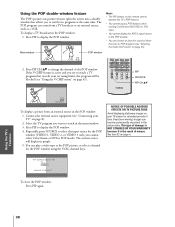
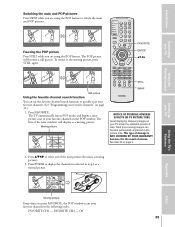
... HD1/HD2 or DVI input. • You cannot display the ANT-2 signal source in the POP window: 1. See item 32 on your TV screen for the POP window (VIDEO 1, VIDEO 2, or VIDEO 3 only; Introduction Connecting your TV Using the Remote Control Using the POP double-window feature... The POP (picture-out-picture) feature splits the screen into a double window that allows you to watch a TV program that exceeds your set rating limits, the program will display in POP mode). You...
... HD1/HD2 or DVI input. • You cannot display the ANT-2 signal source in the POP window: 1. See item 32 on your TV screen for the POP window (VIDEO 1, VIDEO 2, or VIDEO 3 only; Introduction Connecting your TV Using the Remote Control Using the POP double-window feature... The POP (picture-out-picture) feature splits the screen into a double window that allows you to watch a TV program that exceeds your set rating limits, the program will display in POP mode). You...
User Manual
Page 38
.... Press FAVORITE. This type of damage is NOT COVERED BY YOUR WARRANTY because it is the result of time. See item 32 on your TV screen for extended periods of misuse. Setting up your TV Using the TV's Features Appendix Index Moving picture Every time you press FAVORITE, the POP window...
.... Press FAVORITE. This type of damage is NOT COVERED BY YOUR WARRANTY because it is the result of time. See item 32 on your TV screen for extended periods of misuse. Setting up your TV Using the TV's Features Appendix Index Moving picture Every time you press FAVORITE, the POP window...
User Manual
Page 42
... L V EXCEED SET LIMITS PUSH MUTE TO ENTER PIN CABLE 9 NOTICE OF POSSIBLE ADVERSE EFFECTS ON TV PICTURE TUBE Avoid displaying stationary images on your TV screen for other channels. If you set, the TV enters program lock mode. If the correct code is entered, the program lock mode is turned on...
... L V EXCEED SET LIMITS PUSH MUTE TO ENTER PIN CABLE 9 NOTICE OF POSSIBLE ADVERSE EFFECTS ON TV PICTURE TUBE Avoid displaying stationary images on your TV screen for other channels. If you set, the TV enters program lock mode. If the correct code is entered, the program lock mode is turned on...

User Manual
Page 44
... Lock: OFF" appears on the TV for example). The new PIN code is in step 2 above, or press and hold the VOLUME DOWN (x ) button on -screen. To lock the front panel: 1.
... Lock: OFF" appears on the TV for example). The new PIN code is in step 2 above, or press and hold the VOLUME DOWN (x ) button on -screen. To lock the front panel: 1.


