User Manual
Page 10
...Connecting a HDMI audio system 21 Connecting a PC 22 Connecting to a home network 23 Chapter 3: Using the remote control 24 Controlling other devices 24 Installing batteries 24 The remote's buttons 25 Chapter 4: Initial Setup and Menu 26 Initial Setup 26 Navigating the menu system 27 Main menu ... . . . . . 43 REGZA-LINK® input source selection 43 Adjusting the amplifier's audio 44 Other REGZA-LINK® functions 44 Connecting a Toshiba PC compatible to REGZA-LINK 44 Using the HDMI® settings feature 45 Setting the HDMI® audio mode 45 Viewing the HDMI® signal...
...Connecting a HDMI audio system 21 Connecting a PC 22 Connecting to a home network 23 Chapter 3: Using the remote control 24 Controlling other devices 24 Installing batteries 24 The remote's buttons 25 Chapter 4: Initial Setup and Menu 26 Initial Setup 26 Navigating the menu system 27 Main menu ... . . . . . 43 REGZA-LINK® input source selection 43 Adjusting the amplifier's audio 44 Other REGZA-LINK® functions 44 Connecting a Toshiba PC compatible to REGZA-LINK 44 Using the HDMI® settings feature 45 Setting the HDMI® audio mode 45 Viewing the HDMI® signal...
User Manual
Page 11
...IN and HDMI terminals 85 PC IN signal formats 85 HDMI signal formats 86 Acceptable signal formats for 3D 87 Remote control functional key chart 88 Operating other devices 91 Programming the remote to operate other devices . . . 91 Device code setup 91 Searching for a device code 92 Locking ... Test Pattern 56 RGB Filter 56 White Balance 56 Resetting to the factory default 92 Operating TV with combination buttons 93 Remote control codes 94 Limited United States Warranty for LCD Televisions 100 Limited Canadian Warranty for Toshiba Brand Flat Panel Televisions 101 Index 104 11
...IN and HDMI terminals 85 PC IN signal formats 85 HDMI signal formats 86 Acceptable signal formats for 3D 87 Remote control functional key chart 88 Operating other devices 91 Programming the remote to operate other devices . . . 91 Device code setup 91 Searching for a device code 92 Locking ... Test Pattern 56 RGB Filter 56 White Balance 56 Resetting to the factory default 92 Operating TV with combination buttons 93 Remote control codes 94 Limited United States Warranty for LCD Televisions 100 Limited Canadian Warranty for Toshiba Brand Flat Panel Televisions 101 Index 104 11
User Manual
Page 12
...channel memory (- RGB Range feature adjusts RGB full range signal automatically. •REGZA-LINK® allows control of external devices from the TV remote via the HDMI cable. p. 70). •ColorMaster™ lets you view photo files and play music or movie files (- p. 24...exciting features. 1 To choose a location for the TV: •Read "Important notes about your TV (- p. 15-23). 5 See "Chapter 3: Using the remote control" (- p. 17). •HDMI capabilities ARC (Audio Return Channel) enables the audio signal of the TV's connections and controls (- p. 8). •Place ...
...channel memory (- RGB Range feature adjusts RGB full range signal automatically. •REGZA-LINK® allows control of external devices from the TV remote via the HDMI cable. p. 70). •ColorMaster™ lets you view photo files and play music or movie files (- p. 24...exciting features. 1 To choose a location for the TV: •Read "Important notes about your TV (- p. 15-23). 5 See "Chapter 3: Using the remote control" (- p. 17). •HDMI capabilities ARC (Audio Return Channel) enables the audio signal of the TV's connections and controls (- p. 8). •Place ...
User Manual
Page 13
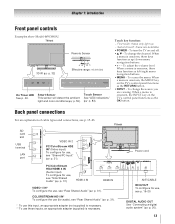
TV front Remote Sensor 3D IR (- This sensor will detect the ambient See "LED indications" light and color conditions (- p. 83). Touch key function: - First touch: these inputs, an ...
TV front Remote Sensor 3D IR (- This sensor will detect the ambient See "LED indications" light and color conditions (- p. 83). Touch key function: - First touch: these inputs, an ...
User Manual
Page 15
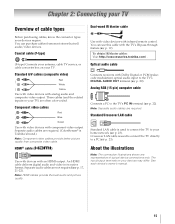
...IN terminal (- Separate audio cables are not required (- p. 19). p. 22). p. 23). Separate audio cables are required. (ColorStream® is Toshiba's brand.) Note: Component video cables provide better picture quality than composite video cable. See each device's owner's manual. 15 HDMI® cable ( ...) Use with devices with infrared remote control. p. 20). The input/output terminals on your home network (- Crossover LAN cable is used to connect the TV directly to...
...IN terminal (- Separate audio cables are not required (- p. 19). p. 22). p. 23). Separate audio cables are required. (ColorStream® is Toshiba's brand.) Note: Component video cables provide better picture quality than composite video cable. See each device's owner's manual. 15 HDMI® cable ( ...) Use with devices with infrared remote control. p. 20). The input/output terminals on your home network (- Crossover LAN cable is used to connect the TV directly to...
User Manual
Page 17
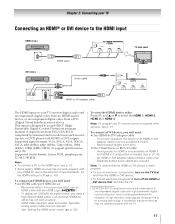
... p. 91. p. 45). HDMI cable transfers video and audio. See "Setting the HDMI audio mode" (- Separate analog audio cables are required. Note: To program the TV remote control to -DVI adapter cable The HDMI input on the TV first and then the HDMI or DVI device. • To turn off electronic components...
... p. 91. p. 45). HDMI cable transfers video and audio. See "Setting the HDMI audio mode" (- Separate analog audio cables are required. Note: To program the TV remote control to -DVI adapter cable The HDMI input on the TV first and then the HDMI or DVI device. • To turn off electronic components...
User Manual
Page 18
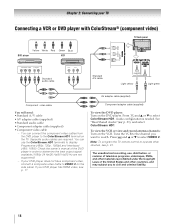
... connect the component video cables from the DVD player to operate other devices, see p. 17. p. 31), and select ColorStream HD1. Note: To program the TV remote control to the ColorStream HD1 terminal on the side panel. G Component adapter cable (supplied) To view the DVD player: Turn on the VCR. To view...
... connect the component video cables from the DVD player to operate other devices, see p. 17. p. 31), and select ColorStream HD1. Note: To program the TV remote control to the ColorStream HD1 terminal on the side panel. G Component adapter cable (supplied) To view the DVD player: Turn on the VCR. To view...
User Manual
Page 19
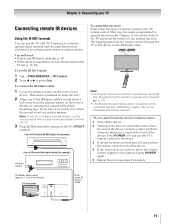
...Chapter 3) toward the front of the TV and press the button for example) Infrared sensor To control the device(s): Point either the device's remote control or the TV remote control (that you have a second device, coil the second wand with the infrared emitter) so it behind the TV. 3 Plug the IR...cannot locate the device's infrared sensor: 1 Turn off the device. 2 Starting at the device's lower-left corner, place the end of the device's remote control (with a rubber band and leave it touches the front of the device. The signal passes from device) TV back panel Dualwand IR blaster cable...
...Chapter 3) toward the front of the TV and press the button for example) Infrared sensor To control the device(s): Point either the device's remote control or the TV remote control (that you have a second device, coil the second wand with the infrared emitter) so it behind the TV. 3 Plug the IR...cannot locate the device's infrared sensor: 1 Turn off the device. 2 Starting at the device's lower-left corner, place the end of the device's remote control (with a rubber band and leave it touches the front of the device. The signal passes from device) TV back panel Dualwand IR blaster cable...
User Manual
Page 20
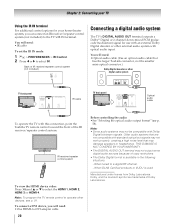
... has the larger TosLink connector, not the smaller mini-optical connector.) Dolby Digital decoder or other devices, see p. 91. Note: To program the TV remote control to operate other digital audio system LINE IN LR Optical Audio IN TV back panel IR cable TV back panel Optical audio cable To... operate the TV with this connection, point the Toshiba TV remote control toward the front of copy restrictions. • The Dolby Digital format is used. When tuned to select the HDMI 1, HDMI 2, HDMI 3 or ...
... has the larger TosLink connector, not the smaller mini-optical connector.) Dolby Digital decoder or other devices, see p. 91. Note: To program the TV remote control to operate other digital audio system LINE IN LR Optical Audio IN TV back panel IR cable TV back panel Optical audio cable To... operate the TV with this connection, point the Toshiba TV remote control toward the front of copy restrictions. • The Dolby Digital format is used. When tuned to select the HDMI 1, HDMI 2, HDMI 3 or ...
User Manual
Page 21
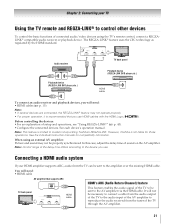
... the devices: •For an explanation of sound on the AV amplifier. p. 43). •Configure the connected devices. When using the TV's remote control, connect a REGZALINK® compatible audio receiver or playback device. In this case, adjust the delay time of setup and operations, see "Using...DVD player,etc.) HDMI cable HDMI OUT To connect an audio receiver and playback devices, you will need : •HDMI cables (- However, Toshiba is limited to the amplifier over the existing HDMI cable. You will need : •HDMI cable AV amplifier that you use HDMI cables with...
... the devices: •For an explanation of sound on the AV amplifier. p. 43). •Configure the connected devices. When using the TV's remote control, connect a REGZALINK® compatible audio receiver or playback device. In this case, adjust the delay time of setup and operations, see "Using...DVD player,etc.) HDMI cable HDMI OUT To connect an audio receiver and playback devices, you will need : •HDMI cables (- However, Toshiba is limited to the amplifier over the existing HDMI cable. You will need : •HDMI cable AV amplifier that you use HDMI cables with...

User Manual
Page 24
Non-Toshiba device or a Toshiba device that the remote control is not being used for an extended period of batteries. Always follow applicable laws and regulations. • If the remote does not operate correctly, or if the operating range becomes reduced, replace the batteries. • Always ... mix battery types or use new and used batteries together. • Always remove batteries from leaking into the battery compartment. 24 Toshiba device: The remote is programmed to excessive heat such as cable converter boxes, satellite receivers, VCRs, DVD players, and HTIBs (home theater in a...
Non-Toshiba device or a Toshiba device that the remote control is not being used for an extended period of batteries. Always follow applicable laws and regulations. • If the remote does not operate correctly, or if the operating range becomes reduced, replace the batteries. • Always ... mix battery types or use new and used batteries together. • Always remove batteries from leaking into the battery compartment. 24 Toshiba device: The remote is programmed to excessive heat such as cable converter boxes, satellite receivers, VCRs, DVD players, and HTIBs (home theater in a...
User Manual
Page 25
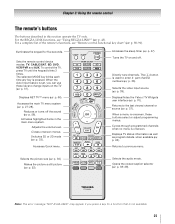
... in this section operate the TV only. Directly tune channels. p. 70). Returns to change inputs on and off the sound (- Chapter 3: Using the remote control The remote's buttons The buttons described in the main menu system. p. 58). Closes onscreen menus. p. 47) Turns the TV on the TV (- When a ...menu is set, you press a key for five seconds. Sets the remote control device modes: TV, CABLE/SAT, BD, DVD, VCR/PVR and AUX. Adjusts the volume level. Accesses Quick menu. Selects the audio mode. When the...
... in this section operate the TV only. Directly tune channels. p. 70). Returns to change inputs on and off the sound (- Chapter 3: Using the remote control The remote's buttons The buttons described in the main menu system. p. 58). Closes onscreen menus. p. 47) Turns the TV on the TV (- When a ...menu is set, you press a key for five seconds. Sets the remote control device modes: TV, CABLE/SAT, BD, DVD, VCR/PVR and AUX. Adjusts the volume level. Accesses Quick menu. Selects the audio mode. When the...
User Manual
Page 27
...If channels are not found after scanning: •Check the antenna/cable connections, and scan again. •Connect the TV to information on www.tacp.toshiba.com/ customersupport. 27 Type RF Ch. 2 ATV 2 4-1 DTV 4 4-2 DTV 4 6 ATV 6 11 ATV 11 13 ATV 13 18 ATV ... Start Scan Press . SOUND MTS Balance Advanced Sound Settings Dolby Volume Dynamic Range Control Stereo 0 Low Off •Press B, b, C or c on the remote control or TV control panel. Press C or c to stop scanning, press O while scanning. • After scanning completes, a channel list screen (such as...
...If channels are not found after scanning: •Check the antenna/cable connections, and scan again. •Connect the TV to information on www.tacp.toshiba.com/ customersupport. 27 Type RF Ch. 2 ATV 2 4-1 DTV 4 4-2 DTV 4 6 ATV 6 11 ATV 11 13 ATV 13 18 ATV ... Start Scan Press . SOUND MTS Balance Advanced Sound Settings Dolby Volume Dynamic Range Control Stereo 0 Low Off •Press B, b, C or c on the remote control or TV control panel. Press C or c to stop scanning, press O while scanning. • After scanning completes, a channel list screen (such as...

User Manual
Page 28
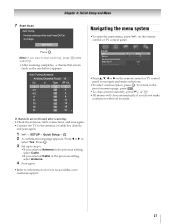
... Menu Main menu layout To open the main menus (illustrated below), press Y on the current mode. Note: Quick menu items are different depending on the remote control or TV control panel. Press to display the Quick menu and press B or b to select the option. Icon Item Page PICTURE Picture Mode 53...
... Menu Main menu layout To open the main menus (illustrated below), press Y on the current mode. Note: Quick menu items are different depending on the remote control or TV control panel. Press to display the Quick menu and press B or b to select the option. Icon Item Page PICTURE Picture Mode 53...

User Manual
Page 29
... TV to specify the correct time zone for the TV installation. 1 Y > SOUND > Advanced Sound Settings > . To cancel the selection or adjustment, select Cancel on the remote control or the control panel, store those channels in its memory. Auto Tuning Note: You must set your area and store them in the TV...
... TV to specify the correct time zone for the TV installation. 1 Y > SOUND > Advanced Sound Settings > . To cancel the selection or adjustment, select Cancel on the remote control or the control panel, store those channels in its memory. Auto Tuning Note: You must set your area and store them in the TV...
User Manual
Page 30
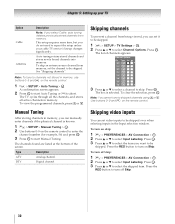
...Skip. OK 3 Press OK to start Auto Tuning or O to turn on skip: 1 Y > PREFERENCES > AV Connection > . Use buttons 0-9 and = on the remote control to turn off Skip. 30 OK 2 Press B or b to skipped channels using < or ,. To view the programmed channels, press < or ,. To clear the ... your TV Option Cable Antenna Description Note: If you can manually enter channels if the physical channel is selected. OK 2 Use buttons 0-9 on the remote control. OK The box is known. 1 Y > SETUP > Manual Tuning > . OK Note: You cannot tune to select Input Labeling. Chapter ...
...Skip. OK 3 Press OK to start Auto Tuning or O to turn on skip: 1 Y > PREFERENCES > AV Connection > . Use buttons 0-9 and = on the remote control to turn off Skip. 30 OK 2 Press B or b to skipped channels using < or ,. To view the programmed channels, press < or ,. To clear the ... your TV Option Cable Antenna Description Note: If you can manually enter channels if the physical channel is selected. OK 2 Use buttons 0-9 on the remote control. OK The box is known. 1 Y > SETUP > Manual Tuning > . OK Note: You cannot tune to select Input Labeling. Chapter ...
User Manual
Page 31
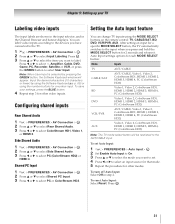
... > AV Connection > . Auto Input settings options for other video inputs. Press . Note: When User Input is selected by using the MODE SELECT buttons on the remote control: TV, CABLE/SAT, BD, DVD, VCR/PVR, AUX. To set Auto Input: 1 Y > PREFERENCES > Auto Input > OK 2 Set Enable Auto Input to On. 3 Press B or...
... > AV Connection > . Auto Input settings options for other video inputs. Press . Note: When User Input is selected by using the MODE SELECT buttons on the remote control: TV, CABLE/SAT, BD, DVD, VCR/PVR, AUX. To set Auto Input: 1 Y > PREFERENCES > Auto Input > OK 2 Set Enable Auto Input to On. 3 Press B or...

User Manual
Page 36
...both analog and digital channels normally. Tuning to a specific channel (programmed or unprogrammed) Channel Analog Digital Description Press the 0-9 buttons on the remote control to enter the major channel number. Press the dash (=) button. Enter the sub-channel number. (For example, to highlight Channel Tuning ...inputs from the Inputs List. •Quickly select REGZA-LINK® devices from the REGZA-LINK List. p. 29). OK Press the 0-9 buttons on the remote control. (For example, to Antenna (- To set to select channel 125, press 1, 2, 5.) Press . Page 44). 5 Select On or Off. ...
...both analog and digital channels normally. Tuning to a specific channel (programmed or unprogrammed) Channel Analog Digital Description Press the 0-9 buttons on the remote control to enter the major channel number. Press the dash (=) button. Enter the sub-channel number. (For example, to highlight Channel Tuning ...inputs from the Inputs List. •Quickly select REGZA-LINK® devices from the REGZA-LINK List. p. 29). OK Press the 0-9 buttons on the remote control. (For example, to Antenna (- To set to select channel 125, press 1, 2, 5.) Press . Page 44). 5 Select On or Off. ...

User Manual
Page 37
... Browser™ adds it to the History List and displays it quickly, but one channel to the button, so you want to it on the remote control. •Channels that are tuned for external inputs. 1 Select the first channel you press , the memorized channel will open in Select mode: 1 Highlight the...
... Browser™ adds it to the History List and displays it quickly, but one channel to the button, so you want to it on the remote control. •Channels that are tuned for external inputs. 1 Select the first channel you press , the memorized channel will open in Select mode: 1 Highlight the...
User Manual
Page 38
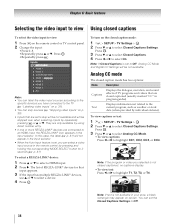
... selector. • When the Auto Input feature is set to the TV (- Note: If Closed Captions is set , you selected is not available in the remote control by individual stations). To view captions or text: 1 Y > SETUP > TV Settings > OK 2 Press b or B to highlight T1, T2, T3...be not available. OK To turn on p. 31). • You can select a video input source in your area, a black rectangle may appear on the remote control or TV control panel. 2 Change the input: • Press 0-8. • Repeatedly press B or b. Displays information not related to select On. WORLD ...
... selector. • When the Auto Input feature is set to the TV (- Note: If Closed Captions is set , you selected is not available in the remote control by individual stations). To view captions or text: 1 Y > SETUP > TV Settings > OK 2 Press b or B to highlight T1, T2, T3...be not available. OK To turn on p. 31). • You can select a video input source in your area, a black rectangle may appear on the remote control or TV control panel. 2 Change the input: • Press 0-8. • Repeatedly press B or b. Displays information not related to select On. WORLD ...


