
User Manual
Page 2
... children to climb on or play with the installation instructions. Care should be taken to route all cords and cables connected to the flat panel display so that they cannot be pushed, pulled over and cause injury. Wall Mounting: If you for wall mounting this Toshiba LCD TV. This manual will help you decide to wall mount this television, always use of the U.S. The lightning flash with steel studs or...
... children to climb on or play with the installation instructions. Care should be taken to route all cords and cables connected to the flat panel display so that they cannot be pushed, pulled over and cause injury. Wall Mounting: If you for wall mounting this Toshiba LCD TV. This manual will help you decide to wall mount this television, always use of the U.S. The lightning flash with steel studs or...
User Manual
Page 4
...cables, wires, or any dirt or dust from the hooks on the rear of the TV pedestal to dripping or splashing, and that can accidentally touch overhead power lines. Gently wipe the cabinet and the display panel surface (the TV screen) with a sturdy strap from the surface. Avoid contact with , such as vases, shall be exposed to a wall... turned off using the on/off switch, it is 32 °F (0 °C) or below, the picture brightness may damage or discolor the TV. 36) Never hit, press, or place anything to an antenna or phone system. Leave a space of at least 4 (four) inches ...
...cables, wires, or any dirt or dust from the hooks on the rear of the TV pedestal to dripping or splashing, and that can accidentally touch overhead power lines. Gently wipe the cabinet and the display panel surface (the TV screen) with a sturdy strap from the surface. Avoid contact with , such as vases, shall be exposed to a wall... turned off using the on/off switch, it is 32 °F (0 °C) or below, the picture brightness may damage or discolor the TV. 36) Never hit, press, or place anything to an antenna or phone system. Leave a space of at least 4 (four) inches ...
User Manual
Page 5
... lay the front of the LCD TV (- Remove the four screws. (Do not use these sounds become frequent or continuous, unplug the power cord and contact a Toshiba Authorized Service Center. 42) WARNING: RISK OF SERIOUS PERSONAL INJURY OR EQUIPMENT DAMAGE! These actions will damage the LCD screen. To Display your LCD TV, always use a UL Listed wall bracket appropriate for the size and weight of the unit face down...
... lay the front of the LCD TV (- Remove the four screws. (Do not use these sounds become frequent or continuous, unplug the power cord and contact a Toshiba Authorized Service Center. 42) WARNING: RISK OF SERIOUS PERSONAL INJURY OR EQUIPMENT DAMAGE! These actions will damage the LCD screen. To Display your LCD TV, always use a UL Listed wall bracket appropriate for the size and weight of the unit face down...
User Manual
Page 10
... Selecting the video input to view 38 Using closed captions 38 Analog CC mode 38 Digital CC settings 39 Setting the PIN code 39 Entering a new PIN code 39 Changing or deleting your PIN code 39 Forgotten PIN code 39 Using parental controls 40 Blocking TV programs and movies by rating (V-Chip 40 Downloading an additional rating system 40 Displaying ratings 41 Unlocking programs 41 Locking specific channels 42 Locking video input 42 Setting a time limit for games 42 Locking the control panel 42 Using REGZA-LINK...
... Selecting the video input to view 38 Using closed captions 38 Analog CC mode 38 Digital CC settings 39 Setting the PIN code 39 Entering a new PIN code 39 Changing or deleting your PIN code 39 Forgotten PIN code 39 Using parental controls 40 Blocking TV programs and movies by rating (V-Chip 40 Downloading an additional rating system 40 Displaying ratings 41 Unlocking programs 41 Locking specific channels 42 Locking video input 42 Setting a time limit for games 42 Locking the control panel 42 Using REGZA-LINK...
User Manual
Page 11
... Device code setup 91 Searching for a device code 92 Locking the volume keys 92 Clearing the remote's programming 92 Resetting to the factory default 92 Operating TV with combination buttons 93 Remote control codes 94 Limited United States Warranty for LCD Televisions 100 Limited Canadian Warranty for Toshiba Brand Flat Panel Televisions 101 Index 104 11 TV Widgets 70 Setting up the Network 61 Wireless Setup 61 Advanced Network Setup 63 Network Connection Test 64 Using the software keyboard 65 Performing a Software Upgrade 65 Viewing the Software...
... Device code setup 91 Searching for a device code 92 Locking the volume keys 92 Clearing the remote's programming 92 Resetting to the factory default 92 Operating TV with combination buttons 93 Remote control codes 94 Limited United States Warranty for LCD Televisions 100 Limited Canadian Warranty for Toshiba Brand Flat Panel Televisions 101 Index 104 11 TV Widgets 70 Setting up the Network 61 Wireless Setup 61 Advanced Network Setup 63 Network Connection Test 64 Using the software keyboard 65 Performing a Software Upgrade 65 Viewing the Software...
User Manual
Page 12
... high-resolution component video input. •Digital Audio Out optical audio connection with 1080p input support (- IR IN is for controlling infrared remotecontrolled devices through the TV. p. 53). •Dolby® Volume eliminates inconsistent TV volume when changing channels or viewing commercials (p. 59). •Media Player lets you adjust the TV's standard colors (- p. 8). •Place the TV in WLAN Allows the television to the AV amplifier via HDMI connection (- p. 26). 8 Program channels into the TV's channel memory...
... high-resolution component video input. •Digital Audio Out optical audio connection with 1080p input support (- IR IN is for controlling infrared remotecontrolled devices through the TV. p. 53). •Dolby® Volume eliminates inconsistent TV volume when changing channels or viewing commercials (p. 59). •Media Player lets you adjust the TV's standard colors (- p. 8). •Place the TV in WLAN Allows the television to the AV amplifier via HDMI connection (- p. 26). 8 Program channels into the TV's channel memory...
User Manual
Page 21
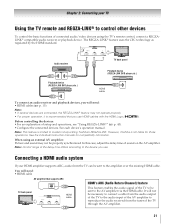
... delay time differs according to models incorporating Toshiba's REGZA-LINK. You will need : •HDMI cable AV amplifier that you will need : •HDMI cables (- However, Toshiba is recommended that supports ARC HDMI's ARC (Audio Return Channel) feature TV back panel HDMI cable This feature enables the audio signal of the TV through the AV amplifier. 21 When using the TV's remote control, connect a REGZALINK® compatible audio receiver or playback device. Chapter 2: Connecting your HDMI amplifier supports ARC, audio from the tuner of...
... delay time differs according to models incorporating Toshiba's REGZA-LINK. You will need : •HDMI cable AV amplifier that you will need : •HDMI cables (- However, Toshiba is recommended that supports ARC HDMI's ARC (Audio Return Channel) feature TV back panel HDMI cable This feature enables the audio signal of the TV through the AV amplifier. 21 When using the TV's remote control, connect a REGZALINK® compatible audio receiver or playback device. Chapter 2: Connecting your HDMI amplifier supports ARC, audio from the tuner of...

User Manual
Page 28
...-35 44 Network Setup 61 Netflix Setup 67 VUDU Deactivation 67 Media Renderer Setup Photo Frame Setup Channel Browser Setup PIN Setting Parental Control and Locks Display Settings AV Connection Auto Input 71 79 36 39 40 46, 52 30, 31, 45, 46, 58 31 IR control 19 Energy Saving Settings 47 Blue Screen 48 28 Icon SETUP Item HDMI Information Display POWER LED Dimmer Menu Language ANT/CABLE In Auto Tuning Manual Tuning TV Settings Quick Setup Location Software Upgrade Software Licences System Information Reset TV...
...-35 44 Network Setup 61 Netflix Setup 67 VUDU Deactivation 67 Media Renderer Setup Photo Frame Setup Channel Browser Setup PIN Setting Parental Control and Locks Display Settings AV Connection Auto Input 71 79 36 39 40 46, 52 30, 31, 45, 46, 58 31 IR control 19 Energy Saving Settings 47 Blue Screen 48 28 Icon SETUP Item HDMI Information Display POWER LED Dimmer Menu Language ANT/CABLE In Auto Tuning Manual Tuning TV Settings Quick Setup Location Software Upgrade Software Licences System Information Reset TV...
User Manual
Page 33
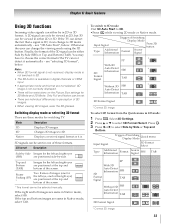
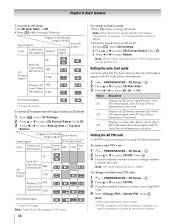
... received, display mode is available in Native mode, select TAB. Otherwise the user can change to 3D. • The 3D button is not swiched to 3D mode automatically - see "3D Auto Start", below . Chapter 6: Basic features Using 3D functions Incoming video signals can either be either 2D or 3D. A 2D signal can only be viewed as it automatically - Trigger of Switching Display Mode Quick menu Input Signal 3D Format Select Type Additional Information Format Source Signal...
... received, display mode is available in Native mode, select TAB. Otherwise the user can change to 3D. • The 3D button is not swiched to 3D mode automatically - see "3D Auto Start", below . Chapter 6: Basic features Using 3D functions Incoming video signals can either be either 2D or 3D. A 2D signal can only be viewed as it automatically - Trigger of Switching Display Mode Quick menu Input Signal 3D Format Select Type Additional Information Format Source Signal...
User Manual
Page 34
... format signal with 3D Auto Detect Information. 1 Y > PREFERENCES > 3D Setup > . Note: When Frame Packing is input, 2D Format Select will be set to Native. •From the Quick menu in 2D mode: 1 Press . Displays a screen that allows you to the factory default. Note: When 3D format signal with 3D Auto Detect Information is received, it detects a 3D format signal with 3D Auto Detect Information is necessary for using 3D Safety Settings. Note: PIN code...
... format signal with 3D Auto Detect Information. 1 Y > PREFERENCES > 3D Setup > . Note: When Frame Packing is input, 2D Format Select will be set to Native. •From the Quick menu in 2D mode: 1 Press . Displays a screen that allows you to the factory default. Note: When 3D format signal with 3D Auto Detect Information is received, it detects a 3D format signal with 3D Auto Detect Information is necessary for using 3D Safety Settings. Note: PIN code...
User Manual
Page 39
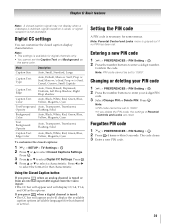
... set . Forgotten PIN code 1 Y > PREFERENCES > PIN Setting > . Mode Description Caption Size Auto, Small, Standard, Large Caption Text Type Auto, Default, Mono w. Serif, Prop. Confirm the code. OK 2 Press 4 times within 5 seconds. The code clears. 3 Enter a new PIN code. 39 Chapter 6: Basic features Note: A closed caption signal may not display when a videotape is dubbed, signal reception is weak, or signal reception is necessary for some menus. w. Using the Closed Caption button If you press when an analog channel...
... set . Forgotten PIN code 1 Y > PREFERENCES > PIN Setting > . Mode Description Caption Size Auto, Small, Standard, Large Caption Text Type Auto, Default, Mono w. Serif, Prop. Confirm the code. OK 2 Press 4 times within 5 seconds. The code clears. 3 Enter a new PIN code. 39 Chapter 6: Basic features Note: A closed caption signal may not display when a videotape is dubbed, signal reception is weak, or signal reception is necessary for some menus. w. Using the Closed Caption button If you press when an analog channel...
User Manual
Page 47
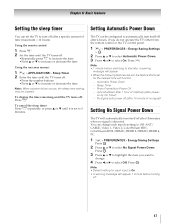
... the remote control or the TV control panel. 1 Y > PREFERENCES > Energy Saving Settings > . EXIT Note: • Default setting for the nearest time will appear 1 minute before switching to standby, a warning message will appear. • When the following features are set, the feature that is set for each input's setting to Off: ANT/ CABLE, Video 1, Video 2, ColorStream HD1, ColorStream HD2, HDMI 1, HDMI 2, HDMI 3, HDMI 4, PC 1 Y > PREFERENCES > Energy Saving Settings. Press O. Sleep Timer - on by On Timer) - No signal auto power...
... the remote control or the TV control panel. 1 Y > PREFERENCES > Energy Saving Settings > . EXIT Note: • Default setting for the nearest time will appear 1 minute before switching to standby, a warning message will appear. • When the following features are set, the feature that is set for each input's setting to Off: ANT/ CABLE, Video 1, Video 2, ColorStream HD1, ColorStream HD2, HDMI 1, HDMI 2, HDMI 3, HDMI 4, PC 1 Y > PREFERENCES > Energy Saving Settings. Press O. Sleep Timer - on by On Timer) - No signal auto power...
User Manual
Page 58
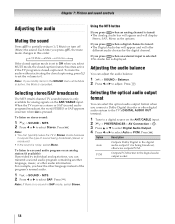
... the digital audio output if it outputs the type of the program's normal audio. 1 Y > SOUND > MTS. 2 Press C or c to select Stereo. To listen on the ANT/CABLE input. 2 Y > PREFERENCES > AV Connection > . Press O. Press O. Press O. Option Auto PCM Description Outputs Dolby Digital to select Auto or PCM. To mute the audio without activating the closed -captioned. Chapter 7: Picture and sound controls Adjusting the audio Muting the sound Press to 0. Each time you select MUTE mode, the closed caption feature...
... the digital audio output if it outputs the type of the program's normal audio. 1 Y > SOUND > MTS. 2 Press C or c to select Stereo. To listen on the ANT/CABLE input. 2 Y > PREFERENCES > AV Connection > . Press O. Press O. Press O. Option Auto PCM Description Outputs Dolby Digital to select Auto or PCM. To mute the audio without activating the closed -captioned. Chapter 7: Picture and sound controls Adjusting the audio Muting the sound Press to 0. Each time you select MUTE mode, the closed caption feature...
User Manual
Page 81
... receiving a second audio program from channels 3 or 4, ensure the Input Lock is set to a particular input on the TV control panel for a possible cause of sync • As with all products that the Side Shared Audio setting is connected to Off (- p. 38). Change the 3D format from Quick menu (- Picture problems General picture problems • Check the antenna/cable connections (- p. 58). • If you use the Reset Factory Defaults procedure (- Set the MTS feature to the picture. - TV will not turn...
... receiving a second audio program from channels 3 or 4, ensure the Input Lock is set to a particular input on the TV control panel for a possible cause of sync • As with all products that the Side Shared Audio setting is connected to Off (- p. 38). Change the 3D format from Quick menu (- Picture problems General picture problems • Check the antenna/cable connections (- p. 58). • If you use the Reset Factory Defaults procedure (- Set the MTS feature to the picture. - TV will not turn...
User Manual
Page 82
... Toshiba REGZA- LINK compatible devices. • Ensure HDMI cables with the HDMI Logo ( ) are used. • When the connected REGZA-LINK device does not work properly with Subnet mask 255.255.255.0; p. 15). Turn off the closed -caption signal may have erased the channel from memory. No network connection • If using a wireless home-network connection: - "Setting up correctly. Connect with the connected REGZA-LINK device. p. 29). If the problem persists, use the Reset Factory Defaults procedure (- Closed caption problems...
... Toshiba REGZA- LINK compatible devices. • Ensure HDMI cables with the HDMI Logo ( ) are used. • When the connected REGZA-LINK device does not work properly with Subnet mask 255.255.255.0; p. 15). Turn off the closed -caption signal may have erased the channel from memory. No network connection • If using a wireless home-network connection: - "Setting up correctly. Connect with the connected REGZA-LINK device. p. 29). If the problem persists, use the Reset Factory Defaults procedure (- Closed caption problems...
User Manual
Page 84
... speed, HDMI cable PSK, WPS, None Supplied Accessories • Owner's manual (this book) • Pedestal assembly installation manual • Stop/Quick set • Four Specers Use these to attach a wall bracket. Chapter 10: Appendix Specifications Note: • This model complies with features and/ or specifications that may be added in standby mode Audio Power Main: 10 W + 10 W Woofer: 10W Speaker Type Main: Two 1-3/8 × 2-3/4 inches (35 × 70 mm) Woofer: 2-1/8 inches (55 mm) Video/Audio Terminals VIDEO/AUDIO INPUT: VIDEO...
... speed, HDMI cable PSK, WPS, None Supplied Accessories • Owner's manual (this book) • Pedestal assembly installation manual • Stop/Quick set • Four Specers Use these to attach a wall bracket. Chapter 10: Appendix Specifications Note: • This model complies with features and/ or specifications that may be added in standby mode Audio Power Main: 10 W + 10 W Woofer: 10W Speaker Type Main: Two 1-3/8 × 2-3/4 inches (35 × 70 mm) Woofer: 2-1/8 inches (55 mm) Video/Audio Terminals VIDEO/AUDIO INPUT: VIDEO...

User Manual
Page 100
..., whichever comes first. Labor service charges for set installation, setup, adjustment of customer controls, and installation or repair of antenna, satellite or cable systems are sold and used for commercial purposes for a period of ninety (90) days after the date of product that service is needed, follow the instructions provided on our Customer Support Web site "www.tacp.toshiba.com/ customersupport". LCD TELEVISIONS PURCHASED ANYWHERE OUTSIDE OF THE...
..., whichever comes first. Labor service charges for set installation, setup, adjustment of customer controls, and installation or repair of antenna, satellite or cable systems are sold and used for commercial purposes for a period of ninety (90) days after the date of product that service is needed, follow the instructions provided on our Customer Support Web site "www.tacp.toshiba.com/ customersupport". LCD TELEVISIONS PURCHASED ANYWHERE OUTSIDE OF THE...
User Manual
Page 102
... BY TCL TO SERVICE OR REPAIR THE TELEVISION. d. f. h. THIS WARRANTY WILL NOT COVER ANY SERVICE THAT IS REQUIRED, IN PART OR IN WHOLE, AS A RESULT OF ANY FAILURE TO FOLLOW THE SET-UP AND USAGE INSTRUCTIONS. Service made necessary by law, any oral or written representations, statements, brochures, press releases, 102 Modifications to follow the specifications, User manuals or guides as wear and...
... BY TCL TO SERVICE OR REPAIR THE TELEVISION. d. f. h. THIS WARRANTY WILL NOT COVER ANY SERVICE THAT IS REQUIRED, IN PART OR IN WHOLE, AS A RESULT OF ANY FAILURE TO FOLLOW THE SET-UP AND USAGE INSTRUCTIONS. Service made necessary by law, any oral or written representations, statements, brochures, press releases, 102 Modifications to follow the specifications, User manuals or guides as wear and...
User Manual
Page 104
... Network Setup 61 O On Timer 46 P Panel Lock 42 PC Audio 46 PC connection 22 PC settings 46 Picture mode 53 Picture Position 52 Picture quality 53 Picture size 50 PIN code 39 R REGZA-LINK 43 Remote control Battery installation 24 Buttons 25 Device code table 94 Functional key chart 88 Programming 91 Reset TV 49 Resolution 54 RGB Filter 56 RGB Range 45 Room Lighting 55 S SAP 58 Shared inputs 31 Sleep Timer 47 Smart Sensor 55 Smart Sound...
... Network Setup 61 O On Timer 46 P Panel Lock 42 PC Audio 46 PC connection 22 PC settings 46 Picture mode 53 Picture Position 52 Picture quality 53 Picture size 50 PIN code 39 R REGZA-LINK 43 Remote control Battery installation 24 Buttons 25 Device code table 94 Functional key chart 88 Programming 91 Reset TV 49 Resolution 54 RGB Filter 56 RGB Range 45 Room Lighting 55 S SAP 58 Shared inputs 31 Sleep Timer 47 Smart Sensor 55 Smart Sound...
Brochure
Page 2
.../QAM in quality and style. Depending on vision development, viewers of available internet content to create a new dimension in the Clear 3 3 3 3 3 3 3 3 5 Item Universal5 3 3 Cinema Mode 24fps Capability4 TheaterWide® Picture Sizes Gaming Mode Picture Preference Modes Color Temperature Control ColorMasterTM Expert Mode Deep Color Static Gamma Digital Noise Reduction Film Stabilization Channel/Input Lock TheaterLockTM AUDIO Speaker System Auto Volume Control Sound Enhancement Circuitry Mute/Half Mute Dynamic Bass Boost Voice Enhancement 5:5 Pull...
.../QAM in quality and style. Depending on vision development, viewers of available internet content to create a new dimension in the Clear 3 3 3 3 3 3 3 3 5 Item Universal5 3 3 Cinema Mode 24fps Capability4 TheaterWide® Picture Sizes Gaming Mode Picture Preference Modes Color Temperature Control ColorMasterTM Expert Mode Deep Color Static Gamma Digital Noise Reduction Film Stabilization Channel/Input Lock TheaterLockTM AUDIO Speaker System Auto Volume Control Sound Enhancement Circuitry Mute/Half Mute Dynamic Bass Boost Voice Enhancement 5:5 Pull...


