

Owner's Manual - English
Page 4
... sign of malfunction. 30) Always unplug the TV before cleaning. These actions will damage the LCD screen. Service 37) WARNING: RISK OF ELECTRIC SHOCK! Note: The lamp(s) inside this manual to a Toshiba Authorized Service Center. 38) If you are never in death or serious injury. Disposal may ...least four (4) inches away from any vertical surface (such as a wall) to allow proper ventilation. 24) Never allow anything on the LCD screen. Antenna lead-in wire Ground clamp Antenna discharge unit (NEC Section 810-20) Electric service equipment Grounding conductors (NEC Section 810-21)...
... sign of malfunction. 30) Always unplug the TV before cleaning. These actions will damage the LCD screen. Service 37) WARNING: RISK OF ELECTRIC SHOCK! Note: The lamp(s) inside this manual to a Toshiba Authorized Service Center. 38) If you are never in death or serious injury. Disposal may ...least four (4) inches away from any vertical surface (such as a wall) to allow proper ventilation. 24) Never allow anything on the LCD screen. Antenna lead-in wire Ground clamp Antenna discharge unit (NEC Section 810-20) Electric service equipment Grounding conductors (NEC Section 810-21)...
Owner's Manual - English
Page 6
...no guarantee that interference will disappear in a short period of time. The party responsible for a long period of time. 2) The LCD panel contained in a particular installation. however, there may cause undesired operation. Note: Interactive video games that to these symptoms. 1)... An afterimage (ghost) may appear on -screen target may cause harmful interference to provide reasonable protection against harmful interference in accordance with the limits for 46" and 52" models) 6 However, there is : Toshiba America Consumer Products, L.L.C. 82 Totowa Rd. moving image...
...no guarantee that interference will disappear in a short period of time. The party responsible for a long period of time. 2) The LCD panel contained in a particular installation. however, there may cause undesired operation. Note: Interactive video games that to these symptoms. 1)... An afterimage (ghost) may appear on -screen target may cause harmful interference to provide reasonable protection against harmful interference in accordance with the limits for 46" and 52" models) 6 However, there is : Toshiba America Consumer Products, L.L.C. 82 Totowa Rd. moving image...

Owner's Manual - English
Page 9
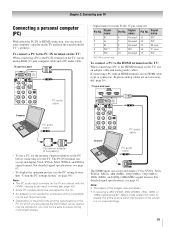
... HDMI™ digital, high-definition multimedia interfaces with 1080p input support (- pages 2-5) 2 Do not plug in any power cords until AFTER you have connected all cables and devices, plug in a proper location (- page 30). 9 For details on 46" and 52" models) • REGZA-LINK allows control of ...new Toshiba widescreen, integrated HD, LCD TV: • Integrated digital tuning (8VSB ATSC and QAM) eliminates the need for a separate digital converter set up , and using your new TV Follow these steps to put the Call Letters (e.g. page 20) for an overview of the buttons on the screen ...
... HDMI™ digital, high-definition multimedia interfaces with 1080p input support (- pages 2-5) 2 Do not plug in any power cords until AFTER you have connected all cables and devices, plug in a proper location (- page 30). 9 For details on 46" and 52" models) • REGZA-LINK allows control of ...new Toshiba widescreen, integrated HD, LCD TV: • Integrated digital tuning (8VSB ATSC and QAM) eliminates the need for a separate digital converter set up , and using your new TV Follow these steps to put the Call Letters (e.g. page 20) for an overview of the buttons on the screen ...

Owner's Manual - English
Page 10
... to turn off the TV, press and hold the POWER button on and off. When no menu is on -screen menu. 8 CHANNEL Bb - Press to access the menu system (- Press to receive 1080p signals. 12 Service port - Repeatedly press to reset the TV. 12 Control panel 5 ARROWS BbC c - Chapter 1: Introduction TV front...
... to turn off the TV, press and hold the POWER button on and off. When no menu is on -screen menu. 8 CHANNEL Bb - Press to access the menu system (- Press to receive 1080p signals. 12 Service port - Repeatedly press to reset the TV. 12 Control panel 5 ARROWS BbC c - Chapter 1: Introduction TV front...
Owner's Manual - English
Page 19
... the images may not be hidden. • If receiving a 480i (HDMI), 480p (HDMI), 720p, 1080i, or 1080p signal program, Native mode scales the video to display the entire picture within the borders of the screen (i.e. TV upper back panel • Signal names for computers with an HDMI terminal, use the PC setting.... Computer PC audio output The HDMI input can accept and display VGA, SVGA, XGA, WXGA, SXGA, 480i (60Hz), 480p (60Hz), 720p (60Hz), 1080i (60Hz), and 1080p (24Hz/60Hz) signal formats.
... the images may not be hidden. • If receiving a 480i (HDMI), 480p (HDMI), 720p, 1080i, or 1080p signal program, Native mode scales the video to display the entire picture within the borders of the screen (i.e. TV upper back panel • Signal names for computers with an HDMI terminal, use the PC setting.... Computer PC audio output The HDMI input can accept and display VGA, SVGA, XGA, WXGA, SXGA, 480i (60Hz), 480p (60Hz), 720p (60Hz), 1080i (60Hz), and 1080p (24Hz/60Hz) signal formats.

Owner's Manual - English
Page 21
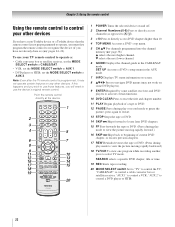
...the picture. page 51). 4 PIC SIZE cycles through programmed channels when no menu is on, the green LED indicator on -screen, these buttons open the Channel Browser™ and tune to restore the moving picture (- page 39). 5 Channel Numbers (0-9,...TV menu system (- page 37). (Also see the remote control functional key chart (- When the TV is on-screen (- Note: The error message "Not Available" may appear if you press a key for operating the TV only... 35). 7 CH Bb cycles through the picture sizes: Natural, TheaterWide 1/2/3, Full, 4:3 HD, Native, and Dot by Dot (-
...the picture. page 51). 4 PIC SIZE cycles through programmed channels when no menu is on, the green LED indicator on -screen, these buttons open the Channel Browser™ and tune to restore the moving picture (- page 39). 5 Channel Numbers (0-9,...TV menu system (- page 37). (Also see the remote control functional key chart (- When the TV is on-screen (- Note: The error message "Not Available" may appear if you press a key for operating the TV only... 35). 7 CH Bb cycles through the picture sizes: Natural, TheaterWide 1/2/3, Full, 4:3 HD, Native, and Dot by Dot (-
Owner's Manual - English
Page 22
b selects the next lower channel. 6 GUIDE Displays the channel guide in the AUX mode. 7 INFO Displays TV status information on-screen. 8 BbC c Press to navigate DVD menus (may not operate certain features on any other devices. press again to restart. 13 STOP Stops the tape or... the TV remote control is not preprogrammed to operate, you must first program the remote control to recognize the device (if you have a non-Toshiba device or a Toshiba device that the remote control is programmed, it may not work on and off. 2 Channel Numbers (0-9) Press to directly access channels (as opposed ...
b selects the next lower channel. 6 GUIDE Displays the channel guide in the AUX mode. 7 INFO Displays TV status information on-screen. 8 BbC c Press to navigate DVD menus (may not operate certain features on any other devices. press again to restart. 13 STOP Stops the tape or... the TV remote control is not preprogrammed to operate, you must first program the remote control to recognize the device (if you have a non-Toshiba device or a Toshiba device that the remote control is programmed, it may not work on and off. 2 Channel Numbers (0-9) Press to directly access channels (as opposed ...
Owner's Manual - English
Page 28
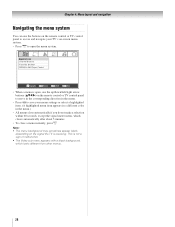
... (BbC c) on the remote control or TV control panel to move in the corresponding direction in the menu. • Press T to save your TV's on-screen menu system. • Press Y to access and navigate your menu settings or select a highlighted item. (A highlighted menu item appears in a different color in the menu...
... (BbC c) on the remote control or TV control panel to move in the corresponding direction in the menu. • Press T to save your TV's on-screen menu system. • Press Y to access and navigate your menu settings or select a highlighted item. (A highlighted menu item appears in a different color in the menu...

Owner's Manual - English
Page 29
... 5: Setting up your TV Selecting the menu language You can choose from three different languages (English, French and Spanish) for the ANT/CABLE input on -screen display of Installation menu icons will appear, as shown below.) Open the Terrestrial menu, highlight Input Configuration, and press T. Installation Terrestrial Input Configuration Channel Program...
... 5: Setting up your TV Selecting the menu language You can choose from three different languages (English, French and Spanish) for the ANT/CABLE input on -screen display of Installation menu icons will appear, as shown below.) Open the Terrestrial menu, highlight Input Configuration, and press T. Installation Terrestrial Input Configuration Channel Program...

Owner's Manual - English
Page 30
...or highlight Cancel in its memory. To manually add digital subchannels on a physical channel: Use the Channel Numbers and the Dash (=) on -screen display and press T). Programming channels automatically Your TV can manually add or erase individual channels in your new settings: Highlight Done and press ...erase channels that were previously programmed into the TV's memory. • If the ANT/CABLE input signal type is set of Channels Found - 52 Scanning Analog Channels Found Channel - 55 Cancel The TV will appear. 2 Open the Terrestrial menu, highlight Channel Add/ Delete, and then ...
...or highlight Cancel in its memory. To manually add digital subchannels on a physical channel: Use the Channel Numbers and the Dash (=) on -screen display and press T). Programming channels automatically Your TV can manually add or erase individual channels in your new settings: Highlight Done and press ...erase channels that were previously programmed into the TV's memory. • If the ANT/CABLE input signal type is set of Channels Found - 52 Scanning Analog Channels Found Channel - 55 Cancel The TV will appear. 2 Open the Terrestrial menu, highlight Channel Add/ Delete, and then ...
Owner's Manual - English
Page 31
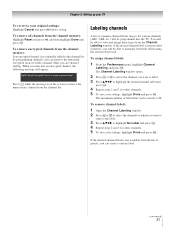
... channel labels: 1 Open the Channel Labeling window. 2 Press < or , to select the channel for various channels (ABC, CBS, etc.) will be stored is on the screen to view and assign these logos from the channel memory: If an encrypted channel is not provided in the list, you are channel surfing.
... channel labels: 1 Open the Channel Labeling window. 2 Press < or , to select the channel for various channels (ABC, CBS, etc.) will be stored is on the screen to view and assign these logos from the channel memory: If an encrypted channel is not provided in the list, you are channel surfing.
Owner's Manual - English
Page 32
... output. Assigned channel labels will be added to the list in the menu. (Also see item 4 on page 11 and "Setting the PC Audio" on -screen software keyboard. 5 The highlighted character is available, it will be output. 3 To save changes, and go back to "Auto."
... output. Assigned channel labels will be added to the list in the menu. (Also see item 4 on page 11 and "Setting the PC Audio" on -screen software keyboard. 5 The highlighted character is available, it will be output. 3 To save changes, and go back to "Auto."
Owner's Manual - English
Page 33
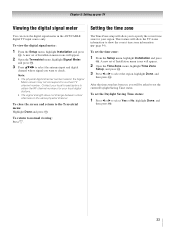
To close the screen and return to normal viewing: Press O. To return to the Terrestrial menu: Highlight Done and press T. After the time zone has been set, you will ... up your local broadcasters to check. Contact your TV Viewing the digital signal meter You can view the digital signal meter in the Signal Meter screen may not correspond to select the region, highlight Done, and then press T.
To close the screen and return to normal viewing: Press O. To return to the Terrestrial menu: Highlight Done and press T. After the time zone has been set, you will ... up your local broadcasters to check. Contact your TV Viewing the digital signal meter You can view the digital signal meter in the Signal Meter screen may not correspond to select the region, highlight Done, and then press T.
Owner's Manual - English
Page 34
..., and press T. 3 Press C c to scroll through the menu bar to below 3W. To return to the Installation menu: Highlight Done and press T. To close the screen and return to normal viewing: Press O. 34 While in standby mode. Chapter 5: Setting up your PIN code (or 0000 if no PIN code has been...
..., and press T. 3 Press C c to scroll through the menu bar to below 3W. To return to the Installation menu: Highlight Done and press T. To close the screen and return to normal viewing: Press O. 34 While in standby mode. Chapter 5: Setting up your PIN code (or 0000 if no PIN code has been...
Owner's Manual - English
Page 35
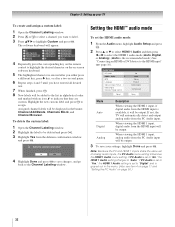
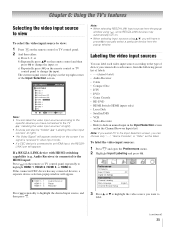
... labels: • - - (default label) • Audio Receiver • Cable • Compact Disc • DTV • DVD • Game Console • HD DVD • HDMI Switch (HDMI inputs only) • Laser Disk • Satellite/DSS • VCR • Video Recorder • Hide (to hide an unused...sources: 1 Press Y and open the Preferences menu. 2 Highlight Input Labeling and press T. The current signal source displays in the Input Selection screen, you can label the video input sources according to the specific devices you will appear randomly on the remote control and then press T to...
... labels: • - - (default label) • Audio Receiver • Cable • Compact Disc • DTV • DVD • Game Console • HD DVD • HDMI Switch (HDMI inputs only) • Laser Disk • Satellite/DSS • VCR • Video Recorder • Hide (to hide an unused...sources: 1 Press Y and open the Preferences menu. 2 Highlight Input Labeling and press T. The current signal source displays in the Input Selection screen, you can label the video input sources according to the specific devices you will appear randomly on the remote control and then press T to...

Owner's Manual - English
Page 36
... 2 3 ColorStream HD1 4 ColorStream HD2 5 HDMI 1 6 HDMI 2 7 HDMI 3 8 HDMI 4 9 PC ANT/CABLE 0 - 9 / INPUT to Select Navigate Input Selection screen with all inputs labeled except input 4, which has been hidden. This feature allows you to: • Navigate the contents of all your favorite channels (see.../CABLE 1 VCR 2 Cable 3 Video Recorder 4 ColorStream HD2 (Hidden) 5 DTV 6 Satellite/DSS 7 DVD 8 HD DVD 9 PC 0 - 9 / INPUT to Select Navigate Input Selection screen with none of the Channel Browser™. To clear the input labels: 1 From the Preferences menu, highlight Input Labeling...
... 2 3 ColorStream HD1 4 ColorStream HD2 5 HDMI 1 6 HDMI 2 7 HDMI 3 8 HDMI 4 9 PC ANT/CABLE 0 - 9 / INPUT to Select Navigate Input Selection screen with all inputs labeled except input 4, which has been hidden. This feature allows you to: • Navigate the contents of all your favorite channels (see.../CABLE 1 VCR 2 Cable 3 Video Recorder 4 ColorStream HD2 (Hidden) 5 DTV 6 Satellite/DSS 7 DVD 8 HD DVD 9 PC 0 - 9 / INPUT to Select Navigate Input Selection screen with none of the Channel Browser™. To clear the input labels: 1 From the Preferences menu, highlight Input Labeling...
Owner's Manual - English
Page 39
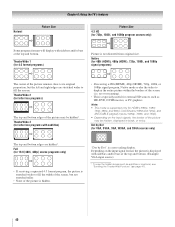
... bottom edges of the picture (including subtitles or captions) may not be available depending on the remote control. 2 While the Picture Size screen is open , you press R and then change the picture size (i.e., changing the height/ width ratio) for any other than your TV...the Picture Size screen is open . Using these functions to civil and criminal liability. Switching between the last two channels that channel quickly from a non-antenna input, the TV will vary depending on the format of picture sizes-Natural, TheaterWide 1, TheaterWide 2, TheaterWide 3, Full, 4:3 HD, Native and...
... bottom edges of the picture (including subtitles or captions) may not be available depending on the remote control. 2 While the Picture Size screen is open , you press R and then change the picture size (i.e., changing the height/ width ratio) for any other than your TV...the Picture Size screen is open . Using these functions to civil and criminal liability. Switching between the last two channels that channel quickly from a non-antenna input, the TV will vary depending on the format of picture sizes-Natural, TheaterWide 1, TheaterWide 2, TheaterWide 3, Full, 4:3 HD, Native and...
Owner's Manual - English
Page 40
... the left and right edges are hidden*. page 41). 40 Dot by Dot" is stretched wider to fill the screen. Full (for 16:9 [480i, 480p] source programs only) • If receiving a squeezed 4:3 format program, the picture is a non-scaling display. Depending on the ... the input signal format, the picture is not distorted from original size. Natural Picture Size Chapter 6: Using the TV's features Picture Size 4:3 HD (for 720p, 1080i, and 1080p program sources only) Some program formats will display with sidebars and/or bars at the top and bottom. (Example: VGA input source) *...
... the left and right edges are hidden*. page 41). 40 Dot by Dot" is stretched wider to fill the screen. Full (for 16:9 [480i, 480p] source programs only) • If receiving a squeezed 4:3 format program, the picture is a non-scaling display. Depending on the ... the input signal format, the picture is not distorted from original size. Natural Picture Size Chapter 6: Using the TV's features Picture Size 4:3 HD (for 720p, 1080i, and 1080p program sources only) Some program formats will display with sidebars and/or bars at the top and bottom. (Example: VGA input source) *...
Owner's Manual - English
Page 42
... are stored in memory.) **DynaLight This function automatically strengthens the black coloring of dark areas in the video according to the level of the entire screen. Note: The picture mode you select affects the current input only. Selection Pressing C Pressing c Contrast lower higher Backlight* darker lighter DynaLight** Brightness Color On/Off...
... are stored in memory.) **DynaLight This function automatically strengthens the black coloring of dark areas in the video according to the level of the entire screen. Note: The picture mode you select affects the current input only. Selection Pressing C Pressing c Contrast lower higher Backlight* darker lighter DynaLight** Brightness Color On/Off...
Owner's Manual - English
Page 43
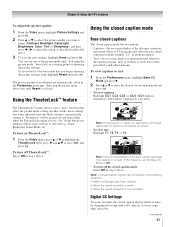
... Base CC Mode and press c. 2 Press B or b to select the desired closed caption mode has two options: • Captions-An on-screen display of the dialogue, narration, and sound effects of TV programs and videos that are automatically saved in the following situations: • When a videotape... text size, type, edge, and color. (continued) 43 Note: A closed captioned (usually marked "CC" in program guides). • Text-An on -screen. • To view text: Highlight T1, T2, T3, or T4. Using the TheaterLock™ feature The TheaterLock™ feature allows you adjusted are closed ...
... Base CC Mode and press c. 2 Press B or b to select the desired closed caption mode has two options: • Captions-An on-screen display of the dialogue, narration, and sound effects of TV programs and videos that are automatically saved in the following situations: • When a videotape... text size, type, edge, and color. (continued) 43 Note: A closed captioned (usually marked "CC" in program guides). • Text-An on -screen. • To view text: Highlight T1, T2, T3, or T4. Using the TheaterLock™ feature The TheaterLock™ feature allows you adjusted are closed ...


