
Owners Manual
Page 2
... with a dry cloth. 2 Downloaded from overheating and avoid possible damage to check for reflections on a sturdy platform. The lightning symbol in picture distortion or color fading. Precautions Installing your TV • Do not stand or climb on the TV. • Do not put any ...heavy object on top of misuse. If any reflections while viewing. Stationary patterns generated by a picture-in-picture (PIP) display, Multi-Window display, computer displays, video games, stock market reports, etc., can become permanently engrained on the lenses resulting...
... with a dry cloth. 2 Downloaded from overheating and avoid possible damage to check for reflections on a sturdy platform. The lightning symbol in picture distortion or color fading. Precautions Installing your TV • Do not stand or climb on the TV. • Do not put any ...heavy object on top of misuse. If any reflections while viewing. Stationary patterns generated by a picture-in-picture (PIP) display, Multi-Window display, computer displays, video games, stock market reports, etc., can become permanently engrained on the lenses resulting...
Owners Manual
Page 3
Introduction 4 Welcome to Toshiba 4 Exploring your new TV 4 Connecting your TV 5 Connecting a VCR 5 Connecting a cable converter box 6 Connecting ... Locking channels 29 Locking video inputs 30 Changing pin code 30 Adjusting the picture 31 Selecting the picture modes 31 Adjusting the picture quality 31 Saving new preference 32 Using the flesh tone feature 32 Using... the noise reduction feature 32 Selecting the color temperature 33 Resetting your picture adjustments 33 Watching video input 34 Selecting the video label 34 Using the closed caption feature ...
Introduction 4 Welcome to Toshiba 4 Exploring your new TV 4 Connecting your TV 5 Connecting a VCR 5 Connecting a cable converter box 6 Connecting ... Locking channels 29 Locking video inputs 30 Changing pin code 30 Adjusting the picture 31 Selecting the picture modes 31 Adjusting the picture quality 31 Saving new preference 32 Using the flesh tone feature 32 Using... the noise reduction feature 32 Selecting the color temperature 33 Resetting your picture adjustments 33 Watching video input 34 Selecting the video label 34 Using the closed caption feature ...
Owners Manual
Page 5
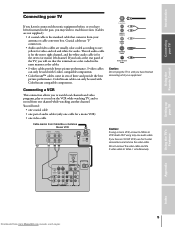
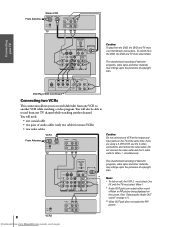
... cables use "F" connectors. • Audio and video cables are color coded in the same manner as the cables. • S-video cables provide better picture performance. S-video cables can only be used with S-video compatible components. • ColorStream™ cables come in sets of the TV, you look at... the rear panel of three and provide the best picture performance. Connecting a VCR This connection allows you to watch local channels and video programs, play or record on the VCR while watching TV, ...
... cables use "F" connectors. • Audio and video cables are color coded in the same manner as the cables. • S-video cables provide better picture performance. S-video cables can only be used with S-video compatible components. • ColorStream™ cables come in sets of the TV, you look at... the rear panel of three and provide the best picture performance. Connecting a VCR This connection allows you to watch local channels and video programs, play or record on the VCR while watching TV, ...
Owners Manual
Page 7
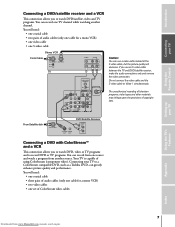
... channel while watching another source. You will need : • one coaxial cable • three pairs of the S-video cable, but the picture quality will decrease. From Satellite dish IN from ANT S-VIDEO VIDEO OUT OUT DVD/Satellite Receiver AUDIO OUT L R Connecting a DVD with ColorStream... search engine Do not connect the video cable and the S-video cable to a ColorStream compatible DVD, such as a Toshiba DVD, can greatly enhance picture quality and performance. Introduction Connecting your TV Using the Remote Control Connecting a DVD/satellite receiver and a VCR This connection...
... channel while watching another source. You will need : • one coaxial cable • three pairs of the S-video cable, but the picture quality will decrease. From Satellite dish IN from ANT S-VIDEO VIDEO OUT OUT DVD/Satellite Receiver AUDIO OUT L R Connecting a DVD with ColorStream... search engine Do not connect the video cable and the S-video cable to a ColorStream compatible DVD, such as a Toshiba DVD, can greatly enhance picture quality and performance. Introduction Connecting your TV Using the Remote Control Connecting a DVD/satellite receiver and a VCR This connection...
Owners Manual
Page 8
... IN OUT Caution: Do not connect one VCR to the output and input jacks on page 41.) ** Video OUT jack does not output the PIP picture. You will need: • one coaxial cable • two pairs of copyright laws. You will also be able to record from one VCR to ....Manualslib.com manuals search engine The unauthorized recording of television programs, video tapes and other materials may infringe upon the provisions of Main or PIP picture being displayed on the screen. (See "Selecting the Audio OUT sound" on the TV at the same time. If you to Video-1 simultaneously. Using the...
... IN OUT Caution: Do not connect one VCR to the output and input jacks on page 41.) ** Video OUT jack does not output the PIP picture. You will need: • one coaxial cable • two pairs of copyright laws. You will also be able to record from one VCR to ....Manualslib.com manuals search engine The unauthorized recording of television programs, video tapes and other materials may infringe upon the provisions of Main or PIP picture being displayed on the screen. (See "Selecting the Audio OUT sound" on the TV at the same time. If you to Video-1 simultaneously. Using the...
Owners Manual
Page 15
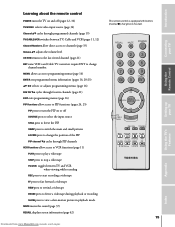
... volume level CH RTN returns to the last viewed channel (page 21) ENT some VCR's and Cable TV converters require ENT to view a slow-motion picture in playback mode MUTE mutes the sound (page 37) RECALL displays screen information (page 42) Downloaded from www.Manualslib.com manuals search engine This remote... PIP on and off SOURCE press to select the input source STILL press to freeze the PIP SWAP press to switch the main and small pictures LOCATE press to change the position of the PIP PIP channel zy cycles through programmed channels (page 19) TV/CABLE/VCR switches between TV, Cable...
... volume level CH RTN returns to the last viewed channel (page 21) ENT some VCR's and Cable TV converters require ENT to view a slow-motion picture in playback mode MUTE mutes the sound (page 37) RECALL displays screen information (page 42) Downloaded from www.Manualslib.com manuals search engine This remote... PIP on and off SOURCE press to select the input source STILL press to freeze the PIP SWAP press to switch the main and small pictures LOCATE press to change the position of the PIP PIP channel zy cycles through programmed channels (page 19) TV/CABLE/VCR switches between TV, Cable...
Owners Manual
Page 19
..., skip this procedure. To change the channel, you want to add or erase using the Channel Number buttons. 2. Press y or z to form a full color picture. Repeat steps 1-4 for at least 30 minutes. You can : • change the programmed channels using the remote control • select a channel directly using the ...remote control • scan the channels using the TV buttons To change to add by using Channel y or z. If you can see a clear picture only when they converge to highlight ADD/ERASE. 1 2 3 4 5 6 7 8 9 10 11 12 13 14 15 16 17 18 19 20 21 22 23 24 ...
..., skip this procedure. To change the channel, you want to add or erase using the Channel Number buttons. 2. Press y or z to form a full color picture. Repeat steps 1-4 for at least 30 minutes. You can : • change the programmed channels using the remote control • select a channel directly using the ...remote control • scan the channels using the TV buttons To change to add by using Channel y or z. If you can see a clear picture only when they converge to highlight ADD/ERASE. 1 2 3 4 5 6 7 8 9 10 11 12 13 14 15 16 17 18 19 20 21 22 23 24 ...
Owners Manual
Page 20
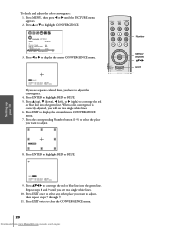
... 29 30 31 32 33 34 35 8. Press MENU, then press x or • until you see two single white lines. 6. Repeat steps 8 and 9 until the PICTURE menu appears. 2. Press y or z to display the center CONVERGENCE menu. 1 2 3 4 5 6 7 8 9 10 11 12 13 14 15 16 17 18 19 20 21 22 23 24...
... 29 30 31 32 33 34 35 8. Press MENU, then press x or • until you see two single white lines. 6. Repeat steps 8 and 9 until the PICTURE menu appears. 2. Press y or z to display the center CONVERGENCE menu. 1 2 3 4 5 6 7 8 9 10 11 12 13 14 15 16 17 18 19 20 21 22 23 24...
Owners Manual
Page 24
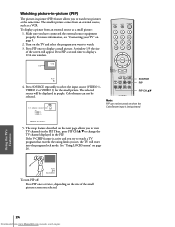
... depending on when the ColorStream input is active and you try to watch a TV program that exceeds the rating limits you want to watch two pictures at the same time. Press SOURCE repeatedly to display a 1/16 size window. 1/16 1/9 PIP 6 4. SOURCE : TO SELECT 5. Setting... source will enter into the program lock mode. See "Using LOCKS menu" on page 5. 2. Introduction Connecting your TV Using the Remote Control Watching picture-in-picture (PIP) The picture-in-picture (PIP) feature allows you selected. P I P SOURCE SELECT I ON TV V I DEO 1 V I DEO 2 V I DEO 3 RECALL MUTE POWER 123 456...
... depending on when the ColorStream input is active and you try to watch a TV program that exceeds the rating limits you want to watch two pictures at the same time. Press SOURCE repeatedly to display a 1/16 size window. 1/16 1/9 PIP 6 4. SOURCE : TO SELECT 5. Setting... source will enter into the program lock mode. See "Using LOCKS menu" on page 5. 2. Introduction Connecting your TV Using the Remote Control Watching picture-in-picture (PIP) The picture-in-picture (PIP) feature allows you selected. P I P SOURCE SELECT I ON TV V I DEO 1 V I DEO 2 V I DEO 3 RECALL MUTE POWER 123 456...
Owners Manual
Page 25
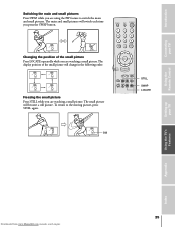
...25 Downloaded from www.Manualslib.com manuals search engine To return to switch the main and small pictures. The small picture will switch each time you are using the PIP feature to the moving picture, press STILL again. RECALL MUTE POWER 123 456 78 9 CH RTN 100 0 ENT CH... the main and small pictures Press SWAP while you press the SWAP button. Changing the position of the small picture will change in the following order: Freezing the small picture Press STILL while you are watching a small picture. The display position of the small picture Press LOCATE repeatedly while ...
...25 Downloaded from www.Manualslib.com manuals search engine To return to switch the main and small pictures. The small picture will switch each time you are using the PIP feature to the moving picture, press STILL again. RECALL MUTE POWER 123 456 78 9 CH RTN 100 0 ENT CH... the main and small pictures Press SWAP while you press the SWAP button. Changing the position of the small picture will change in the following order: Freezing the small picture Press STILL while you are watching a small picture. The display position of the small picture Press LOCATE repeatedly while ...
Owners Manual
Page 28
... 13 14 15 16 17 18 19 20 21 22 23 24 25 26 27 28 29 30 31 32 33 34 35 Note: The picture-in-picture is not locked even if ON is selected.
... 13 14 15 16 17 18 19 20 21 22 23 24 25 26 27 28 29 30 31 32 33 34 35 Note: The picture-in-picture is not locked even if ON is selected.
Owners Manual
Page 29
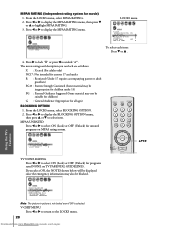
... channels. If the number is reapplied. All locking is disabled until the TV is entered, the message appears. It will be released and the normal picture will be enabled when the power is correct, the lock mode will appear. RECALL MUTE POWER 123 456 78 9 CH RTN 100 0 ENT CH MENU...
... channels. If the number is reapplied. All locking is disabled until the TV is entered, the message appears. It will be released and the normal picture will be enabled when the power is correct, the lock mode will appear. RECALL MUTE POWER 123 456 78 9 CH RTN 100 0 ENT CH MENU...
Owners Manual
Page 31
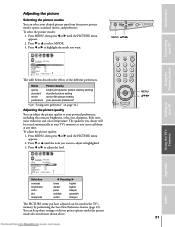
...35 Selection contrast brightness color tint sharpness x Pressing • lower darker paler reddish softer higher lighter deeper greenish sharper The PICTURE items you have adjusted can adjust the picture quality to select MODE. 3. The qualities you want . 1 2 3 4 5 6 7 8 9 10 11 ...press x or • until the PICTURE menu appears. 2. Press MENU, then press x or • until the PICTURE menu appears. 2. Mode sports standard movie preference Picture Quality bright and dynamic picture (factory setting) standard picture setting movie-like picture setting your TV's memory so you...
...35 Selection contrast brightness color tint sharpness x Pressing • lower darker paler reddish softer higher lighter deeper greenish sharper The PICTURE items you have adjusted can adjust the picture quality to select MODE. 3. The qualities you want . 1 2 3 4 5 6 7 8 9 10 11 ...press x or • until the PICTURE menu appears. 2. Press MENU, then press x or • until the PICTURE menu appears. 2. Mode sports standard movie preference Picture Quality bright and dynamic picture (factory setting) standard picture setting movie-like picture setting your TV's memory so you...
Owners Manual
Page 32
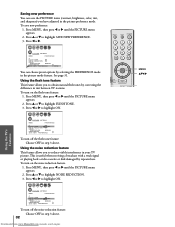
... the difference in tint between TV stations. To turn on the noise reduction feature. 1. See page 31. Press MENU, then press x or • until the PICTURE menu appears. 2. Press x or • to highlight ON. 1 2 3 4 5 6 7 8 9 10 11 12 13 14 15 16 17 18 19 20 21 22 23 24 25 26... 22 23 24 25 26 27 28 29 30 31 32 33 34 35 To turn off the flesh tone feature: Choose OFF in the picture preference mode. Press x or •. 1 2 3 4 5 6 7 8 9 10 11 12 13 14 15 16 17 18 19 20 21 22 23 24 25 26 27 28 29...
... the difference in tint between TV stations. To turn on the noise reduction feature. 1. See page 31. Press MENU, then press x or • until the PICTURE menu appears. 2. Press x or • to highlight ON. 1 2 3 4 5 6 7 8 9 10 11 12 13 14 15 16 17 18 19 20 21 22 23 24 25 26... 22 23 24 25 26 27 28 29 30 31 32 33 34 35 To turn off the flesh tone feature: Choose OFF in the picture preference mode. Press x or •. 1 2 3 4 5 6 7 8 9 10 11 12 13 14 15 16 17 18 19 20 21 22 23 24 25 26 27 28 29...
Owners Manual
Page 33
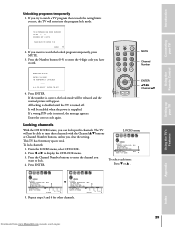
... 22 23 24 25 26 27 28 29 30 31 32 33 34 35 Mode cool medium warm Picture Quality blueish neutral reddish Resetting your picture adjustments 1. Press MENU, then press x or • until the PICTURE menu appears. 2. Press x or • to highlight COLOR TEMPERATURE. 3. Press x or •. 1 2 3 4...settings. contrast max (100) brightness center (50) color center (50) tint center (0) sharpness center (50) color temperature cool noise reduction off picture mode sports RECALL MUTE POWER 123 456 78 9 CH RTN 100 0 ENT CH MENU/ VOL ENTER VOL TV CABLE VCR CH EX I ...
... 22 23 24 25 26 27 28 29 30 31 32 33 34 35 Mode cool medium warm Picture Quality blueish neutral reddish Resetting your picture adjustments 1. Press MENU, then press x or • until the PICTURE menu appears. 2. Press x or • to highlight COLOR TEMPERATURE. 3. Press x or •. 1 2 3 4...settings. contrast max (100) brightness center (50) color center (50) tint center (0) sharpness center (50) color temperature cool noise reduction off picture mode sports RECALL MUTE POWER 123 456 78 9 CH RTN 100 0 ENT CH MENU/ VOL ENTER VOL TV CABLE VCR CH EX I ...

Owners Manual
Page 41
... 24 25 26 27 28 29 30 31 32 33 34 35 To turn off . Press x or • to avoid extreme change of the main picture with the built-in step 3. Using the stable sound feature The stable sound feature, when the signal source is automatically turned off the stable sound... 14 15 16 17 18 19 20 21 22 23 24 25 26 27 28 29 30 31 32 33 34 35 • MAIN : Main picture sound you to select the sound sources (MAIN and PIP) output from www.Manualslib.com manuals search engine Press y or z to highlight AUDIO OUT. 3. Press...
... 24 25 26 27 28 29 30 31 32 33 34 35 To turn off . Press x or • to avoid extreme change of the main picture with the built-in step 3. Using the stable sound feature The stable sound feature, when the signal source is automatically turned off the stable sound... 14 15 16 17 18 19 20 21 22 23 24 25 26 27 28 29 30 31 32 33 34 35 • MAIN : Main picture sound you to select the sound sources (MAIN and PIP) output from www.Manualslib.com manuals search engine Press y or z to highlight AUDIO OUT. 3. Press...
Owners Manual
Page 45
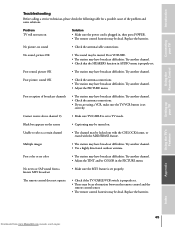
.... • The station may have broadcast difficulties. No stereo or SAP sound from www.Manualslib.com manuals search engine Poor sound, picture OK • The station may have broadcast difficulties. Try another channel. • Use a highly directional outdoor antenna. Try another ... COLOR in , then press POWER. • The remote control batteries may be dead. Try another channel. • Adjust the PICTURE menu. Introduction Connecting your TV Using the Remote Control Setting up your TV Troubleshooting Before calling a service technician, please check the following...
.... • The station may have broadcast difficulties. No stereo or SAP sound from www.Manualslib.com manuals search engine Poor sound, picture OK • The station may have broadcast difficulties. Try another channel. • Use a highly directional outdoor antenna. Try another ... COLOR in , then press POWER. • The remote control batteries may be dead. Try another channel. • Adjust the PICTURE menu. Introduction Connecting your TV Using the Remote Control Setting up your TV Troubleshooting Before calling a service technician, please check the following...
Owners Manual
Page 46
..., the defect. Limited Two (2) Year Warranty of instructions furnished by inadequate antenna systems are not covered by you find the nearest TOSHIBA Authorized Service Station. (2) Please present your home when warranty service is replaced after the date of sale or other purchaser or transferee... THI be taken to the TACP/THI Authorized service station for commercial use in violation of Picture Tube TACP and THI further warrant the picture tube in lieu of sale to TOSHIBA OF CANADA to "Register and Validate" their option, with better customer service and improved products...
..., the defect. Limited Two (2) Year Warranty of instructions furnished by inadequate antenna systems are not covered by you find the nearest TOSHIBA Authorized Service Station. (2) Please present your home when warranty service is replaced after the date of sale or other purchaser or transferee... THI be taken to the TACP/THI Authorized service station for commercial use in violation of Picture Tube TACP and THI further warrant the picture tube in lieu of sale to TOSHIBA OF CANADA to "Register and Validate" their option, with better customer service and improved products...
Owners Manual
Page 47
... selection 17 Last mode memory 43 Locks menu 26 Menu system 16 MTS feature 37 MUTE button 37 P Picture adjustments COLOR TEMPERATURE 33 FLESH TONE 32 NOISE REDUCTION 32 Picture mode 31 Picture quality 31 Picture in Picture (PIP) LOCATE button 25 PIP button 24 PIP CH y z buttons 24 SOURCE button 24 STILL button 25...
... selection 17 Last mode memory 43 Locks menu 26 Menu system 16 MTS feature 37 MUTE button 37 P Picture adjustments COLOR TEMPERATURE 33 FLESH TONE 32 NOISE REDUCTION 32 Picture mode 31 Picture quality 31 Picture in Picture (PIP) LOCATE button 25 PIP button 24 PIP CH y z buttons 24 SOURCE button 24 STILL button 25...

