Owner's Manual - English
Page 3
... the user's authority to operate this equipment. Servicing is located in case the product requires service. 19) NEVER route the product's power cord inside the TV contains glass and a toxic liquid. fully insert. 16) WARNING: To prevent the spread of fire, keep candles or other open ... apparatus (including amplifiers) that produce heat. 9) Do not defeat the safety purpose of Wide blade the polarized or grounding type plug. The LCD panel inside a wall or similar enclosed area. 20) Never modify this equipment under the rules of the Federal Communications Commission. 21) DANGER:...
... the user's authority to operate this equipment. Servicing is located in case the product requires service. 19) NEVER route the product's power cord inside the TV contains glass and a toxic liquid. fully insert. 16) WARNING: To prevent the spread of fire, keep candles or other open ... apparatus (including amplifiers) that produce heat. 9) Do not defeat the safety purpose of Wide blade the polarized or grounding type plug. The LCD panel inside a wall or similar enclosed area. 20) Never modify this equipment under the rules of the Federal Communications Commission. 21) DANGER:...
Owner's Manual - English
Page 4
...surface. If these recommendations and precautions: 32) If you need to clean the LCD screen, follow these sounds become frequent or continuous, unplug the power cord and contact a Toshiba Authorized Service Center. 39) WARNING: RISK OF SERIOUS PERSONAL INJURY OR EQUIPMENT ...DAMAGE! These actions will damage the LCD screen. Leave a space of at least four (4) inches away from any vertical surface (such as in item 33 on or roll over the power cord, and never place the TV where the power...
...surface. If these recommendations and precautions: 32) If you need to clean the LCD screen, follow these sounds become frequent or continuous, unplug the power cord and contact a Toshiba Authorized Service Center. 39) WARNING: RISK OF SERIOUS PERSONAL INJURY OR EQUIPMENT ...DAMAGE! These actions will damage the LCD screen. Leave a space of at least four (4) inches away from any vertical surface (such as in item 33 on or roll over the power cord, and never place the TV where the power...
Owner's Manual - English
Page 6
...accordance with more intelligible dialog. • Manufactured under your LCD TV The following symptoms are technical limitations of LCD Display technology and are not visible when the picture is ...): The Toshiba 42ZV650U, 47ZV650U and 55ZV650U Televisions comply with the limits for a Class B digital device, pursuant to Part 15 of the FCC rules. ENERGY STAR® qualified TV. Environmental ...non-moving image is encouraged to try to correct the interference by removing and applying power to radio communications. ENERGY STAR® User Information ENERGY STAR User Information Statement: ...
...accordance with more intelligible dialog. • Manufactured under your LCD TV The following symptoms are technical limitations of LCD Display technology and are not visible when the picture is ...): The Toshiba 42ZV650U, 47ZV650U and 55ZV650U Televisions comply with the limits for a Class B digital device, pursuant to Part 15 of the FCC rules. ENERGY STAR® qualified TV. Environmental ...non-moving image is encouraged to try to correct the interference by removing and applying power to radio communications. ENERGY STAR® User Information ENERGY STAR User Information Statement: ...

Owner's Manual - English
Page 7
...Service 3 Choosing a location for your LCD TV 5 Chapter 1: Introduction 9 Features of your new TV 9 Overview of steps for installing, setting up, and using your new TV 9 TV front and side panel controls and connections . . . . 10 TV back panel connections 11 Chapter 2: Connecting your TV 12 Overview of cable types 12 About... 38 Setting the Auto Input feature 39 Setting the time zone 39 Selecting the location 39 Selecting the TOSHIBA Illumination mode 39 Selecting the Power-On Mode 40 Using Blue Screen 40 Setting the screen transparency 40 Viewing the system status 40 Reset ...
...Service 3 Choosing a location for your LCD TV 5 Chapter 1: Introduction 9 Features of your new TV 9 Overview of steps for installing, setting up, and using your new TV 9 TV front and side panel controls and connections . . . . 10 TV back panel connections 11 Chapter 2: Connecting your TV 12 Overview of cable types 12 About... 38 Setting the Auto Input feature 39 Setting the time zone 39 Selecting the location 39 Selecting the TOSHIBA Illumination mode 39 Selecting the Power-On Mode 40 Using Blue Screen 40 Setting the screen transparency 40 Viewing the system status 40 Reset ...
Owner's Manual - English
Page 8
... Link 60 Using the HDMI settings feature 61 Setting the HDMI audio mode 61 Displaying TV status information 62 Understanding the auto power off feature 62 Understanding the last mode memory feature 62 Chapter 7: Using the TV's advanced features 63 Using the advanced picture settings features 63 Using Resolution 63 Using DynaLight...Acceptable signal formats for PC IN and HDMI terminals 75 PC IN signal formats 75 HDMI signal formats 76 Limited United States Warranty for LCD Televisions 26" and Larger 77 Limited Canadian Warranty for Toshiba Brand Flat Panel Televisions 78 Index 81 8
... Link 60 Using the HDMI settings feature 61 Setting the HDMI audio mode 61 Displaying TV status information 62 Understanding the auto power off feature 62 Understanding the last mode memory feature 62 Chapter 7: Using the TV's advanced features 63 Using the advanced picture settings features 63 Using Resolution 63 Using DynaLight...Acceptable signal formats for PC IN and HDMI terminals 75 PC IN signal formats 75 HDMI signal formats 76 Limited United States Warranty for LCD Televisions 26" and Larger 77 Limited Canadian Warranty for Toshiba Brand Flat Panel Televisions 78 Index 81 8
Owner's Manual - English
Page 9
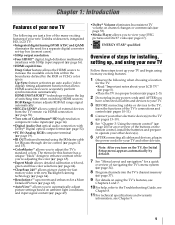
... 7. 10For help, refer to set up your TV and begin using its many exciting features of your new Toshiba widescreen, integrated HD, LCD TV: •Integrated digital tuning (8VSB ATSC and QAM) eliminates the need for a separate digital converter set-top box (in the power cords for your TV and other electronic device(s) to view your...
... 7. 10For help, refer to set up your TV and begin using its many exciting features of your new Toshiba widescreen, integrated HD, LCD TV: •Integrated digital tuning (8VSB ATSC and QAM) eliminates the need for a separate digital converter set-top box (in the power cords for your TV and other electronic device(s) to view your...
Owner's Manual - English
Page 10
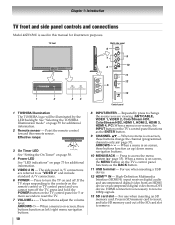
... a menu is on-screen, these buttons change the source you cannot turn the TV on and off the TV, press and hold the POWER button on the TV's control panel functions as the ENTER button. 9 CHANNEL Bb - For use when... inserting a USB device. 12 HDMI™ IN - These buttons adjust the volume level. ARROWS U u - Press to change the channel (programmed channels only; - TV front Right side panel 6 7 9 10 8 11 12 5 1 2 34 13 Control panel 1 TOSHIBA Illumination The TOSHIBA...
... a menu is on-screen, these buttons change the source you cannot turn the TV on and off the TV, press and hold the POWER button on the TV's control panel functions as the ENTER button. 9 CHANNEL Bb - For use when... inserting a USB device. 12 HDMI™ IN - These buttons adjust the volume level. ARROWS U u - Press to change the channel (programmed channels only; - TV front Right side panel 6 7 9 10 8 11 12 5 1 2 34 13 Control panel 1 TOSHIBA Illumination The TOSHIBA...
Owner's Manual - English
Page 11
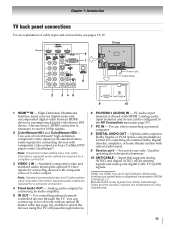
...output. You can be configured in Dolby Digital or PCM (pulse-code modulation) format for connecting devices with component video output, such as a Toshiba DVD player with an optical IR blaster cable (- PC audio input terminal is necessary to two devices with ColorStream®. Dolby and the double-D... in the AV Connection menu (- Input that supports analog (NTSC) and digital (ATSC) off-air antenna signals and analog and digital Cable TV (QAM) signals. Also see pages 12-19. 1 6 7 TV back Power cord Cable Strap 8 2 345 9 10 1 HDMI™ IN - page 57). 7 PC IN -
...output. You can be configured in Dolby Digital or PCM (pulse-code modulation) format for connecting devices with component video output, such as a Toshiba DVD player with an optical IR blaster cable (- PC audio input terminal is necessary to two devices with ColorStream®. Dolby and the double-D... in the AV Connection menu (- Input that supports analog (NTSC) and digital (ATSC) off-air antenna signals and analog and digital Cable TV (QAM) signals. Also see pages 12-19. 1 6 7 TV back Power cord Cable Strap 8 2 345 9 10 1 HDMI™ IN - page 57). 7 PC IN -
Owner's Manual - English
Page 15
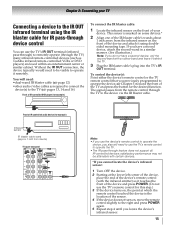
...the IR OUT connection, the device typically would need : •dual-wand IR blaster cable (- page 12) •other audio/video cables as Toshiba infrared remote-controlled VCRs or DVD players) enclosed within an entertainment center or similar cabinet. pages 13, 14 and 16) Front of IR-controlled DVD... via the IR blaster cable. satisfactory performance may not be visible to operate it touches the front of the device and press POWER. (Do not use the TV's remote control for example) Infrared sensor IR blaster cable wand (approx.1 inch from the remote control through device control You can...
...the IR OUT connection, the device typically would need : •dual-wand IR blaster cable (- page 12) •other audio/video cables as Toshiba infrared remote-controlled VCRs or DVD players) enclosed within an entertainment center or similar cabinet. pages 13, 14 and 16) Front of IR-controlled DVD... via the IR blaster cable. satisfactory performance may not be visible to operate it touches the front of the device and press POWER. (Do not use the TV's remote control for example) Infrared sensor IR blaster cable wand (approx.1 inch from the remote control through device control You can...
Owner's Manual - English
Page 21
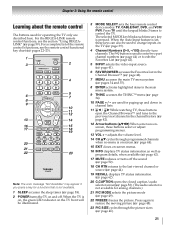
... the remote control Learning about the remote control The buttons used for paging up and down in channel lists. 11 3 C / # c While watching TV, these buttons open the Channel Browser™ and tune to the previous/next channel in the channel history (page 42). 12 Arrow buttons (BbC c) ...is set, these buttons select or adjust programming menus. 13 VOL + - page 44). 19 RECALL displays TV status information (- page 58). 2 POWER turns the TV on -screen menus. 16 INFO displays TV status information as well as program details, when available (- When the Auto Input feature is pressed. page 52...
... the remote control Learning about the remote control The buttons used for paging up and down in channel lists. 11 3 C / # c While watching TV, these buttons open the Channel Browser™ and tune to the previous/next channel in the channel history (page 42). 12 Arrow buttons (BbC c) ...is set, these buttons select or adjust programming menus. 13 VOL + - page 44). 19 RECALL displays TV status information (- page 58). 2 POWER turns the TV on -screen menus. 16 INFO displays TV status information as well as program details, when available (- When the Auto Input feature is pressed. page 52...
Owner's Manual - English
Page 34
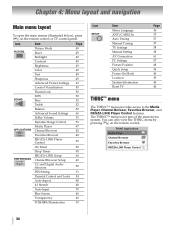
... 48 Auto Input 39 Blue Screen 40 Transparency 40 TOSHIBA Illumination 39 Icon SETUP Item Menu Language ANT/CABLE In Auto Tuning Manual Tuning TV Settings Manual Setting AV Connection PC Settings Picture Position Quick Setup Power-On Mode Location System Information Reset TV Page 36 37 37 37 38 38 61 57 48...
... 48 Auto Input 39 Blue Screen 40 Transparency 40 TOSHIBA Illumination 39 Icon SETUP Item Menu Language ANT/CABLE In Auto Tuning Manual Tuning TV Settings Manual Setting AV Connection PC Settings Picture Position Quick Setup Power-On Mode Location System Information Reset TV Page 36 37 37 37 38 38 61 57 48...
Owner's Manual - English
Page 39
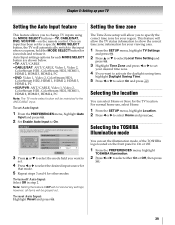
... to activate the daylight saving time, highlight Daylight Saving Time. 5 Press C or c to select On and press O. SLEEP POWER MODE SELECT CABLE/SAT DVD TV VCR/PVR Enable Auto Input TV CABLE/SAT DVD VCR/PVR On -ColorStream HD1 HDMI 1 Video 1 Reset 3 Press B or b to select the mode field...to On. Note: Setting the feature to the ANT/CABLE input. Selecting the location You can set the illumination mode of the TOSHIBA logo located on your TV Setting the Auto Input feature This feature allows you to the input when you to show the correct time zone information for a specific...
... to activate the daylight saving time, highlight Daylight Saving Time. 5 Press C or c to select On and press O. SLEEP POWER MODE SELECT CABLE/SAT DVD TV VCR/PVR Enable Auto Input TV CABLE/SAT DVD VCR/PVR On -ColorStream HD1 HDMI 1 Video 1 Reset 3 Press B or b to select the mode field...to On. Note: Setting the feature to the ANT/CABLE input. Selecting the location You can set the illumination mode of the TOSHIBA logo located on your TV Setting the Auto Input feature This feature allows you to the input when you to show the correct time zone information for a specific...

Owner's Manual - English
Page 40
... 1 From the SETUP menu, highlight System Information. 2 Press T to select No and press T. 40 SETUP menu, highlight Reset TV and 2 Enter your TV Selecting the Power-On Mode You can select either Power-Saving or Select Power-Saving for optimal energy efficiency. Chapter 5: Setting up your PIN code (if PIN code has been set the...
... 1 From the SETUP menu, highlight System Information. 2 Press T to select No and press T. 40 SETUP menu, highlight Reset TV and 2 Enter your TV Selecting the Power-On Mode You can select either Power-Saving or Select Power-Saving for optimal energy efficiency. Chapter 5: Setting up your PIN code (if PIN code has been set the...
Owner's Manual - English
Page 42
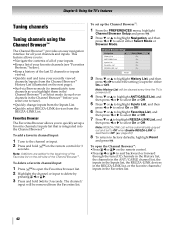
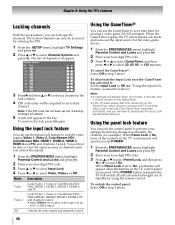
... channel/input: 1 Press n to open the Channel Browser™: •Press 3 C or # c on the remote control for 3 seconds. Chapter 6: Using the TV's features Tuning channels Tuning channels using the Channel Browser™ The Channel Browser™ provides an easy navigation interface for all of your inputs. •... surf and tune your channels and inputs. Note: REGZA-LINK List will be automatically grayed out and set up a favorite channels/inputs list that is powered off. 4 Press b or B to highlight ANT/CABLE List, and then press C or c to select On or Off. 5 Press b or B to ...
... channel/input: 1 Press n to open the Channel Browser™: •Press 3 C or # c on the remote control for 3 seconds. Chapter 6: Using the TV's features Tuning channels Tuning channels using the Channel Browser™ The Channel Browser™ provides an easy navigation interface for all of your inputs. •... surf and tune your channels and inputs. Note: REGZA-LINK List will be automatically grayed out and set up a favorite channels/inputs list that is powered off. 4 Press b or B to highlight ANT/CABLE List, and then press C or c to select On or Off. 5 Press b or B to ...
Owner's Manual - English
Page 56
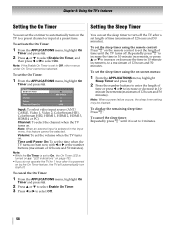
... in the lock column. 4 PIN code entry will not be brought out of the controls on the GameTimer, when power is pressed the TV will operate except POWER. 1 From the Parental CPRonEtFrEoRl aEnNdCLEoSckmseannud, hpirgehslsigTht. 2 Enter your settings from being changed accidentally (by entering the PIN.... •A message will appear when 10 minutes, 3 minutes, and 1 minute remain on the GameTimer. • If the TV loses power with time remaining on the TV control panel will switch off and can lock specific channels. You will be accessed by children, for example). To cancel the...
... in the lock column. 4 PIN code entry will not be brought out of the controls on the GameTimer, when power is pressed the TV will operate except POWER. 1 From the Parental CPRonEtFrEoRl aEnNdCLEoSckmseannud, hpirgehslsigTht. 2 Enter your settings from being changed accidentally (by entering the PIN.... •A message will appear when 10 minutes, 3 minutes, and 1 minute remain on the GameTimer. • If the TV loses power with time remaining on the TV control panel will switch off and can lock specific channels. You will be accessed by children, for example). To cancel the...
Owner's Manual - English
Page 58
... Timer, and then press C or cto select On. IONS menu, highlight On On Timer Enable On Timer Input Channel Volume Time until Power On: To set the time when the TV turns on (- Note: • While the On Timer is turned on from now with C or c or the number buttons (maximum of... set to select Off. Setting the Sleep Timer You can set the on timer to automatically turn itself off the TV after it is powered on by the On Timer feature, the TV will automatically turn on . To display the remaining sleep time: Press [. To set the sleep timer using the on . Note...
... Timer, and then press C or cto select On. IONS menu, highlight On On Timer Enable On Timer Input Channel Volume Time until Power On: To set the time when the TV turns on (- Note: • While the On Timer is turned on from now with C or c or the number buttons (maximum of... set to select Off. Setting the Sleep Timer You can set the on timer to automatically turn itself off the TV after it is powered on by the On Timer feature, the TV will automatically turn on . To display the remaining sleep time: Press [. To set the sleep timer using the on . Note...
Owner's Manual - English
Page 59
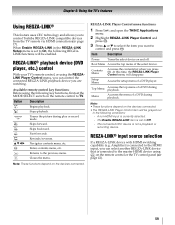
...b C c T R O Navigates contents menu, etc. Item Description Power Turns the select device on the remote control to control and press T. Contents Menu Accesses the contents list when you want to TV. Menu Accesses the menu of the select device. REGZA-LINK® ... menu, you can select another REGZA-LINK device t+ hatoins connected to On, the following conditions: - Returns to control Toshiba REGZA-LINK compatible devices from the TV remote via HDMI connection (- Note: • These functions depend on the devices connected. Button S D Description Begins playback...
...b C c T R O Navigates contents menu, etc. Item Description Power Turns the select device on the remote control to control and press T. Contents Menu Accesses the contents list when you want to TV. Menu Accesses the menu of the select device. REGZA-LINK® ... menu, you can select another REGZA-LINK device t+ hatoins connected to On, the following conditions: - Returns to control Toshiba REGZA-LINK compatible devices from the TV remote via HDMI connection (- Note: • These functions depend on the devices connected. Button S D Description Begins playback...
Owner's Manual - English
Page 60
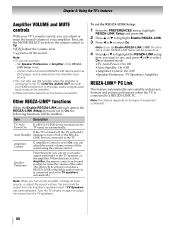
...is set to On, you want to use this item is connected to the TV's DIGITAL AUDIO OUT terminal (not HDMI connection). Item Description TV Auto Power On If a REGZA-LINK device is turned off, the TV will send a Auto Standby message to turn off the sound using the remote ...Note: • To use , and press C or c to select On or desired mode. •TV Auto Power: On/Off •Auto Standby: On/Off •Amplifier Control: On/Off •Speaker Preference: TV Speakers/Amplifier REGZA-LINK® PC Link This feature automatically sets suitable widescreen formats and picture preferences...
...is set to On, you want to use this item is connected to the TV's DIGITAL AUDIO OUT terminal (not HDMI connection). Item Description TV Auto Power On If a REGZA-LINK device is turned off, the TV will send a Auto Standby message to turn off the sound using the remote ...Note: • To use , and press C or c to select On or desired mode. •TV Auto Power: On/Off •Auto Standby: On/Off •Amplifier Control: On/Off •Speaker Preference: TV Speakers/Amplifier REGZA-LINK® PC Link This feature automatically sets suitable widescreen formats and picture preferences...

Owner's Manual - English
Page 62
...The last position will remove the entire banner. Chapter 6: Using the TV's features Displaying TV status information TProesdsisE plaoynTtVhesrtaetmuostiencfoonrmtroatl.ion using INFO: (only available for ANT/CABLE input) Press Q on the TV when the power is resupplied. The following information will display (if applicable): •Current...(if in ANT/CABLE mode) •Input label (if set ) ANT 5 : 29min Stereo 480i 4:3 Understanding the auto power off feature The TV will be stored to memory.) 62 Note: The location of the banner can be moved to a vacant channel or a station...
...The last position will remove the entire banner. Chapter 6: Using the TV's features Displaying TV status information TProesdsisE plaoynTtVhesrtaetmuostiencfoonrmtroatl.ion using INFO: (only available for ANT/CABLE input) Press Q on the TV when the power is resupplied. The following information will display (if applicable): •Current...(if in ANT/CABLE mode) •Input label (if set ) ANT 5 : 29min Stereo 480i 4:3 Understanding the auto power off feature The TV will be stored to memory.) 62 Note: The location of the banner can be moved to a vacant channel or a station...
Owner's Manual - English
Page 71
... gaming system, and video processing or different compression rates used by the Lock feature. Poor composite or S-video picture • If the TV is plugged in rare instances, when viewing certain content (e.g. Sound problems • Check the antenna/cable connections (- page 52). •...to the owner's manual for a possible cause of the following suggestions, which will not turn off the TV, press and hold the POWER button on • Make sure the power cord is connected to an external A/V device (e.g. Picture problems General picture problems • Check the antenna/...
... gaming system, and video processing or different compression rates used by the Lock feature. Poor composite or S-video picture • If the TV is plugged in rare instances, when viewing certain content (e.g. Sound problems • Check the antenna/cable connections (- page 52). •...to the owner's manual for a possible cause of the following suggestions, which will not turn off the TV, press and hold the POWER button on • Make sure the power cord is connected to an external A/V device (e.g. Picture problems General picture problems • Check the antenna/...


