
User Guide
Page 2
...enjoyable and safe. CHILD SAFETY: It Makes A Difference How and Where You Use Your Flat Panel Display Congratulations on page 4. This manual will help you for purchasing this television, always use a mounting bracket that has been Listed by an independent laboratory (such as ...grounding and, in mind: The Issue • The home theater entertainment experience is committed to wall mount this Toshiba LED TV. See item 26) on your purchase! TOSHIBA Cares! • The consumer electronics industry is a growing trend and larger flat panel displays are inappropriately situated ...
...enjoyable and safe. CHILD SAFETY: It Makes A Difference How and Where You Use Your Flat Panel Display Congratulations on page 4. This manual will help you for purchasing this television, always use a mounting bracket that has been Listed by an independent laboratory (such as ...grounding and, in mind: The Issue • The home theater entertainment experience is committed to wall mount this Toshiba LED TV. See item 26) on your purchase! TOSHIBA Cares! • The consumer electronics industry is a growing trend and larger flat panel displays are inappropriately situated ...
User Guide
Page 5
... service technician to use a wall bracket Listed by the manufacturer. • Upon completion of this manual to a Toshiba Authorized Service Provider. 45) If you to the wall and the back of the TV, remove the pedestal stand from power and a minute amount of current is being turned on a ...safety checks to the LCD panel. 2) Place the TV on or off switch, it is not completely disconnected from the TV, as described below. 7) VESA Mounting Pattern TV Size Hole Pattern (HxV) Screw Size 42L6200U 400x400 mm M6 47L6200U 400x400 mm M6 55L6200U 400x400 mm M6 47L7200U 400x400 mm...
... service technician to use a wall bracket Listed by the manufacturer. • Upon completion of this manual to a Toshiba Authorized Service Provider. 45) If you to the wall and the back of the TV, remove the pedestal stand from power and a minute amount of current is being turned on a ...safety checks to the LCD panel. 2) Place the TV on or off switch, it is not completely disconnected from the TV, as described below. 7) VESA Mounting Pattern TV Size Hole Pattern (HxV) Screw Size 42L6200U 400x400 mm M6 47L6200U 400x400 mm M6 55L6200U 400x400 mm M6 47L7200U 400x400 mm...
User Guide
Page 22
...TYPE OF DAMAGE IS NOT COVERED UNDER THE TOSHIBA WARRANTY. 3 Do not plug in any power cords until after you have connected all cables and devices to your TV. 4 Before connecting cables or devices to the TV, learn the functions of the TV's connections and controls, see "Overview of ... care, and service information. 22 Introduction Overview of the unit. Keep this manual for future reference. 2 To choose a location for your TV" on page 8. ❖ Place the TV on the screen. ❖ Place the TV far enough from walls and other objects to allow proper ventilation. Inadequate ventilation may...
...TYPE OF DAMAGE IS NOT COVERED UNDER THE TOSHIBA WARRANTY. 3 Do not plug in any power cords until after you have connected all cables and devices to your TV. 4 Before connecting cables or devices to the TV, learn the functions of the TV's connections and controls, see "Overview of ... care, and service information. 22 Introduction Overview of the unit. Keep this manual for future reference. 2 To choose a location for your TV" on page 8. ❖ Place the TV on the screen. ❖ Place the TV far enough from walls and other objects to allow proper ventilation. Inadequate ventilation may...

User Guide
Page 30
...may differ from those illustrated herein. About the connection illustrations You can connect different types and brands of devices to your TV in this manual are representative of typical device connections only. To view the antenna or cable signal: Select ANT/CABLE video input source on the... TV.* To view basic and premium cable channels: Select the ANT/CABLE video input source on the TV. The connection illustrations in several ...
...may differ from those illustrated herein. About the connection illustrations You can connect different types and brands of devices to your TV in this manual are representative of typical device connections only. To view the antenna or cable signal: Select ANT/CABLE video input source on the... TV.* To view basic and premium cable channels: Select the ANT/CABLE video input source on the TV. The connection illustrations in several ...
User Guide
Page 38
... delay time differs according to models incorporating Toshiba's HDMI® CEC Control feature. However, Toshiba is limited to the device you use HDMI® cables with HDMI Logo)" on page 28. See each device's operation manual. In this case, adjust the delay time... of setup and operations, see "Other HDMI® CEC Control functions" on page 101. ❖ Configure the connected devices. 38 Connecting Your TV...
... delay time differs according to models incorporating Toshiba's HDMI® CEC Control feature. However, Toshiba is limited to the device you use HDMI® cables with HDMI Logo)" on page 28. See each device's operation manual. In this case, adjust the delay time... of setup and operations, see "Other HDMI® CEC Control functions" on page 101. ❖ Configure the connected devices. 38 Connecting Your TV...
User Guide
Page 66
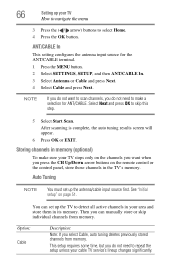
...input source first. Option: Cable Description: Note: If you do not need to repeat the setup unless your area and store them in the TV's memory. ANT/CABLE In This setting configures the antenna input source for ANT/CABLE. NOTE If you do not want when you do not ...MENU button. 2 Select SETTINGS, SETUP, and then ANT/CABLE In. 3 Select Antenna or Cable and press Next. 4 Select Cable and press Next. You can manually store or skip individual channels from memory. After scanning is complete, the auto tuning results screen will appear. 6 Press OK or EXIT. See "Initial setup...
...input source first. Option: Cable Description: Note: If you do not need to repeat the setup unless your area and store them in the TV's memory. ANT/CABLE In This setting configures the antenna input source for ANT/CABLE. NOTE If you do not want when you do not ...MENU button. 2 Select SETTINGS, SETUP, and then ANT/CABLE In. 3 Select Antenna or Cable and press Next. 4 Select Cable and press Next. You can manually store or skip individual channels from memory. After scanning is complete, the auto tuning results screen will appear. 6 Press OK or EXIT. See "Initial setup...
User Guide
Page 67
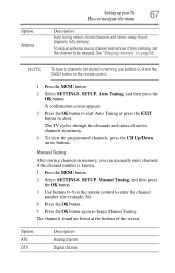
.... Option: Antenna Setting up your TV How to navigate the menu 67 Description: Auto tuning retains stored channels and stores newly found are listed at the bottom of the screen. To skip an antenna source channel and remove it from memory, set the channel to begin Manual Tuning. A confirmation screen appears. 3 Press...
.... Option: Antenna Setting up your TV How to navigate the menu 67 Description: Auto tuning retains stored channels and stores newly found are listed at the bottom of the screen. To skip an antenna source channel and remove it from memory, set the channel to begin Manual Tuning. A confirmation screen appears. 3 Press...
User Guide
Page 76
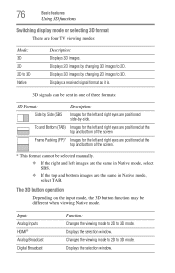
The 3D button operation Depending on the input mode, the 3D button function may be selected manually. ❖ If the right and left and right eyes are the same in Native mode, select SBS. ❖ If the top and bottom images are ... to 2D to 3D mode. Displays the selection window. 76 Basic features Using 3D functions Switching display mode or selecting 3D format There are four TV viewing modes: Mode: 3D 2D 2D to 3D.
The 3D button operation Depending on the input mode, the 3D button function may be selected manually. ❖ If the right and left and right eyes are the same in Native mode, select SBS. ❖ If the top and bottom images are ... to 2D to 3D mode. Displays the selection window. 76 Basic features Using 3D functions Switching display mode or selecting 3D format There are four TV viewing modes: Mode: 3D 2D 2D to 3D.
User Guide
Page 131
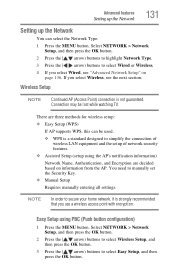
...( / arrow) buttons to select Wireless Setup, and then press the OK button. 3 Press the ( / arrow) buttons to manually set the Security Key. ❖ Manual Setup Requires manually entering all settings. Advanced features Setting up the Network 131 Setting up the Network You can be lost while watching... TV. Connection may be used. ❖ WPS is a standard designed to simplify the connection of wireless LAN...
...( / arrow) buttons to select Wireless Setup, and then press the OK button. 3 Press the ( / arrow) buttons to manually set the Security Key. ❖ Manual Setup Requires manually entering all settings. Advanced features Setting up the Network 131 Setting up the Network You can be lost while watching... TV. Connection may be used. ❖ WPS is a standard designed to simplify the connection of wireless LAN...

User Guide
Page 136
... the OK button. 2 Press the ( / arrow) buttons to select Advanced Network Setup, and then press the OK button. 3 Press the ( / arrow) buttons to select On. Manual Setup: 1 Press the MENU button. IP Address Setup NOTE The settings in the DNS Setup menu. 136 Item: DNS Advanced features Setting up the Network... Setup, and then press the OK button. 4 Select Auto Setup. Advanced Network Setup NOTE ❖ When the DHCP function of the router connected to this TV is On, you can set Auto Setup to On or Off. (Usually set it to On.) ❖ When the DHCP function of the router is...
... the OK button. 2 Press the ( / arrow) buttons to select Advanced Network Setup, and then press the OK button. 3 Press the ( / arrow) buttons to select On. Manual Setup: 1 Press the MENU button. IP Address Setup NOTE The settings in the DNS Setup menu. 136 Item: DNS Advanced features Setting up the Network... Setup, and then press the OK button. 4 Select Auto Setup. Advanced Network Setup NOTE ❖ When the DHCP function of the router connected to this TV is On, you can set Auto Setup to On or Off. (Usually set it to On.) ❖ When the DHCP function of the router is...
User Guide
Page 137
...IP Address Setup, and then press the OK button. 4 Select Auto Setup. NOTE If you manually set the DNS address(es). DNS Setup NOTE ❖ When the DHCP function of the router connected to this TV is set to On, then Auto Setup in a digit. Your Internet Service Provider should be reset... to the previous value. 7 Press the ( / arrow) buttons to highlight Subnet Mask, and edit in the same way as IP Address. 8 Press the ( / arrow) buttons to Off, and manually set the ...
...IP Address Setup, and then press the OK button. 4 Select Auto Setup. NOTE If you manually set the DNS address(es). DNS Setup NOTE ❖ When the DHCP function of the router connected to this TV is set to On, then Auto Setup in a digit. Your Internet Service Provider should be reset... to the previous value. 7 Press the ( / arrow) buttons to highlight Subnet Mask, and edit in the same way as IP Address. 8 Press the ( / arrow) buttons to Off, and manually set the ...
User Guide
Page 138
... the OK button. 4 Select Auto Setup. To save the setting, press the OK button. MAC Address You can view the fixed MAC address for the TV. 1 Press the MENU button. Manual setup: 1 Press the MENU button.
... the OK button. 4 Select Auto Setup. To save the setting, press the OK button. MAC Address You can view the fixed MAC address for the TV. 1 Press the MENU button. Manual setup: 1 Press the MENU button.
User Guide
Page 159
... arrow) buttons to select the device name on the screen, and then press the OK button. 4 Press the ( / arrow) buttons to select the device. The TV will return to the previous layer. Using MediaShare (Media Player) with a Media Server You need to Off, you can start the MediaShare (Media Player... (movies and music) appears. 4 Press the ( / arrow) buttons to select the Device Name button on the screen, and then press the OK button. Manual Start 1 Insert a USB device into the USB terminal. 2 Press the ePORTAL button. Select the Video, Music, or Photos icon, and then press the OK...
... arrow) buttons to select the device name on the screen, and then press the OK button. 4 Press the ( / arrow) buttons to select the device. The TV will return to the previous layer. Using MediaShare (Media Player) with a Media Server You need to Off, you can start the MediaShare (Media Player... (movies and music) appears. 4 Press the ( / arrow) buttons to select the Device Name button on the screen, and then press the OK button. Manual Start 1 Insert a USB device into the USB terminal. 2 Press the ePORTAL button. Select the Video, Music, or Photos icon, and then press the OK...
User Guide
Page 184
...station may have erased the channel from the AC wall outlet for your external device. Remove all obstructions between the remote control and the TV. Add the channel to the correct device mode, see "Using SurfLock™" on page 107. 184 Troubleshooting Sound problems ❖ The ...may not operate certain features on page 35. ❖ Turn off and unplug the TV from memory. Replace the remote control's batteries, see "Connecting a digital audio system" on your other device to the owner's manual for a few seconds and plug it back in. Refer to determine its available ...
...station may have erased the channel from the AC wall outlet for your external device. Remove all obstructions between the remote control and the TV. Add the channel to the correct device mode, see "Using SurfLock™" on page 107. 184 Troubleshooting Sound problems ❖ The ...may not operate certain features on page 35. ❖ Turn off and unplug the TV from memory. Replace the remote control's batteries, see "Connecting a digital audio system" on your other device to the owner's manual for a few seconds and plug it back in. Refer to determine its available ...
User Guide
Page 186
...operation. Ensure your IP address is set up correctly. Ensure that HDMI® cables with the ( ) Logo are used, see "Connecting the TV to a home network" on page 36. If several devices are connected properly, see "Connecting to a home network with an Internet connection - Ensure... for Internet service issues. Check to your router does not support DHCP, you must manually set up the IP address. Check the modem and its incoming cable/telephone connections, see "Connecting the TV to the HDMI® input" on page 42. If using a wired network connection...
...operation. Ensure your IP address is set up correctly. Ensure that HDMI® cables with the ( ) Logo are used, see "Connecting the TV to a home network" on page 36. If several devices are connected properly, see "Connecting to a home network with an Internet connection - Ensure... for Internet service issues. Check to your router does not support DHCP, you must manually set up the IP address. Check the modem and its incoming cable/telephone connections, see "Connecting the TV to the HDMI® input" on page 42. If using a wired network connection...
User Guide
Page 187
...187 Network Setup fails (Manual). they are not connected properly, see "Connecting the TV to the television and turn it On. 4 After approximately two minutes, check connection stability. ❖ Connect with the Subnet mask 255.255.253.0; When using the same network type (DHCP/ manual) and have compatible network... power to the router. 3 Reconnect AC power to a home network with the Subnet mask 255.255.255.0; both the media server and TV are different addresses on the Server is incorrect. The media server name is not the same as the networked computer. ❖ Example of ...
...187 Network Setup fails (Manual). they are not connected properly, see "Connecting the TV to the television and turn it On. 4 After approximately two minutes, check connection stability. ❖ Connect with the Subnet mask 255.255.253.0; When using the same network type (DHCP/ manual) and have compatible network... power to the router. 3 Reconnect AC power to a home network with the Subnet mask 255.255.255.0; both the media server and TV are different addresses on the Server is incorrect. The media server name is not the same as the networked computer. ❖ Example of ...
User Guide
Page 189
... on the front of the TV indicates the TV's status, as described below. If Media Renderer playback starts regardless of the user's intention, check the access control of Media Renderer or set Media Renderer to the media server's instruction manual. Troubleshooting Light Indicator 189 Confirm... that the contents of either the media server or the USB storage device are supported by this TV, Media Controller may not be able to control a Media ...
... on the front of the TV indicates the TV's status, as described below. If Media Renderer playback starts regardless of the user's intention, check the access control of Media Renderer or set Media Renderer to the media server's instruction manual. Troubleshooting Light Indicator 189 Confirm... that the contents of either the media server or the USB storage device are supported by this TV, Media Controller may not be able to control a Media ...

User Guide
Page 202
...overview of cables 27 standard A/V (red/white/yellow) 27 channel return 85 channels auto tuning 66 labeling analog TV channels 69 labeling video inputs 70 locking specific channels 95 manual tuning 67 next programmed channel 85 skipping 68 skipping video inputs 68 specific channel 85 storing in memory 66 ...closed captions Analog CC mode 87 button 90 Digital CC settings 89 using 87 computer adjusting image 102 setting the audio 103 to the TV's HDMI®...
...overview of cables 27 standard A/V (red/white/yellow) 27 channel return 85 channels auto tuning 66 labeling analog TV channels 69 labeling video inputs 70 locking specific channels 95 manual tuning 67 next programmed channel 85 skipping 68 skipping video inputs 68 specific channel 85 storing in memory 66 ...closed captions Analog CC mode 87 button 90 Digital CC settings 89 using 87 computer adjusting image 102 setting the audio 103 to the TV's HDMI®...


