User Guide
Page 2
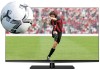
... the many exciting features of your new LED TV. For additional antenna grounding information, see items 33) and 34) on page 4. This manual will help you are unsure, contact a professional installer. • A minimum of two people are required for proper grounding and, in serious... bodily injury and/or property damage. TOSHIBA Cares! • The consumer electronics industry is committed to Article 820-40 of the U.S. Care should be taken to route all . If you...
... the many exciting features of your new LED TV. For additional antenna grounding information, see items 33) and 34) on page 4. This manual will help you are unsure, contact a professional installer. • A minimum of two people are required for proper grounding and, in serious... bodily injury and/or property damage. TOSHIBA Cares! • The consumer electronics industry is committed to Article 820-40 of the U.S. Care should be taken to route all . If you...
User Guide
Page 5
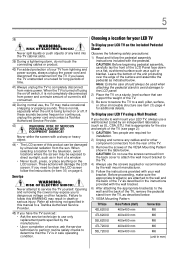
...OF ELECTRIC SHOCK! When selecting a location for long periods of your wall bracket. If you need to clean the LCD screen follow this manual to a Toshiba Authorized Service Provider. 45) If you leave the TV unattended or unused for the television, avoid locations where the screen may make sure...a flat, cushioned surface such as indicated below . 7) VESA Mounting Pattern TV Size Hole Pattern (HxV) Screw Size 42L6200U 400x400 mm M6 47L6200U 400x400 mm M6 55L6200U 400x400 mm M6 47L7200U 400x400 mm M6 55L7200U 400x400 mm M6 (unit in item 36) on the LCD screen.
...OF ELECTRIC SHOCK! When selecting a location for long periods of your wall bracket. If you need to clean the LCD screen follow this manual to a Toshiba Authorized Service Provider. 45) If you leave the TV unattended or unused for the television, avoid locations where the screen may make sure...a flat, cushioned surface such as indicated below . 7) VESA Mounting Pattern TV Size Hole Pattern (HxV) Screw Size 42L6200U 400x400 mm M6 47L6200U 400x400 mm M6 55L6200U 400x400 mm M6 47L7200U 400x400 mm M6 55L7200U 400x400 mm M6 (unit in item 36) on the LCD screen.
User Guide
Page 10
No patent liability is assumed, however, with all rights reserved. TOSHIBA CORPORATION AND TOSHIBA AMERICA INFORMATION SYSTEMS, INC. (TOSHIBA) PROVIDES NO WARRANTY WITH REGARD TO THIS MANUAL OR ANY OTHER INFORMATION CONTAINED HEREIN AND HEREBY EXPRESSLY DISCLAIMS ANY IMPLIED WARRANTIES OF MERCHANTABILITY OR...OTHERWISE, ARISING OUT OF OR IN CONNECTION WITH THIS MANUAL OR ANY OTHER INFORMATION CONTAINED HEREIN OR THE USE THEREOF. Under the copyright laws, this manual, including but not limited to the use of Toshiba. TOSHIBA ASSUMES NO LIABILITY FOR ANY DAMAGES INCURRED DIRECTLY OR ...
No patent liability is assumed, however, with all rights reserved. TOSHIBA CORPORATION AND TOSHIBA AMERICA INFORMATION SYSTEMS, INC. (TOSHIBA) PROVIDES NO WARRANTY WITH REGARD TO THIS MANUAL OR ANY OTHER INFORMATION CONTAINED HEREIN AND HEREBY EXPRESSLY DISCLAIMS ANY IMPLIED WARRANTIES OF MERCHANTABILITY OR...OTHERWISE, ARISING OUT OF OR IN CONNECTION WITH THIS MANUAL OR ANY OTHER INFORMATION CONTAINED HEREIN OR THE USE THEREOF. Under the copyright laws, this manual, including but not limited to the use of Toshiba. TOSHIBA ASSUMES NO LIABILITY FOR ANY DAMAGES INCURRED DIRECTLY OR ...
User Guide
Page 20
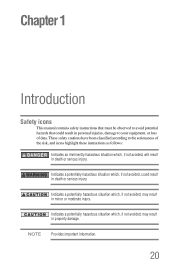
Indicates a potentially hazardous situation which , if not avoided, will result in property damage. Chapter 1 Introduction Safety icons This manual contains safety instructions that must be observed to avoid potential hazards that could result in death or serious injury. These safety cautions have been classified ...
Indicates a potentially hazardous situation which , if not avoided, will result in property damage. Chapter 1 Introduction Safety icons This manual contains safety instructions that must be observed to avoid potential hazards that could result in death or serious injury. These safety cautions have been classified ...
User Guide
Page 22
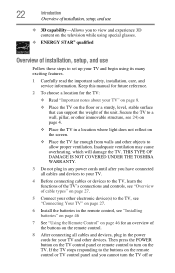
... devices, plug in a location where light does not reflect on the TV control panel or remote control to turn the TV off or Keep this manual for future reference. 2 To choose a location for an overview of the buttons on the TV. Inadequate ventilation may cause overheating, which will damage the TV.... THIS TYPE OF DAMAGE IS NOT COVERED UNDER THE TOSHIBA WARRANTY. 3 Do not plug in any power cords until after you have connected all cables and devices to your TV. 4 Before connecting cables or ...
... devices, plug in a location where light does not reflect on the TV control panel or remote control to turn the TV off or Keep this manual for future reference. 2 To choose a location for an overview of the buttons on the TV. Inadequate ventilation may cause overheating, which will damage the TV.... THIS TYPE OF DAMAGE IS NOT COVERED UNDER THE TOSHIBA WARRANTY. 3 Do not plug in any power cords until after you have connected all cables and devices to your TV. 4 Before connecting cables or ...

User Guide
Page 30
The connection illustrations in this manual are representative of devices to your TV in several different configurations. For details on connecting and using your devices may not be able to use ... ). The input/output terminals on the TV.* Tune the TV to channel 3 or 4 (whichever channel the cable box output is set to each device's owner's manual. About the connection illustrations You can connect different types and brands of typical device connections only.
The connection illustrations in this manual are representative of devices to your TV in several different configurations. For details on connecting and using your devices may not be able to use ... ). The input/output terminals on the TV.* Tune the TV to channel 3 or 4 (whichever channel the cable box output is set to each device's owner's manual. About the connection illustrations You can connect different types and brands of typical device connections only.
User Guide
Page 38
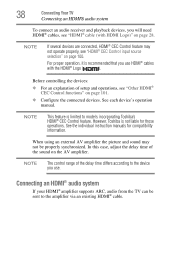
... Toshiba is recommended that you use HDMI® cables with HDMI Logo)" on the AV amplifier. NOTE This feature is limited to the amplifier via an existing HDMI® cable. In this case, adjust the delay time of the sound on page 28. See each device's operation manual....amplifier the picture and sound may not operate properly, see "HDMI® cable (with the HDMI® Logo ( ). See the individual instruction manuals for those operations. Connecting an HDMI® audio system If your HDMI® amplifier supports ARC, audio from the TV can be properly synchronized...
... Toshiba is recommended that you use HDMI® cables with HDMI Logo)" on the AV amplifier. NOTE This feature is limited to the amplifier via an existing HDMI® cable. In this case, adjust the delay time of the sound on page 28. See each device's operation manual....amplifier the picture and sound may not operate properly, see "HDMI® cable (with the HDMI® Logo ( ). See the individual instruction manuals for those operations. Connecting an HDMI® audio system If your HDMI® amplifier supports ARC, audio from the TV can be properly synchronized...
User Guide
Page 59
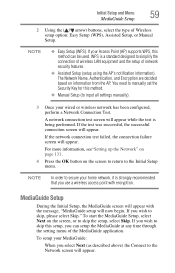
...the connection of wireless LAN equipment and the setup of Wireless setup option: Easy Setup (WPS), Assisted Setup, or Manual Setup. You need to input all settings manually). 3 Once your MediaGuide: When you use a wireless access point with the message, "MediaGuide setup will appear with ...wireless network has been configured, perform a Network Connection Test. If your Access Point (AP) supports WPS, this method. ❖ Manual Setup (to manually set the Security Key for this method can setup the MediaGuide at any time through the setting menu of the MediaGuide application. For...
...the connection of wireless LAN equipment and the setup of Wireless setup option: Easy Setup (WPS), Assisted Setup, or Manual Setup. You need to input all settings manually). 3 Once your MediaGuide: When you use a wireless access point with the message, "MediaGuide setup will appear with ...wireless network has been configured, perform a Network Connection Test. If your Access Point (AP) supports WPS, this method. ❖ Manual Setup (to manually set the Security Key for this method can setup the MediaGuide at any time through the setting menu of the MediaGuide application. For...
User Guide
Page 66
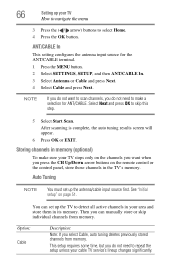
..., the auto tuning results screen will appear. 6 Press OK or EXIT. Then you do not need to skip this step. 5 Select Start Scan. You can manually store or skip individual channels from memory. Storing channels in the TV's memory. See "Initial setup" on the remote control or the control panel, store...
..., the auto tuning results screen will appear. 6 Press OK or EXIT. Then you do not need to skip this step. 5 Select Start Scan. You can manually store or skip individual channels from memory. Storing channels in the TV's memory. See "Initial setup" on the remote control or the control panel, store...
User Guide
Page 67
... A confirmation screen appears. 3 Press the OK button to start Auto Tuning or press the EXIT button to be skipped. NOTE To tune to begin Manual Tuning. To skip an antenna source channel and remove it from memory, set the channel to abort. The TV cycles through the channels and stores... button. 5 Press the OK button again to channels not stored in memory. 4 To view the programmed channels, press the CH Up/Down arrow buttons. Manual Tuning After storing channels in memory, you can manually enter channels if the channel number is known. 1 Press the MENU button. 2 Select SETTINGS, SETUP...
... A confirmation screen appears. 3 Press the OK button to start Auto Tuning or press the EXIT button to be skipped. NOTE To tune to begin Manual Tuning. To skip an antenna source channel and remove it from memory, set the channel to abort. The TV cycles through the channels and stores... button. 5 Press the OK button again to channels not stored in memory. 4 To view the programmed channels, press the CH Up/Down arrow buttons. Manual Tuning After storing channels in memory, you can manually enter channels if the channel number is known. 1 Press the MENU button. 2 Select SETTINGS, SETUP...
User Guide
Page 76
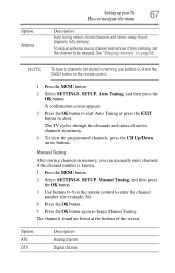
... and Bottom (TAB) Images for the left and right eyes are positioned at the top and bottom of the screen. * This format cannot be selected manually. ❖ If the right and left and right eyes are positioned side-by Side (SBS Images for the left and right eyes are positioned at...
... and Bottom (TAB) Images for the left and right eyes are positioned at the top and bottom of the screen. * This format cannot be selected manually. ❖ If the right and left and right eyes are positioned side-by Side (SBS Images for the left and right eyes are positioned at...
User Guide
Page 131
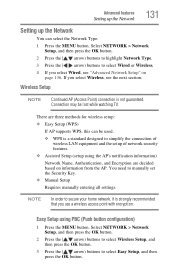
... OK button. 2 Press the ( / arrow) buttons to select Wireless Setup, and then press the OK button. 3 Press the ( / arrow) buttons to manually set the Security Key. ❖ Manual Setup Requires manually entering all settings. Wireless Setup NOTE Continued AP (Access Point) connection is strongly recommended that you select Wireless, see "Advanced Network Setup...
... OK button. 2 Press the ( / arrow) buttons to select Wireless Setup, and then press the OK button. 3 Press the ( / arrow) buttons to manually set the Security Key. ❖ Manual Setup Requires manually entering all settings. Wireless Setup NOTE Continued AP (Access Point) connection is strongly recommended that you select Wireless, see "Advanced Network Setup...
User Guide
Page 132
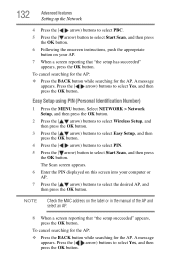
...) button to select Start Scan, and then press the OK button. 6 Following the onscreen instructions, push the appropriate button on the label or in the manual of the AP and select an AP. 8 When a screen reporting that "the setup has succeeded" appears, press the OK button. Easy Setup using PIN (Personal...
...) button to select Start Scan, and then press the OK button. 6 Following the onscreen instructions, push the appropriate button on the label or in the manual of the AP and select an AP. 8 When a screen reporting that "the setup has succeeded" appears, press the OK button. Easy Setup using PIN (Personal...
User Guide
Page 133
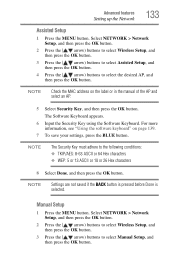
... Setting up the Network 133 Assisted Setup 1 Press the MENU button. For more information, see "Using the software keyboard" on the label or in the manual of the AP and select an AP. 5 Select Security Key, and then press the OK button. NOTE Settings are not saved if the BACK button... is pressed before Done is selected. NOTE The Security Key must adhere to select Manual Setup, and then press the OK button. Select NETWORK > Network Setup, and then press the OK button. 2 Press the ( / arrow) buttons to select Wireless Setup...
... Setting up the Network 133 Assisted Setup 1 Press the MENU button. For more information, see "Using the software keyboard" on the label or in the manual of the AP and select an AP. 5 Select Security Key, and then press the OK button. NOTE Settings are not saved if the BACK button... is pressed before Done is selected. NOTE The Security Key must adhere to select Manual Setup, and then press the OK button. Select NETWORK > Network Setup, and then press the OK button. 2 Press the ( / arrow) buttons to select Wireless Setup...

User Guide
Page 136
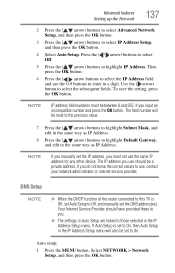
... is set to On, then Auto Setup in the DNS Setup menu will also be low. Manual Setup: 1 Press the MENU button. We recommend that the Encryption setting are linked to those selected ...in Auto Setup are changed to AES (Under manual setup). Advanced Network Setup NOTE ❖ When the DHCP function of the router connected to this ... if an AP for IEEE 802.11n is used when Encryption is Off, set Auto Setup to Off, and manually set the IP Address or DNS Address. Select NETWORK > Network Setup, and then press the OK button. 2...
... is set to On, then Auto Setup in the DNS Setup menu will also be low. Manual Setup: 1 Press the MENU button. We recommend that the Encryption setting are linked to those selected ...in Auto Setup are changed to AES (Under manual setup). Advanced Network Setup NOTE ❖ When the DHCP function of the router connected to this ... if an AP for IEEE 802.11n is used when Encryption is Off, set Auto Setup to Off, and manually set the IP Address or DNS Address. Select NETWORK > Network Setup, and then press the OK button. 2...
User Guide
Page 137
... buttons to select the IP Address field and use the same IP address for any other device. If you must be a private address. If you manually set the DNS address(es). Use the ( arrow) button to use should have provided these to you. ❖ The settings in Auto Setup are linked... to Off, and manually set the IP address, you input an incompatible number and press the OK button. The field number will be set to On, then Auto Setup...
... buttons to select the IP Address field and use the same IP address for any other device. If you must be a private address. If you manually set the DNS address(es). Use the ( arrow) button to use should have provided these to you. ❖ The settings in Auto Setup are linked... to Off, and manually set the IP address, you input an incompatible number and press the OK button. The field number will be set to On, then Auto Setup...
User Guide
Page 138
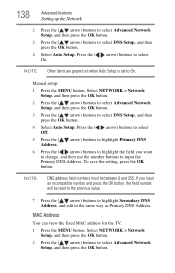
... numbers must be reset to the previous value. 7 Press the ( / arrow) buttons to select DNS Setup, and then press the OK button. 4 Select Auto Setup. Manual setup: 1 Press the MENU button. 138 Advanced features Setting up the Network 2 Press the ( / arrow) buttons to select Advanced Network Setup, and then press the...
... numbers must be reset to the previous value. 7 Press the ( / arrow) buttons to select DNS Setup, and then press the OK button. 4 Select Auto Setup. Manual setup: 1 Press the MENU button. 138 Advanced features Setting up the Network 2 Press the ( / arrow) buttons to select Advanced Network Setup, and then press the...
User Guide
Page 158
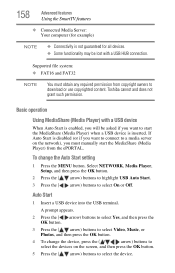
...a media server on the screen, and then press the OK button. 5 Press the ( / arrow) buttons to select On or Off. Toshiba cannot and does not grant such permission. Auto Start 1 Insert a USB device into the USB terminal. 158 Advanced features Using the SmartTV features...; Connected Media Server: Your computer (for example) NOTE ❖ Connectivity is inserted. Supported file system: ❖ FAT16 and FAT32 NOTE You must manually start the MediaShare (Media Player) from copyright owners to download or use copyrighted content. A prompt appears. 2 Press the ( / arrow) buttons to...
...a media server on the screen, and then press the OK button. 5 Press the ( / arrow) buttons to select On or Off. Toshiba cannot and does not grant such permission. Auto Start 1 Insert a USB device into the USB terminal. 158 Advanced features Using the SmartTV features...; Connected Media Server: Your computer (for example) NOTE ❖ Connectivity is inserted. Supported file system: ❖ FAT16 and FAT32 NOTE You must manually start the MediaShare (Media Player) from copyright owners to download or use copyrighted content. A prompt appears. 2 Press the ( / arrow) buttons to...
User Guide
Page 159
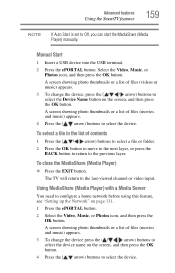
... select the device. Advanced features Using the SmartTV features 159 NOTE If Auto Start is set to Off, you can start the MediaShare (Media Player) manually. Manual Start 1 Insert a USB device into the USB terminal. 2 Press the ePORTAL button.
... select the device. Advanced features Using the SmartTV features 159 NOTE If Auto Start is set to Off, you can start the MediaShare (Media Player) manually. Manual Start 1 Insert a USB device into the USB terminal. 2 Press the ePORTAL button.
User Guide
Page 184
... a digital audio system" on page 107. Try another device, use the remote control that the Rear Shared Audio setting is properly set to the owner's manual for a few seconds and plug it back in. Refer to the correct device mode, see "Using SurfLock™" on page 49. Channel tuning problems Ensure...
... a digital audio system" on page 107. Try another device, use the remote control that the Rear Shared Audio setting is properly set to the owner's manual for a few seconds and plug it back in. Refer to the correct device mode, see "Using SurfLock™" on page 49. Channel tuning problems Ensure...


