

Owners Manual
Page 5
... sub-pages when in teletext mode Selectable picture preferences On-screen Menus Widescreen viewing To exit Menus Stereo/Bilingual reception To select mode When using a TOSHIBA VCR or DVD: m press to PAUSE w press to EJECT q press l to SKIP-REWIND s press l to SKIP-FORWARD r press to PLAY p... control. English The remote controlUP Simple at-a-glance reference of your selection Teletext control buttons Bass Boost/Super Woofer To mute the sound When in TV mode: 8/9 Time display When in Teletext mode: r To reveal concealed text q To hold a wanted page s To enlarge teletext display size 8 9/...
... sub-pages when in teletext mode Selectable picture preferences On-screen Menus Widescreen viewing To exit Menus Stereo/Bilingual reception To select mode When using a TOSHIBA VCR or DVD: m press to PAUSE w press to EJECT q press l to SKIP-REWIND s press l to SKIP-FORWARD r press to PLAY p... control. English The remote controlUP Simple at-a-glance reference of your selection Teletext control buttons Bass Boost/Super Woofer To mute the sound When in TV mode: 8/9 Time display When in Teletext mode: r To reveal concealed text q To hold a wanted page s To enlarge teletext display size 8 9/...

Owners Manual
Page 6
...,oodFureelrde. HDMI, the HDMI logo, and High-Definition Multimedia Interface are trademarks or registered trademarks of the television. Connect the decoder TV socket to the decoder VCR socket. English Connecting external equipment Before connecting any external equipment, turn off all additional equipment must be referred...Aerial cables: Connect the aerial to Off. If connecting S-VIDEO equipment, set to the socket on the rear of HDMI Licensing, LLC. 6 If the television automatically switches over to monitor external equipment, return to the television.
...,oodFureelrde. HDMI, the HDMI logo, and High-Definition Multimedia Interface are trademarks or registered trademarks of the television. Connect the decoder TV socket to the decoder VCR socket. English Connecting external equipment Before connecting any external equipment, turn off all additional equipment must be referred...Aerial cables: Connect the aerial to Off. If connecting S-VIDEO equipment, set to the socket on the rear of HDMI Licensing, LLC. 6 If the television automatically switches over to monitor external equipment, return to the television.
Owners Manual
Page 9
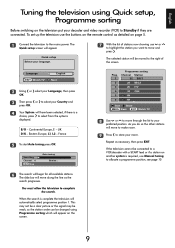
... Before switching on the television put your decoder and video recorder (VCR) to your move and press R . UK D/K - Eastern Europe, L1, L2 - EXIT Watch TV Next 2 Using S or R select your Language, then press OK. 3 Then press S or R to select your language. 7 With the list of the screen. ... : Prog. 1 2 3 4 5 6 Programme sorting Channel Station 22 BBC1 28 BBC2 25 ITV 32 CH4 69 69 Sort Store MENU Back EXIT Watch TV 8 Use Q or P to store your preferred position. B/G - The slide bar will move through the list to Standby if they are connected. English Tuning...
... Before switching on the television put your decoder and video recorder (VCR) to your move and press R . UK D/K - Eastern Europe, L1, L2 - EXIT Watch TV Next 2 Using S or R select your Language, then press OK. 3 Then press S or R to select your language. 7 With the list of the screen. ... : Prog. 1 2 3 4 5 6 Programme sorting Channel Station 22 BBC1 28 BBC2 25 ITV 32 CH4 69 69 Sort Store MENU Back EXIT Watch TV 8 Use Q or P to store your preferred position. B/G - The slide bar will move through the list to Standby if they are connected. English Tuning...
Owners Manual
Page 10
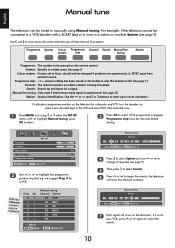
...I I I I I I Manual tuning Channel Station 60 VCR 22 BBC1 25 ITV 28 BBC2 32 CH4 69 Select MENU Back EXIT Watch TV 0 IA Manual tuning System 60 0 VCR Store MENU Back EXIT Watch TV 4 Press R to select System and use P or Q to change (if required, see page 9). Use S and R to highlight the...Manual tuning, press OK to select. 3 Press OK to seven characters. Language Country Auto tuning Manual tuning Programme sorting SET UP MENU Back EXIT Watch TV English UK OK OK OK 2 Use P or Q to move across the screen and select any of these Manual Tune options. Colour system: Factory ...
...I I I I I I Manual tuning Channel Station 60 VCR 22 BBC1 25 ITV 28 BBC2 32 CH4 69 Select MENU Back EXIT Watch TV 0 IA Manual tuning System 60 0 VCR Store MENU Back EXIT Watch TV 4 Press R to select System and use P or Q to change (if required, see page 9). Use S and R to highlight the...Manual tuning, press OK to select. 3 Press OK to seven characters. Language Country Auto tuning Manual tuning Programme sorting SET UP MENU Back EXIT Watch TV English UK OK OK OK 2 Use P or Q to move across the screen and select any of these Manual Tune options. Colour system: Factory ...
Owners Manual
Page 11
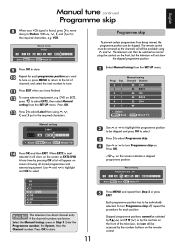
... 4 5 Sys. on screen showing all stored programmes and external equipment. Manual tuning Programme skip : On 1 IA 22 0 B BC 1 Store MENU Back EXIT Watch TV 11 5 Press MENU and repeat from being viewed, the programme position can still be removed as EXT2 DVD. To turn Programme skip on the screen...any time by pressing OK a list will not show on . VCR. 0 IA Manual tuning Station 32 0 VCR Store MENU Back EXIT Watch TV 9 Press OK to store. 10 Repeat for each programme position you have finished. Press OK. 13 Press R to store. EXT2 Manual setting Label...
... 4 5 Sys. on screen showing all stored programmes and external equipment. Manual tuning Programme skip : On 1 IA 22 0 B BC 1 Store MENU Back EXIT Watch TV 11 5 Press MENU and repeat from being viewed, the programme position can still be removed as EXT2 DVD. To turn Programme skip on the screen...any time by pressing OK a list will not show on . VCR. 0 IA Manual tuning Station 32 0 VCR Store MENU Back EXIT Watch TV 9 Press OK to store. 10 Repeat for each programme position you have finished. Press OK. 13 Press R to store. EXT2 Manual setting Label...

Owners Manual
Page 12
...Dual will have been selected, if there is a choice, press S or R to the previous programme position press . Press I MENU Back EXIT Watch TV 5 Your System will appear on -screen information i.e. The Time Display The time display facility allows the current (teletext) time to be selected using P ...programme position, input mode or stereo/mono signal, press CALL. Language Country Auto tuning Manual tuning Programme sorting SET UP MENU Back EXIT Watch TV English UK OK OK OK 2 Press Q to highlight Language and S or R to select. 3 Using Q highlight Country, then Sor...
...Dual will have been selected, if there is a choice, press S or R to the previous programme position press . Press I MENU Back EXIT Watch TV 5 Your System will appear on -screen information i.e. The Time Display The time display facility allows the current (teletext) time to be selected using P ...programme position, input mode or stereo/mono signal, press CALL. Language Country Auto tuning Manual tuning Programme sorting SET UP MENU Back EXIT Watch TV English UK OK OK OK 2 Press Q to highlight Language and S or R to select. 3 Using Q highlight Country, then Sor...
Owners Manual
Page 13
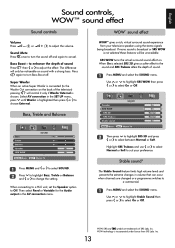
... are trademarks of sound. 1 Press MENU and select the SOUND menu. Speaker SRS WOW SRS 3D SRS Trubass Stable sound SOUND MENU Back EXIT Watch TV On On Normal Normal On 2 Then press Q to highlight SRS 3D and press S or R to change the setting. Inc. to choose External. Select ... the effect. The difference will only be unavailable. Bass, Treble and Balance Bass Treble Balance Speaker SRS WOW SOUND - 4 0 0 On On MENU Back EXIT Watch TV 1 Press MENU and S or R to select SOUND. 2 Press Q to highlight Bass, Treble or Balance and S or R to select between Normal or Soft. WOW ...
... are trademarks of sound. 1 Press MENU and select the SOUND menu. Speaker SRS WOW SRS 3D SRS Trubass Stable sound SOUND MENU Back EXIT Watch TV On On Normal Normal On 2 Then press Q to highlight SRS 3D and press S or R to change the setting. Inc. to choose External. Select ... the effect. The difference will only be unavailable. Bass, Treble and Balance Bass Treble Balance Speaker SRS WOW SOUND - 4 0 0 On On MENU Back EXIT Watch TV 1 Press MENU and S or R to select SOUND. 2 Press Q to highlight Bass, Treble or Balance and S or R to select between Normal or Soft. WOW ...
Owners Manual
Page 15
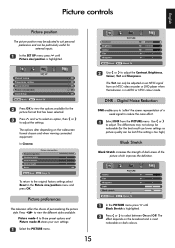
...the picture m style. In Cinema: Picture size/position Horizontal position Horizontal width Vertical position Vertical height Reset OK MENU Back EXIT Watch TV To return to adjust. Digital Noise Reduction DNR enables you to 'soften' the screen representation of a weak signal to select between ...On and Off. Colour Tint Sharpness DNR Black stretch PICTURE 0 0 0 2 On MENU Back EXIT Watch TV 1 In the PICTURE menu press Q until Picture size/position is highlighted. 2 Press S or R to reduce the noise effect. 1 Select DNR from...
...the picture m style. In Cinema: Picture size/position Horizontal position Horizontal width Vertical position Vertical height Reset OK MENU Back EXIT Watch TV To return to adjust. Digital Noise Reduction DNR enables you to 'soften' the screen representation of a weak signal to select between ...On and Off. Colour Tint Sharpness DNR Black stretch PICTURE 0 0 0 2 On MENU Back EXIT Watch TV 1 In the PICTURE menu press Q until Picture size/position is highlighted. 2 Press S or R to reduce the noise effect. 1 Select DNR from...
Owners Manual
Page 16
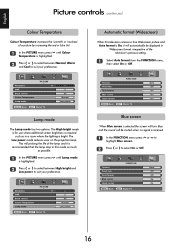
... be displayed in a room where the lighting is bright. Sharpness DNR Black stretch Colour Temperature Lamp mode PICTURE 0 MENU Back EXIT Watch TV 2 On Normal Low power Automatic format (Widescreen) When this television receives a true Widescreen picture and Auto format is On, it is... 2 Press S or R to select between High bright and Low power to suit your preference. The Low power mode reduces wear on the projection lamp. English Picture controls continued Colour Temperature Colour Temperature increases the 'warmth' or 'coolness' of a picture by increasing the red or blue tint...
... be displayed in a room where the lighting is bright. Sharpness DNR Black stretch Colour Temperature Lamp mode PICTURE 0 MENU Back EXIT Watch TV 2 On Normal Low power Automatic format (Widescreen) When this television receives a true Widescreen picture and Auto format is On, it is... 2 Press S or R to select between High bright and Low power to suit your preference. The Low power mode reduces wear on the projection lamp. English Picture controls continued Colour Temperature Colour Temperature increases the 'warmth' or 'coolness' of a picture by increasing the red or blue tint...
Owners Manual
Page 17
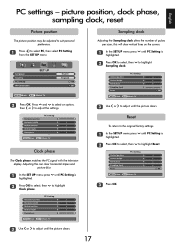
...phase matches the PC signal with the television display. Language Country PC Setting AV Connection SET UP English England OK OK MENU Back EXIT Watch TV 2 Press OK. B 1 Press to highlight Clock phase. Adjusting this will clear vertical lines on the screen. 1 In the SET ...Q until the picture clears. 17 English PC settings - PC Setting Vertical position 0 Vertical height 0 Clock phase 0 Sampling clock 0 Reset OK MENU Back EXIT Watch TV 3 Press OK. 3 Use S or R to adjust the settings. Press P and Q to select an option, then S or R to adjust until PC Setting...
...phase matches the PC signal with the television display. Language Country PC Setting AV Connection SET UP English England OK OK MENU Back EXIT Watch TV 2 Press OK. B 1 Press to highlight Clock phase. Adjusting this will clear vertical lines on the screen. 1 In the SET ...Q until the picture clears. 17 English PC settings - PC Setting Vertical position 0 Vertical height 0 Clock phase 0 Sampling clock 0 Reset OK MENU Back EXIT Watch TV 3 Press OK. 3 Use S or R to adjust the settings. Press P and Q to select an option, then S or R to adjust until PC Setting...
Owners Manual
Page 18
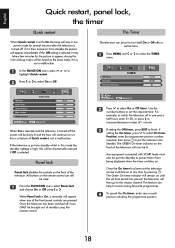
... can still be used. 1 From the FUNCTION menu select Panel lock and choose On or Off using the remote control. 0 - 9 Set MENU Back EXIT Watch TV 2 Press Q to select On or Off timer. Any equipment connected with SCART leads must also be put the television into Standby. If setting the On... On timer On timer Position TIMER 01:30 00:00 01 Teletext Panel lock Auto format Blue screen Quick restart FUNCTION MENU Back EXIT Watch TV Auto. Once the On timer has been set the required time. English Quick restart, panel lock, the timer Quick restart The Timer When Quick restart...
... can still be used. 1 From the FUNCTION menu select Panel lock and choose On or Off using the remote control. 0 - 9 Set MENU Back EXIT Watch TV 2 Press Q to select On or Off timer. Any equipment connected with SCART leads must also be put the television into Standby. If setting the On... On timer On timer Position TIMER 01:30 00:00 01 Teletext Panel lock Auto format Blue screen Quick restart FUNCTION MENU Back EXIT Watch TV Auto. Once the On timer has been set the required time. English Quick restart, panel lock, the timer Quick restart The Timer When Quick restart...
Owners Manual
Page 19
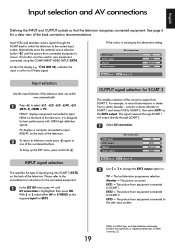
...2. Alternatively press the external source selection B button until AV connection is highlighted, then press OK. This button must be used to : TV = The last television programme selection. The signal received through SCART 1 will output directly through the SCART lead to switch the television to ...the television. OUTPUT signal selection for EXT3. If the colour is set for best performance with 1080i high definition signals. MENU Back EXIT Watch TV 2 Use S or R to change the EXT3 output option to view equipment connected using the COMPONENT VIDEO INPUT (EXT4). EXT5 = The ...
...2. Alternatively press the external source selection B button until AV connection is highlighted, then press OK. This button must be used to : TV = The last television programme selection. The signal received through SCART 1 will output directly through the SCART lead to switch the television to ...the television. OUTPUT signal selection for EXT3. If the colour is set for best performance with 1080i high definition signals. MENU Back EXIT Watch TV 2 Use S or R to change the EXT3 output option to view equipment connected using the COMPONENT VIDEO INPUT (EXT4). EXT5 = The ...
Owners Manual
Page 20
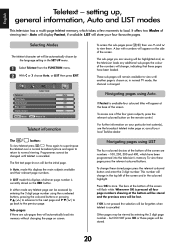
...page. The first text page shown will display Fastext, if available. Auto will be changed until another page is chosen or, in normal TV mode, the channel is pressed all four page numbers showing at the bottom of the screen will change , indicating that these pages will ...offers two Modes of the four given subjects, press the relevant coloured button on the RED button. These sub-pages will store your local Toshiba dealer. LIST will remain available to view them. In LIST mode this displays the main subjects available and their relevant page numbers. Other ...
...page. The first text page shown will display Fastext, if available. Auto will be changed until another page is chosen or, in normal TV mode, the channel is pressed all four page numbers showing at the bottom of the screen will change , indicating that these pages will ...offers two Modes of the four given subjects, press the relevant coloured button on the RED button. These sub-pages will store your local Toshiba dealer. LIST will remain available to view them. In LIST mode this displays the main subjects available and their relevant page numbers. Other ...
Owners Manual
Page 25
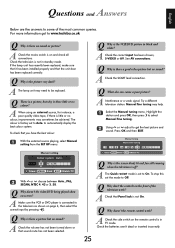
... 3. 58. A Check the volume has not been turned down or that the unit door has been replaced correctly. Q Why is set the mode to www.toshiba.co.uk Q Why is in standby mode. A The Quick restart mode is the VCR/DVD picture in black and white? Q Why doesn't the remote control... unit has recently been replaced, make sure that it has been installed properly and that sound mute has not been selected. Q Why is not in TV mode. To check that Panel lock is not On. Manual setting Colour system : Auto. Q What else can cause a poor picture? A Interference or a weak signal. ...
... 3. 58. A Check the volume has not been turned down or that the unit door has been replaced correctly. Q Why is set the mode to www.toshiba.co.uk Q Why is in standby mode. A The Quick restart mode is the VCR/DVD picture in black and white? Q Why doesn't the remote control... unit has recently been replaced, make sure that it has been installed properly and that sound mute has not been selected. Q Why is not in TV mode. To check that Panel lock is not On. Manual setting Colour system : Auto. Q What else can cause a poor picture? A Interference or a weak signal. ...
Owners Manual
Page 26
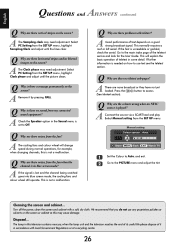
... the SET UP menu. This normally requires a roof or loft aerial. A Connect the source via a SCART lead and play. EXT3 A V C R Store MENU Back EXIT Watch TV 1 Set the Colour to the PICTURE menu and adjust the tint. A The Clock phase may need adjustment. A Good performance of the teletext service and look...
... the SET UP menu. This normally requires a roof or loft aerial. A Connect the source via a SCART lead and play. EXT3 A V C R Store MENU Back EXIT Watch TV 1 Set the Colour to the PICTURE menu and adjust the tint. A The Clock phase may need adjustment. A Good performance of the teletext service and look...


