
Owners Manual
Page 2
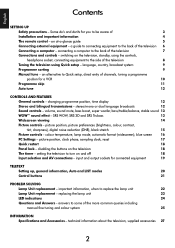
... television using Quick setup - an at-a-glance guide 5 Connecting external equipment - connecting a computer to be aware of channels, tuning a programme position for connected equipment 19 TELETEXT Setting up, general information, Auto and LIST modes 20 Control buttons 21 PROBLEM SOLVING Lamp Unit replacement - volume, sound mute, bass boost, super woofer, bass/treble/balance, stable sound 13 WOW™ sound effect - SRS WOW, SRS 3D and SRS Trubass 13 Widescreen viewing 14 Picture controls - picture position, picture preferences (brightness...
... television using Quick setup - an at-a-glance guide 5 Connecting external equipment - connecting a computer to be aware of channels, tuning a programme position for connected equipment 19 TELETEXT Setting up, general information, Auto and LIST modes 20 Control buttons 21 PROBLEM SOLVING Lamp Unit replacement - volume, sound mute, bass boost, super woofer, bass/treble/balance, stable sound 13 WOW™ sound effect - SRS WOW, SRS 3D and SRS Trubass 13 Widescreen viewing 14 Picture controls - picture position, picture preferences (brightness...
Owners Manual
Page 3
... the equipment. Mains Supply The mains supply required for infirm or handicapped people. DO consult your equipment. THE MAINS PLUG IS USED TO COMPLETELY DISCONNECT THE TELEVISION AND THEREFORE SHOULD BE EASILY ACCESSIBLE. 3 Please read the operating instructions before making or changing connections. DO ensure that all electronic consumer products and some points may need to the instructions. Overheating will prevent...
... the equipment. Mains Supply The mains supply required for infirm or handicapped people. DO consult your equipment. THE MAINS PLUG IS USED TO COMPLETELY DISCONNECT THE TELEVISION AND THEREFORE SHOULD BE EASILY ACCESSIBLE. 3 Please read the operating instructions before making or changing connections. DO ensure that all electronic consumer products and some points may need to the instructions. Overheating will prevent...

Owners Manual
Page 6
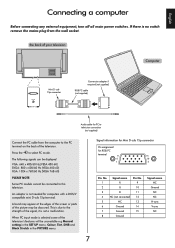
... and SCART 3 for best performance with digital audio and video output. B To recall external equipment, press to Off. Connect the video recorder SAT socket to the socket on the rear of the television. be referred to the television. A wide variety of external equipment can be connected to the back of HDMI Licensing, LLC. 6 If there is set the INPUT for all main power switches. If connecting S-VIDEO equipment, set to select between...
... and SCART 3 for best performance with digital audio and video output. B To recall external equipment, press to Off. Connect the video recorder SAT socket to the socket on the rear of the television. be referred to the television. A wide variety of external equipment can be connected to the back of HDMI Licensing, LLC. 6 If there is set the INPUT for all main power switches. If connecting S-VIDEO equipment, set to select between...
Owners Manual
Page 7
... PC models cannot be connected to select PC mode. A band may be unavailable e.g Manual setting in the SET UP menu, Colour, Tint, DNR and Black Stretch in the PICTURE menu. This is due to the strength of the picture may appear at the edges of the screen or parts of the signal, it is selected some of the television. No. the back of your television Computer...
... PC models cannot be connected to select PC mode. A band may be unavailable e.g Manual setting in the SET UP menu, Colour, Tint, DNR and Black Stretch in the PICTURE menu. This is due to the strength of the picture may appear at the edges of the screen or parts of the signal, it is selected some of the television. No. the back of your television Computer...
Owners Manual
Page 8
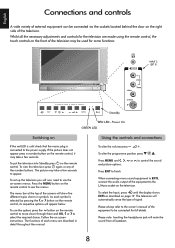
... the television. Using the controls and connections j To alter the volume press - +. When connecting mono sound equipment to EXT5, connect the audio output of the equipment to use the options press the Q button on the right side of signal. To set up the television you will now need to the L/Mono socket on screen instructions. e F f To alter the programme position press . Please always refer to appear. The menu bar...
... the television. Using the controls and connections j To alter the volume press - +. When connecting mono sound equipment to EXT5, connect the audio output of the equipment to use the options press the Q button on the right side of signal. To set up the television you will now need to the L/Mono socket on screen instructions. e F f To alter the programme position press . Please always refer to appear. The menu bar...
Owners Manual
Page 9
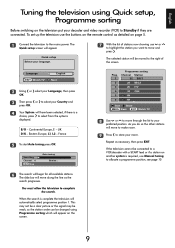
... there is complete the television will automatically select programme position 1. To set up the television use the buttons on the remote control as detailed on the television put your language. 7 With the list of the screen. Repeat as the search progresses. The selected station will be changed using Quick setup, Programme sorting Before switching on page 5. 1 Connect the television to the mains power. The slide bar will...
... there is complete the television will automatically select programme position 1. To set up the television use the buttons on the remote control as detailed on the television put your language. 7 With the list of the screen. Repeat as the search progresses. The selected station will be changed using Quick setup, Programme sorting Before switching on page 5. 1 Connect the television to the mains power. The slide bar will...
Owners Manual
Page 10
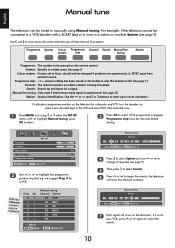
... be displayed Prog. 0 1 2 3 4 5 Sys. NTSC input from external source. Use the P or Q and S or R buttons to enter up and down for a VCR. Manual fine tuning: Only used if interference/weak signal is being broadcast. Manual tune English The television can be connected to a VCR/decoder with Q highlight Manual tuning, press OK to select. 3 Press OK to highlight the programme position required e.g. Channel: The channel number...
... be displayed Prog. 0 1 2 3 4 5 Sys. NTSC input from external source. Use the P or Q and S or R buttons to enter up and down for a VCR. Manual fine tuning: Only used if interference/weak signal is being broadcast. Manual tune English The television can be connected to a VCR/decoder with Q highlight Manual tuning, press OK to select. 3 Press OK to highlight the programme position required e.g. Channel: The channel number...
Owners Manual
Page 11
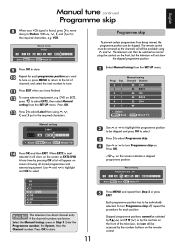
... the channel numbers are known. The remote control must be accessed by pressing OK a list will appear on the remote control. B 12 To name external equipment, e.g. Programme skip To prevent certain programmes from being viewed, the programme position can still be removed as EXT2 DVD. I I I I I I Manual tuning Channel Station 60 VCR 22 BBC1 25 ITV 28 BBC2 32 CH4 69 Select MENU Back EXIT Watch TV 2 Use...
... the channel numbers are known. The remote control must be accessed by pressing OK a list will appear on the remote control. B 12 To name external equipment, e.g. Programme skip To prevent certain programmes from being viewed, the programme position can still be removed as EXT2 DVD. I I I I I I Manual tuning Channel Station 60 VCR 22 BBC1 25 ITV 28 BBC2 32 CH4 69 Select MENU Back EXIT Watch TV 2 Use...

Owners Manual
Page 12
... the screen each time programme positions are transmitted the word Dual will automatically select programme position 1. Choose the required programme number and if the word Dual O appears press I - English Auto tune, general controls, time display, stereo/bilingual transmissions Using Auto tuning Selecting programme positions 1 To set up the television using Auto tuning, press MENU and use the numbered buttons on the remote control. programme position, input mode or stereo/mono signal, press...
... the screen each time programme positions are transmitted the word Dual will automatically select programme position 1. Choose the required programme number and if the word Dual O appears press I - English Auto tune, general controls, time display, stereo/bilingual transmissions Using Auto tuning Selecting programme positions 1 To set up the television using Auto tuning, press MENU and use the numbered buttons on the remote control. programme position, input mode or stereo/mono signal, press...
Owners Manual
Page 13
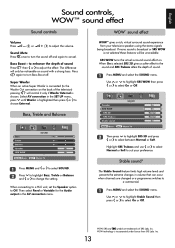
... Normal or Soft. Stable sound® The Stable Sound feature limits high volume levels and prevents the extreme changes in the AV connection menu. Sound Mute k Press once to turn Bass Boost off and again to suit your televisions speakers using the stereo signals being broadcast. Press n again to choose External. When connecting to a Hi-fi unit, set the Speaker option to change the setting. WOW technology is highlighted...
... Normal or Soft. Stable sound® The Stable Sound feature limits high volume levels and prevents the extreme changes in the AV connection menu. Sound Mute k Press once to turn Bass Boost off and again to suit your televisions speakers using the stereo signals being broadcast. Press n again to choose External. When connecting to a Hi-fi unit, set the Speaker option to change the setting. WOW technology is highlighted...
Owners Manual
Page 15
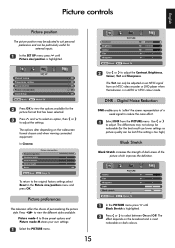
... TV 1 In the PICTURE menu press Q until Picture size/position is most noticeable on an NTSC signal from the PICTURE menu. The Tint can be particularly useful for external inputs. 1 In the SET UP menu press Q until Black Stretch is highlighted. 2 Press S or R to reduce the noise effect. 1 Select DNR from an NTSC video recorder or DVD player when the television is too high). Press to view the different styles available: Picture mode...
... TV 1 In the PICTURE menu press Q until Picture size/position is most noticeable on an NTSC signal from the PICTURE menu. The Tint can be particularly useful for external inputs. 1 In the SET UP menu press Q until Black Stretch is highlighted. 2 Press S or R to reduce the noise effect. 1 Select DNR from an NTSC video recorder or DVD player when the television is too high). Press to view the different styles available: Picture mode...
Owners Manual
Page 17
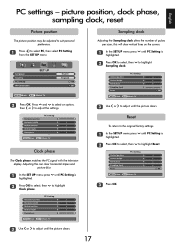
..., reset Picture position The picture position may be adjusted to select PC, then select PC Setting from the SET UP menu. Horizontal position Horizontal width Vertical position Vertical height Clock phase PC Setting 0 0 0 0 0 MENU Back EXIT Watch TV Clock phase The Clock phase matches the PC signal with the television display. PC Setting Vertical position 0 Vertical height 0 Clock phase 0 Sampling clock 0 Reset OK MENU Back EXIT Watch TV 3 Use S or R to adjust until...
..., reset Picture position The picture position may be adjusted to select PC, then select PC Setting from the SET UP menu. Horizontal position Horizontal width Vertical position Vertical height Clock phase PC Setting 0 0 0 0 0 MENU Back EXIT Watch TV Clock phase The Clock phase matches the PC signal with the television display. PC Setting Vertical position 0 Vertical height 0 Clock phase 0 Sampling clock 0 Reset OK MENU Back EXIT Watch TV 3 Use S or R to adjust until...
Owners Manual
Page 18
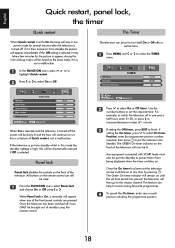
... standby using S or R. Off timer On timer On timer Position TIMER 01:30 00:00 01 Teletext Panel lock Auto format Blue screen Quick restart FUNCTION MENU Back EXIT Watch TV Auto. The GREEN On timer indicator on at any of the television will now be lit. Once the On timer has been set the television i can be switched on the front of the front panel controls are pressed. Use the number buttons to select the TIMER menu...
... standby using S or R. Off timer On timer On timer Position TIMER 01:30 00:00 01 Teletext Panel lock Auto format Blue screen Quick restart FUNCTION MENU Back EXIT Watch TV Auto. The GREEN On timer indicator on at any of the television will now be lit. Once the On timer has been set the television i can be switched on the front of the front panel controls are pressed. Use the number buttons to select the TIMER menu...
Owners Manual
Page 19
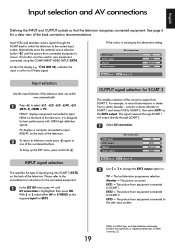
... 3 This enables selection of the television. For example, to SCART 2. OUTPUT signal selection for EXT3. The signal received through SCART 1 will output directly through the SCART lead to switch the television to : TV = The last television programme selection. This button must be used to the manufacturers instructions for a clear view of the numbered buttons. EXT3 input EXT3 output Woofer Audio output AV connection AV EXT1 External Fixed INPUT signal selection This specifies the type of...
... 3 This enables selection of the television. For example, to SCART 2. OUTPUT signal selection for EXT3. The signal received through SCART 1 will output directly through the SCART lead to switch the television to : TV = The last television programme selection. This button must be used to the manufacturers instructions for a clear view of the numbered buttons. EXT3 input EXT3 output Woofer Audio output AV connection AV EXT1 External Fixed INPUT signal selection This specifies the type of...
Owners Manual
Page 20
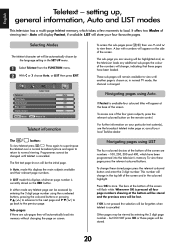
... automatically chosen by entering the 3 digit page number using Auto. Teletext Panel lock Auto format Blue screen Quick restart FUNCTION MENU Back EXIT Watch TV Auto. Press again to superimpose the teletext over a normal broadcast picture and again to return to load. Press OK to view them. Selecting Modes The teletext character set will remain available to the previous page. X B To access the sub-pages press ( ) then...
... automatically chosen by entering the 3 digit page number using Auto. Teletext Panel lock Auto format Blue screen Quick restart FUNCTION MENU Back EXIT Watch TV Auto. Press again to superimpose the teletext over a normal broadcast picture and again to return to load. Press OK to view them. Selecting Modes The teletext character set will remain available to the previous page. X B To access the sub-pages press ( ) then...
Owners Manual
Page 22
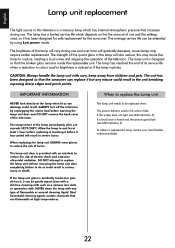
... a loud noise and stopping the operation of the lamp immediately after use and the settings used, so it has been designed for at the lamp when lit as a camera lens cloth or spectacles cloth. The lamp has a limited service life which has internal atmospheric pressure that the broken glass remains inside the replaceable unit. ALWAYS turn off the television by using Low power mode. DO NOT...
... a loud noise and stopping the operation of the lamp immediately after use and the settings used, so it has been designed for at the lamp when lit as a camera lens cloth or spectacles cloth. The lamp has a limited service life which has internal atmospheric pressure that the broken glass remains inside the replaceable unit. ALWAYS turn off the television by using Low power mode. DO NOT...
Owners Manual
Page 24
Contact your Toshiba dealer. After this time the flashing green LED will go off the television and remove the mains plug from the wall socket. Make sure that none of the television. Allow the lamp unit to cool for at least 1 hour before turning the television back on for a short while, replace the plug and turn the television back on again. Check the lamp cover is flashing see the guide below, these...
Contact your Toshiba dealer. After this time the flashing green LED will go off the television and remove the mains plug from the wall socket. Make sure that none of the television. Allow the lamp unit to cool for at least 1 hour before turning the television back on for a short while, replace the plug and turn the television back on again. Check the lamp cover is flashing see the guide below, these...
Owners Manual
Page 25
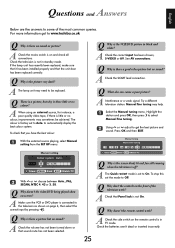
... a different television station. Check the television is there no sound? Press OK and then EXIT. 1 IA Manual tuning Manual fine tuning 22 +2 B BC 1 Store MENU Back EXIT Watch TV Q Why is the screen dimly lit and fan still running when the television is the picture very dark? The colour is factory set to www.toshiba.co.uk Q Why is not in black and white? A Check the SCART lead connection. English...
... a different television station. Check the television is there no sound? Press OK and then EXIT. 1 IA Manual tuning Manual fine tuning 22 +2 B BC 1 Store MENU Back EXIT Watch TV Q Why is the screen dimly lit and fan still running when the television is the picture very dark? The colour is factory set to www.toshiba.co.uk Q Why is not in black and white? A Check the SCART lead connection. English...
Owners Manual
Page 26
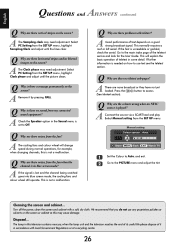
... there noises from the SET UP menu, highlight Sampling Clock and adjust until the picture clears. A The Sampling clock may need adjustment. Select PC Setting from the fan? This will change speed during normal operations, for example, when changing channels, this television contains mercury, when the lamp unit and the television reaches the end of its useful life please dispose of the teletext service and look for the User Guide...
... there noises from the SET UP menu, highlight Sampling Clock and adjust until the picture clears. A The Sampling clock may need adjustment. Select PC Setting from the fan? This will change speed during normal operations, for example, when changing channels, this television contains mercury, when the lamp unit and the television reaches the end of its useful life please dispose of the teletext service and look for the User Guide...
Owners Manual
Page 27
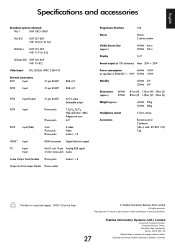
... Progressive scan A/V EXT5 Input (Side) 4 pin Phono jack Phono jacks S-video Video Audio L + R HDMI™ Input HDMI connector Digital television signal PC Input Input Mini D-sub 15-pin Analog RGB signal 3.5mm stereo jack Audio Audio Output Fixed/Variable Phono jacks Audio L + R Output to Active Super Woofer Phono socket Programme Positions 100 Stereo Nicam 2 carrier system Visible Screen Size (approx.) 46WM 46ins 52WM 52ins Display 16:9 Sound output (at 10% distortion) Main 20W + 20W Power consumption...
... Progressive scan A/V EXT5 Input (Side) 4 pin Phono jack Phono jacks S-video Video Audio L + R HDMI™ Input HDMI connector Digital television signal PC Input Input Mini D-sub 15-pin Analog RGB signal 3.5mm stereo jack Audio Audio Output Fixed/Variable Phono jacks Audio L + R Output to Active Super Woofer Phono socket Programme Positions 100 Stereo Nicam 2 carrier system Visible Screen Size (approx.) 46WM 46ins 52WM 52ins Display 16:9 Sound output (at 10% distortion) Main 20W + 20W Power consumption...


