
User Manual
Page 1
...Record The model number and serial number are on the back and side of steps for setting up your new TV, see page 11. Refer to these numbers in the spaces below. www.support.toshiba.com Model number: Serial number: TD/M VX1A00205000 Record these numbers whenever you communicate with ...nition picture, the TV must be receiving a High Definition signal (such as an over-the-air High Definition TV broadcast, a High Definition digital cable program, or a High Definition digital satellite program). Integrated High Definition LCD Television 42SL417U 46SL417U 55SL417U...
...Record The model number and serial number are on the back and side of steps for setting up your new TV, see page 11. Refer to these numbers in the spaces below. www.support.toshiba.com Model number: Serial number: TD/M VX1A00205000 Record these numbers whenever you communicate with ...nition picture, the TV must be receiving a High Definition signal (such as an over-the-air High Definition TV broadcast, a High Definition digital cable program, or a High Definition digital satellite program). Integrated High Definition LCD Television 42SL417U 46SL417U 55SL417U...
User Manual
Page 7
... and is not covered under your television is displayed for normal home use of information to operate this equipment. Canada - Picture Settings, Auto Brightness Sensor) may be co-located or operating in case of absence of repetitive codes where required by the technology.... This equipment should be operated. Important notes about your body. Enabling or changing certain features and functionality (e.g. therefore, Toshiba is not responsible for compliance could automatically discontinue transmission in conjunction with RSS-210. This device and its antenna(s) must accept...
... and is not covered under your television is displayed for normal home use of information to operate this equipment. Canada - Picture Settings, Auto Brightness Sensor) may be co-located or operating in case of absence of repetitive codes where required by the technology.... This equipment should be operated. Important notes about your body. Enabling or changing certain features and functionality (e.g. therefore, Toshiba is not responsible for compliance could automatically discontinue transmission in conjunction with RSS-210. This device and its antenna(s) must accept...
User Manual
Page 9
... 44 Chapter 7: Picture and sound controls 45 Selecting the picture size 45 Scrolling the picture 47 Using the Auto Aspect feature 47 Using the 4:3 Stretch 47 Freezing the picture 47 Adjusting the picture 48 Selecting the picture mode 48 Adjusting the picture quality 48 Using the advanced picture settings features 49 Edge ... Adjustment Pro 50 ColorMaster 51 Base Color Adjustment 51 Color temperature 51 Resetting to the factory default 51 Setting the Expert Picture Settings 51 Test Pattern 51 RGB Filter 51 White Balance 51 Resetting to the factory default 52 Locking the...
... 44 Chapter 7: Picture and sound controls 45 Selecting the picture size 45 Scrolling the picture 47 Using the Auto Aspect feature 47 Using the 4:3 Stretch 47 Freezing the picture 47 Adjusting the picture 48 Selecting the picture mode 48 Adjusting the picture quality 48 Using the advanced picture settings features 49 Edge ... Adjustment Pro 50 ColorMaster 51 Base Color Adjustment 51 Color temperature 51 Resetting to the factory default 51 Setting the Expert Picture Settings 51 Test Pattern 51 RGB Filter 51 White Balance 51 Resetting to the factory default 52 Locking the...
User Manual
Page 11
... memory (- Chapter 1: Introduction Features •Integrated digital tuning (8VSB ATSC and QAM) eliminates the need for a separate digital converter set up your TV and other device(s). 6 AFTER connecting all cables and devices to your TV. 3 BEFORE connecting cables or devices to... p. 51). •ClearFrame™ 120 Hz anti-blur feature (-p. 50). •AutoView® lets you automatically adjust picture settings based on your other electronic device(s) to set -top box (in any power cords until AFTER you have connected all cables and devices, plug in an appropriate location ...
... memory (- Chapter 1: Introduction Features •Integrated digital tuning (8VSB ATSC and QAM) eliminates the need for a separate digital converter set up your TV and other device(s). 6 AFTER connecting all cables and devices to your TV. 3 BEFORE connecting cables or devices to... p. 51). •ClearFrame™ 120 Hz anti-blur feature (-p. 50). •AutoView® lets you automatically adjust picture settings based on your other electronic device(s) to set -top box (in any power cords until AFTER you have connected all cables and devices, plug in an appropriate location ...
User Manual
Page 20
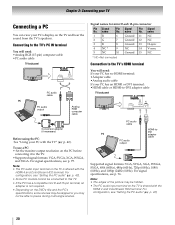
... terminal on the TV is shared with the HDMI 4 and ColorStream HD2 terminal. name Pin Signal No. Note: • The edges of the picture may not be hidden. • The PC audio input terminal on the TV is shared with the TV" (- Signal names for mini D-sub ...-to the TV. •Supported signal formats: VGA, SVGA, XGA, WXGA, and SXGA. For configuration, see "Setting the PC audio" (- name Pin Signal No. For configuration, see "Setting the PC audio" (- To use a PC: • Set the monitor output resolution on the TV and hear the sound from the TV's speakers. name 1 R 2 G ...
... terminal on the TV is shared with the HDMI 4 and ColorStream HD2 terminal. name Pin Signal No. Note: • The edges of the picture may not be hidden. • The PC audio input terminal on the TV is shared with the TV" (- Signal names for mini D-sub ...-to the TV. •Supported signal formats: VGA, SVGA, XGA, WXGA, and SXGA. For configuration, see "Setting the PC audio" (- name Pin Signal No. For configuration, see "Setting the PC audio" (- To use a PC: • Set the monitor output resolution on the TV and hear the sound from the TV's speakers. name 1 R 2 G ...
User Manual
Page 23
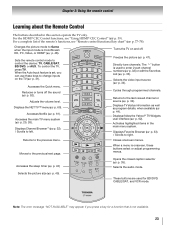
When the Auto Input feature is set, you press a key for BD/DVD, CABLE/SAT, and VCR mode. Displays the NET TV™ menu (- Accesses the main TV menu system (- Freezes the picture (- Returns to control the device: TV, CABLE/SAT, BD/DVD, or AUX. Displays Favorite ...status information as well as program details, when available (p. 44). Closes onscreen menus. Selects the picture size (- For a complete list of the remote's functions, see "Using HDMI® CEC Control" (- Sets the remote control mode to the last viewed channel or source (- Reduces or turns off . ...
When the Auto Input feature is set, you press a key for BD/DVD, CABLE/SAT, and VCR mode. Displays the NET TV™ menu (- Accesses the main TV menu system (- Freezes the picture (- Returns to control the device: TV, CABLE/SAT, BD/DVD, or AUX. Displays Favorite ...status information as well as program details, when available (p. 44). Closes onscreen menus. Selects the picture size (- For a complete list of the remote's functions, see "Using HDMI® CEC Control" (- Sets the remote control mode to the last viewed channel or source (- Reduces or turns off . ...

User Manual
Page 26
... Contrast 48 Brightness 48 Color 48 Tint 48 Sharpness 48 Advanced Picture Settings 49 Expert Picture Settings 51 TheaterLock 52 MTS 52 Balance 53 Bass 53 Treble 53 Advanced Sound Settings 54 Dynamic Volume (Audyssey 53 Dynamic Volume®) Dynamic Range Control 53 1st Layer Settings 2nd Layer APPLICATIONS PREFERENCES 3rd Layer Widgets NET TV Media...
... Contrast 48 Brightness 48 Color 48 Tint 48 Sharpness 48 Advanced Picture Settings 49 Expert Picture Settings 51 TheaterLock 52 MTS 52 Balance 53 Bass 53 Treble 53 Advanced Sound Settings 54 Dynamic Volume (Audyssey 53 Dynamic Volume®) Dynamic Range Control 53 1st Layer Settings 2nd Layer APPLICATIONS PREFERENCES 3rd Layer Widgets NET TV Media...
User Manual
Page 27
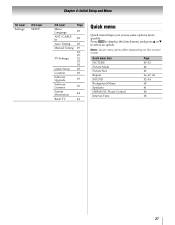
... Quick menu items differ depending on the current mode. Chapter 4: Initial Setup and Menu 1st Layer Settings 2nd Layer SETUP 3rd Layer Menu Language ANT/CABLE In Auto Tuning Manual Tuning TV Settings Quick Setup Location Software Upgrade Software Licenses System Information Reset TV Page 28 28 28 29 28, ...29, 32, 35, 38 28 28 60 60 44 44 Quick menu Quick menu helps you access some options more quickly. Quick menu Item PICTURE Picture Mode Picture Size Repeat ...
... Quick menu items differ depending on the current mode. Chapter 4: Initial Setup and Menu 1st Layer Settings 2nd Layer SETUP 3rd Layer Menu Language ANT/CABLE In Auto Tuning Manual Tuning TV Settings Quick Setup Location Software Upgrade Software Licenses System Information Reset TV Page 28 28 28 29 28, ...29, 32, 35, 38 28 28 60 60 44 44 Quick menu Quick menu helps you access some options more quickly. Quick menu Item PICTURE Picture Mode Picture Size Repeat ...
User Manual
Page 28
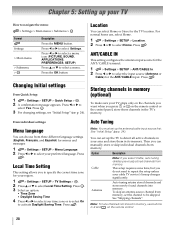
... To tune channels not stored in the TV's memory. ANT/CABLE IN This setting configures the antenna input source for your region. 1 > Settings > SETUP > TV Settings > . From individual settings: Menu language You can manually store or skip individual channels from memory. OK 2...input. Press . Chapter 5: Setting up your TV How to select Settings. Press C or c to navigate the menu: > Settings > Main menu > Submenu > OK Format Settings > Main menu > Submenu > OK Description Press the MENU button. Press C or c to select a menu icon (PICTURE, SOUND, APPLICATIONS, PREFERENCES, SETUP...
... To tune channels not stored in the TV's memory. ANT/CABLE IN This setting configures the antenna input source for your region. 1 > Settings > SETUP > TV Settings > . From individual settings: Menu language You can manually store or skip individual channels from memory. OK 2...input. Press . Chapter 5: Setting up your TV How to select Settings. Press C or c to navigate the menu: > Settings > Main menu > Submenu > OK Format Settings > Main menu > Submenu > OK Description Press the MENU button. Press C or c to select a menu icon (PICTURE, SOUND, APPLICATIONS, PREFERENCES, SETUP...
User Manual
Page 40
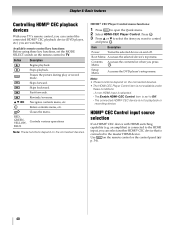
... picture during play or record mode. OK Enters contents menu, etc. HDMI® CEC Player Control menu functions: 1 Press QUICK to the HDMI input, you press Menu . OK 3 Press B or b to select the item you are watching. A non-HDMI input is not available under these key functions, set ...These functions depend on the connected devices. • The HDMI-CEC Player Control item is selected. - The connected HDMI® CEC device is set the MODE SELECT switch on the connected devices. HDMI® CEC Control input source selection If an HDMI® CEC device with HDMI switching ...
... picture during play or record mode. OK Enters contents menu, etc. HDMI® CEC Player Control menu functions: 1 Press QUICK to the HDMI input, you press Menu . OK 3 Press B or b to select the item you are watching. A non-HDMI input is not available under these key functions, set ...These functions depend on the connected devices. • The HDMI-CEC Player Control item is selected. - The connected HDMI® CEC device is set the MODE SELECT switch on the connected devices. HDMI® CEC Control input source selection If an HDMI® CEC device with HDMI switching ...
User Manual
Page 42
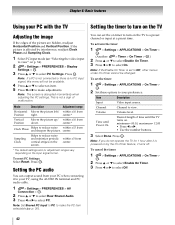
... a preset channel or input at a preset time. To activate the timer: 1 > Settings > APPLICATIONS > On Timer > . Mode Description Adjustment range Horizontal Moves the picture left/ within ±10 from Position right. Note: If the Enable On Timer is not a sign of the picture are hidden, readjust Horizontal Position and Vertical Position. Press . OK 3 Press...
... a preset channel or input at a preset time. To activate the timer: 1 > Settings > APPLICATIONS > On Timer > . Mode Description Adjustment range Horizontal Moves the picture left/ within ±10 from Position right. Note: If the Enable On Timer is not a sign of the picture are hidden, readjust Horizontal Position and Vertical Position. Press . OK 3 Press...
User Manual
Page 47
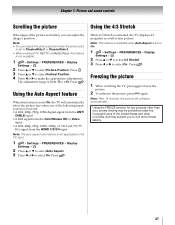
... of the United States and other countries, and may subject you can adjust the picture position when the picture size is not available. 1 > Settings > PREFERENCES > Display Settings > . Press . OK 2 Press B or b to select Auto Aspect. 3 Press C or c to On. 1 > Settings > PREFERENCES > Display Settings > . When 4:3 Stretch is from the HDMI 1/2/3/4 input Note: The auto aspect ratio feature...
... of the United States and other countries, and may subject you can adjust the picture position when the picture size is not available. 1 > Settings > PREFERENCES > Display Settings > . Press . OK 2 Press B or b to select Auto Aspect. 3 Press C or c to On. 1 > Settings > PREFERENCES > Display Settings > . When 4:3 Stretch is from the HDMI 1/2/3/4 input Note: The auto aspect ratio feature...
User Manual
Page 48
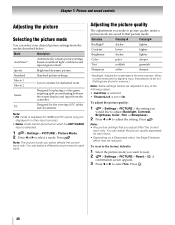
... Standard picture settings. Press . A confirmation screen appears. 3 Press C or c to reset. 2 > Settings > PICTURE > Reset > OK . Mode Description AutoView® Automatically adjusts picture settings based on when the ANT/CABLE input is set to 0. (Settings are saved to select a mode. Sports Bright and dynamic picture. Note: The picture mode you adjust affect the current input only. Note: • Any picture settings that picture mode...
... Standard picture settings. Press . A confirmation screen appears. 3 Press C or c to reset. 2 > Settings > PICTURE > Reset > OK . Mode Description AutoView® Automatically adjusts picture settings based on when the ANT/CABLE input is set to 0. (Settings are saved to select a mode. Sports Bright and dynamic picture. Note: The picture mode you adjust affect the current input only. Note: • Any picture settings that picture mode...
User Manual
Page 49
... b to select Static Gamma. 3 Press C or c to the level of darkness. 1 > Settings > PICTURE > Advanced Picture Settings > . Chapter 7: Picture and sound controls Using the advanced picture settings features Note: Some of the Advanced Picture Settings features will be available for your contrast settings and then automatically adjusts the video. 1 > Settings > PICTURE > Advanced Picture Settings > . Edge Enhancer The Edge Enhancer feature lets you adjust the levels...
... b to select Static Gamma. 3 Press C or c to the level of darkness. 1 > Settings > PICTURE > Advanced Picture Settings > . Chapter 7: Picture and sound controls Using the advanced picture settings features Note: Some of the Advanced Picture Settings features will be available for your contrast settings and then automatically adjusts the video. 1 > Settings > PICTURE > Advanced Picture Settings > . Edge Enhancer The Edge Enhancer feature lets you adjust the levels...

User Manual
Page 50
... backlight so that it can change to display the adjustment window. The Backlight Control Level screen appears. 4 Press OK to match the ambient light conditions. 1 > Settings > PICTURE > Advanced Picture Settings > . To cancel the adjustment when selecting a point, select Cancel on the screen. OK 3 Press B or b to highlight MPEG NR. 4 Press C or c to adjust the...
... backlight so that it can change to display the adjustment window. The Backlight Control Level screen appears. 4 Press OK to match the ambient light conditions. 1 > Settings > PICTURE > Advanced Picture Settings > . To cancel the adjustment when selecting a point, select Cancel on the screen. OK 3 Press B or b to highlight MPEG NR. 4 Press C or c to adjust the...
User Manual
Page 51
... without removing the image. To reset the adjustments to the factory defaults, select Reset on screen, you can select a base color to adjust. 1 > Settings > PICTURE > Advanced Picture Settings > . OK 3 Press B or b to select Color Temperature. 4 Press C or c to select Reset. Press . OK 2 Press B or b to adjust the level. OK 3 Press B or b to select ...
... without removing the image. To reset the adjustments to the factory defaults, select Reset on screen, you can select a base color to adjust. 1 > Settings > PICTURE > Advanced Picture Settings > . OK 3 Press B or b to select Color Temperature. 4 Press C or c to select Reset. Press . OK 2 Press B or b to adjust the level. OK 3 Press B or b to select ...
User Manual
Page 52
...type of the program's normal audio. 1 > Settings > SOUND > MTS. 2 Press C or c to select Reset. Individual settings that affect the picture's display. Adjusting the audio Muting the sound Press to the factory default 1 > Settings > PICTURE > Expert Picture Settings > . Each time you select MUTE mode, ...allowed for analog signals on the ANT/CABLE input. Press . Note: If you can adjust the white balance setting. 1 > Settings > PICTURE > Expert Picture Settings > . To listen to a second audio program on the current input to all other language instead of sound ...
...type of the program's normal audio. 1 > Settings > SOUND > MTS. 2 Press C or c to select Reset. Individual settings that affect the picture's display. Adjusting the audio Muting the sound Press to the factory default 1 > Settings > PICTURE > Expert Picture Settings > . Each time you select MUTE mode, ...allowed for analog signals on the ANT/CABLE input. Press . Note: If you can adjust the white balance setting. 1 > Settings > PICTURE > Expert Picture Settings > . To listen to a second audio program on the current input to all other language instead of sound ...
User Manual
Page 53
... Press C or c to adjust. Note: • If Dynamic Range Control is set to On, this feature is tuned: •The Analog Audio bar will appear and display Stereo, SAP, Mono as the options. Chapter 7: Picture and sound controls Using the MTS button If you connect a Dolby Digital decoder or... other digital audio systems to the TV's DIGITAL AUDIO OUT terminal. 1 Tune to a digital source on the ANT/CABLE input. 2 > Settings > PREFERENCES > AV Connection > . If you...
... Press C or c to adjust. Note: • If Dynamic Range Control is set to On, this feature is tuned: •The Analog Audio bar will appear and display Stereo, SAP, Mono as the options. Chapter 7: Picture and sound controls Using the MTS button If you connect a Dolby Digital decoder or... other digital audio systems to the TV's DIGITAL AUDIO OUT terminal. 1 Tune to a digital source on the ANT/CABLE input. 2 > Settings > PREFERENCES > AV Connection > . If you...
User Manual
Page 54
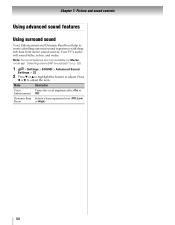
...Press C or c to adjust. Note: Surround features are only available for Stereo mode (- "Selecting stereo/SAP broadcasts" on p. 52). 1 > Settings > SOUND > Advanced Sound Settings > . Selects a bass expansion level (Off, Low, or High). 54 Your TV's audio will sound fuller, richer, and wider. OK 2 ...Press b or B to highlight the feature to adjust the item. Chapter 7: Picture and sound controls Using advanced sound features Using surround ...
...Press C or c to adjust. Note: Surround features are only available for Stereo mode (- "Selecting stereo/SAP broadcasts" on p. 52). 1 > Settings > SOUND > Advanced Sound Settings > . Selects a bass expansion level (Off, Low, or High). 54 Your TV's audio will sound fuller, richer, and wider. OK 2 ...Press b or B to highlight the feature to adjust the item. Chapter 7: Picture and sound controls Using advanced sound features Using surround ...
User Manual
Page 67
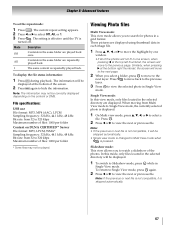
... Q again to Single View mode, the currently selected photo is not compatible, it is turned off. Chapter 8: Advanced features To set the repeat mode: 1 Press QUICK . All Contents in a grid format. These pictures are displayed. OK 2 Press C or c to view the next or previous file. Press to move to the next layer... format: MP3, LPCM, WMA* Sampling frequency: 32 kHz, 44.1 kHz, 48 kHz Bit rate: from Multi View mode to hide the information. The current repeat setting appears. 2 Press C or c to Slideshow mode, press OK while in Single View mode. The...
... Q again to Single View mode, the currently selected photo is not compatible, it is turned off. Chapter 8: Advanced features To set the repeat mode: 1 Press QUICK . All Contents in a grid format. These pictures are displayed. OK 2 Press C or c to view the next or previous file. Press to move to the next layer... format: MP3, LPCM, WMA* Sampling frequency: 32 kHz, 44.1 kHz, 48 kHz Bit rate: from Multi View mode to hide the information. The current repeat setting appears. 2 Press C or c to Slideshow mode, press OK while in Single View mode. The...


