
Owner's Manual - English
Page 3
...power cord to qualified service personnel. Leave a space of the TV. Additional Safety Precautions 14a) CAUTION: If the TV is required when the apparatus has been damaged in accordance with the manufacturer's instructions. 8) Do not install near water. 6) Clean only with dry cloth. 7) Do not block any ventilation openings. The LCD panel inside the TV... contains glass and a toxic liquid. Never place the TV on or pinched, particularly at all servicing to avoid possible electric shock or fire...
...power cord to qualified service personnel. Leave a space of the TV. Additional Safety Precautions 14a) CAUTION: If the TV is required when the apparatus has been damaged in accordance with the manufacturer's instructions. 8) Do not install near water. 6) Clean only with dry cloth. 7) Do not block any ventilation openings. The LCD panel inside the TV... contains glass and a toxic liquid. Never place the TV on or pinched, particularly at all servicing to avoid possible electric shock or fire...
Owner's Manual - English
Page 4
... all servicing not specified in this manual to a Toshiba Authorized Service Center. 38) If you leave the TV unattended or unused for your area, or ask a qualified service technician to clean the LCD screen, follow these sounds become frequent or continuous, unplug the power cord and contact a Toshiba Authorized Service Center. 35) WARNING: RISK OF...
... all servicing not specified in this manual to a Toshiba Authorized Service Center. 38) If you leave the TV unattended or unused for your area, or ask a qualified service technician to clean the LCD screen, follow these sounds become frequent or continuous, unplug the power cord and contact a Toshiba Authorized Service Center. 35) WARNING: RISK OF...

Owner's Manual - English
Page 6
... High-Definition Multimedia Interface are trademarks of SRS Labs, Inc. FCC Declaration of Conformity Compliance Statement (Part 15): The Toshiba 40RF350U and 46RF350U Televisions comply with the instructions, may cause harmful interference to radio communications. This equipment generates, uses, and can be an... Licensing LLC. 6 however, there may be determined by removing and applying power to the equipment, the user is incorporated under license from SRS Labs, Inc. • Manufactured under your LCD TV The following two conditions: (1) this device may not work with the limits...
... High-Definition Multimedia Interface are trademarks of SRS Labs, Inc. FCC Declaration of Conformity Compliance Statement (Part 15): The Toshiba 40RF350U and 46RF350U Televisions comply with the instructions, may cause harmful interference to radio communications. This equipment generates, uses, and can be an... Licensing LLC. 6 however, there may be determined by removing and applying power to the equipment, the user is incorporated under license from SRS Labs, Inc. • Manufactured under your LCD TV The following two conditions: (1) this device may not work with the limits...
Owner's Manual - English
Page 7
... Service 3 Chapter 1: Introduction 9 Welcome to Toshiba 9 Features of your new TV 9 Overview of steps for installing, setting up, and using your new TV 10 TV front and side panel controls and connections 11 TV back panel connections 12 Chapter 2: Connecting your TV 13 Overview of cable types 13 About the ... Viewing the system status 44 Selecting the Blue LED Illumination level 45 Selecting the Power-On Mode 45 Chapter 6: Using the TV's features 46 Selecting the video input source to view 46 Labeling the video input sources 47 Tuning channels 48 Tuning channels using the Channel ...
... Service 3 Chapter 1: Introduction 9 Welcome to Toshiba 9 Features of your new TV 9 Overview of steps for installing, setting up, and using your new TV 10 TV front and side panel controls and connections 11 TV back panel connections 12 Chapter 2: Connecting your TV 13 Overview of cable types 13 About the ... Viewing the system status 44 Selecting the Blue LED Illumination level 45 Selecting the Power-On Mode 45 Chapter 6: Using the TV's features 46 Selecting the video input source to view 46 Labeling the video input sources 47 Tuning channels 48 Tuning channels using the Channel ...

Owner's Manual - English
Page 10
..., and service information. page 3). • Place the TV in the power cords for 5 seconds to your TV and other device(s) (- pages 13-22). 6 Install the batteries in any power cords until the TV goes into the TV's channel memory (- page 36). 11 Programming channels into ...TOSHIBA WARRANTY. 3 Do not plug in the remote control (- When the TV is operating. pages 27-35). 9 AFTER connecting all cables and devices to reset the TV. 10 See "Menu layout and navigation" for the TV: • Read "Important notes about the remote control" (- pages 11-12). 5 Connect your LCD TV...
..., and service information. page 3). • Place the TV in the power cords for 5 seconds to your TV and other device(s) (- pages 13-22). 6 Install the batteries in any power cords until the TV goes into the TV's channel memory (- page 36). 11 Programming channels into ...TOSHIBA WARRANTY. 3 Do not plug in the remote control (- When the TV is operating. pages 27-35). 9 AFTER connecting all cables and devices to reset the TV. 10 See "Menu layout and navigation" for the TV: • Read "Important notes about the remote control" (- pages 11-12). 5 Connect your LCD TV...

Owner's Manual - English
Page 11
... When no menu is on page 77. Power indicator This slit will be illuminated by the blue LED back light. "Remote control effective range" on -screen, these buttons change the source you cannot turn the TV on -screen menu. 9 CHANNEL Bb - page 46). 11 Point the remote control toward this ...remote sensor (- pages 36-37). See "Selecting the Blue LED Illumination level" on page 45 for 5 or more seconds to instantly close an on and off the TV, press and hold the POWER button on the TV control panel for additional ...
... When no menu is on page 77. Power indicator This slit will be illuminated by the blue LED back light. "Remote control effective range" on -screen, these buttons change the source you cannot turn the TV on -screen menu. 9 CHANNEL Bb - page 46). 11 Point the remote control toward this ...remote sensor (- pages 36-37). See "Selecting the Blue LED Illumination level" on page 45 for 5 or more seconds to instantly close an on and off the TV, press and hold the POWER button on the TV control panel for additional ...

Owner's Manual - English
Page 12
... IN - HDMI connection is necessary to two devices with ColorStream®. Used for connecting devices with component video output, such as a Toshiba DVD player with an optical IR blaster cable (- Antenna input that supports analog (NTSC) and digital (ATSC) off-air antenna signals ...(composite) video and S-video cables carry only video information; Optical audio output in the Audio Setup menu (- Also see pages 13-22. 1 TV back 2 345 Power cord Cable Clamper 6 1 IR OUT - Analog audio outputs for connecting an audio amplifier. 5 PC/HDMI-1 (AUDIO) IN - Manufactured under ...
... IN - HDMI connection is necessary to two devices with ColorStream®. Used for connecting devices with component video output, such as a Toshiba DVD player with an optical IR blaster cable (- Antenna input that supports analog (NTSC) and digital (ATSC) off-air antenna signals ...(composite) video and S-video cables carry only video information; Optical audio output in the Audio Setup menu (- Also see pages 13-22. 1 TV back 2 345 Power cord Cable Clamper 6 1 IR OUT - Analog audio outputs for connecting an audio amplifier. 5 PC/HDMI-1 (AUDIO) IN - Manufactured under ...

Owner's Manual - English
Page 17
... other audio/video cables as Toshiba infrared remotecontrolled VCRs or DVD players) enclosed within an entertainment center or similar cabinet. This sensor is the location of the sensor. 4 If the device does not turn on, move the remote control slightly to the right and press POWER again. 5 Repeat step ... the infrared sensor on the front of the device and press POWER. (Do not use the TV's IR OUT terminal (infrared passthrough) to remotely operate (through the TV to operate the device; - You will need to use the TV's remote control to be attainable with certain devices. *If you...
... other audio/video cables as Toshiba infrared remotecontrolled VCRs or DVD players) enclosed within an entertainment center or similar cabinet. This sensor is the location of the sensor. 4 If the device does not turn on, move the remote control slightly to the right and press POWER again. 5 Repeat step ... the infrared sensor on the front of the device and press POWER. (Do not use the TV's IR OUT terminal (infrared passthrough) to remotely operate (through the TV to operate the device; - You will need to use the TV's remote control to be attainable with certain devices. *If you...

Owner's Manual - English
Page 24
...input source (- page 46). 6 FAV BROWSER accesses the Favorites List in the main menu system. 9 THINC accesses the THINC menu (- page 48). 7 MENU accesses the main TV menu system (- Chapter 3: Using the remote control Learning about the remote control The buttons used to select TV mode and view ... The error message "Not Available" may appear if you press a key for a function that is pressed. (- page 66). 2 POWER turns the TV on -screen (- Press TV until the keypad blinks 3 times to restore the moving picture. 22 PIC SIZE cycles through programmed channels when no menu is on and...
...input source (- page 46). 6 FAV BROWSER accesses the Favorites List in the main menu system. 9 THINC accesses the THINC menu (- page 48). 7 MENU accesses the main TV menu system (- Chapter 3: Using the remote control Learning about the remote control The buttons used to select TV mode and view ... The error message "Not Available" may appear if you press a key for a function that is pressed. (- page 66). 2 POWER turns the TV on -screen (- Press TV until the keypad blinks 3 times to restore the moving picture. 22 PIC SIZE cycles through programmed channels when no menu is on and...

Owner's Manual - English
Page 25
... VCR combo • DVD/ Receiver/ CD AMP (AUDIO) PVR DVD-R s TV Power Digit 1 Digit 2 Digit 3 Digit 4 Digit 5 Digit 6 Digit 7 Digit 8 Digit 9 Digit 0 +100 s TV s TV --- --- Chapter 3: Using the remote control Remote Control functional key chart REMOTE CONTROL KEY Toshiba TV (TV) CABLE SAT (satellite) MODE SELECT SLEEP POWER 1 2 3 4 5 6 7 8 9 0 100/-/+10 INPUT PIC SIZE MENU FAV BROWSER/ SET UP...
... VCR combo • DVD/ Receiver/ CD AMP (AUDIO) PVR DVD-R s TV Power Digit 1 Digit 2 Digit 3 Digit 4 Digit 5 Digit 6 Digit 7 Digit 8 Digit 9 Digit 0 +100 s TV s TV --- --- Chapter 3: Using the remote control Remote Control functional key chart REMOTE CONTROL KEY Toshiba TV (TV) CABLE SAT (satellite) MODE SELECT SLEEP POWER 1 2 3 4 5 6 7 8 9 0 100/-/+10 INPUT PIC SIZE MENU FAV BROWSER/ SET UP...

Owner's Manual - English
Page 36
...Front Panel Lock GameTimer® New PIN Code Installation CE-Link Setup Sleep Timer HDMI Settings PC Settings Blue LED Illumination Power-On Mode Option S Sports/Standard/Movie/Document/Preference S [Opens the Picture Settings menu] S [Opens the Noise Reduction ...Sleep Timer menu] S [Opens the HDMI Settings menu] S [Opens the PC Settings menu] S High/Middle/Low S Power-Saving/Fast Page 54 55 71 72 73 74 51 55 57 58 74 58 57 56 56 41 47 42 39 ... ), press Y on the next page provide a quick overview of your TV's menu system. To open the main menus (illustrated below and on the remote control or...
...Front Panel Lock GameTimer® New PIN Code Installation CE-Link Setup Sleep Timer HDMI Settings PC Settings Blue LED Illumination Power-On Mode Option S Sports/Standard/Movie/Document/Preference S [Opens the Picture Settings menu] S [Opens the Noise Reduction ...Sleep Timer menu] S [Opens the HDMI Settings menu] S [Opens the PC Settings menu] S High/Middle/Low S Power-Saving/Fast Page 54 55 71 72 73 74 51 55 57 58 74 58 57 56 56 41 47 42 39 ... ), press Y on the next page provide a quick overview of your TV's menu system. To open the main menus (illustrated below and on the remote control or...

Owner's Manual - English
Page 39
... B or b to select the input source (Cable or Antenna) for the on the TV. Setup Installation CE-Link Setup Sleep Timer HDMI Settings PC Settings Blue LED Illumination High Power-On Mode Power-Saving 3 (A new set of menus and messages. Installation Terrestrial Input Configuration Channel Program Channel... To select the menu language: 1 Press Y and open the Setup menu. 2 Highlight Installation and press T. Chapter 5: Setting up your TV Selecting the menu language You can choose from three different languages (English, French and Spanish) for the ANT input on -screen display of ...
... B or b to select the input source (Cable or Antenna) for the on the TV. Setup Installation CE-Link Setup Sleep Timer HDMI Settings PC Settings Blue LED Illumination High Power-On Mode Power-Saving 3 (A new set of menus and messages. Installation Terrestrial Input Configuration Channel Program Channel... To select the menu language: 1 Press Y and open the Setup menu. 2 Highlight Installation and press T. Chapter 5: Setting up your TV Selecting the menu language You can choose from three different languages (English, French and Spanish) for the ANT input on -screen display of ...

Owner's Manual - English
Page 40
...if you have to repeat the programming process again unless your Cable TV service lineup changes significantly. Setup Installation CE-Link Setup Sleep Timer HDMI Settings PC Settings Blue LED Illumination High Power-On Mode Power-Saving 4 (A new set of Installation menu icons will appear, as... shown below .) Open the Terrestrial menu, highlight Channel Program to bring up your TV Programming channels into the TV's channel memory When you press < or...
...if you have to repeat the programming process again unless your Cable TV service lineup changes significantly. Setup Installation CE-Link Setup Sleep Timer HDMI Settings PC Settings Blue LED Illumination High Power-On Mode Power-Saving 4 (A new set of Installation menu icons will appear, as... shown below .) Open the Terrestrial menu, highlight Channel Program to bring up your TV Programming channels into the TV's channel memory When you press < or...

Owner's Manual - English
Page 41
...then press T to check the box. Auto Input settings options for a specific mode select button, the TV will be checked. Enable Auto Input On SLEEP POWER MODE SELECT CABLE/SAT DVD TV VCR/PVR TV CABLE/SAT DVD VCR/PVR -ColorStream HD1 HDMI 1 Video 1 Reset Done (continued) 41 To revert to... your new settings: Highlight Done and press T. To set for each mode select button are shown below. • TV: ANT •...
...then press T to check the box. Auto Input settings options for a specific mode select button, the TV will be checked. Enable Auto Input On SLEEP POWER MODE SELECT CABLE/SAT DVD TV VCR/PVR TV CABLE/SAT DVD VCR/PVR -ColorStream HD1 HDMI 1 Video 1 Reset Done (continued) 41 To revert to... your new settings: Highlight Done and press T. To set for each mode select button are shown below. • TV: ANT •...

Owner's Manual - English
Page 42
...Done and press T. Custom Clear All Done The maximum number of common channel labels (logos) for that can be programmed into the TV. Preferences CC Selector Base CC Mode Digital CC Settings Auto Input Input Labeling Channel Labeling Menu Language Channel Browser Setup Off English Channel...select the desired input source for various channels (ABC, CBS, etc.) will not cancel any settings; Enable Auto Input On SLEEP POWER MODE SELECT CABLE/SAT DVD TV VCR/PVR TV CABLE/SAT DVD VCR/PVR -ColorStream HD1 HDMI 1 Video 1 Reset Done 5 Press C or c to change channels. To ...
...Done and press T. Custom Clear All Done The maximum number of common channel labels (logos) for that can be programmed into the TV. Preferences CC Selector Base CC Mode Digital CC Settings Auto Input Input Labeling Channel Labeling Menu Language Channel Browser Setup Off English Channel...select the desired input source for various channels (ABC, CBS, etc.) will not cancel any settings; Enable Auto Input On SLEEP POWER MODE SELECT CABLE/SAT DVD TV VCR/PVR TV CABLE/SAT DVD VCR/PVR -ColorStream HD1 HDMI 1 Video 1 Reset Done 5 Press C or c to change channels. To ...

Owner's Manual - English
Page 45
... B or b to turn on the front of the blue LED located on more quickly. After the TV turns off , unplug the TV power cord and then plug it takes a bit longer for the TV to select your TV 6 Highlight Yes and press T. As a result, it in standby mode to confirm. Setup Installation CE... the reset process. No Yes To cancel the reset: Highlight No and press T. The TV will turn off automatically after a few seconds. Selecting the Power-On Mode You can adjust the brightness of the TV will be lit. System Information Press YES to below 3W. Chapter 5: Setting up your ...
... B or b to turn on the front of the blue LED located on more quickly. After the TV turns off , unplug the TV power cord and then plug it takes a bit longer for the TV to select your TV 6 Highlight Yes and press T. As a result, it in standby mode to confirm. Setup Installation CE... the reset process. No Yes To cancel the reset: Highlight No and press T. The TV will turn off automatically after a few seconds. Selecting the Power-On Mode You can adjust the brightness of the TV will be lit. System Information Press YES to below 3W. Chapter 5: Setting up your ...

Owner's Manual - English
Page 48
The channel/input will be saved every power on/off cycle of the TV. 5 Press b to highlight ANT List, and then press C or c to select On ... allows you to quickly set to On and the Power-On Mode (- Note: When History List is integrated into the Channel Browser™. Chapter 6: Using the TV's features Tuning channels Tuning channels using the Channel Browser... • Press # c to factory defaults, highlight Reset and press T. Note: CE-Link List will be cleared with every power on/off cycle. To open the Channel Browser™: • Press 3 C or # c on the remote control. •...
The channel/input will be saved every power on/off cycle of the TV. 5 Press b to highlight ANT List, and then press C or c to select On ... allows you to quickly set to On and the Power-On Mode (- Note: When History List is integrated into the Channel Browser™. Chapter 6: Using the TV's features Tuning channels Tuning channels using the Channel Browser... • Press # c to factory defaults, highlight Reset and press T. Note: CE-Link List will be cleared with every power on/off cycle. To open the Channel Browser™: • Press 3 C or # c on the remote control. •...

Owner's Manual - English
Page 49
... tuned using < or , on the remote control. To tune to a channel or input in Select mode: 1 While watching TV, press 3 C or # c to open the Channel Browser™ and surf back to a previous item or forward to ... • Auto: digital channels will have no effect. • Pressing n will be handled for various reasons), the TV will automatically tune to the previously viewed channel or input. The Channel Browser™ will store the following channels: •... repeated in the History List, but you must be set to "Power Off Clear (On)," turning off the TV will clear the History List.
... tuned using < or , on the remote control. To tune to a channel or input in Select mode: 1 While watching TV, press 3 C or # c to open the Channel Browser™ and surf back to a previous item or forward to ... • Auto: digital channels will have no effect. • Pressing n will be handled for various reasons), the TV will automatically tune to the previously viewed channel or input. The Channel Browser™ will store the following channels: •... repeated in the History List, but you must be set to "Power Off Clear (On)," turning off the TV will clear the History List.

Owner's Manual - English
Page 64
... b to display the PIN code entering screen. 3 Enter your settings from being changed accidentally (by children, for example). button on the TV control panel will operate except POWER. When the control panel lock is On, none of time until the volume icon appears. 64 Note: • A message will have to...Off in step 5 above , or press and hold the VOLUME - When the control panel is locked and any button on the GameTimer, when power is restored the TV will enter Input Lock mode (as if the GameTimer had been activated) and you will appear when 10 minutes, 3 minutes, and 1 minute...
... b to display the PIN code entering screen. 3 Enter your settings from being changed accidentally (by children, for example). button on the TV control panel will operate except POWER. When the control panel lock is On, none of time until the volume icon appears. 64 Note: • A message will have to...Off in step 5 above , or press and hold the VOLUME - When the control panel is locked and any button on the GameTimer, when power is restored the TV will enter Input Lock mode (as if the GameTimer had been activated) and you will appear when 10 minutes, 3 minutes, and 1 minute...
Owner's Manual - English
Page 65
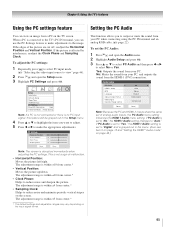
... the PC settings: 1 Repeatedly press + to reduce noise and minimize periodic vertical stripes on page 43.) 65 "Selecting the video input source to view" page 46). 2 Press Y and open the Audio menu. 2 Highlight Audio Setup and press T. 3 Press B or b to select PC Audio and then press C or c to "Digital...the picture. Setup Installation CE-Link Setup Sleep Timer HDMI Settings PC Settings Blue LED Illumination High Power-On Mode Power-Saving Note: If a PC is not connected or there is connected to the TV's PC IN terminal, you to output or mute the sound from your PC, and outputs the...
... the PC settings: 1 Repeatedly press + to reduce noise and minimize periodic vertical stripes on page 43.) 65 "Selecting the video input source to view" page 46). 2 Press Y and open the Audio menu. 2 Highlight Audio Setup and press T. 3 Press B or b to select PC Audio and then press C or c to "Digital...the picture. Setup Installation CE-Link Setup Sleep Timer HDMI Settings PC Settings Blue LED Illumination High Power-On Mode Power-Saving Note: If a PC is not connected or there is connected to the TV's PC IN terminal, you to output or mute the sound from your PC, and outputs the...


